

Walkthrough Menu
- General Tips
- Chapter 1: Near Conti Villa
- Chapter 2: Giovanni's Store
- Chapter 3: Conti's Villa
- Chapter 4: Mario's Garage
- Chapter 5: Luigi's Room
- Chapter 6: Francesco's Room
- Chapter 7: The Finale
General Tips
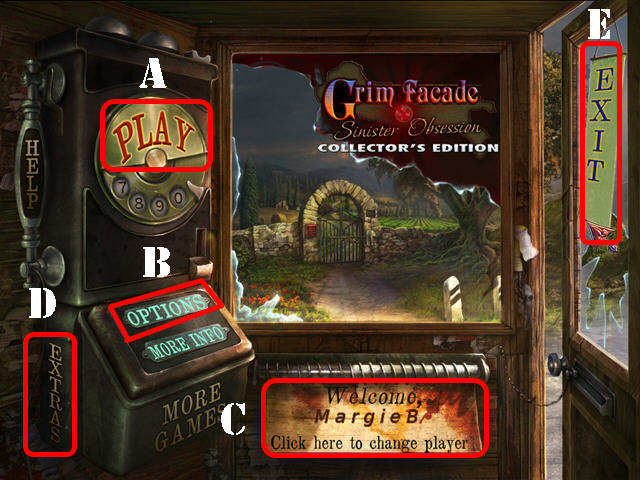
- Click on 'Play' (A) to access the main chapters in the game.
- The 'Options' (B) button allows you to adjust the screen, music, cursor, and sound.
- The 'Click here to change player' button (C) can be used to add or delete a player.
- Exit the game here (D).
- You can skip a puzzle once the 'SKIP' button fills. The 'SKIP' button only appears in puzzle sections; it is located in the lower right corner.
- In this guide we will use the acronym 'HOS' for Hidden Object Scenes and 'HOP' for Hidden Object Puzzles.
- Items written in orange in HOS are hidden; you must open or click on something to make the hidden items appear.
- Click on the lorgnette Icon, when it appears, to take a closer look at a section, or to read information regarding the game.
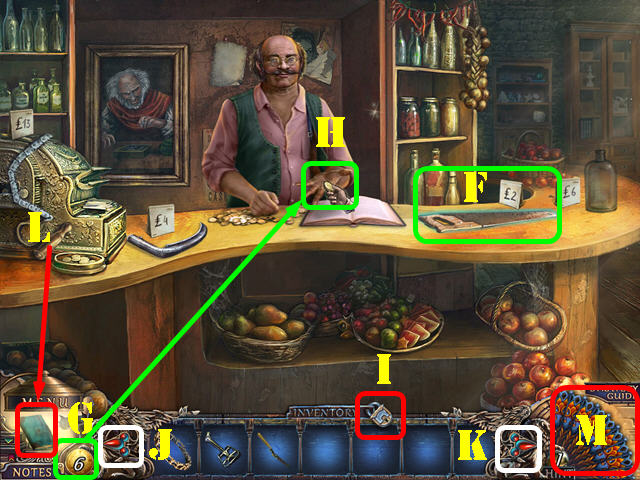
- Collect the GOLDEN LIRE in the game in order to buy items in Giovanni's shop.
- Select and item for sale (F), click on the Lire coin icon (G), and then put the coins in Giovanni's hand (H).
- Pass your mouse over the bottom of the scene to access your Inventory Tray. You can lock the inventory tray by opening or closing the lock icon (I) attached to the inventory tray.
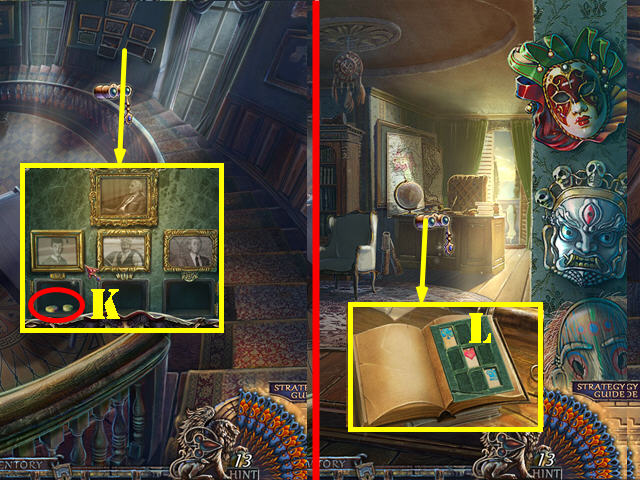
- Use the arrows in your inventory tray to scroll through all the items you've collected (J and K).
- Read the Diary (L) to find clues and read part of the story.
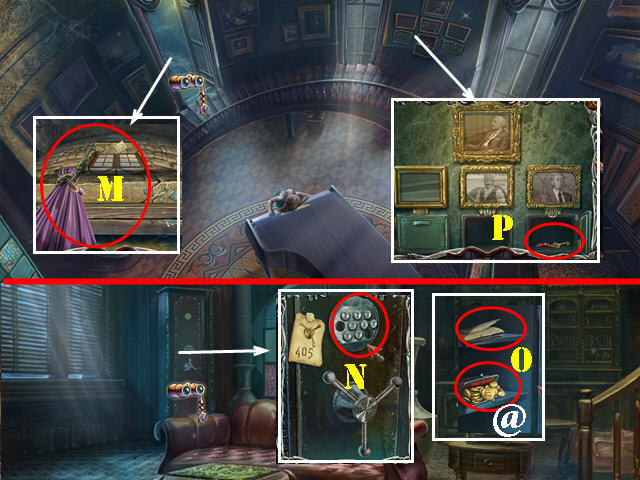
- Click on the Fan (M) in the lower right to obtain a Hint.
- Collect the Fans in HOS and HOP to gain one additional hint per fan. You have unlimited Hints in the Hidden Object Scenes and in Quest Scenes, but you must wait for them to recharge in between uses if you used up all the fans you've collected.
Chapter 1: Near Conti Villa
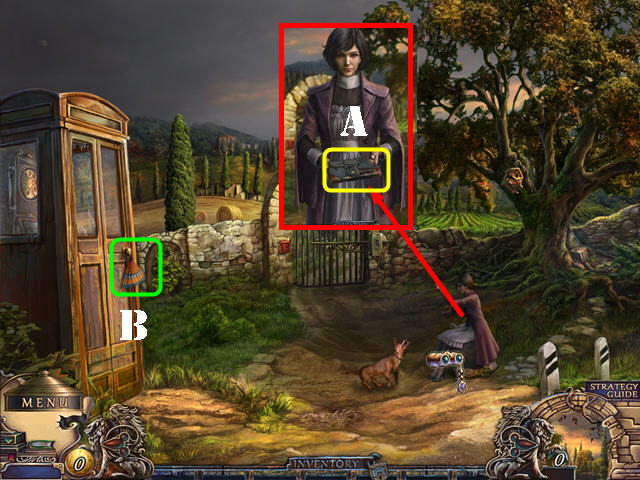
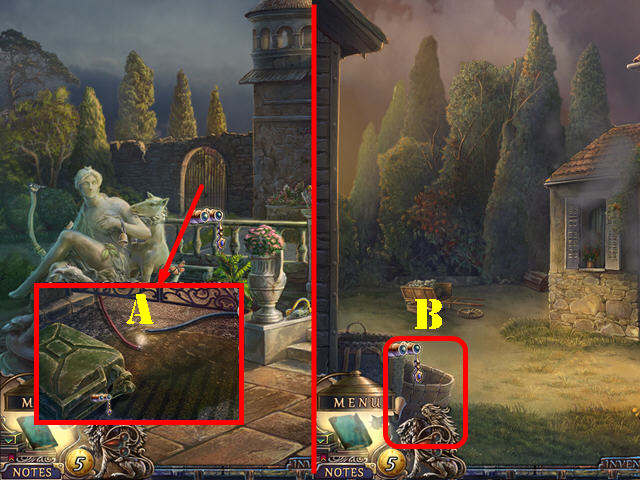
- Talk to the lady.
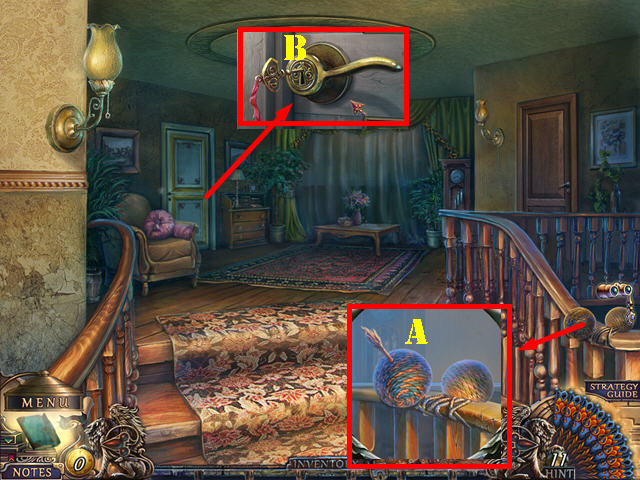
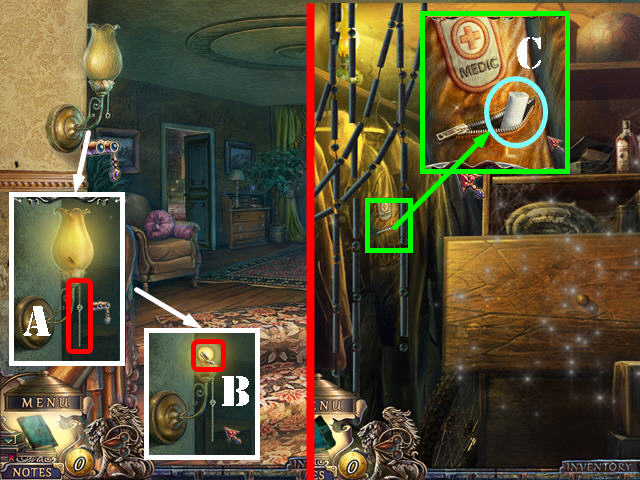
- Take the notebook (A).
- Take the fan (B).
- Go right.
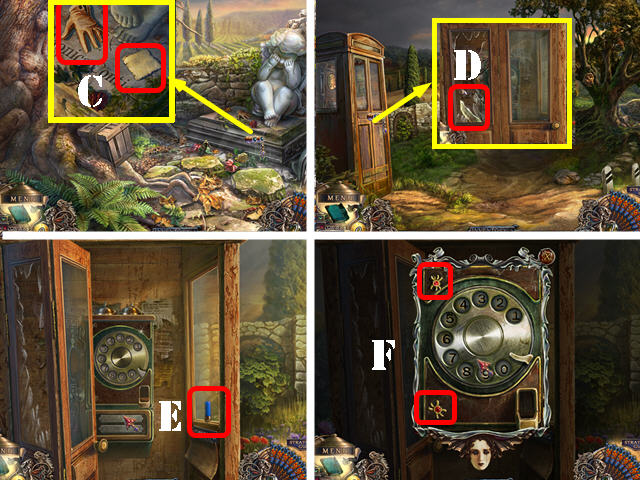
- Look at the base of the statue; take the note and the GLOVE (C).
- Walk down and zoom into the phone booth; use the GLOVE to get the SHARP GLASS (D).
- Open the door; take the BLUE SHELL (E).
- Look at the phone and remove the 2 screws (F). Zoom into the phone to activate a puzzle.

- Move the coin to the coin collecting box in the lower right by using the numbers on the telephone dial (G) to push the coin. The direction the coin takes will depend on which arrow it lands on.
- To solve the puzzle, press on the numbers on the telephone dial in this order: 2, 3, 2, 6, 2, 3, 3, and 2 x 7.
- Take the GOLDEN LIRE (@).
- Exit the booth and go right.
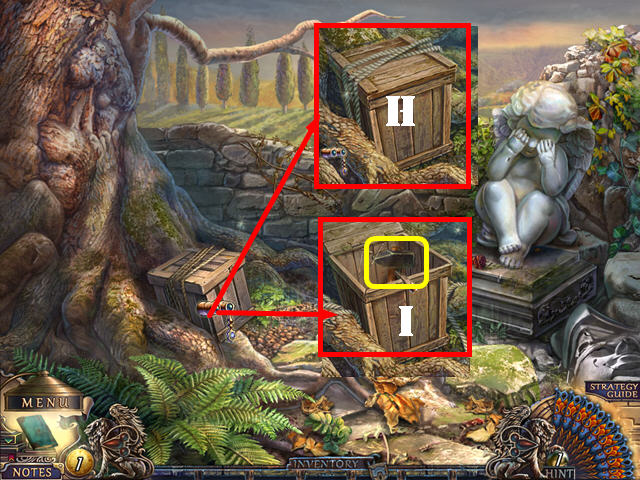
- Zoom into the crate; cut the rope with the SHARP GLASS (H) and take the TOOL KIT (I).
- Walk down.
- Zoom into the tree; use the TOOL KIT on the birdhouse and take the POSTAL EMBLEM (I).
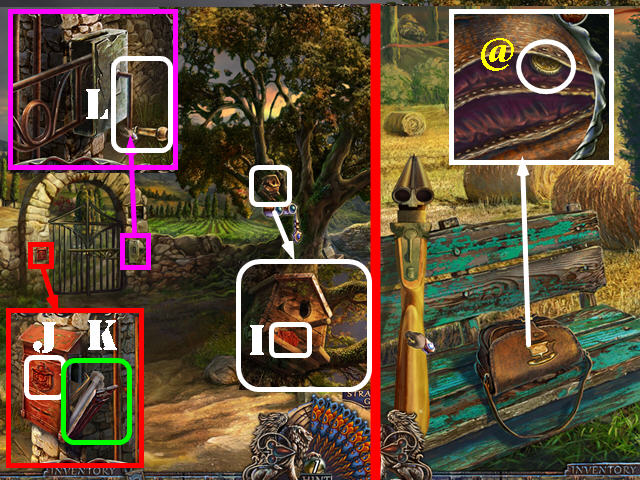
- Inspect the mailbox; put the POSTAL EMBLEM on it (J); take the note and the GATE HANDLE (K).
- Zoom into the control box; put the GATE HANDLE on it (L); turn the handle and go through the gate.
- Look at the bench; open the purse; zoom into it and take the GOLDEN LIRE (@).
- Exit the bench and go forward.
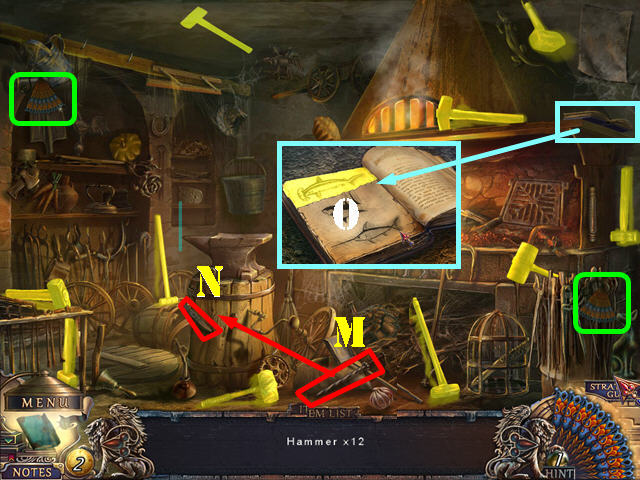
- Play the HOS.
- Take the 2 Fans marked in green.
- Find the 12 hammers.
- Put the hammer handle (M) on the hammer head (N); take the hammer.
- Zoom into the shelf; flip the page and take the hammer (O).
- The HAMMER will be added to inventory.
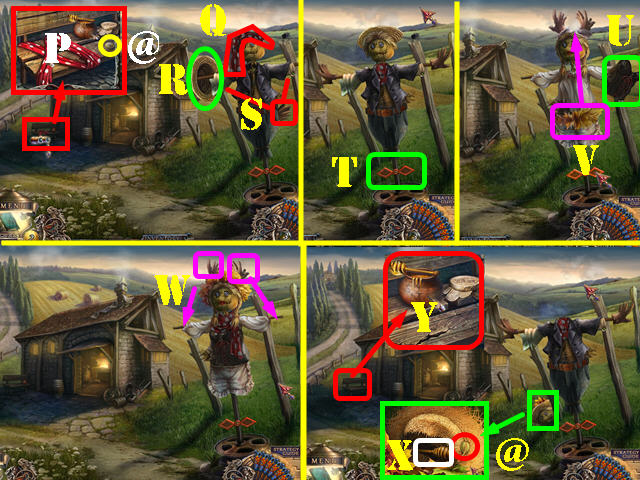
- Examine the bench; click on the SCARF 4 times (P).
- Take the GOLDEN LIRE (@) on the bench.
- Put the scarf on the scarecrow's head, around his neck (Q).
- Put the hat (R) on the scarecrow's head and the gloves (S) on his hands.
- Turn the handle (T) at the bottom of the scarecrow to flip it around.
- Put the corset (U) and the SCARF (from inventory) on the female scarecrow. Then put the crown (V) on her head.
- Put the gloves located on top of her head on her hands (W).
- Zoom into the fallen head; take the GOLDEN LIRE (@) and the HONEY DIPPER (X).
- Examine the bench; remove the cover and dip the HONEY DIPPER in the jar. Take the HONEY-COVERED DIPPER (Y).
- Walk down.
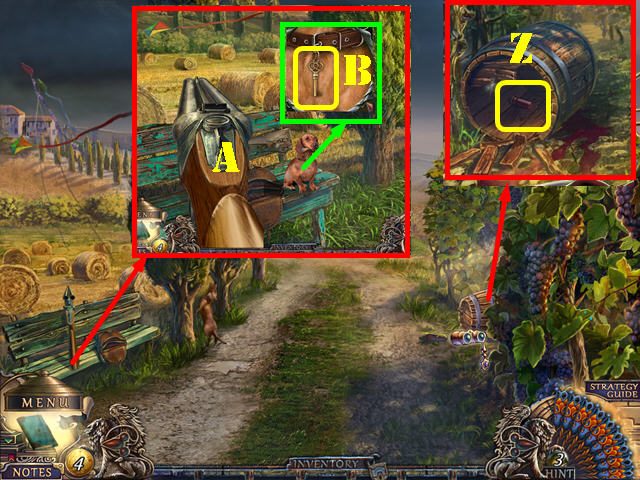
- Inspect the barrel; break it with the HAMMER and take the RED SHELL (Z).
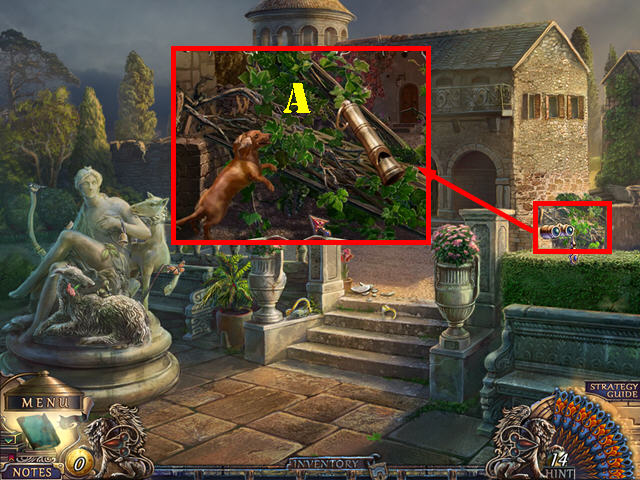
- Examine the bench and select the rifle; put the RED SHELL and the BLUE SHELL in it (A).
- Shoot the rifle.
- Zoom into the dog and take the GATE KEY (B).
- Go forward.
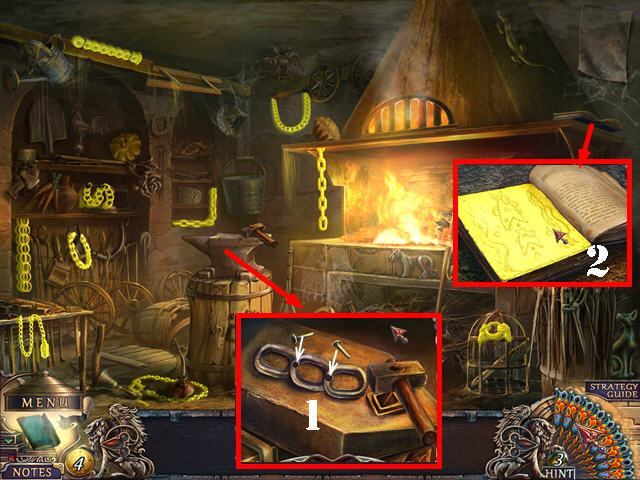
- Play the HOS.
- Find the 12 chains.
- Look at the anvil (1); put the nails on the chain; use the hammer on the nails and take the chain.
- Examine the shelf; flip the page and take the chain (2).
- The BIKE CHAIN will be added to inventory.
- Go through the left path.
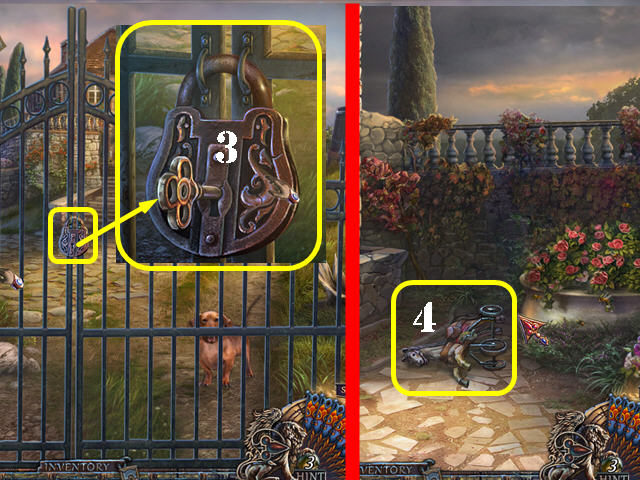
- Zoom into the lock (3); use the GATE KEY in the lock turn the key 3 times to open the gate.
- Go forward for a cut scene.
- Zoom into the horse for a puzzle (4).
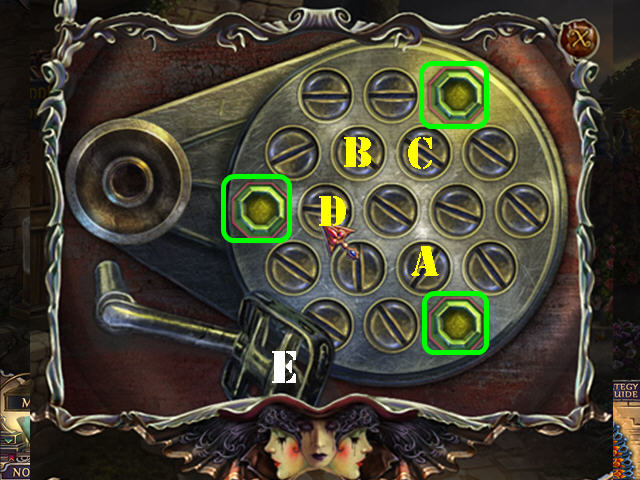
- Put the hexagonal bolts into the octagonal slots.
- To solve the puzzle, press on the bolts in this order: A x 2, B, C, and D x 5.
- Take the PEDAL (E).
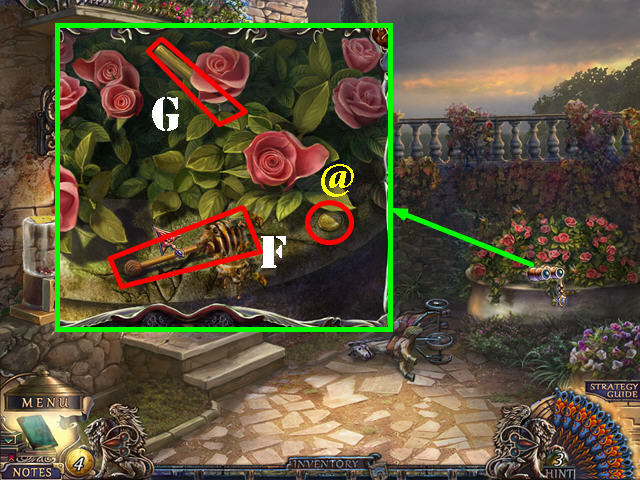
- Inspect the roses; put down the HONEY-COVERED DIPPER (F).
- Take the GOLDEN LIRE (@) and the GARDEN PRUNERS HALF (G).
- Open the door and go into Giovanni's store.
Chapter 2: Giovanni's Store
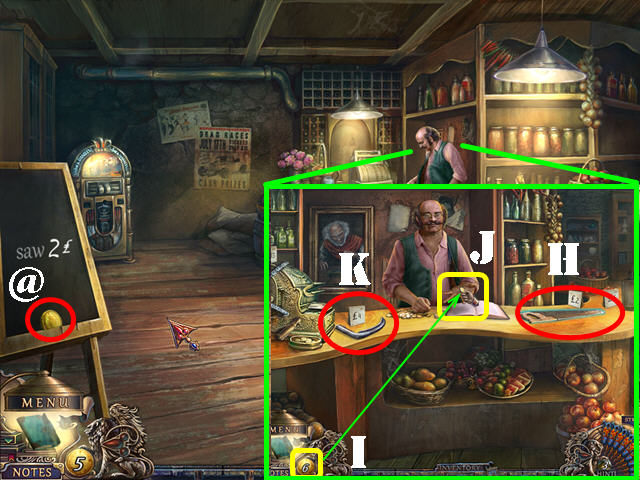
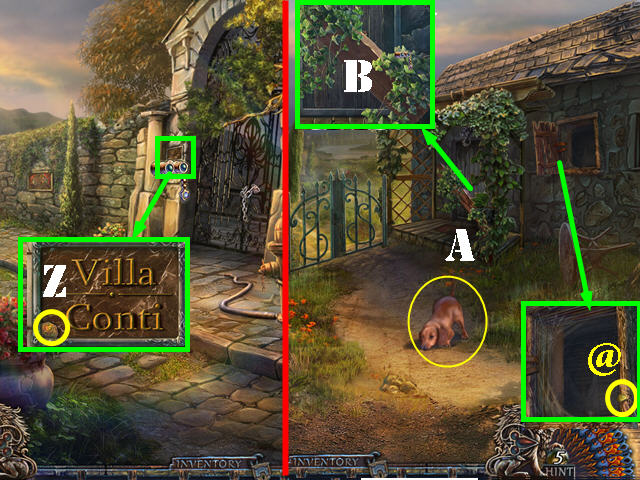
- Take the GOLDEN LIRE (@). Talk to Giovanni.
- Look at the price tags to see what you can afford.
- Select the HANDSAW (H); select the GOLDEN LIRE (I) and then put the coins in Giovanni's hand (J).
- Also purchase the SCYTHE BLADE for 4 GOLDEN LIRA (K).
- Walk down three times and go left.
- Play the HOP.
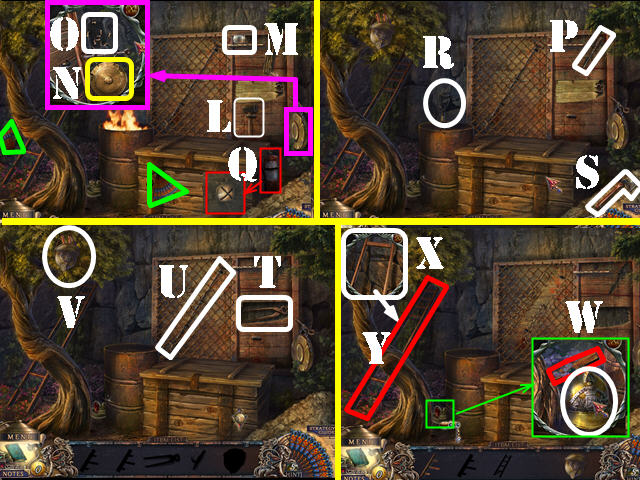
- Take the hammer (L), the jar (M), and the 2 FANS marked in green.
- Zoom into the gong and use the hammer on it (N).
- Use the jar to collect the termites (O).
- Use the termites on the wood and take the screwdriver (P).
- Zoom into the extinguisher; remove the screw with the screwdriver and take the extinguisher (Q).
- Douse the trash can fire with the extinguisher and take the shovel (R).
- Use the shovel in the sand and take the axe (S).
- Use the axe on the plank and take the pliers (T).
- Cut the wire with the pliers and take the hook (U).
- Get the helmet and the steps (V) with the hook.
- Zoom into the snake; put the helmet on the snake and take the steps (W).
- Zoom into the broken ladder; put the 2 steps on it (X) and take the LADDER (Y).
- Take a closer look at the sign; take the CANDY MACHINE TOKEN (Z).
- Walk down and go right.
- Touch the dog (A) and it will go through the window.
- Zoom into the window and take the GOLDEN LIRE (@).
- Zoom into the door; use the HANDSAW on the beam and then go into the barn (B).
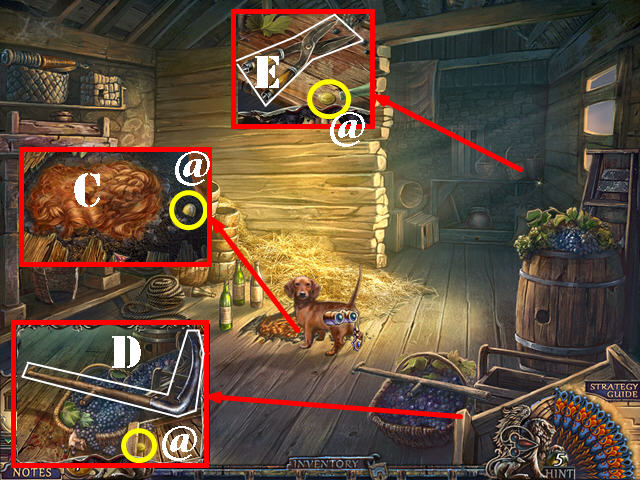
- Touch the dog; take the GOLDEN LIRE (@) and remove the wig (C).
- Take a closer look at the basket; take the GOLDEN LIRE (@).
- Put the SCYTHE BLADE HANDLE on the scythe; take the LONG SCYTHE (D).
- Look at the table; take the GOLDEN LIRE (@).
- Put the GARDEN PRUNERS HALF on the other one and take the GARDEN PRUNERS (E).
- Walk down twice and go forward to Giovanni's store.
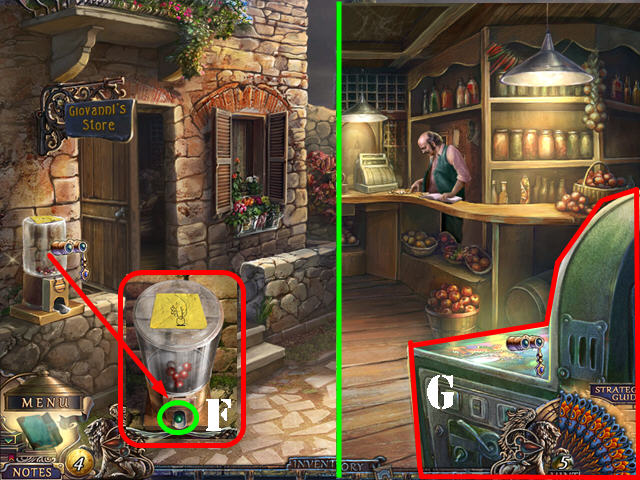
- Zoom into the candy dispenser; put the CANDY MACHINE TOKEN in the slot and take the GREEN BALL (F).
- Go into Giovanni's store.
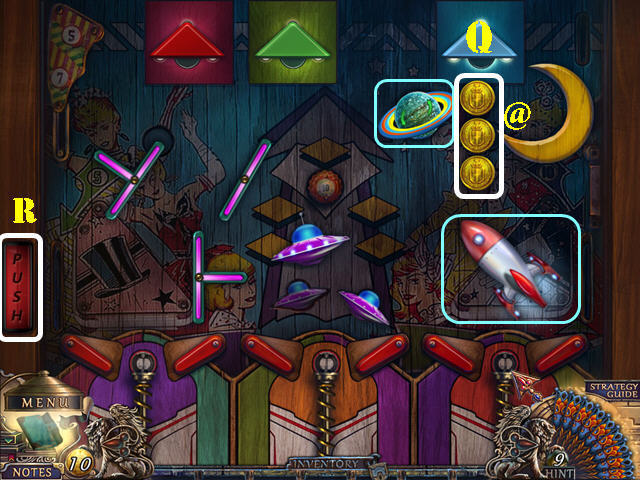
- Zoom into the pinball machine (G) and add the GREEN BALL to activate a puzzle.

- Move the elements marked in green as shown in the screenshot and then shoot the ball into the green pouch (H) by using the 'push' button (I).
- Take the 2 GOLDEN LIRA (@).
- Zoom into Giovanni.
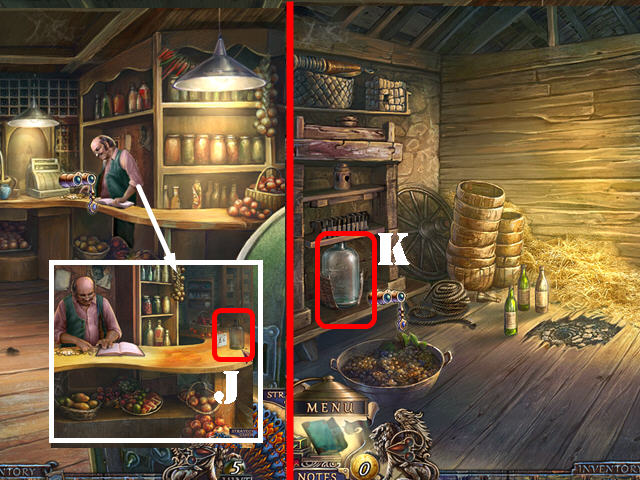
- Buy the WINE BOTTLE (J) for a total of 6 GOLDEN LIRA.
- Walk down 3 times; go right and into the barn.
- Put the WINE BOTTLE in the wine press (K) and zoom into it to activate a puzzle.
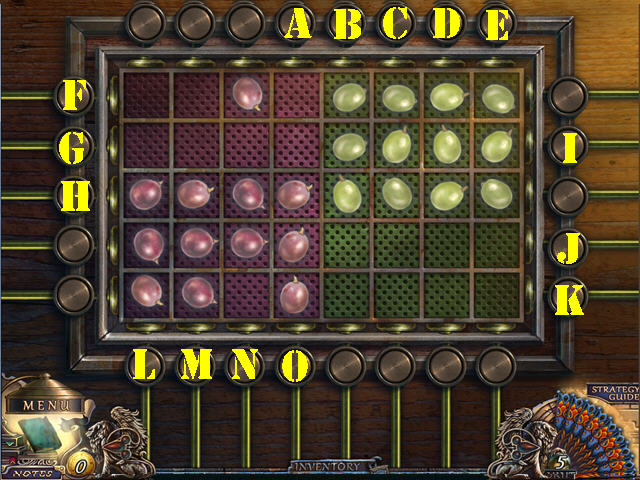
- Move the grapes to their matching background by using the surround buttons to push them into the tray.
- To solve the puzzle, press on the buttons in this order: I x 2, O, M x 2, B x 2, C, E x 3.
- F x 3, N x 2, G x 3, A, G, H, L, J x 4, K x 4, B x 2, C x 2, D x 2, E x 2.
- L, M, N, O, G x 4, and K x 3.
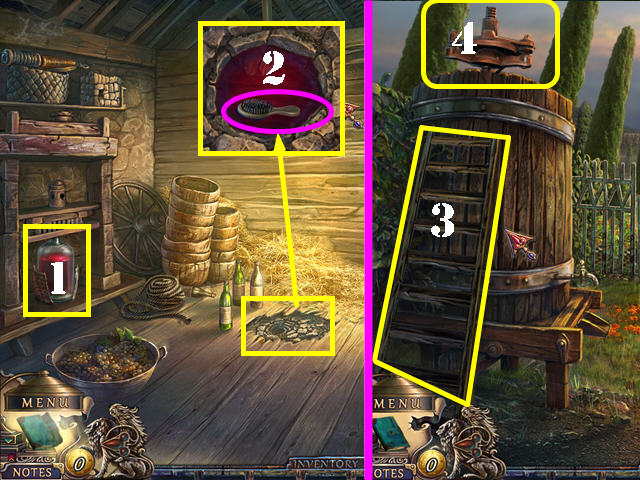
- Take the FULL WINE BOTTLE (1).
- Zoom into the ground and pour the FULL WINE BOTTLE in the hole; take the CAT BRUSH (2).
- Walk down.
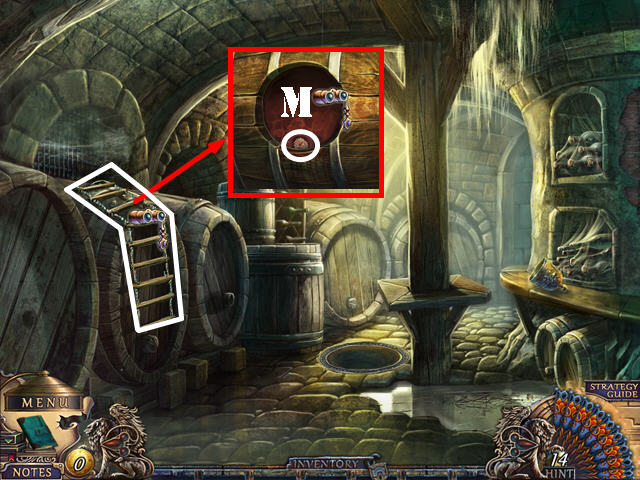
- Put the LADDER on the side of the barrel (3); zoom into the top of the barrel; you need a wrench (4). This action triggers a HOP by the gate.
- Walk down and go left.
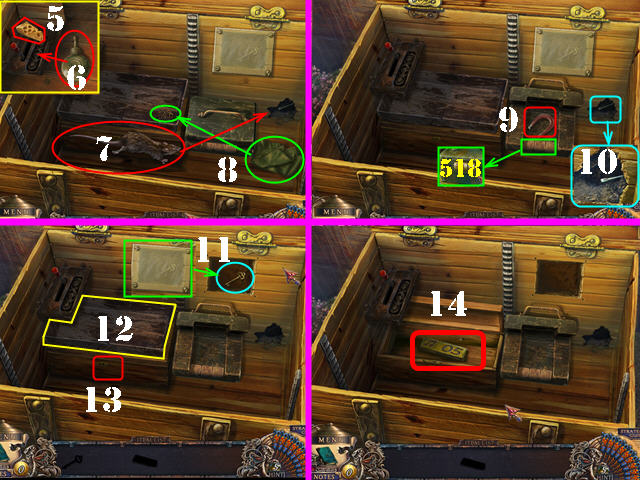
- Play the HOP.
- Zoom into the crate; open it and take the cheese (5).
- Put the oil (6) on the lever.
- Put the cheese in the crate and the mouse (7) will go into the hole.
- Take the rag (8) and use it to wipe the surface and reveal the number 518.
- Take a closer look at the locked box; enter the number 518 and take the magnet (9).
- Look into the hole; put the magnet in the hole to take the screwdriver (10).
- Remove the screws around the plate with the screwdriver and take the key (11).
- Remove the top box (12) and insert the key into the lock (13).
- Take the JUKEBOX BUTTON (14).
- Go back to Giovanni's store.
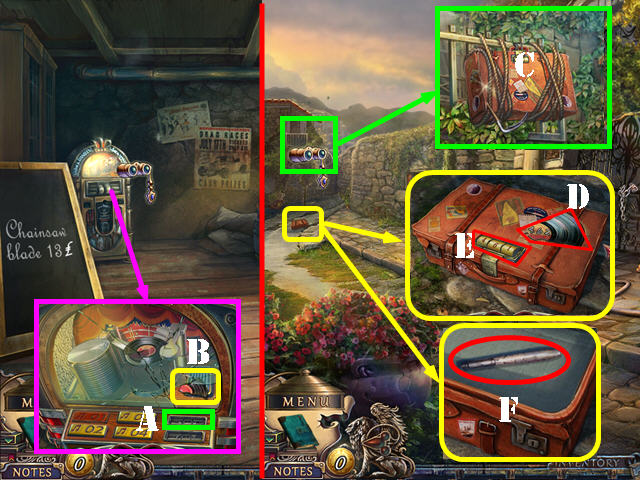
- Zoom into the jukebox; add the JUKEBOX BUTTON to it (A) and take the SUITCASE CODE (B).
- Walk down twice and go left.
- Look at the balcony; cut the rope with the LONG SCYTHE (C).
- Zoom into the fallen suitcase and add the SUITCASE CODE to it (D).
- Enter the code 462 on the tumblers (E); remove all the items in the suitcase and take the TAP HANDLE (F).
- Walk down and go right.
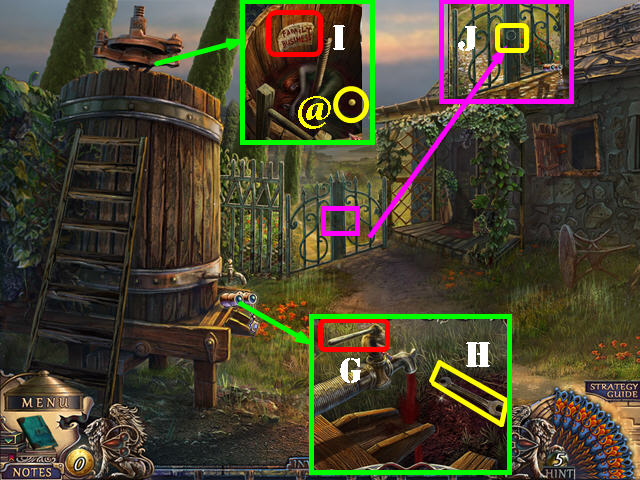
- Examine the tap; put the TAP HANDLE on it and turn the handle (G).
- Take the WRENCH (H).
- Zoom into the top of the barrel and use the WRENCH on it. Take the GOLDEN LIRE (@) and the note (I).
- Zoom into the gate; remove the bolt with the WRENCH and go through the gate (J).
- Examine the boat for a cut scene.
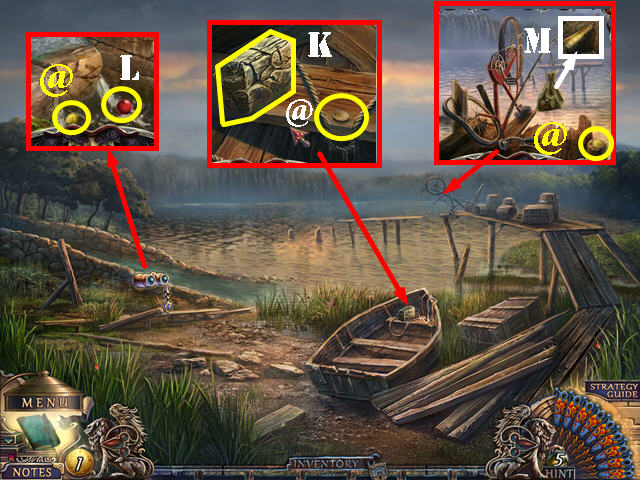
- Examine the boat again; take the GOLDEN LIRE (@) and the STONE PIECE (K).
- Inspect the left side of the water; put down the STONE PIECE. Take the RED BALL (L) and the GOLDEN LIRE (@).
- Examine the pier; take the GOLDEN LIRE (@).
- Put the BICYCLE CHAIN and the PEDAL on the bicycle. Touch the bicycle and then zoom into the sack.
- Take the FIRE HOSE NOZZLE from the sack (M).
- Return to Giovanni's store.
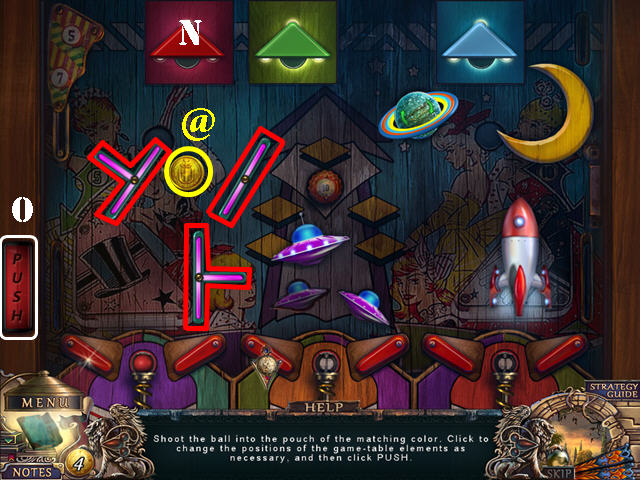
- Zoom into the pinball machine and add the RED BALL to it to activate a puzzle.
- Move the elements marked in red as shown in the screenshot and then shoot the ball into the red pouch (N) by using the 'push' button (O).
- Take the GOLDEN LIRE (@).
- Walk down thrice and go left.
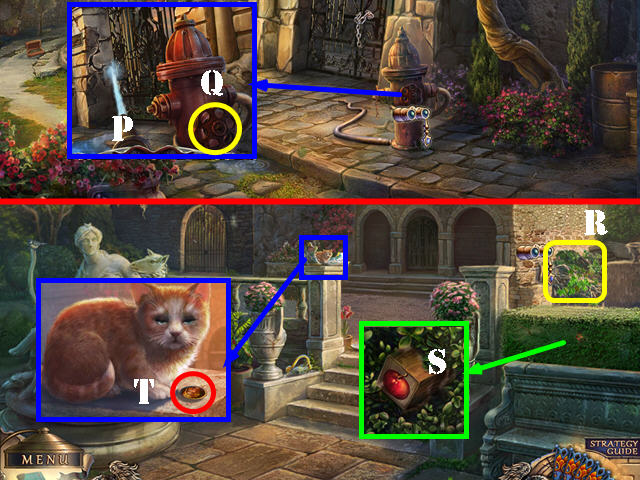
- Zoom into the fire hydrant; touch the hose and then attach the FIRE HOSE NOZZLE to it (P).
- Turn the valve on (Q); aim the hose at the gate and then go through it.
- Try to go right for a brief cut scene to appear; then zoom into the area again; you will not be able to pass (R).
- Inspect the hedges; cut them with the GARDEN PRUNERS and take the APPLE CUBE (S).
- Look at the cat and use the CAT BRUSH on it; take the THEATER AD PIECE (T).
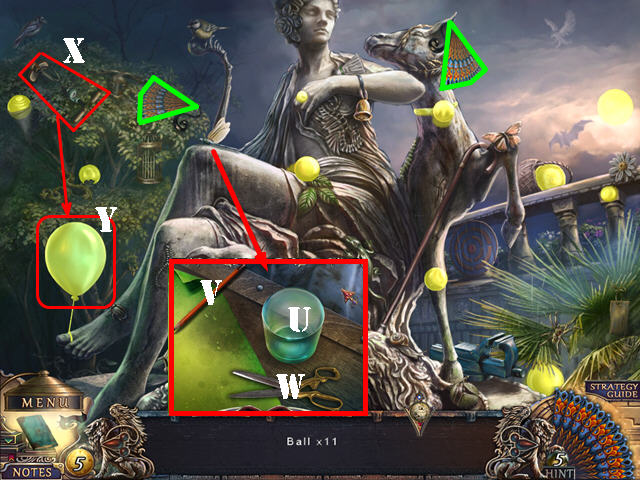
- Play the HOS.
- Find the 12 balls.
- Take the 2 Fans marked in green.
- Zoom into the statue's lap; move the glass (U) onto the paper; use the pencil (V) on the glass. Cut the paper with the scissors (W) and take the ball.
- Use the pump (X) on the balloon (Y) and take the ball.
- The BLUE BALL will be added to inventory.
- Walk down.
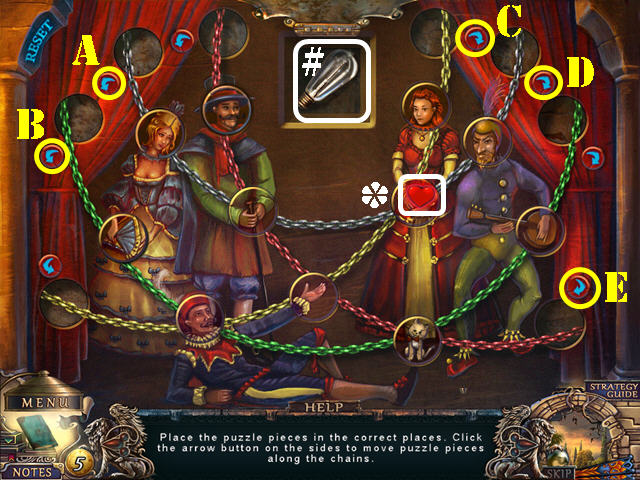
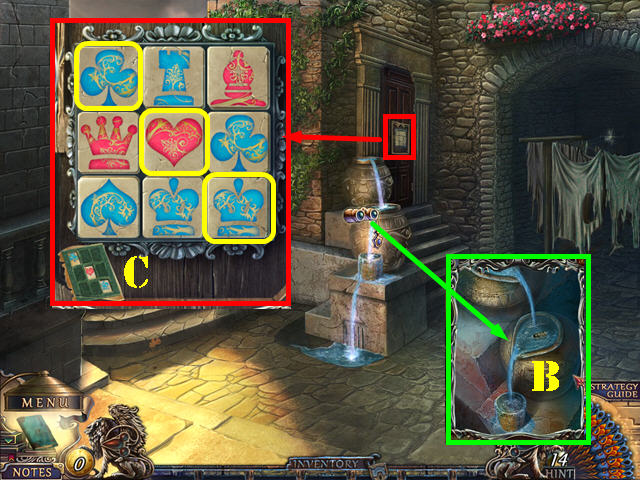
- Zoom into the puzzle on the wall and put the THEATER AD PIECE on it to activate the puzzle.
- Use the arrows to move the pieces along the chain until all the pieces are in the correct spots.
- To solve the puzzle, press on the arrows in this order: B, D, D, E, C, and A.
- Press on the heart (*) and take the LIGHT BULB (#).
- Go forward.
Chapter 3: Conti's Villa

- Inspect the door and put the LIGHT BULB in the lamp (1); open the door and go through it.
- Try to talk to the man in the chair (2) to activate a HOP and a cut scene.
- Play the HOP.
- Take the 2 Fans marked in green.
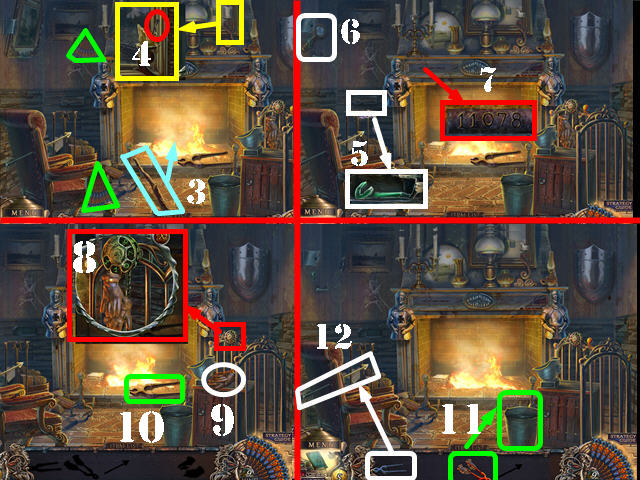
- Put the stick (3) in the fireplace.
- Zoom into the candle; light it with the stick and take the nail (4).
- Inspect the brick; put the nail on it and take the crowbar (5).
- Remove the clamps on the picture with the crowbar and take the magnifying glass (6).
- Inspect the left side of the mantle; put the glass on it and look at the code 11078 (7).
- Zoom into the lock; enter the numbers 11078 (8) and take the gloves (9).
- Use the gloves to take the hot pliers from the fireplace (10).
- Put the hot pliers in the bucket to get the pliers (11).
- Remove the arrow with the pliers (12).
- The BROKEN ARROW will be added to inventory.
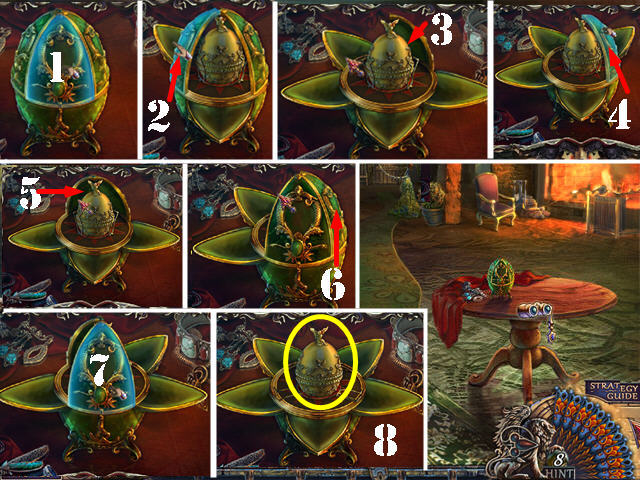
- Examine the egg on the table to activate a puzzle.
- Open the segments in the right order.
- To solve the puzzle, press on the segments in the order shown in the screenshot (1-7).
- Take the GOLDEN EGG (8).
- Try to go up the steps and a cupboard will fall and block access to the stairs (1).
- Go right.
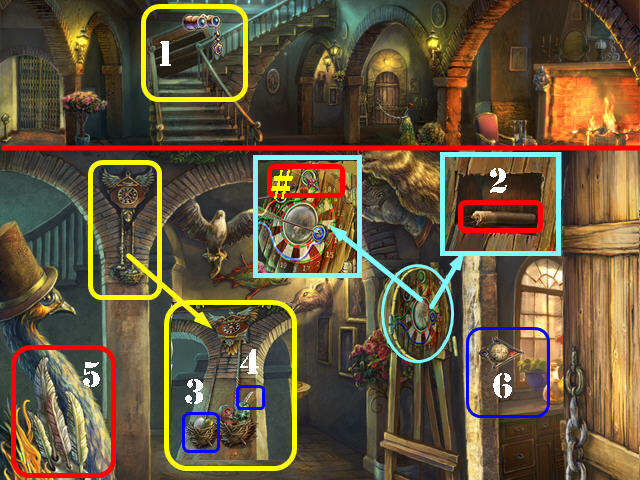
- Examine the target; put the BROKEN ARROW on it (#) and take the CANDLE (2).
- Zoom into the clock; put the GOLDEN EGG in the nest (3). Take the PEACOCK FEATHER (4).
- Put the PEACOCK FEATHER on the peacock (5) to open the right door (6); go through it.
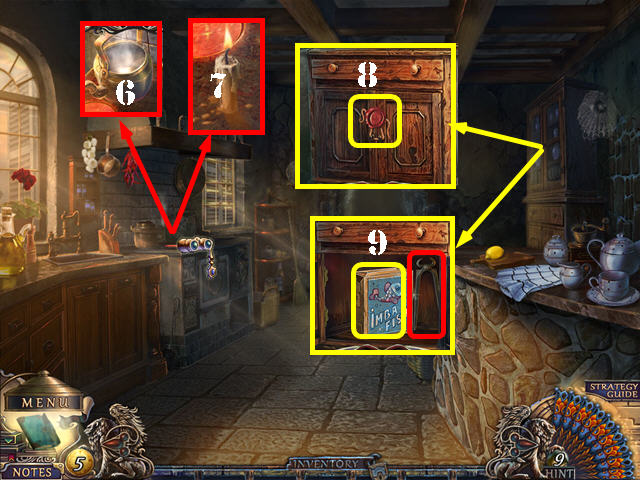
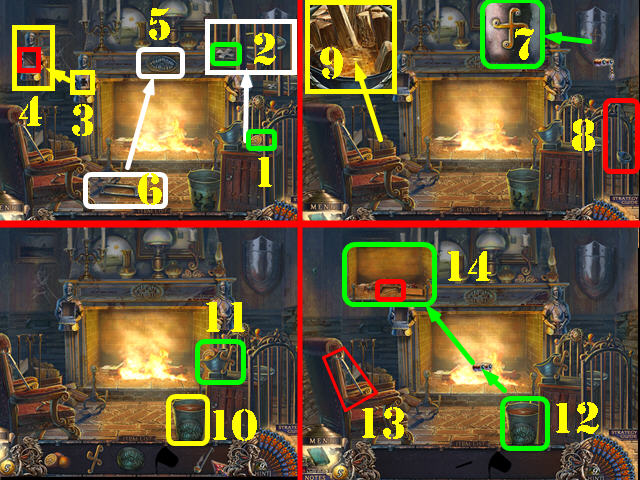
- Examine the stove and take the EMPTY KETTLE (6).
- Put the CANDLE on the stove and take the LIT CANDLE (7).
- Examine the cupboard; melt the wax seal with the LIT CANDLE (8).
- Open the doors; take the FISH FOOD and the TONGS (9).
- Walk down.
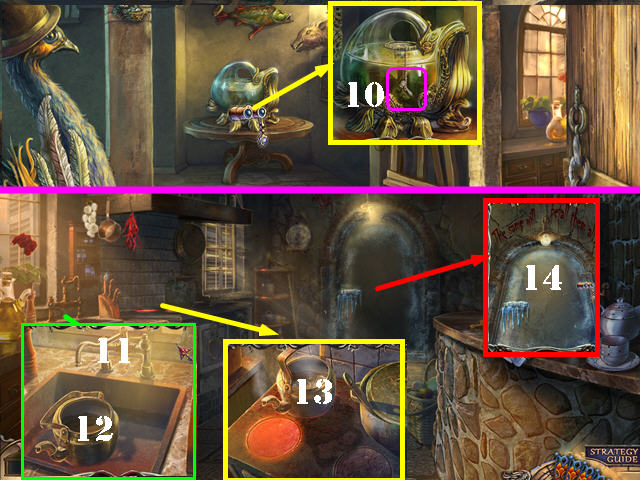
- Inspect the fish bowl, add the FISH FOOD to it and take the FAUCET HANDLE (10).
- Return to the kitchen.
- Take a closer look at the sink; put the EMPTY KETTLE in it. Put the FAUCET HANDLE on the tap (11); turn the handle and take the KETTLE WITH WATER (12).
- Zoom into the stove; put the KETTLE WITH WATER on it and take the KETTLE WITH BOILING WATER (13).
- Inspect the frozen door; put the KETTLE WITH BOILING WATER on it (14); open the door and go through it.
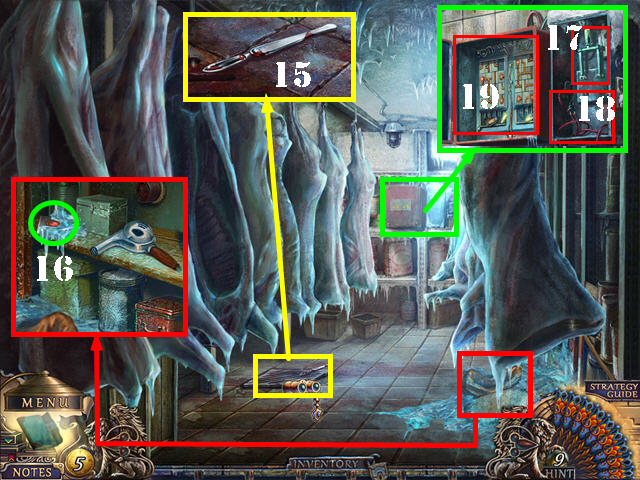
- Look at the grate and take the SCALPEL (15).
- Look on the ground and take the CIRCUIT PART (16).
- Examine the power box in the back; open the right cover, take the KNIFE SWITCH (17) and the POWER CORD (18).
- Open the left cover; zoom into it and add the CIRCUIT PART to activate a puzzle (19).
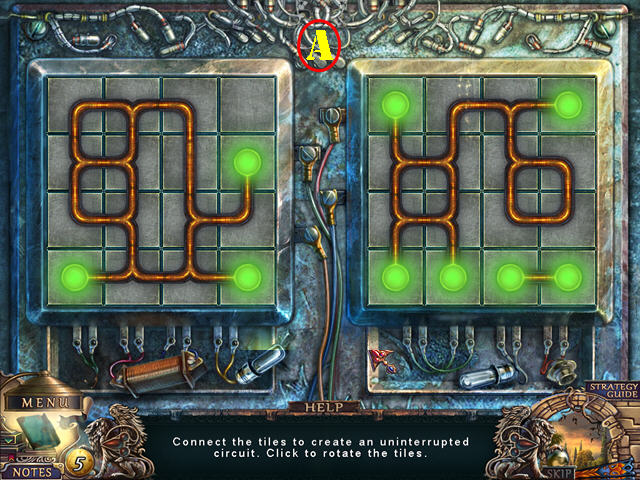
- Press on the tiles to rotate them until all the circuits are connected on both sides.
- Please look at the screenshot for the solution (A).
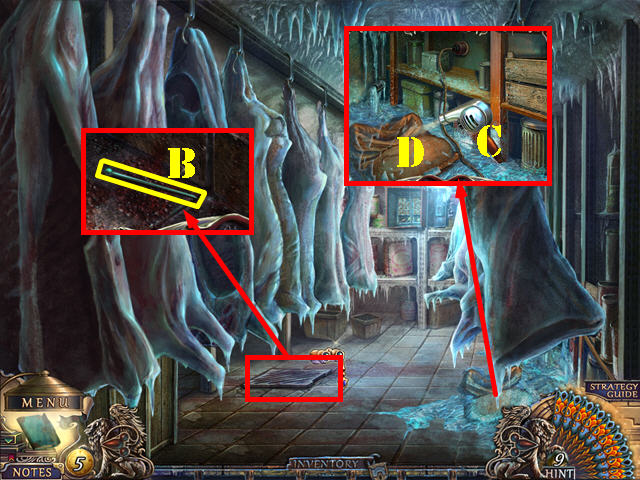
- Inspect the grate; lift the grate with the KNIFE SWITCH and take the PIN (B).
- Inspect the ground; put the POWER CORD on the hair dryer (C).
- Hold down your mouse and move it around the bag to melt the ice with the blow dryer.
- Take the SAND BAG (D).
- Walk down.
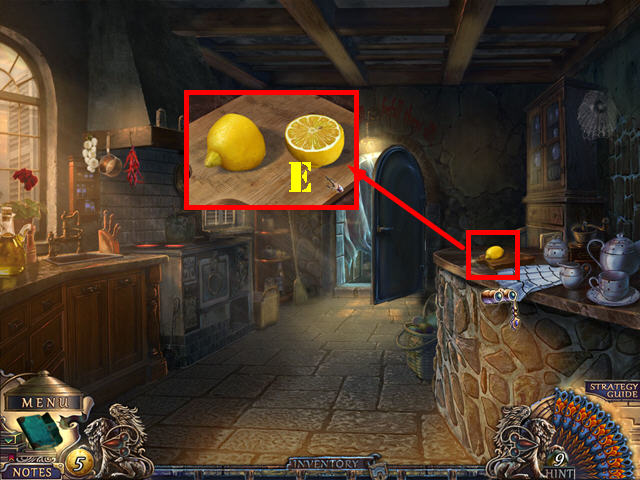
- Take a closer look at the lemon; cut it with the SCALPEL and take the LEMON (E).
- Walk down twice.
- Play the HOP.
- Take the oranges (1); move the bowl and take the cross (2).
- Put the cross in the slot (3) and take the screwdriver (4).
- Remove the patch (5) with the saw (6).
- Zoom into the shield; remove the screws with the screwdriver and take the handle (7).
- Take the ladle (8); zoom into the resin and put the ladle in it to get the ladle with pitch (9).
- Put the patch on the bucket, followed by the ladle with pitch (10).
- Put the oranges and the handle on the juicer (11). Press on the handle and take the bucket with juice.
- Throw the bucket with juice into the fire (12); use the poker (13) in the fireplace.
- Remove the cover and take the first SPOKE (14).
- Walk down.
- Take a closer look at the gate; use the SAND BAG on the wires and go through the gate (A).
- Remove the lid on the basket and zoom into it (B); put the APPLE CUBE on it to activate a puzzle.
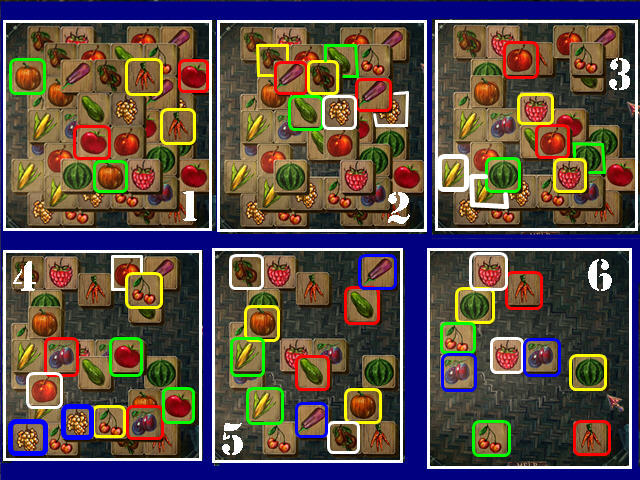
- Select two unblocked matching elements to eliminate them until they are all gone. If you make a mistake you can select the Reset button to start over.
- Please look at the screenshot for the solution and press on the tiles in this order: Red, Yellow, Green, White, and Blue. Note: in the screenshot, some of the items may be blocked, but take them in the order shown after they have been freed.
- Touch the bottom of the basket and take the second SPOKE.

- Examine the cart; add the two SPOKES to the wheel and take the WHEEL (C).
- Add the WHEEL to the cart (D) and move the cart aside.
- Take the TRASH CAN LID (E).
- Zoom into the trash can; cover it with the TRASH CAN LID and then take the GLASS CUTTER (F).
- Inspect the lock (G); put the PIN on it and enter the garage.
Chapter 4: Mario's Garage
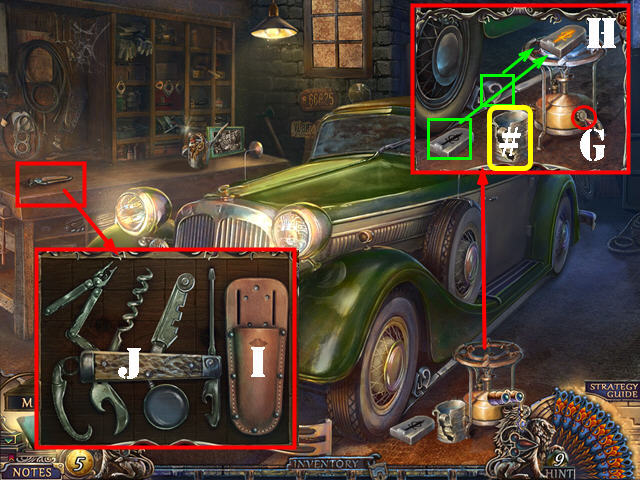
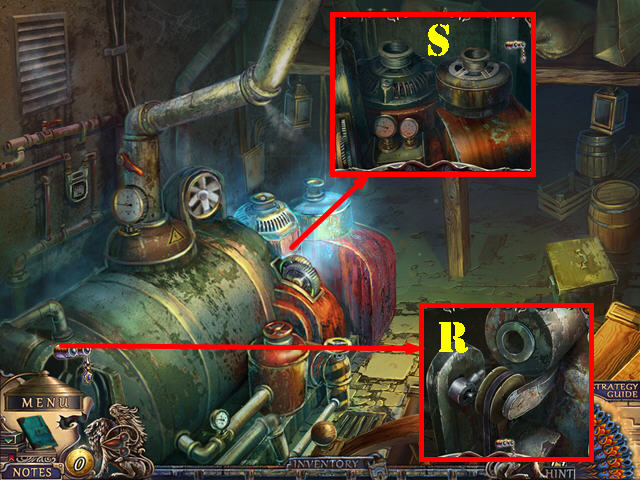
- Inspect the burner and turn it on (G).
- Put the 2 metal pieces marked in green on the burner; remove the mold with the TONGS (H).
- Pour the water (#) on the mold and take the HOOD LEVER.
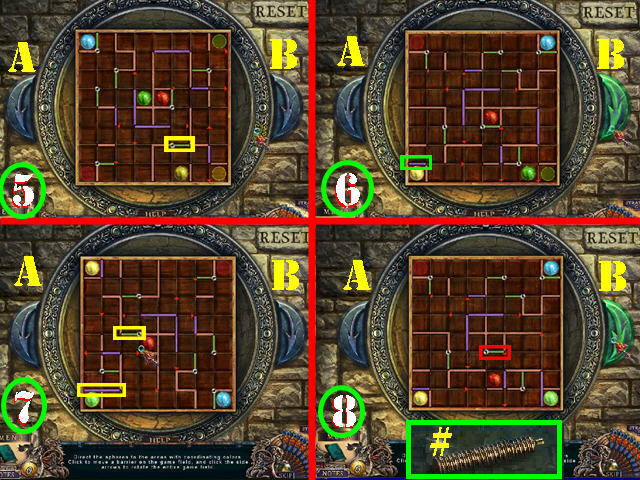
- Examine the left side of the worktable; put the GLASS CUTTER in the holder to activate a puzzle (I).
- Put the tools in the right spots. A tool will lock in place when placed correctly.
- Please look at the screenshot for the solution (J).
- Take the MULTITOOL.
- Go to the back of the car.
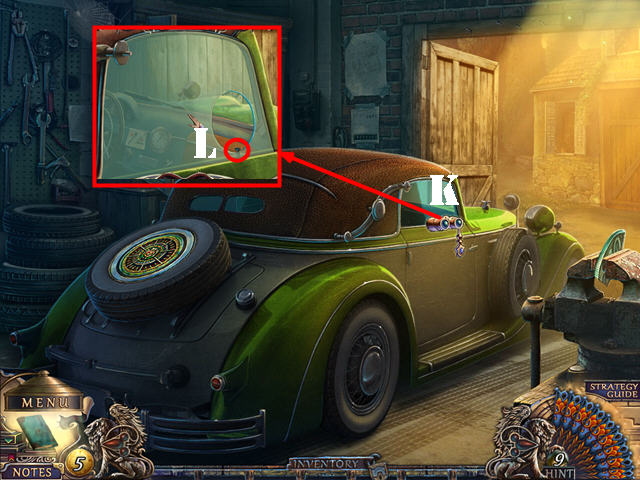
- Zoom into the car window (K).
- Cut the glass with the MULTITOOL. Open the latch (L) and go into the car.
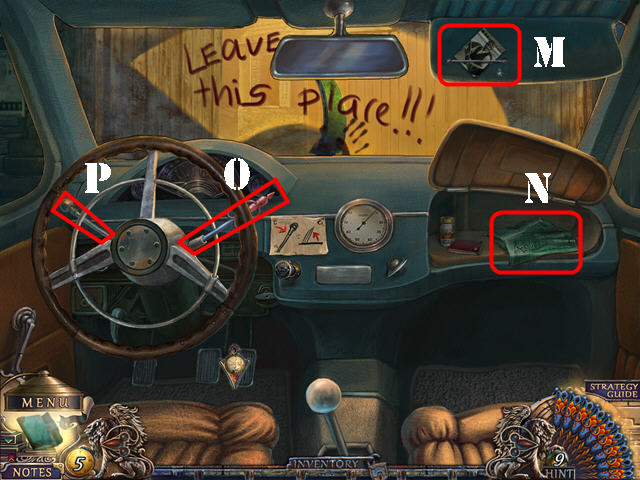
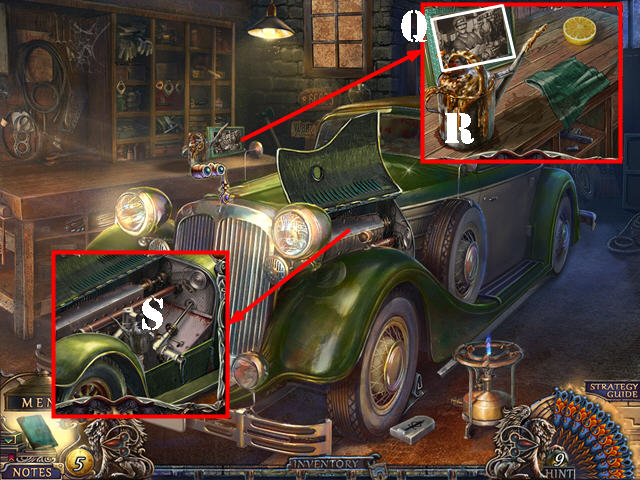
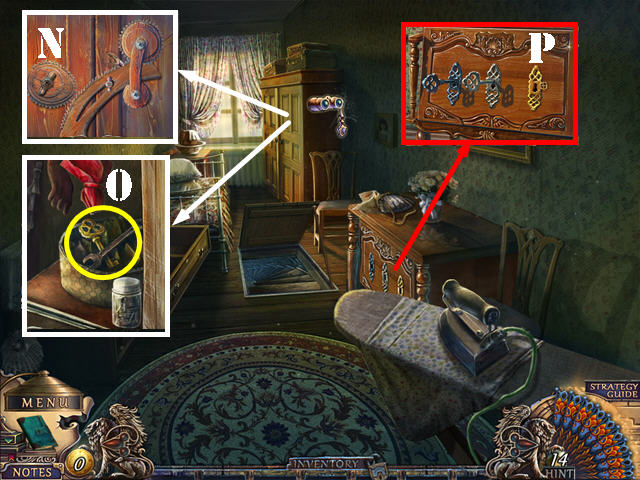
- Look at the visor and take MARIO'S PHOTO (M).
- Open the glove compartment and take the RAG (N).
- Put the HOOD LEVER on the steering wheel (O).
- Pull on the hood lever and then pull on the windshield wiper lever (P).
- Go to the front of the car.
- Examine the right side of the worktable; take the photo (Q).
- Put the LEMON and the RAG on the table.
- Squeeze the lemon on the rag and then clean the oil can with it (R); take the EMPTY OILER.
- Examine the engine; put the EMPTY OILER on it to get the FULL OILER (S).
- Go to the back of the car.
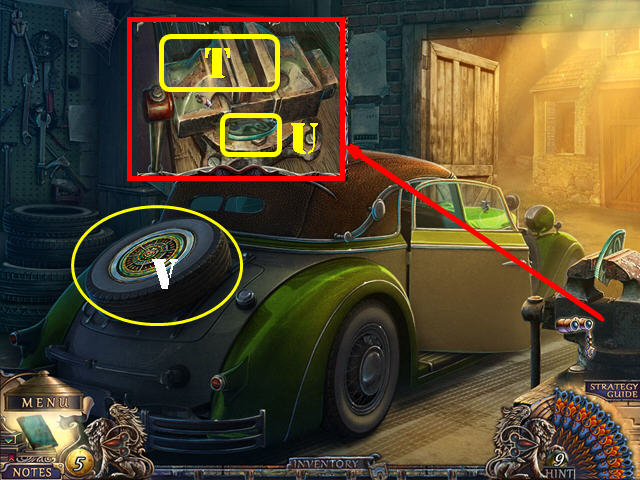
- Inspect the vise; put the FULL OILER on it; turn the handle (T) and take the HUBCAP PIECE (U).
- Inspect the tire on the back of the car (V); put the HUBCAP PIECE on it to activate a puzzle.
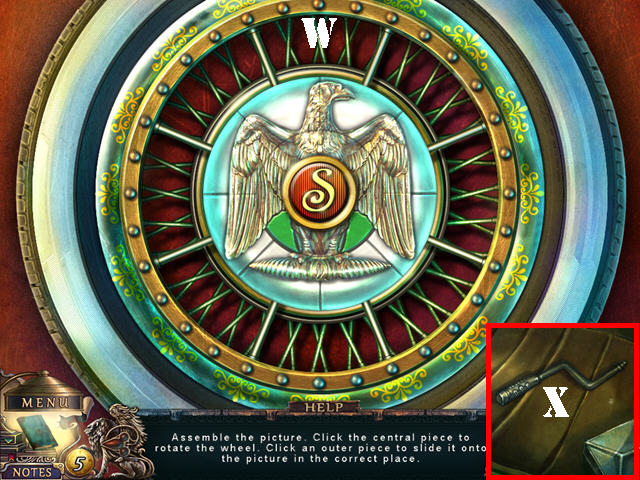
- Reconstruct the picture by putting the pieces into the right spots.
- Press in the center to rotate the wheel; press on the outer pieces to move them to the center wheel. If the pieces are placed correctly, they will lock in place. If they are not in the correct spots, they will go back to their original spot.
- Please look at the screenshot for the solution (W).
- Zoom into the trunk and take the GRATE HANDLE (X).
- Go back to Conti's Villa.
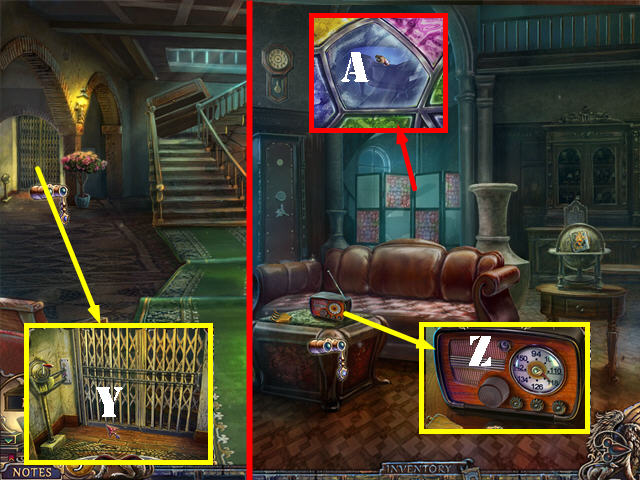
- Zoom into the mechanism on the left; put the GRATE HANDLE on it; turn the handle and go through the door (Y).
- Examine the table; take the RADIO (Z).
- Inspect the partition; touch it to get the SHARP GLASS PIECE (A).
- Go right.
- Examine the potted plant; press on the vines several times until it's all tied up (B).
- Cut the vines with the SHARP GLASS PIECE and take the first CORD.
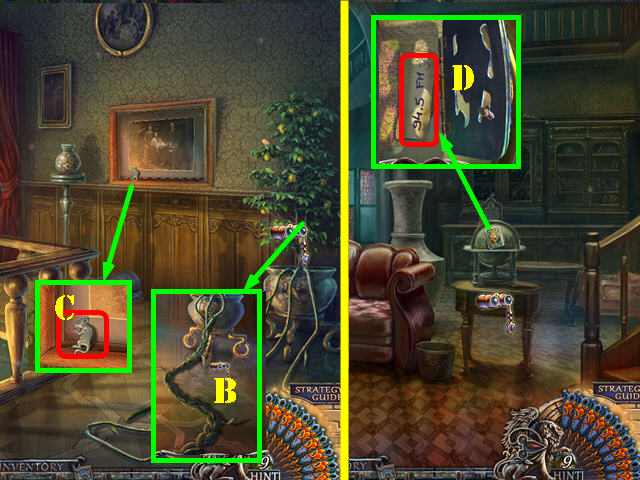
- Examine the picture and take the MOUSE (C).
- Walk down.
- Inspect the globe; put the MOUSE down and take the RADIO SOLUTION (D).
- Go right.
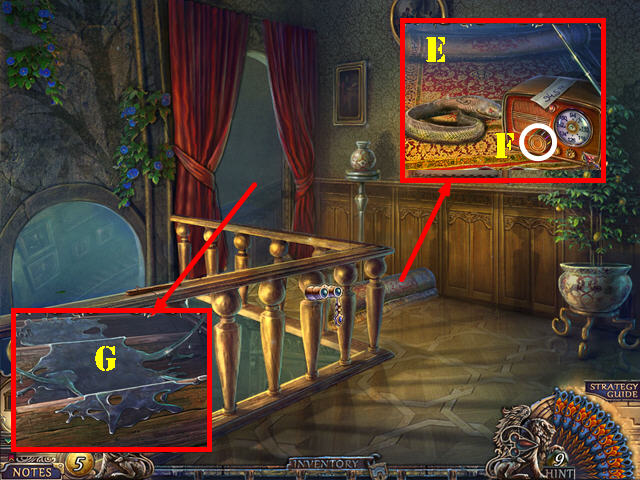
- Inspect the carpet and unroll it (E); put the RADIO on the carpet and then put the RADIO SOLUTION on the radio.
- Use the knob (F) to tune the radio to 94.5.
- Remove the snake and the radio; take the CARPET.
- Examine the steps; put the CARPET on it and take the steps (G).
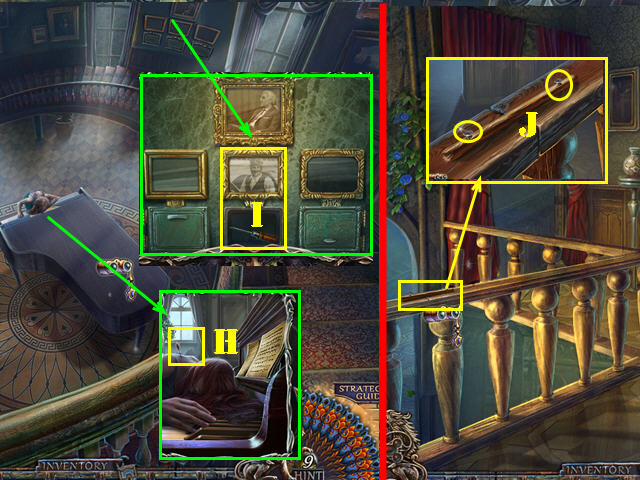
- Go to the piano hall. Examine the piano and take the DART (H).
- Zoom into frames; put MARIO'S PHOTO in the frame and take the SCREWDRIVER (I).
- Walk down.
- Inspect the railing; remove the screws with the SCREWDRIVER and take the WOODEN STICK (J).
- Walk down.
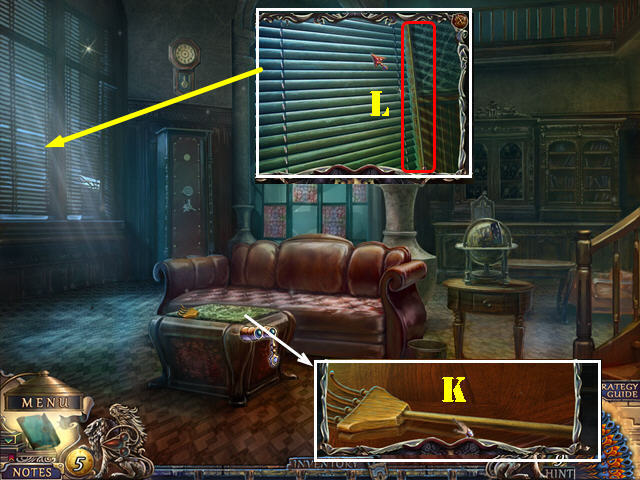
- Examine the table; put the WOODEN STICK on the hand and take the WOODEN HAND (K).
- Zoom into the blinds; use the WOODEN HAND on it 4 times and take the second CORD (L).
- Go back to the piano hall.
- Inspect the window; attach the 2 CORDS to the curtain and take the SAFE CODE (M).
- Walk down twice.
- Inspect the safe; put the SAFE CODE on it and enter the code 405 on the keypad (N).
- Take LUIGI'S PHOTO (O); open the coin purse and take the 5 GOLDEN LIRA (@).
- Go back to the piano hall.
- Zoom into frames; put LUIGI'S PHOTO in the frame and take LUIGI'S ROOM KEY (P).
- Return to Giovanni's store.
- Zoom into the pinball machine and add the BLUE BALL to it to activate a puzzle.
- Move the elements marked in blue as shown in the screenshot; shoot the ball into the blue pouch (Q) and then press on the Push Button (R).
- Take the 3 GOLDEN LIRA (@).
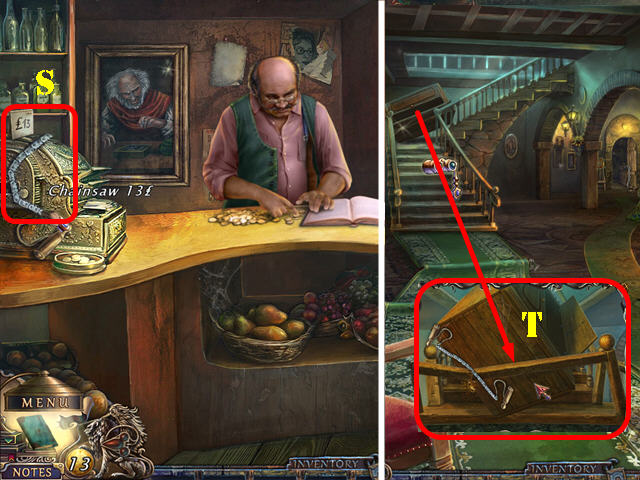
- Zoom into Giovanni; buy the CHAINSAW for 13 LIRA (S).
- Return to Conti's Villa.
- Examine the blocked staircase; use the CHAINSAW on the cupboard and go up the steps (T).
Chapter 5: Luigi's Room
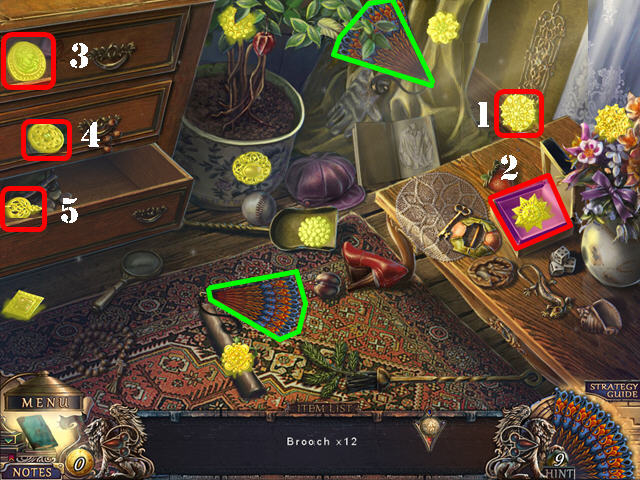
- Play the HOS.
- Pick up the 12 BROOCHES.
- Pick up the 2 Fans marked in green.
- Open the curtain and take the brooch (1).
- Open the box and take the brooch (2).
- Open the top, center, and lower drawers; pick up the 3 BROOCHES from inside the drawers (3, 4, and 5).
- The BOX BROOCH will be added to inventory.
- Examine the railing; put the DART on the yarn ball and cut the string with the SHARP GLASS PIECE. Take the DRUM STICK (A).
- Inspect the left door; put LUIGI'S ROOM KEY in the lock; turn the key and go into the room (B).
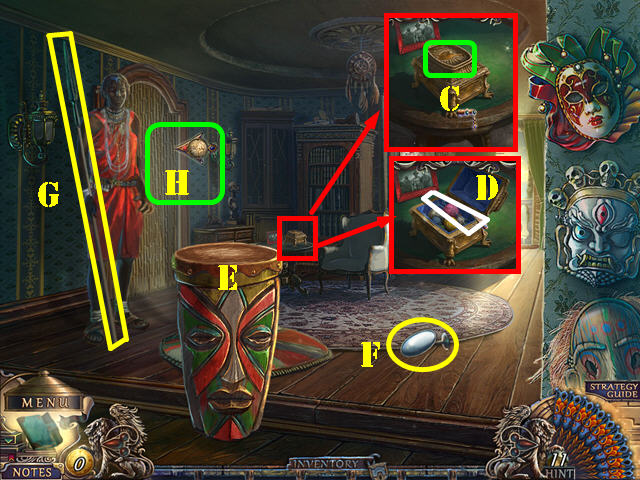
- Examine the table; put the BOX BROOCH on the box (C) and take the CHAIN EXTENSION (D).
- Put the DRUM STICK on the drum (E) and pick up the MIRROR (F).
- Put the DRUM STICK on the drum two more times and take the POLE (G).
- Go through the door behind the warrior (H).
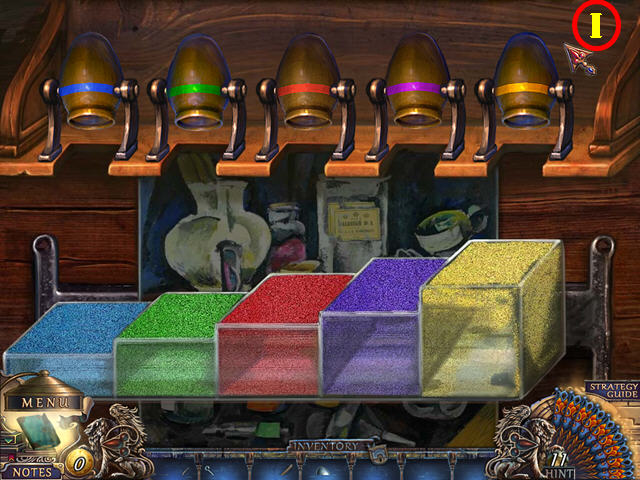
- Open the drawer on the right and zoom into it to activate a puzzle.
- You have to find the correct container for each paint color; select any two colors to swap their positions.
- Select a color twice to add it to a container.
- Please look at the screenshot for the solution (I).
- Take the PAINT.
- Select the center drawer to activate a HOS.
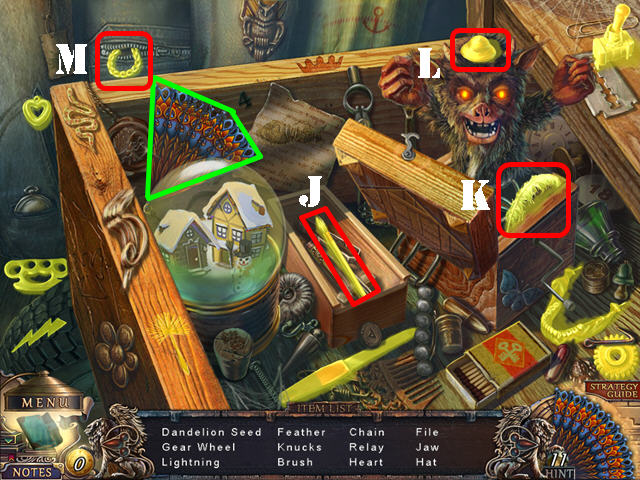
- Play the HOS.
- Take the Fan marked in green.
- Open the small box and take the brush (J).
- Open the large box; take the feather (K) and the hat (L).
- Pull the zipper and take the chain (M).
- The BRUSH will be added to inventory.
- Walk down and go through the back door.
- Look at the steps to see a grenade with a trip wire (N). This will activate a HOS.
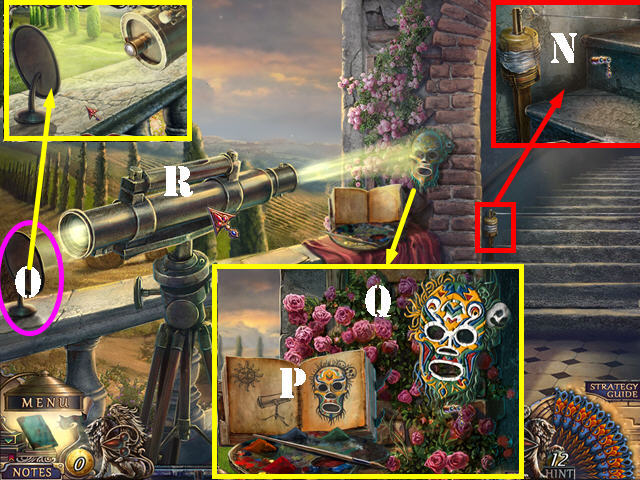
- Examine the railing; put the MIRROR down (O).
- Zoom into the palette; add the BRUSH, PAINTS and the FULL OILER to it to activate a puzzle.
- Flip the book pages twice (P). Paint the mask according to the image in the book. Dip the brush into the paint and then add that color to the mask.
- Please look at the screenshot for the solution (Q).
- Exit the scene and turn the telescope so the light shines on the mask (R).
- Zoom back into the MASK and take it.
- Walk down.
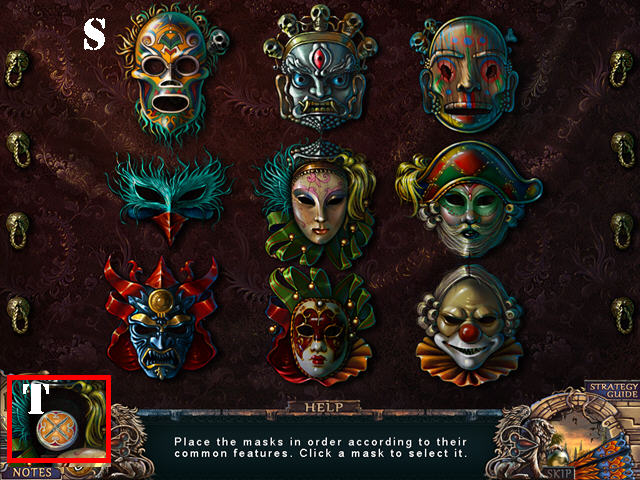
- Zoom into the masks on the wall and put the MASK on the board to activate a puzzle.
- Put the masks in the right order using their common features as a clue.
- Masks will lock in place once they are in the right spot.
- Please look at the screenshot for the solution (S).
- Take the MEDICINE CHEST TOKEN (T).
- Walk down.
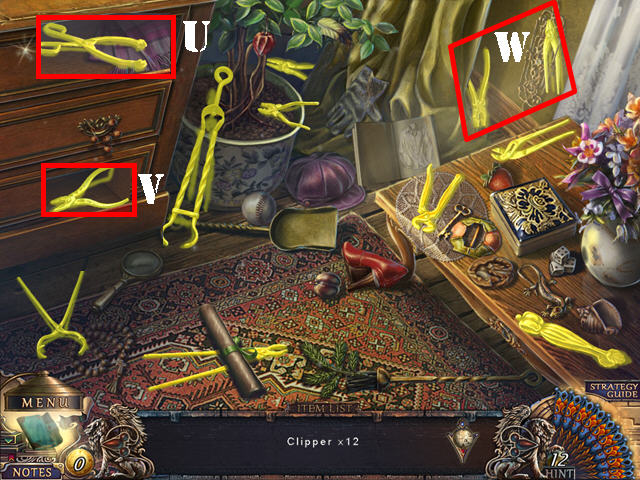
- Play the HOS.
- Find the 12 clippers.
- Open the top drawer; take the clipper (U). Open the bottom drawer; take the clipper (V).
- Open the curtain and take the 2 clippers (W).
- The CLIPPER will be added to inventory.
- Return to the telescope area.
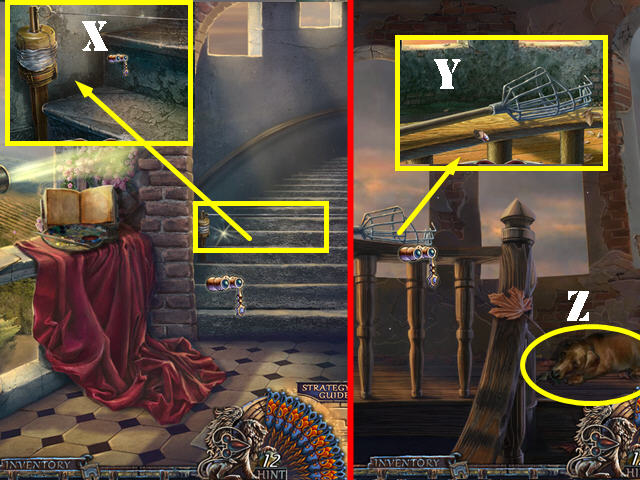
- Examine the steps; use the CLIPPER on the trip wire and take the steps (X).
- Examine the railing; put the POLE on the device and take the FRUIT PICKER (Y).
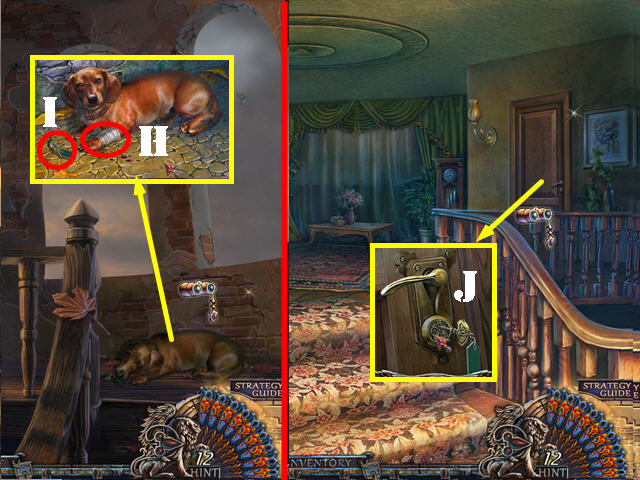
- Check the dog; he's injured (Z).
- Walk down 3 times.
- Examine the lamp; put the CHAIN EXTENSION on it and pull the chain (A).
- Use the FRUIT PICKER on the lamp and take the ZIPPER PULL (B).
- Return to Luigi's closet.
- Examine the jacket; put the ZIPPER PULL on the zipper; pull the zipper and take the BANDAGE (C).
- Play the HOS.
- Take the Fan marked in green.
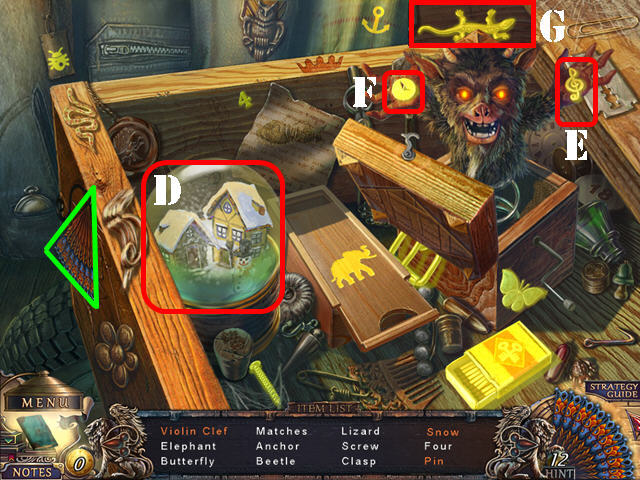
- Touch the globe and take the snow (D).
- Open the box; take the violin clef (E) and the pin (F). Note: if the box is open the lizard (G) will be behind the monster.
- The MATCHES will be added to inventory.
- Go back to the tower.
- Examine the dog and put the BANDAGE on him (H); take FRANCESCO'S ROOM KEY (I).
- Walk down 3 times.
- Zoom into the right door; put FRANCESCO'S ROOM KEY into the lock; turn the key and go through the door (J).
Chapter 6: Francesco's Room
- Play the HOP.
- Take the Fan marked in green.
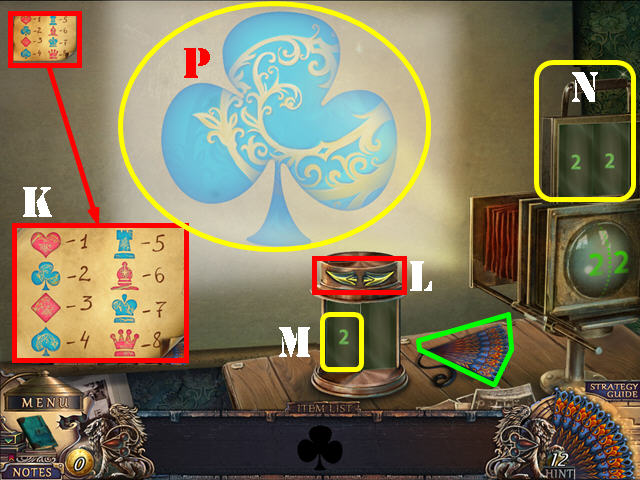
- Look at the code (K). Change the numbers with the arrows (L) until it falls on the 2.
- Take the 'number 2 plate' twice (M) and put them both in the slots (N); lower the panel and take the club on the screen (O).
- To remove a plate from a panel, just click on it.
- Repeat the same process using the numbers and symbols on the clue until you have all 8 symbols.
- Two 6's will get you the Bishop.
- Two 3's will get you the Diamond.
- Two 7's will get you the King.
- Two 8's will get you the Queen.
- Two 5's will get you the Rook.
- Two 1's will get you the Heart.
- Two 4's will get you the Spade.
- The SPADE TILE will be added to inventory.
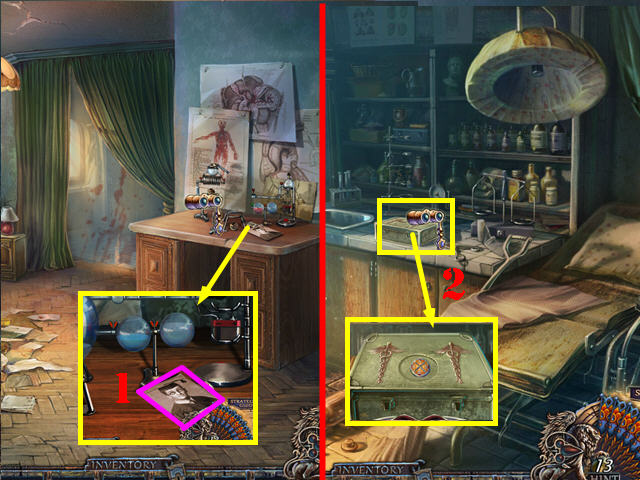
- Examine the desk and take FRANCESCO'S PHOTO (1).
- Go through the curtains to reach the lab.
- Examine the first aid kit; put the MEDICINE CHEST TOKEN on it to activate a puzzle (2).
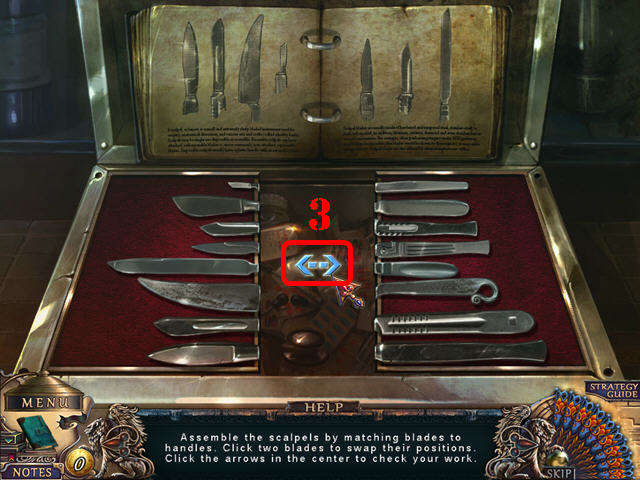
- You must match up the right blades with the right handles. Select any two blades and any two handles to swap their positions.
- Look at the sketch in the back for a clue.
- Look at the screenshot for the solution and then select the center arrows (3).
- Take the SHARP KNIFE.
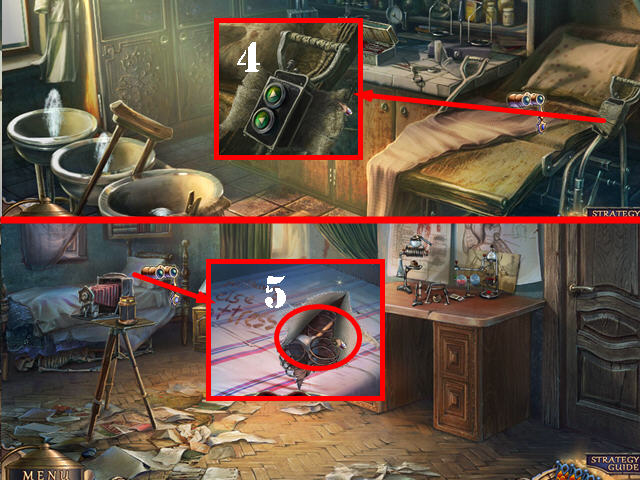
- Zoom into the stretcher; cut the bandage with the SHARP KNIFE and take the CONTROL BOX (4).
- Walk down.
- Inspect the bed and move the pillow. Cut the mattress with the SHARP KNIFE and take the PLUNGER (5).
- Open the right door and go through it.
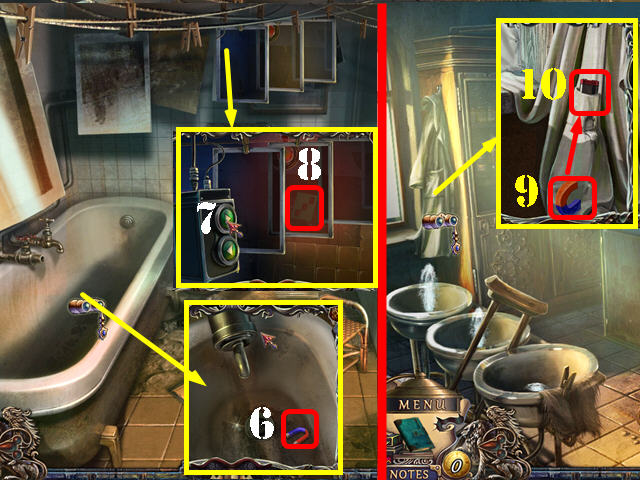
- Examine the tub; use the PLUNGER on the drain and take the MAGNET (6).
- Zoom into the photo scrolls; put the CONTROL BOX (7) on the cable. Press on the top button 3 times and take the STENCIL (8).
- Go back into the lab.
- Examine the robe; put the magnet on the item in the pocket (9) and drag it up to the pocket; take the BATTERY (10).
- Walk down.

- Zoom into the flasks; put down the MATCHES and the BATTERY to activate a puzzle.
- You must prepare a cleaning solution by turning the valves on and off according to the instructions on the wall (A). Keep flipping the pages to view all the information.
- Strike the match (B) against the matchbox (C) to light the burner (D).
- Put the BATTERY on the device (E) and turn the valve on (F).
- Switch on the second valve (G).
- Strike the match on the matchbox to light up the second burner (H).
- Turn on the valve (I).
- Turn on the 3 valves marked in yellow.
- Take the WATER CLEANER (J).
- Go back to the piano hall.
- Zoom into the frames; put FRANCESCO'S PHOTO in the frame and take the 2 CORKS (K).
- Return to Luigi's room.
- Examine the desk and open the book; put the STENCIL on the book and take the SOLUTION (L).
- Go back to the lab in Francesco's room.
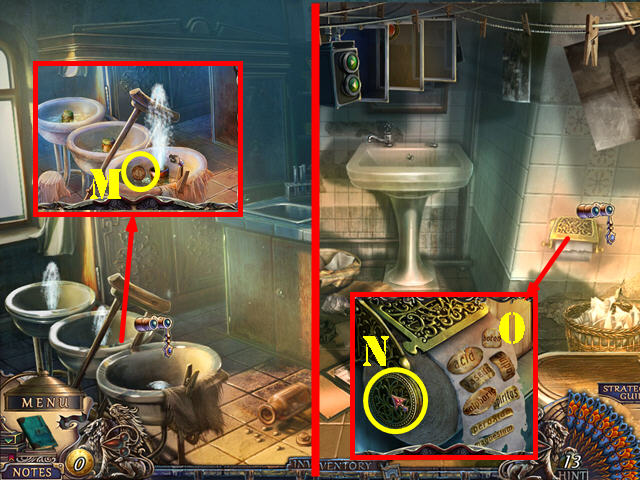
- Examine the sinks; put the 2 CORKS in the sinks and take the TOILET PAPER ROLLER KNOB (M).
- Go back to the bathroom.
- Zoom into the toilet paper holder; put the TOILET PAPER ROLLER KNOB on it (N). Roll the handle and take the MEDICINE LABELS (O).
- Return to the lab.
- Zoom into the bottles and put the MEDICINE LABELS on them to activate a puzzle.
- Put the labels on the correct bottles.
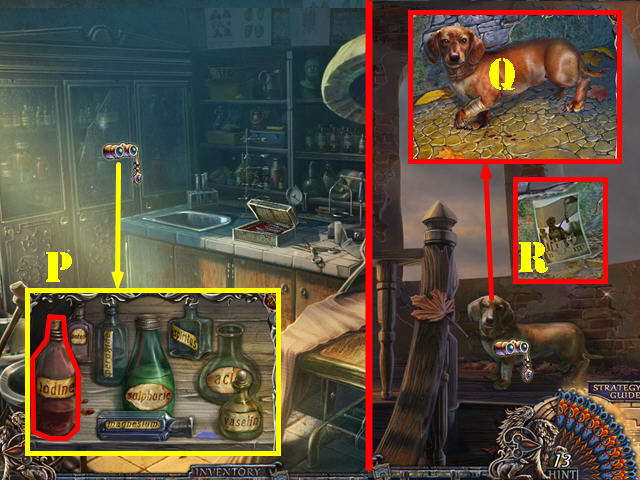
- Please look at the screenshot for the solution. Take the IODINE (P).
- Return to the tower.
- Zoom into the dog; put the IODINE on the wound (Q) and take the photo (R). This activates the HOS in Francesco's room.
- Go back to Francesco's room.
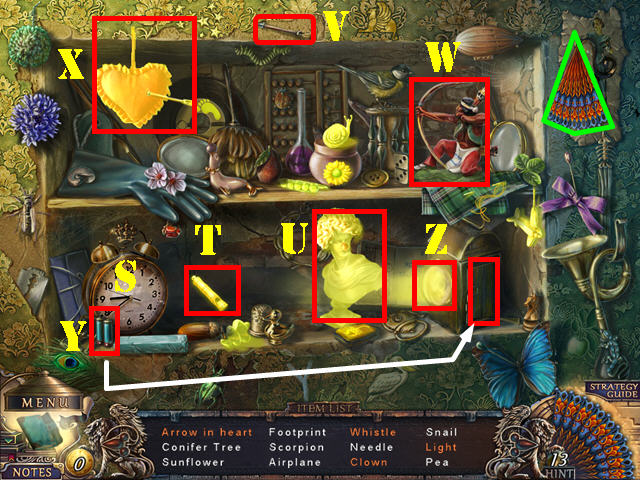
- Play the HOS.
- Take the Fan marked in green.
- Touch the alarm clock (S) and take the whistle (T).
- Touch the bust and take the clown (U).
- Give the arrow (V) to the archer (W) and take the arrow in heart (X).
- Put the batteries (Y) on the side of the lantern; close the cover and take the light (Z).
- The WHISTLE will be added to inventory.
- Walk down 3 times.
- Zoom into the debris.
- Use the WHISTLE on the scene for the dog to remove the debris (A).
- Follow the dog.
Chapter 7: The Finale
- Examine the pots; use the WATER CLEANER on them; take the THIMBLE and the CLEAR WATER (B).
- Inspect the door; put the SPADE TILE and the SOLUTION on it.
- Change the diagonal line to match the solution given. Please look at the screenshot for the solution (C).
- Enter Maria's room.
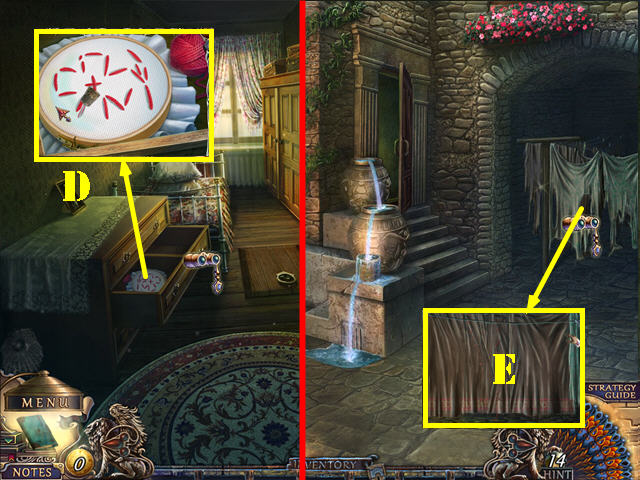
- Inspect the open drawer; put the THIMBLE on the embroidery hoop and take the SEWING KIT (D).
- Walk down.
- Inspect the sheets and touch them. Use the SEWING KIT on the sheets and take the LINEN (E).
- Take the steps on the left.
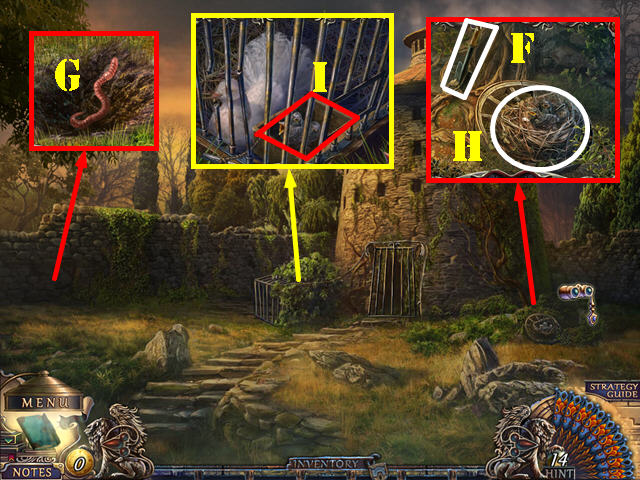
- Inspect the nest and take the SHOVEL (F).
- Examine the ground; use the SHOVEL on the ground and take the WORM (G).
- Zoom into the nest; give the WORM to the chicks (H). Then give the CLEAR WATER to the chicks. Take the CHICKS and the CARRIAGE RETURN HANDLE in the nest.
- Examine the cage; give the CHICKS to the pigeon (I). Press on the cage to lift the gate.
- Enter the pigeon house.
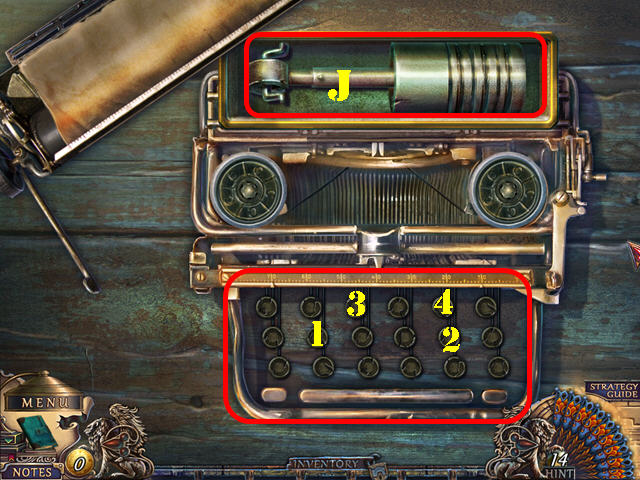
- Inspect the typewriter; put the CARRIAGE RETURN HANDLE on it to activate a puzzle.
- Press on the correct buttons until all the buttons are depressed.
- To solve the puzzle, select the buttons in the order shown in the screenshot (1-4).
- Take the PISTON (J).
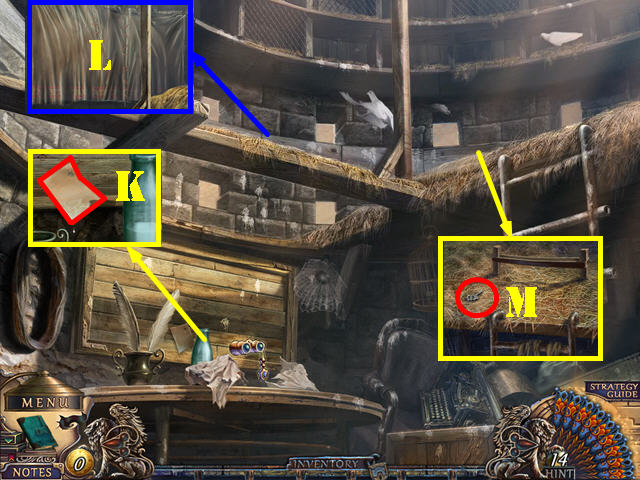
- Examine the table; take the INVISIBLE LETTER (K).
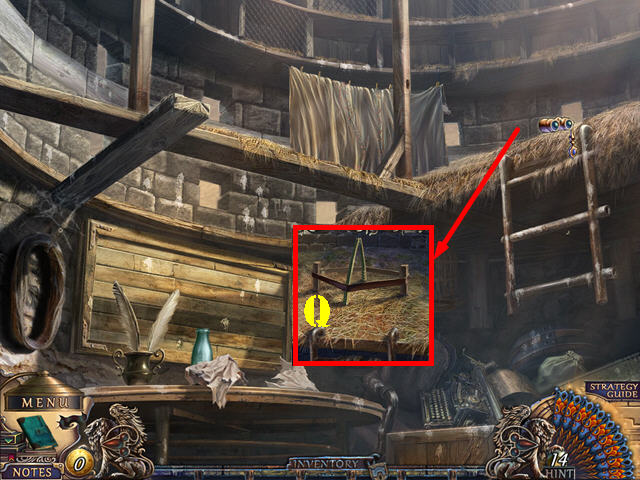
- Examine the area on the top left; put the LINEN on the wall (L).
- Examine the area above the ladder; take the SILVER DESK KEY (M).
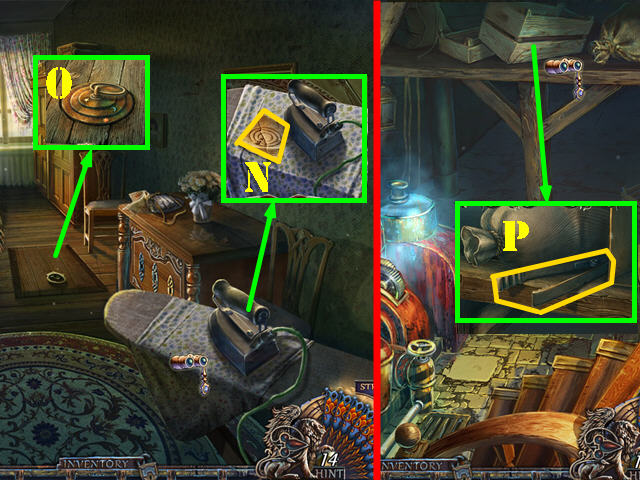
- Go back to Maria's room.
- Zoom into the ironing board; put the INVISIBLE LETTER on it. Touch the iron and take the CODE SOLUTION (N).
- Examine the hatch; put the CODE SOLUTION on it and go down the hatch (O).
- Examine the shelf; take the LAUNDRY PIN (P).
- Go back to the pigeon house.
- Zoom into the area above the ladder; use the LAUNDRY PIN on the belt; take the GENERATOR BELT (Q).
- Go back to the generator room.
- Inspect the device and put the PISTON on it (R).
- Examine the mechanism; put the BELT on it (S).
- Go forward to the wine cellar.
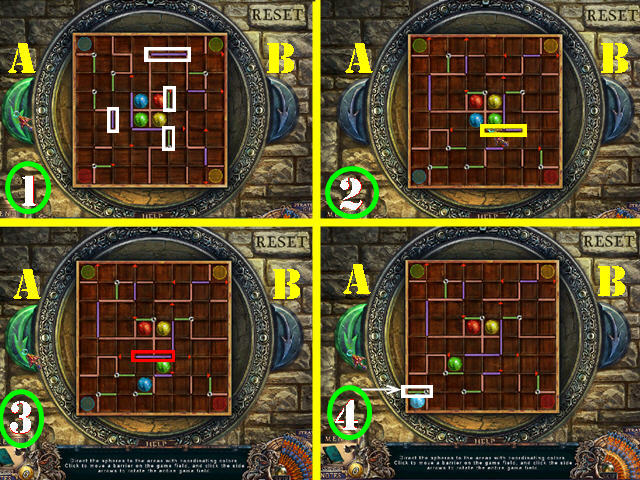
- Examine the manhole cover to access a puzzle.
- Move the spheres to the matching colored sections by use of the arrows on each side of the puzzle.
- Select the green and purple barriers to open and close them. Some of the barriers can be moved in more than one direction.
- Please follow the steps below to solve the puzzle.
- Move the barriers marked in white as shown in section 1, then press on the A arrow.
- Move the barrier marked in yellow in section 2 to the right once to drop the blue ball. Then move that same barrier to the left 2 times, to drop the green ball. Move the barrier marked in red in section 3 to the position shown and then press on the arrows in this order: A and B.
- Move the barrier marked in white as shown in section 4, then press on the arrow A x 3.
- Move the barrier marked in yellow as shown in section 5, then press on the arrows in this order: B x 2, A x 2, and B.
- Move the barrier marked in green as shown in section 6, then press on the B arrow.
- Move the barriers marked in yellow as shown in section 7, then press on the A arrow.
- Move the barrier marked in red as shown in section 8, then press on the arrows in this order: B x 3, A, and B to complete the puzzle.
- Take the first JACK PART (#).

- Look at the goblet; touch it and take the second JACK PART (H).
- Walk down.
- Inspect the box; open it and put the 2 JACK PARTS in the box and take the JACK (I).
- Go forward twice.
- Examine the coffin on the right; use the JACK on it and take the IRON DESK KEY (J).
- Examine the coffin in the center; use the JACK on it and take the LADDER (K).
- Examine the coffin on the left; use the JACK on it and take the second NET (L).
- Walk down.
- Put the LADDER over the center barrel.
- Examine the top of the barrel and remove the cover. Use the NET to retrieve the WARDROBE HANDLE PART (M).
- Walk down twice.
- Zoom into and take a closer look at the wardrobe; use the WARDROBE HANDLE PART on it (N). Turn the handle and take the GOLD DESK KEY (O).
- Zoom into the desk and put the IRON DESK KEY, SILVER DESK KEY, and the GOLD DESK KEY into the 3 keyholes (P).
- Congratulations, you have completed Grim Façade: Sinister Obsession Standard Edition!
Created at: 2012-08-03