
WALKTHROUGH MENU
- General Tips
- Level 1
- Level 2
- Level 3
- Level 4
- Level 5
- Level 6
- Level 7
- Level 8
- Level 9
- Level 10
- Level 11
- Level 12
- Level 13
- Level 14
- Level 15
- Level 16
- Level 17
- Level 18
- Level 19
- Level 20
- Level 21
- Level 22
- Level 23
- Level 24
- Level 25
- Level 26
- Level 27
- Level 28
- Level 29
- Level 30
- Level 31
- Level 32
- Level 33
General Tips
- Sprill and Ritchie: Adventures in Time has 33 levels and 52 mini-games.
- There are no timers in the game, so take your time and complete the puzzles and scenes at your own pace.
- When your cursor turns into a hand icon, it means you can grab that item and it will go into inventory.
- A sparkly area in the scene indicates an item that you need to use an inventory item on or that you need to interact with in some kind of way.
- When a magnifying glass icon appears it means you will be able to take a closer look at that particular item.
- Pay attention to what Sprill and Ritchie are saying in between scenes. Often times they are giving you clues as to what you need to do next. If you miss the dialogue, there’s no way to go back to read it.
- If you click randomly on the screen you will see the screens covered with bubbles temporarily. You will not be able to pick up items until the bubbles disappear.
Hints
- The game has unlimited hints but you have to wait until the hint button recharges before you can use it again. It recharges pretty quickly so your waiting period is minimal.
- To use a hint, simply click on the filled hint button in the lower right side of the scene. The game will automatically take off a random item off your list.
- You cannot use hints on your mini-games.
Mini-games
- There are 52mini-games in Sprill and Ritchie: Adventures in Time. The mini-games do not repeat themselves.
- Pay attention to the instructions at the beginning of a mini-game since you will not have access to them once the game has started.
- If you want to follow the instructions given in this walkthrough for any of the mini-games, click on the “close” button. Open the mini-game again and it will be automatically reset.
- You can skip a mini-game once the skip button is filled in green.
Level 1
Collect All the Food
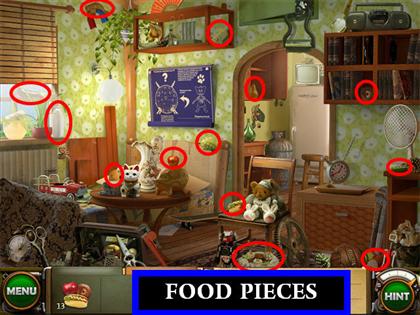
- All the food items are circled in the screenshot.
- When you click on the apple on top of the piggy bank it causes it to fall to the ground and break into pieces, scattering the coins and piggy bank parts all over the floor.
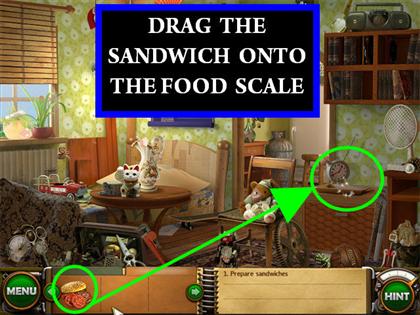
- Once all the food items have been collected, a sandwich will go into your inventory.
- Drag the sandwich from inventory and place it onto the food scale on the right side of the room.
Collect All the Piggy Bank Pieces & the Coins
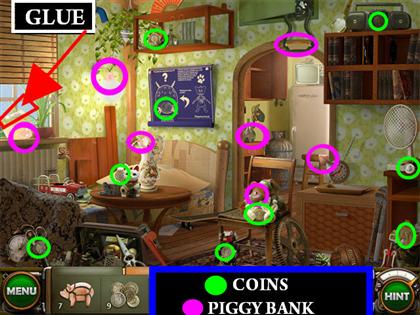
- You can only pick up the piggy bank pieces once you’ve picked up the apple on top of the piggy bank.
- The coin pieces are highlighted in green, the piggy bank pieces are highlighted in pink.
- Pick up the tube of glue by the left window.
Glue the Piggy Bank Together
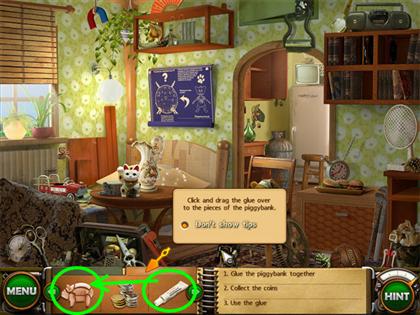
- From the inventory box at the bottom of the page, drag the tube of glue onto the piggy bank.
- Once the pieces have been glued, a mini-game will appear.
Assemble the Piggy Bank
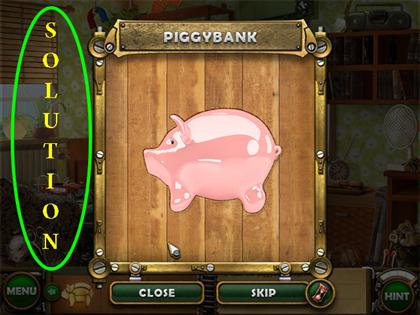
- Drag the puzzle pieces into the outline of the puzzle. Once a piece is in the right spot, it will lock itself in.
- Please look at the screenshot for the solution.
Piggy Bank & Coins
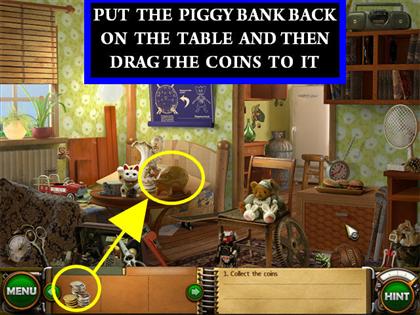
- Once the piggy bank has been assembled put it back on the table in the center of the scene.
- Grab the coins from inventory and place it on the piggy bank.
Level 2
Collect all the Parts of the Diagram
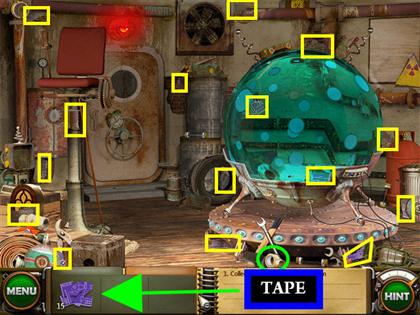
- Please look at the screenshot for the location of all the diagram pieces.
- Once all the pieces have been collected you have to tape the pieces back together.
- Pick up the roll of tape in the lower center of the scene and place it on the diagram located in the inventory box.
Put the Tape on the Diagram
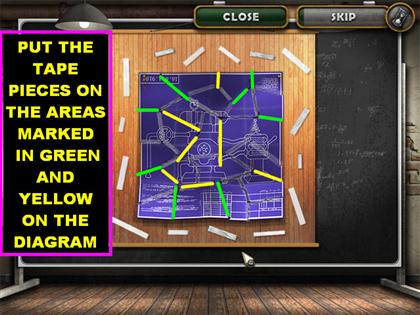
- Drag the pieces of tape to the right places on the diagram.
- You will see some faded pieces of tape on the diagram, the tape pieces do not go on there, they go on the parts of the diagram that do NOT have tape on them.
- Once a piece of tape is in the right place it will lock into place and fade into the diagram like the other pieces of tape.
- Please look at the green and yellow marks on the screenshot, they will show you where the pieces belong.
Hang the Diagram
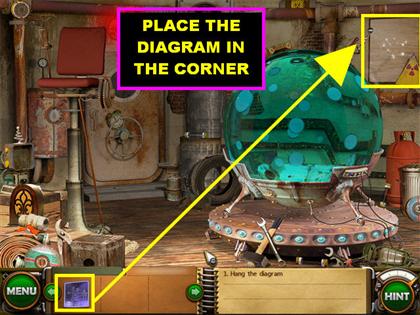
- Place the diagram on the board located in the upper right corner of the scene.
Collect the Parts of the Inductor
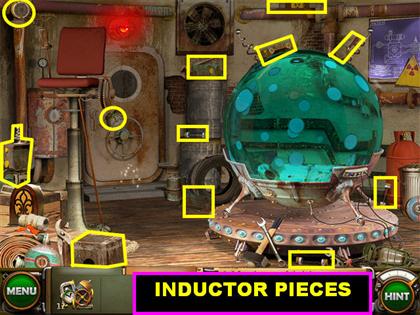
- Please look at the screenshot for the location of all the pieces.
Assemble the Inductor
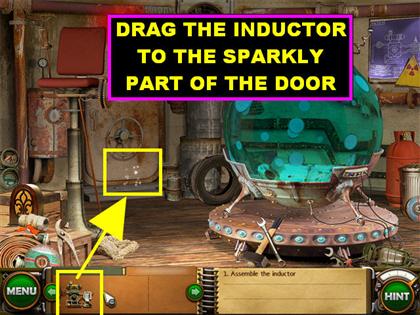
- Drag the inductor from inventory and place it on the sparkly part of the door to enter a new scene.
- Your goal is to assemble the inductor according to the diagram on the wall.
- Drag the pieces on the left side of the scene onto the lower center of the ground.
- The game will help you along by highlighting in yellow where some of the items belong.
- Place the 2 pieces that go in the outlines on the floor.
- Start from the bottom and work your way up.
- The pieces will change positions once you pick them up.
- Once a piece is in the right spot it will lock into place.
- Please look at the screenshot for the solution.
Level 3
Enter Code for Time Machine
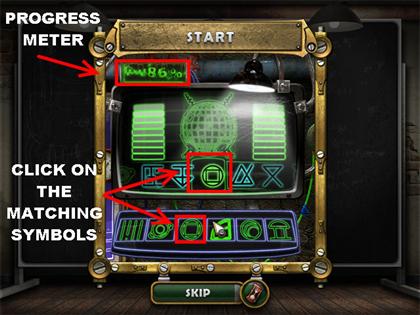
- You will see some images scroll around the screen, some are blue and others are green. Your goal is to click on the green image at the bottom of the machine that matches the green image that falls in the green square in the monitor.
- Each time you click on the correct image, a bar will light up on the monitor.
- If you miss the image the first time, you will have plenty of other chances to get it right.
Collect 13 Buttons & 18 Travel Accessories
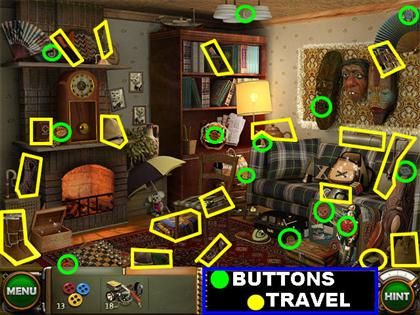
- The buttons are circled in green and the travel accessories are highlighted in yellow.
Put Buttons in Box/ Pack Travel Accessories
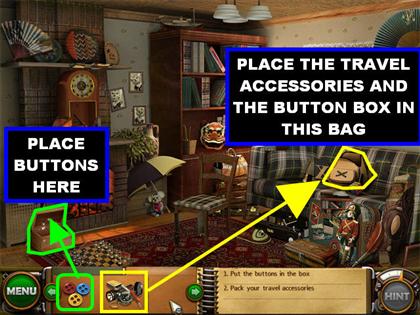
- Once all the buttons have been found, drag them to the sparkly box in the lower left side of the scene.
- Click on the box once the buttons are inside and the button box will go into your inventory.
- Place all your travel accessories in the bag on the couch.
- Then, place the button box in the same bag that has your travel accessories.
Level 4
Collect Everything Modern
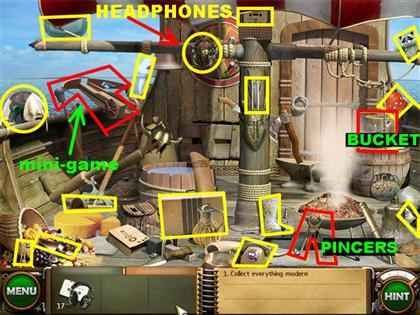
- All the modern items are highlighted in yellow in the screenshot. The inventory items are highlighted in red.
- The first 15 modern objects are highlighted in the screenshot. To find the other two you must use the bucket and the pincers.
- Click on the bucket above the barrel on the right side of the page and it will go into inventory.
- Pick up the pincers on the lower right side of the scene and they will go into inventory.
- After you click on the fourth object on the list Sprill and Ritchie will discuss getting rid of the Cracken.
- Click on the shooter on the top left side to open the mini-game.
Shoot the Cracken Mini-game
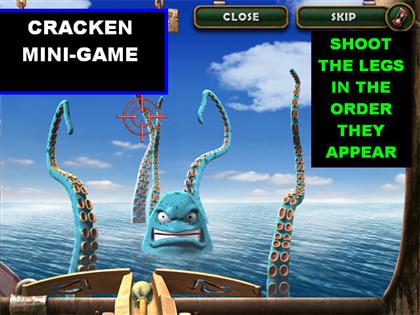
- Your goal is to shoot at the Cracken’s arms in the order in which he lifts them out of the water.
- If you make a mistake the Cracken laughs at you and shakes the screen up a bit. You will have to start that particular round over if this happens.
- Each time you shoot a set of arms correctly, a red “X” will appear in the top left side of the scene. Make several successful rounds and you will win the mini-game.
- Continue looking for all the items on the list.
Bucket & Pincer Usage
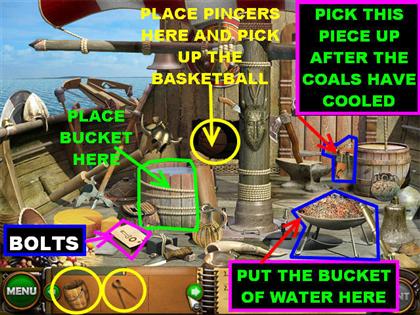
- Grab the empty bucket from inventory and place it on the barrel of water in the middle of the scene. The bucket will go back into inventory full of water.
- Place the bucket of water on the hot coals in the lower right side of the scene, the water will cool the coals down.
- Click on the red modern item that appears behind the barrel on the far right side after the coals have cooled.
- Grab the pincers from inventory and place it on the sparkly area on the back wall.
- The pincers will remove that part of the wall and a basketball will be present, click on the basketball.
- Click on the pack of bolts in the lower left side of the boat and they will scatter all over the scene.
Find Pack of Bolts & Collect the Nuts and Bolts
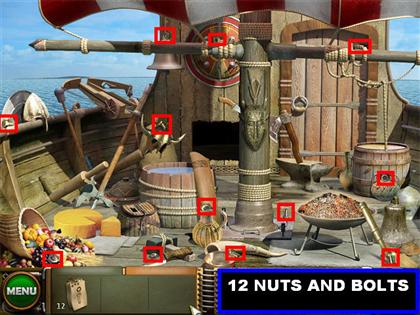
- Your goal is to find all the nuts and bolts that spilled all over the scene.
- Please look at the screenshot for the location of all the items needed.
Level 5
Collect 18 Baked Goods
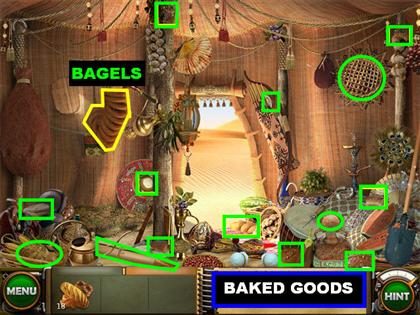
- The baked goods are circled in green.
- Click on the string of bagels in the upper left side of the scene and the bagels will scatter all over the ground.
Find 12 Bagels
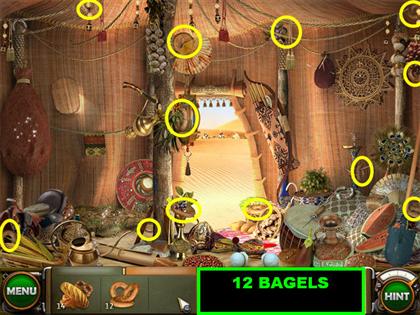
- All 12 bagels are highlighted in yellow.
Awl, Shovel & Watering Can
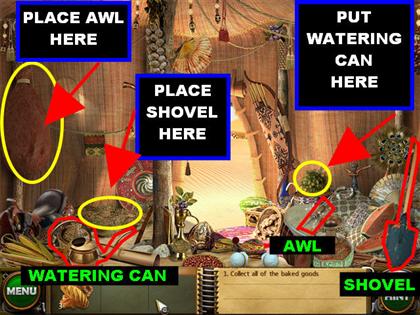
- Pick up the awl on the lower right side of the scene.
- Grab the shovel in the lower right corner of the scene.
- Pick up the watering can in the lower left corner of the scene. All 3 items will go into your inventory.
- Place the awl on the bag on the left side of the wall, the water will come out of the bag and a baked good will appear behind it, click on the baked good.
- Place the shovel on the mound of dirt on the left side of the ground, pick up the baked good that appears in the dirt.
- Use the watering can on the sparkly plant on the right side of the entryway. Click on the baked good that appears once the plant is fully grown.
Level 6
Collect Everything Modern
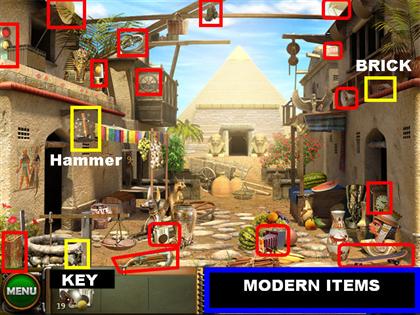
- The modern items are highlighted in red squares. Not all items are visible right away.
- Pick up the hammer on the left side of the scene, close to the clothesline.
- Grab the brick on the top right side of the scene.
- Pick up the key on the lower right corner of the scene, it is partially hidden by the well.
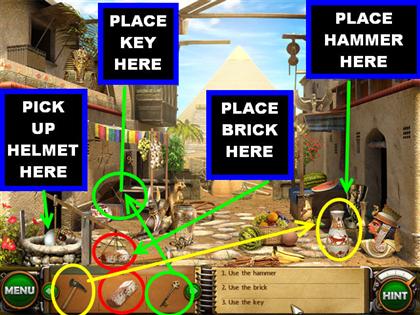
- Place the hammer on the vase in the lower right side of the scene, once it smashes, pick up the tennis ball inside.
- Put the key on the chest on the left side of the scene and grab the telescope that appears inside.
- Put the brick on the scale on the left side of the scene and grab the helmet that appears in the well.
Collect all Clothes and Shoes
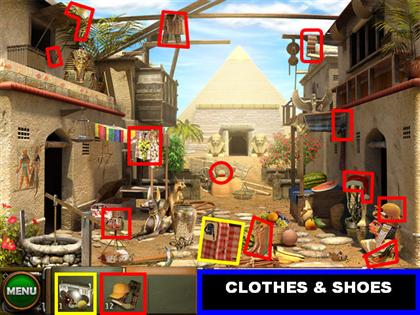
- Once you click on the helmet, a suitcase falls on the ground. Your goal is to collect all the clothes and shoes.
- The last modern item you need to collect is the suitcase that fell on the ground.
Take Photos of the Priests
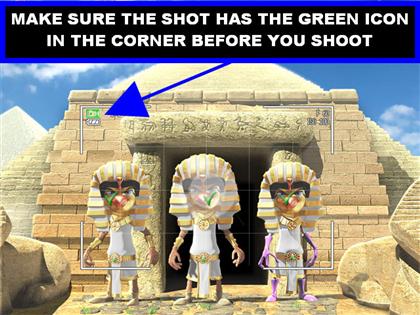
- Your goal in this mini-game is to take photos of all 3 priests looking straight ahead at the same time.
- Take 5 pictures successfully to beat this mini-game.
- Once all 3 priests are looking straight ahead, click on them to take the picture. You have to make sure that the picture is focused correctly.
- If you see a green icon in the top left side of the scene, you can shoot. If you see a red icon in the upper left side of the shot, move it until the icon turns green.
Assemble the Image
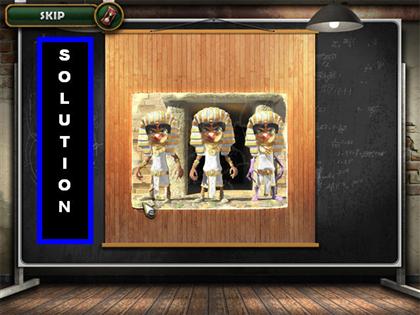
- Assemble the puzzle by dragging the pieces in the right spots.
- Once a piece is in the right place, it will lock itself in place.
- Please look at the screenshot for the solution.
Click on the False Priest
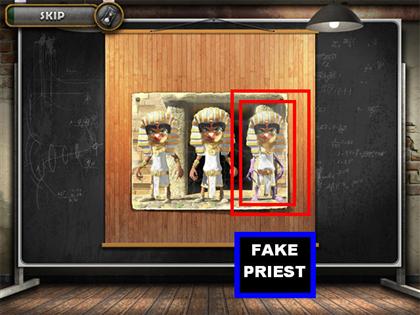
- Your goal is to click on the fake priest. The fake one is the last one, click on him.
Level 7
Collect 18 Antiques
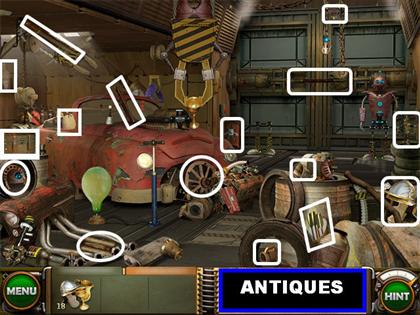
- Please look at the screenshot for the location of all the antiques.
- The first 16 items will be visible to the naked eye, the other 2 are hidden.
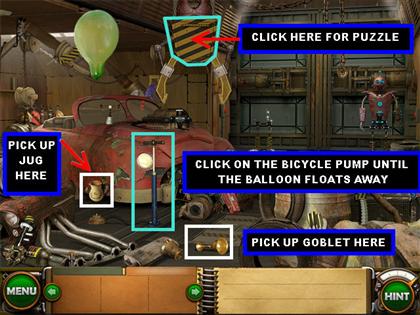
- Click on the bicycle pump in front of the car, keep clicking on it until the balloon inflates and floats away.
- Click on the vase that appears in place of the balloon..
- Click on the yellow and black striped shield above the car to open a puzzle.
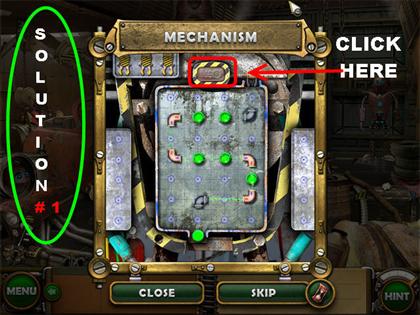
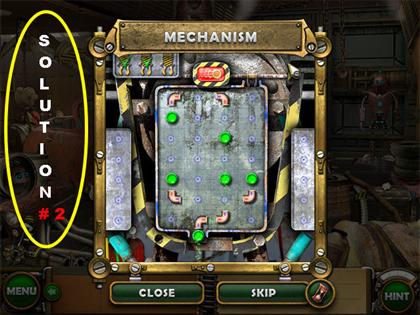
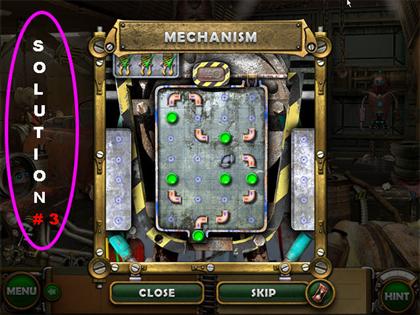
Mechanism Puzzle
- You have to light up the markers with the ball. Use the pipes on the left side of the scene to direct the ball to the way you want it to go.
- Click on the red button on top of the mechanism to release the ball.
- Please look at the next 3 screenshots for the solutions.
Mechanism Puzzle - Solution 1
Mechanism Puzzle - Solution 2
Mechanism Puzzle - Solution 3
- Pick up the gold goblet that falls on the ground once the puzzle has been completed.
Collect the Parts of the Robot
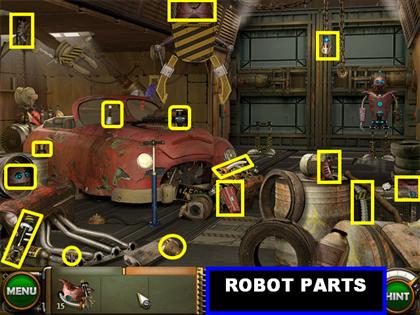
- All the parts of the robot are visible right away. Please look at the screenshot for the location of all the items.
- Click on the robot on the right for a closer view, it shows you the correct way to assemble the robot.
Assemble the Robot
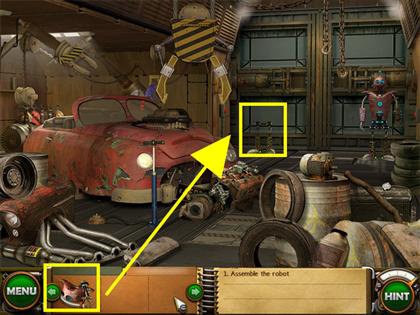
- Drag the robot parts that are in inventory onto the sparkly spot in the back of the scene to open up a puzzle.
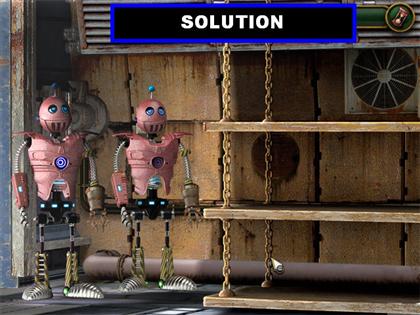
- Assemble the robot in the same manner as the robot that is already in the scene.
- The parts of the robot that are lit on the sample robot will be blue on the parts that are on the shelves. They will light up once the robot has been assembled correctly.
- Objects will change positions once you pick them up. Pick up all the items so you can see what they will look like on the robot. This will give you an idea of what to do first.
- Start from the bottom and work your way up.
- Place the piece with the 3 blue lights first. Above that piece place the silver piece that looks like a spring but has 3 black sticks above it (it looks like a stick with 2 black arms on the side).
- Now you can connect the torso part of the robot (red items).
- Before you connect the head, place the small black piece in the area where the neck would be. Now you can place the head, and then the jaw.
- Connect the arms, hands and the rest of the pieces.
- Please look at the screenshot for the solution.
- Once the robot has been assembled, the back door will open.
Level 8
Collect 18 Foods
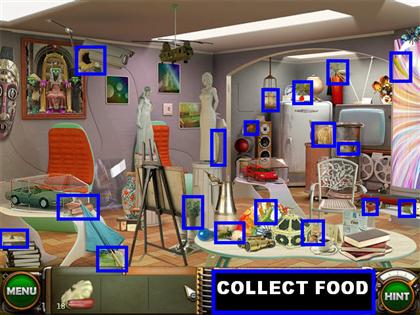
- Please look at the screenshot for the location of all the foods items.
Turn On the lights
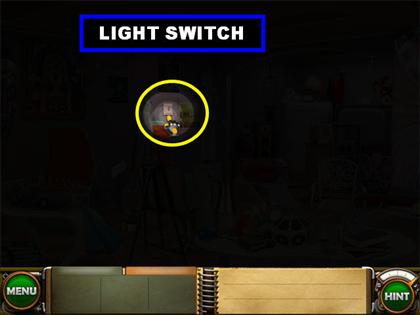
- When you first enter the scene it will be dark. Your goal is to find the light switch and turn the lights on.
- Click on the light switch and a puzzle will appear.
- Please look at the screenshot for the location of the light switch.
Wire Installation Puzzle
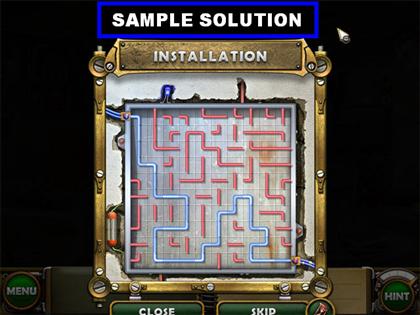
- Assemble the wires so you have pipes connecting from the upper left side of the puzzle down to the lower right side.
- This pipe puzzle is a bit different from most of these types of puzzles. You cannot move pipe pieces individually; you have to move them in groups of four.
- Hover your mouse over the pipes and you will see a light green box on the puzzle. The green box shows you which pieces you are going to move.
- There is more than one solution for this puzzle, the screenshot shows you one possible solution.
- You do not have to use all the pipes in order to complete the puzzle.
Collect 11 Glass Fragments

- Please collect all of the glass fragments according to the screenshot.
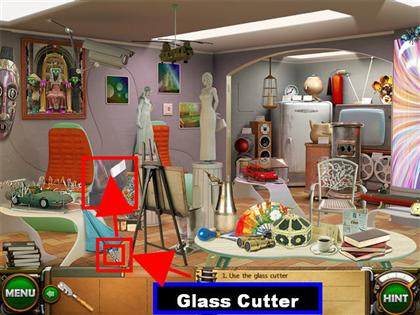
- Pick up the glass cutter in the lower left side of the scene, it is below the umbrella. The glass cutter will go into inventory.
- Use the glass cutter on the glass on the left side of the back wall to open a mini-game.
Glass Mini-game
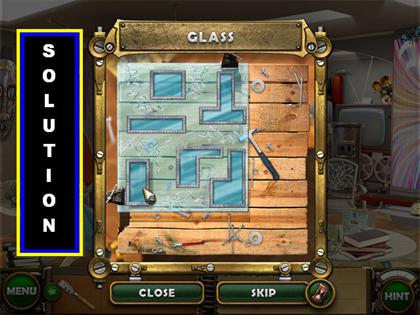
- Your goal is to place the frames on the glass without covering any cracks.
- Grab the frames that are scattered around the puzzle and place them in the right location.
- If you see a red mark appear it means that you are covering one of the cracks, or the piece is in the wrong place, either way move that piece to another location.
- Individual pieces will not lock into place when placed correctly, once all pieces are put in the right location, the puzzle will disappear.
- Please look at the screenshot for the solution.
- You will get a display case added to your inventory once this puzzle is completed.
Fix the Display Case
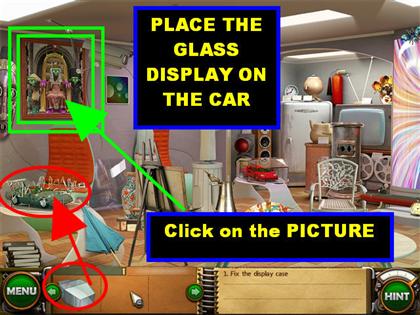
- Put the display case over the car in the lower left side of the scene.
- Click on the picture in the upper left side of the scene.
Level 9
Collect Items from the 20Th Century
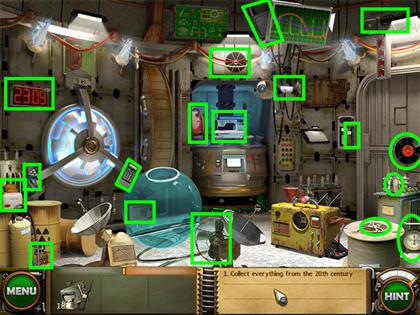
- Please look at the screenshot for the location of all the items.
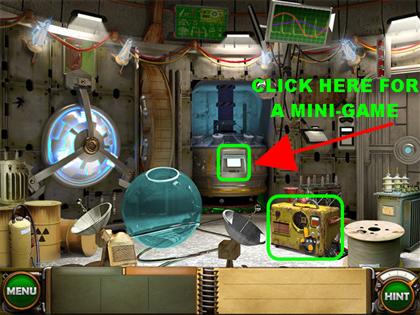
- Click on the yellow machine in the lower right corner of the scene and a message will tell you that it needs fuel.
- Click on the controls at the bottom of the large machine to open a Mini-game.
Fuel Mini-game
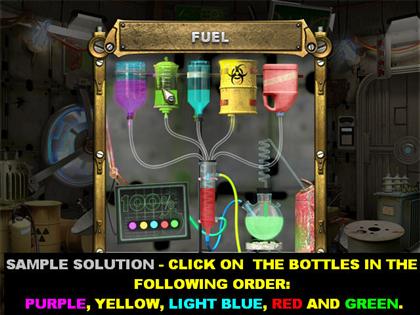
- Your goal is to add the fuels to the flask in the correct order.
- Click on one of the bottles on top of the puzzle and it will empty that liquid into the flask.
- If you clicked on the wrong liquid, the glass will not fill and you will have to start the process all over again.
- Try to remember the order in which you clicked on the liquids in case you have to start over.
- The solutions are random but here is what I ended up with. Click on the bottles in the following order:PURPLE YELLOW LIGHT BLUE RED GREEN
Adding the Fuel
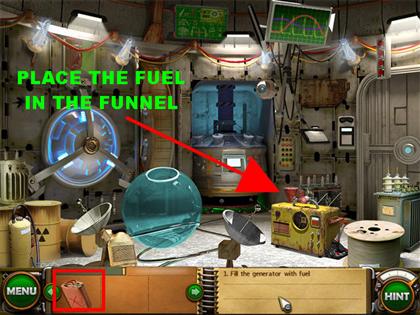
- Once the fuel has been formulated, it is time for you to add it into the generator.
- Grab the fuel can from inventory and place it on the funnel in the top left side of the generator.
- Once you add the fuel, the generator will explode, scattering its pieces around the room. You must collect all the pieces.
Collect 14 Parts of the Generator
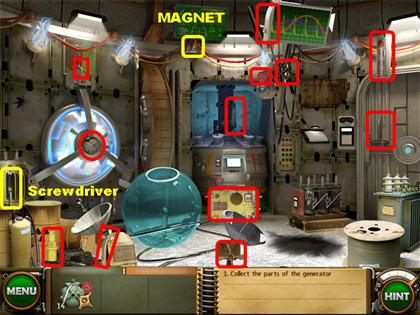
- Click on all the generator parts as indicated by the screenshot.
- Pick up the screwdriver in the lower left side of the scene.
- Pick up the magnet in the top center of the scene.
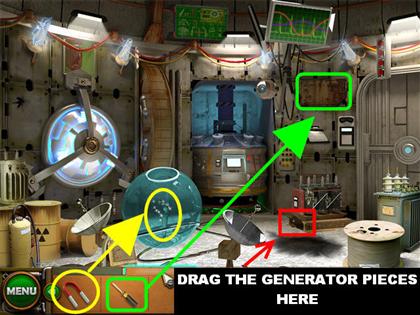
- Place the magnet on the large blue sphere on the lower left side of the scene to find one of the generator pieces.
- Place the screwdriver on the rusty panel in the top right side of the scene. Once the panel opens, click on the modern part.
Assemble the Generator – Part 1
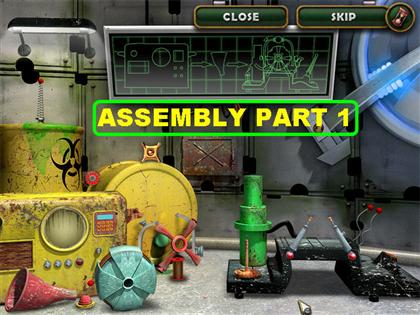
- In this scene you have to put the generator back together by using the diagram on top of the scene as a guide.
- You cannot place the cover on until the internal pieces have been assembled first.
- Please look at the next series of screenshots to see different stages of assembly.
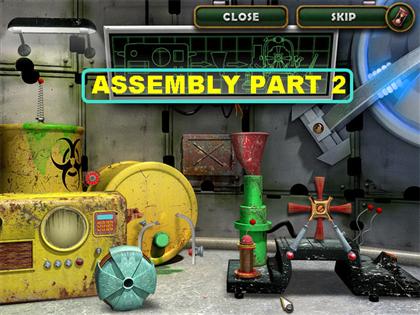
Assembly Part 2
Assembly Part 3
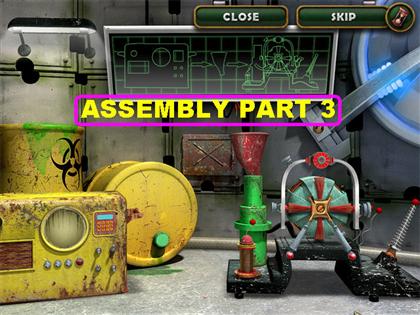
Completed Generator
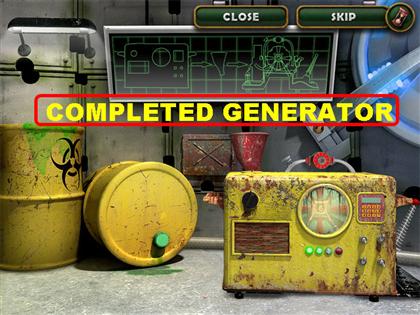
- Once the generator has been correctly assembled, you will be taken back to the main scene. Click on the generator on the floor to complete this level.
Find 15 Alien Symbols
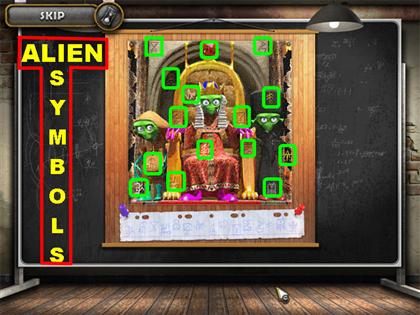
- In this scene you have to find the alien symbols scribbled all over the scene. The locations in which I found the items may be random.
Level 10
Find 18 Tools
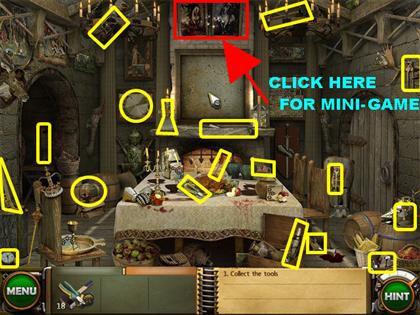
- The tools are all highlighted in yellow.
- Once all the items have been found, click on the pictures in the top center of the scene to open a mini-game.
Pictures Mini-game
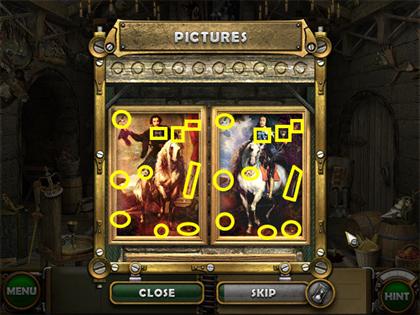
- Your goal is to find the 2 elements the 2 pictures share.
- The similar items will be in the same spot for both pictures. Once you click on one of the items, the same item in the opposite picture will be eliminated.
- Please look at the screenshot for the items they have in common.
Collect 16 Picture Fragments
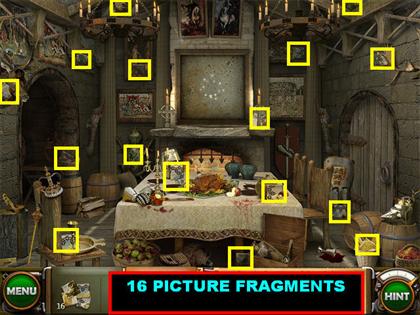
- The screenshot shows you the location of all the picture fragments in the scene.
Hang the Picture
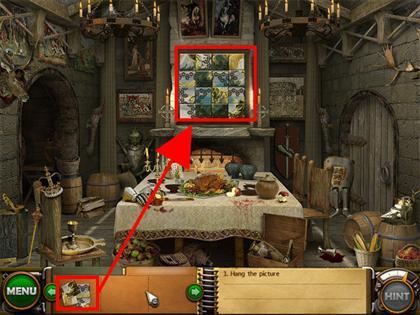
- After all the pieces have been found, drag the picture from inventory on the spot on the back wall to open a mini-game.
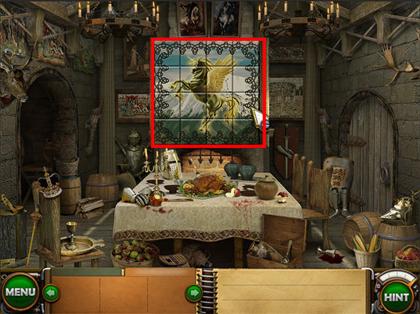
Assemble the Picture
Level 11
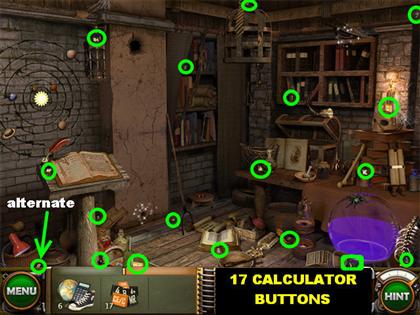
Collect 18 Modern Items

- Find all the modern items on the list.
- Once you click on the calculator on the table, the buttons for it will scatter on the floor.
Find 17 Calculator Buttons
Modern Items Continued
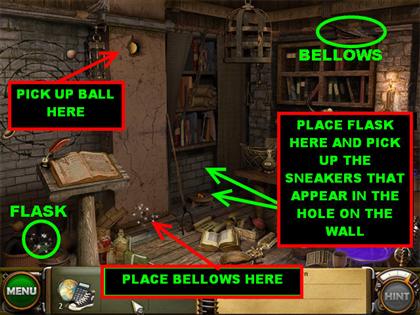
- Pick up the bellows in the upper right side of the scene. Place it on the small hole at the bottom of the left wall.
- Pick up the small ball that shows up on top of that wall.
- Click on the flask in the lower left side of the scene. Place it on the small stool that is against the back wall and part of the wall will be exposed.
- Grab the tennis shoes that appear inside the wall.
- Click on the planets on the left side of the wall to open a mini-game.
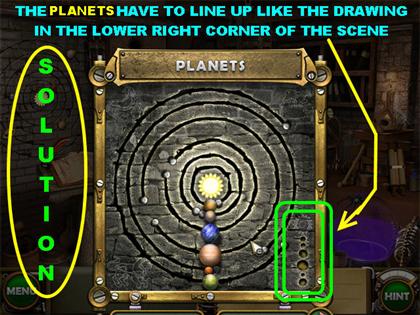
Line Up the Planets Mini-game
- Watch a Video Solution on Big Fish Games Tips YouTube Channel!
- Your goal is to arrange the planets so they are all lined up.
- When you move a planet all of the ones that are smaller will move at the same time.
- If you do not move the planets strategically, some of the planets will get stuck on the silver blockers, keeping you from moving around the pieces you need.
- Please look at the 33 second video to see a complete solution for this puzzle.
Level 12
Cover Parrot /Collect 18 Toys
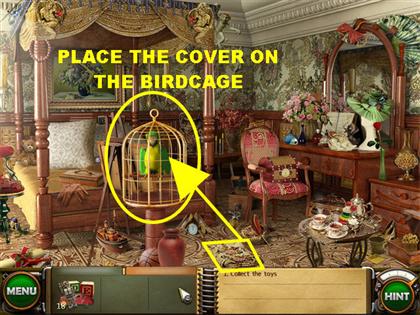
- Before you can collect any items in the scene you have to quiet down the parrot.
- Pick up the birdcage cover in the lower center of the scene and it will go into inventory.
- Grab the cover and place it over the birdcage.
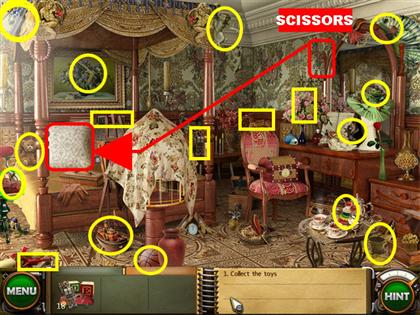
- Find all the items according to the screenshot.
- Pick up the scissors in the upper right side of the scene, behind the mirror, and place it on the pillow located on the bed.
- Once the scissors cut the pillow, click on the toy that appears inside the pillow.
Castle Mini-game
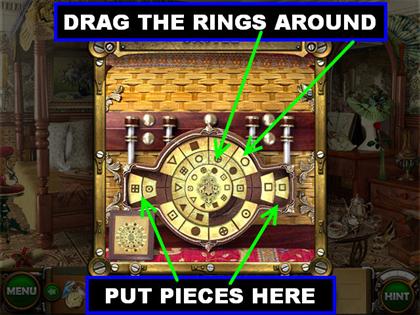
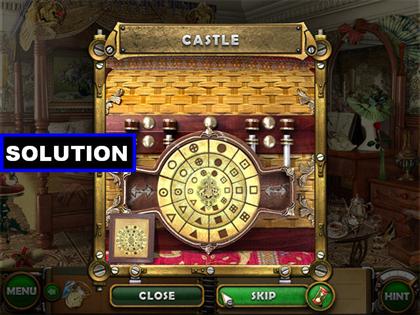
- Click on the jewelry box on the chair to open a mini-game.
- Your goal is to arrange the symbols so that all the like symbols are aligned.
Collect 10 items from Jewelry Box
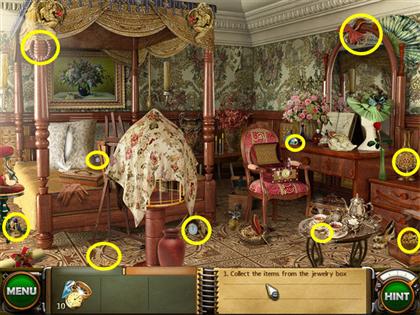
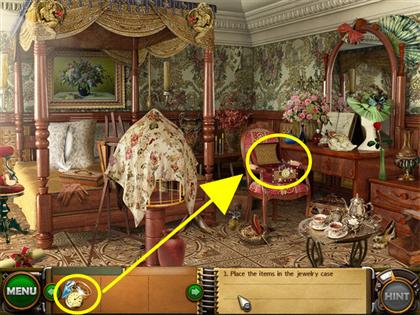
- All 10 items are marked in yellow in the screenshot.
- Once all the items have been collected, drag the items into the jewelry case.
Level 13
Collect 8 Pieces of Armor
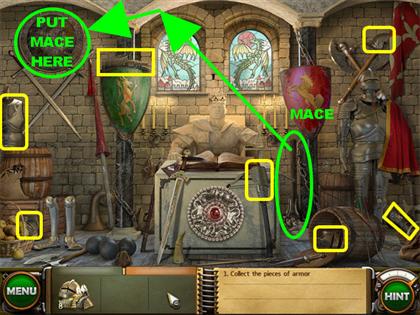
- The screenshot will show you where the first 6 items are located in the scene.
- Pick up the mace in the lower right side of the scene.
- Put the mace on the round shield on the top left side of the wall, the windows will break. Your goal is to pick up the pieces of glass that fell on the ground.
- Once the shied falls to the ground click on the last armor piece that appears on the top left side of the wall.
Collect 12 Mosaic Pieces
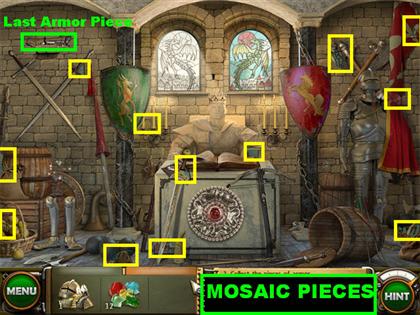
Stained Glass Window Puzzle
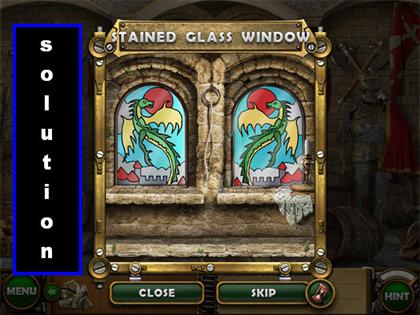
- Drag the Mosaic pieces to the clear window in the back of the scene and a mini-game will open.
- Your goal is to reproduce the image of the stained glass window on the right by reproducing the same colors as the glass on the left.
- Click on one of the colors at the bottom of the puzzle and your cursor will paint in that color.
- Place your cursor on the areas of the glass that you wish to paint.
- To change paint colors, click on a different color and place it on the piece of glass you want to change.
- The images are mirror images of each other so keep that in mind when placing the colors.
- Once you are completely done with a color it will disappear off the bottom of the puzzle.
- If you make a mistake and place the wrong color on a piece of glass, pick up a different color and repaint that spot.
- Please look at the screenshot for the solution.
Assemble the Suit of Armor
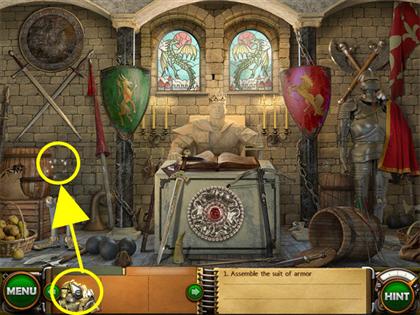
- Drag the suit of armor pieces to the lower left side of the back wall to open a mini-game.
- Your goal is to assemble the armor according to the picture in the screenshot.
- Once a piece is in the right spot it will lock into place.
Level 14
Use the Matches/ Collect 12 Fish
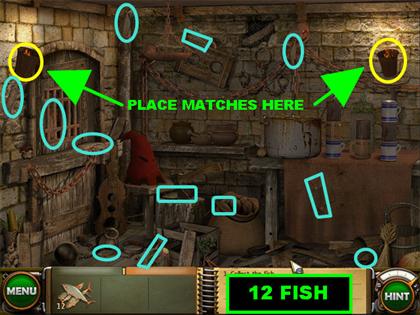
- A box of matches will automatically be added to your inventory at the beginning of this round.
- Place the matches on the torches in the upper left and right corners of the scene and the scene will no longer be dark.
- Collect the 12 fish according to the markings in the screenshot.
Collect 8 Parts of the Barrel
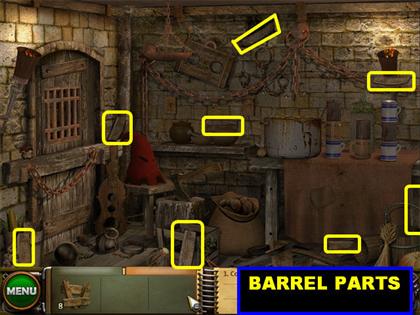
- Once you finish collecting fish, collect the 8 barrel pieces according to the markings on the screenshot.
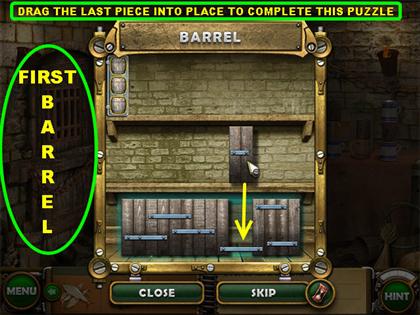
Assemble the Barrel
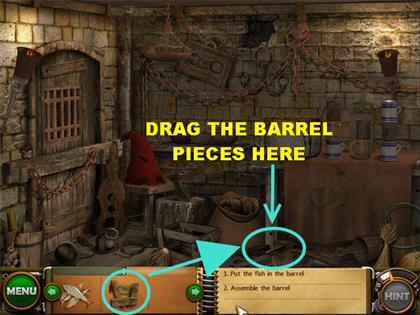
- Drag the barrel pieces from inventory onto the lower right side of the scene to open a mini-game.
- Your goal is to assemble the barrel pieces so they all fit into the green outline at the bottom of the playing field.
- You have to assemble 3 sets of barrels to complete this mini-game.
- Pieces will not lock into each other until all the pieces have been placed correctly. If one arrangement does not work, take the pieces out and rearrange them.
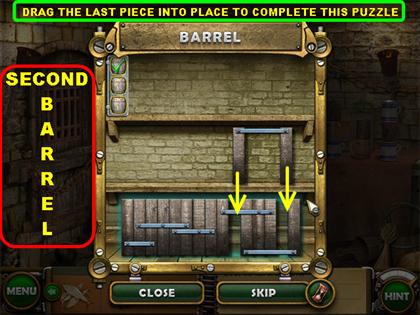
- The following sets of screenshots will show you the solutions for all three barrels. The last piece of each puzzle was not put in place so you could view the solution a bit easier.
Barrel Solution 1
Barrel Solution 2
Barrel Solution 3
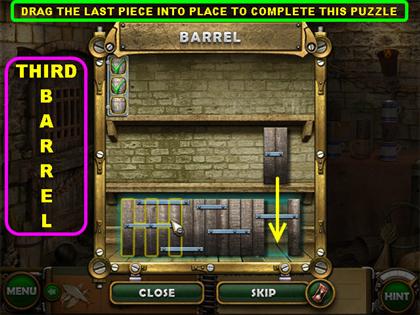
- Once the barrels have been completed, drag the fish to the barrels.
Level 15
Collect Items from the 20th Century
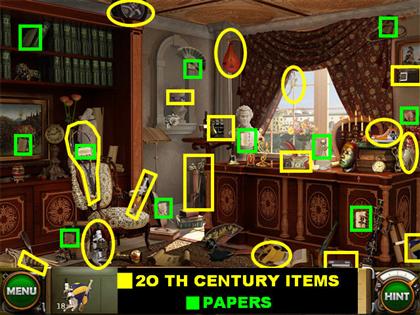
- Click on the clapboard on the wall next to the left side of the curtains and papers will scatter all over the floor, pick up all the papers.
- The 20th century items are highlighted in yellow.
- The papers are highlighted in green.
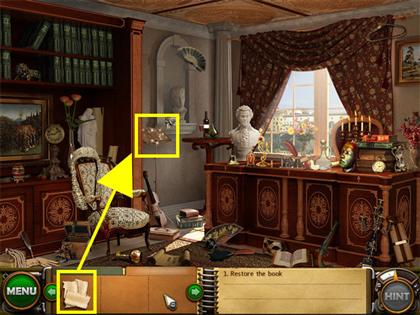
- Once all the papers have been collected place them on the sparkly book to open a mini-game.
Put the Pages Back in the Book
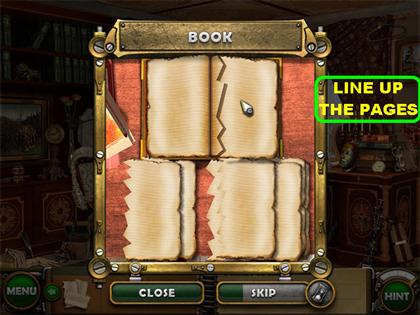
- Your goal in this game to place all the pages back in the right spots.
- Place each page next to the book until the edges match up. Correct pieces will automatically lock into place.
- Once a page is in the right place, it will turn the page to make room for the next page you need to match up.
- You can set the pages that you cannot use on the bottom left side of the playing field.
- Place 11 pages correctly to win the round, the last page cannot go into the book, it will go into your inventory instead.
Reveal the Code/ Last 20th Century Piece
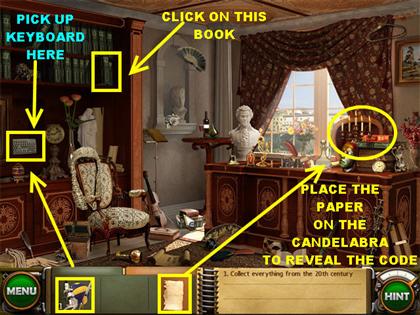
- Place the paper from inventory onto the candelabra on the right side of the room. The page will go back into inventory as a page with a code.
- Click on the book on the second shelf of the bookcase to open a secret compartment in the lower left side of the bookcase.
- Click on the keyboard in the lower left side of the bookcase to collect the last piece of the modern item.
Level 16
Collect 18 Musical Instruments
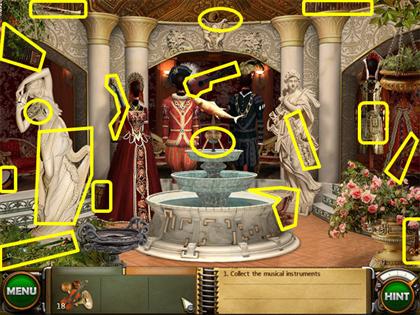
- The first 17 musical instruments are highlighted in yellow in the screenshot. In order to find the 18th piece, you must collect the pipes and repair the fountain first.
Collect 12 Pipes
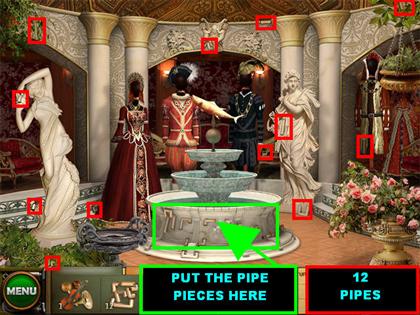
- Find all the pipe pieces according to the location on the screenshot.
- Once all the pieces have been found, drag them to the bottom of the fountain to start a mini-game.
Repair the Fountain Mini-game/ Pick up Flute
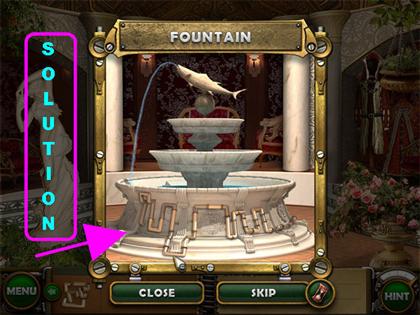
- Drag the pieces on top of the fountain to the pipes located at the bottom of the fountain.
- When a piece is in the right spot, it will lock itself into place.
- Once all the pieces have been installed correctly, water will flow from the fish on top of the fountain.
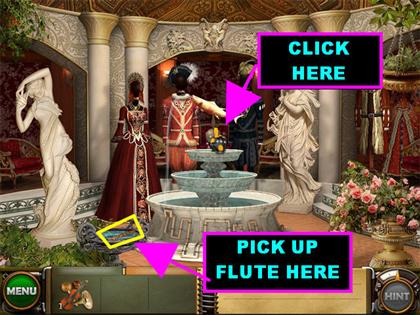
- Click on the base holding the fish and the fish will fill the small fountain in the lower left side of the scene.
- Grab the flute that appears in the small fountain.
Place the Right Hats on the Mannequins
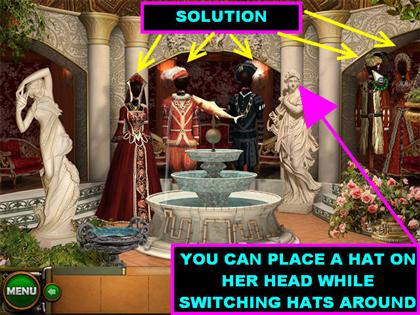
- Click on the base of the fish on top of the fountain and it will spray water on the right side of the scene revealing the last mannequin.
- Your goal is to place the correct hat on each mannequin. The mannequins are painted in black.
- You can use the head of the right stone statue to rest hats on while you switch hats around.
- Please look at the screenshot for the solution.
Level 17
Collect 13 Plate Parts
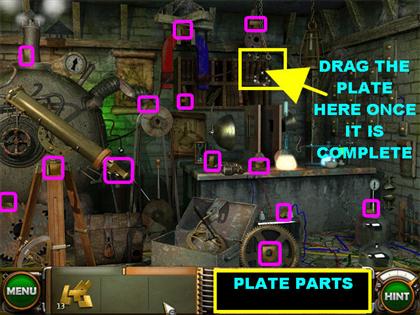
- Please look at the screenshot for the location of all the plate parts.
- Once the plates have been completed, drag them to the upper right side of the scene.
Frame Mini-game
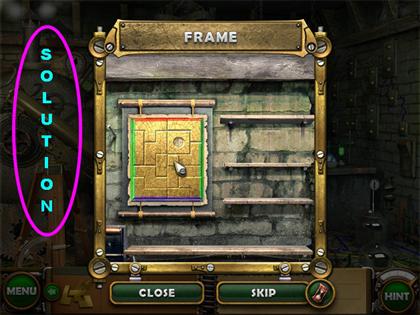
- Your goal in this puzzle is to put the projector plate back together.
- You have to place the pieces so they all fit inside the box.
- Notice the edges of the plate pieces; they have colors that match the edges of the outline of the puzzle.
- The pieces with red lines go on top and the pieces with blue lines go at the bottom.
- You have to start placing pieces at the bottom of the puzzle. If you try to place pieces on top first, they will slide down to the bottom even if they are in the right spot.
- The piece with the hole in the middle goes in the spot that has a circle.
- Please look at the screenshot for the solution.
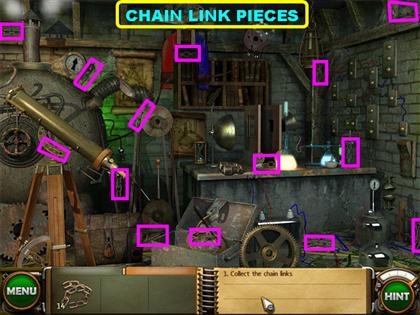
Collect 14 Chain Link Pieces
Hang Plate and Chain
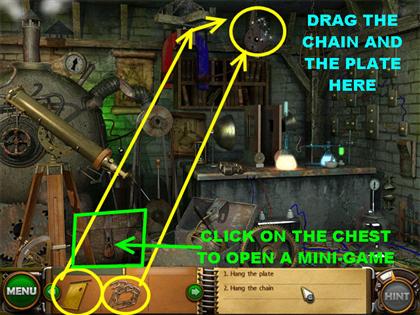
- Drag the chain to the sparkly spot in the upper right side of the scene. Then, drag the plate onto the same spot.
- Click on the lock of the treasure chest in the lower left side of the scene to open a mini-game.
Silver Ball Mini-game
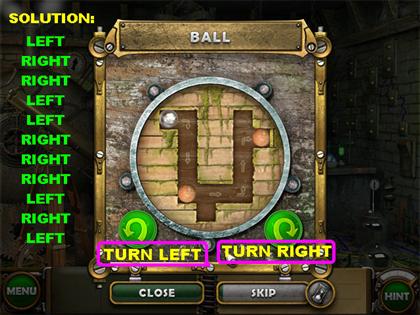
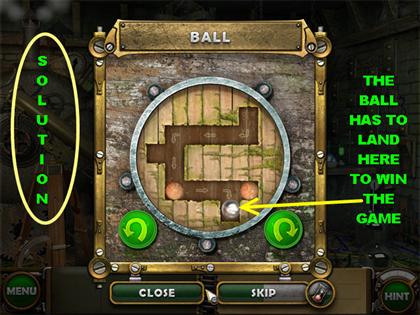
- Your goal is to roll the silver ball to the exit by turning the game board.
- Use the green arrows in the lower right and left side of the board to manipulate the ball to the exit.
- The arrow on the left makes the board go towards the left.
- The arrow on the right makes the board go to the right.
- There is more than one way to solve this puzzle, the next set of instructions describes one way to do it. Please press the arrows in the following order:LEFT RIGHT RIGHT LEFT LEFT RIGHT RIGHT RIGHT LEFT RIGHT LEFT
- If by any chance you already pressed some buttons and would like to use this solution, click on the “CLOSE” button in the lower left side to close the game. Once you return to the puzzle it will be reset and you can use the solution above.
Use the Ball
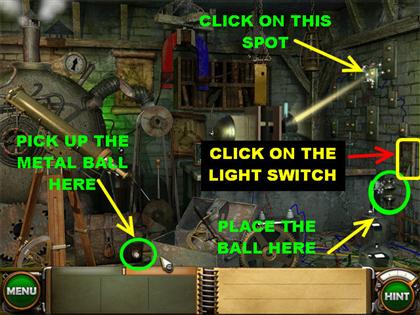
- Grab the metal ball that appears at the bottom of the chest.
- Place the ball on the sparkly spot below the light switch on the right side of the wall.
- Click on the light switch and a light will shine on one of the switches on the right side of the wall.
- Click on the spot the light is pointing to and the level will end.
Level 18
Collect 20th Century Items
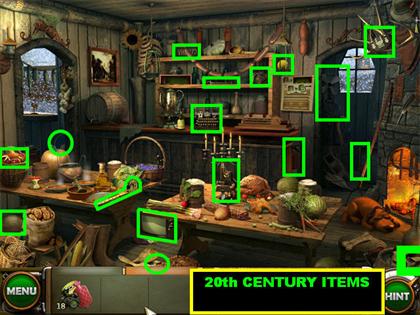
- Collect all the items highlighted in green in the screenshot.
- Click on the sleeping by the fireplace. When he wakes up he will be very angry. In order to make the dog happy you have to fix the barrel organ.
Collect the 13 Barrel Organ Parts
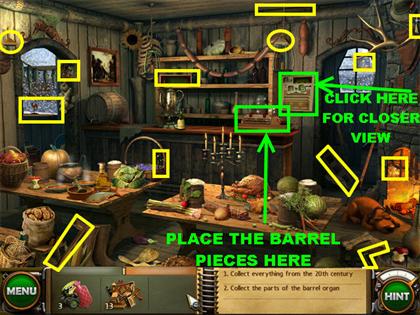
- All the barrel organ pieces are in yellow.
Assemble the Barrel Organ
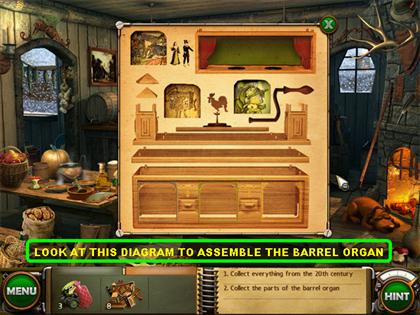
- Look at the panel on the back wall to get a closer view. This will show you the order in which the barrel organ needs to be assembled.
- Once you put the barrel organ pieces in the hotspot, you will no longer be able to get a closer view of the barrel organ assembly.
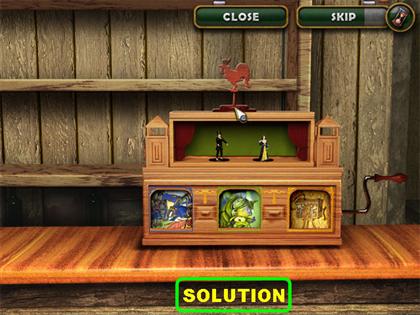
- Place the barrel organ pieces on the sparkly spot below the shelf in the back of the scene to open a mini-game.
- Your goal is to assemble the barrel pieces in the right spots.
- Please look at both screenshots for the solution.
Put the Angry Dog to Sleep
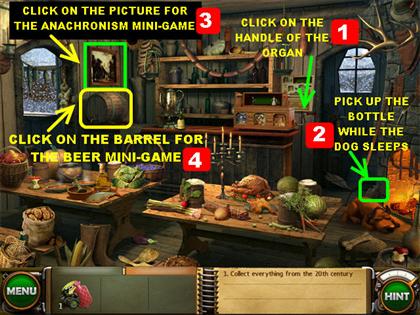
- Once the barrel organ has been assembled, click on the handle so it can play a tune.
- The angry dog will go to sleep, grab the behind the dog (close to the fireplace).
- Click on the picture on the left side of the wall to open a mini-game.
Remove the Anachronisms
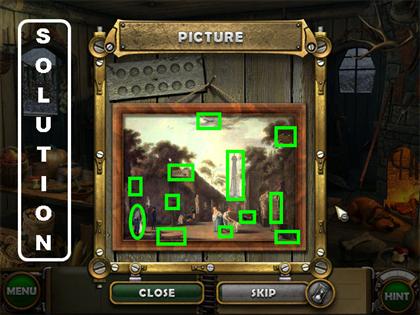
- In this section you want to remove the anachronisms in the scene. In other words, remove all the items that do not chronologically belong in this time period.
- Examples of items that need to be removed are: Stop sign, Olympic symbols, traffic light, skateboard, ladder etc.
- Remove all 12 items to win this round.
- Please look at the screenshot for the solution.
Fill Mugs with Beer Mini-game
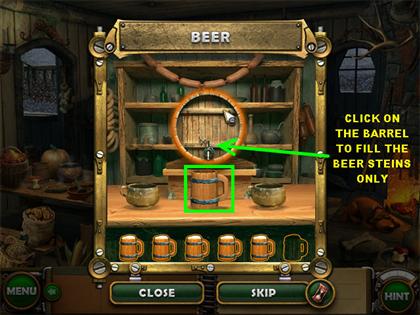
- Click on the sparkly barrel on the left side to open a mini-game.
- In this section you have to fill the beer steins with beer by clicking on the keg.
- Make sure that you fill the wooden beer steins only. You have to fill 6 steins in a row to win the game.
- If you click on the wrong type of glass it will take away one of your filled mugs for each incorrect cup you try to fill.
- The longer it takes you to fill the mugs, the faster the cups will go by.
Level 19
Collect 18 Antiques
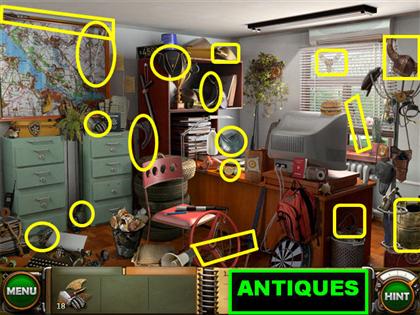
- Click on the trash can handle in the lower right side of the room and it will go into inventory.
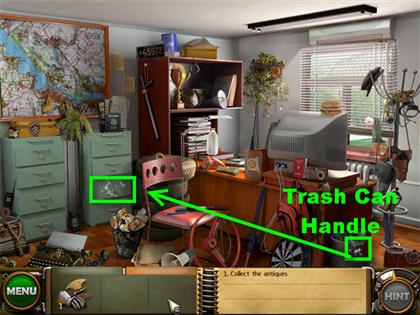
- Place the trash can handle on the drawer of the file cabinet on the right. Click on the book that is inside the drawer.
- Click on the sparkly spot on the desk to open a mini-game.
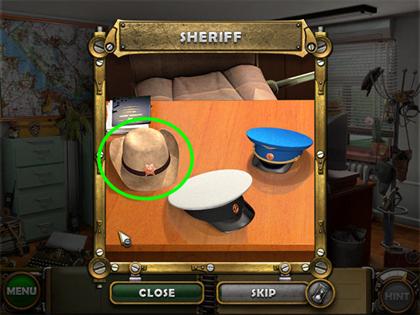
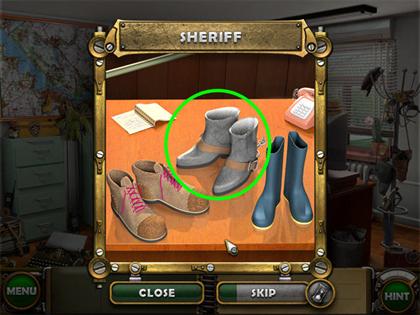
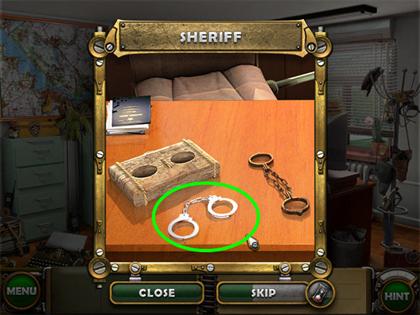
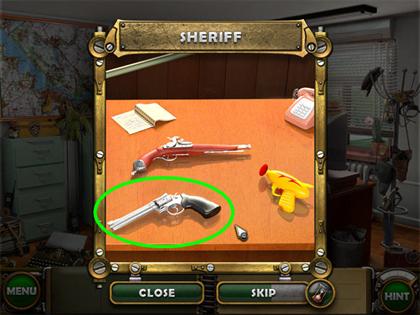
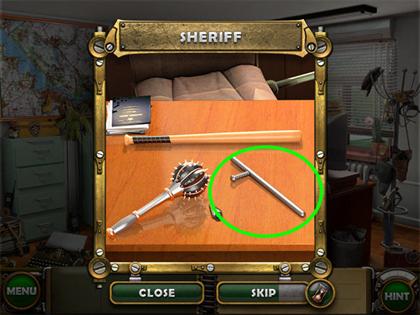
Sheriff Mini-game
- You will be given three items to choose from. Your goal in this game is to click on the sheriff’s things that appear on the screen.
- The next 5 screenshots will show you the items you need to find for each set of items.
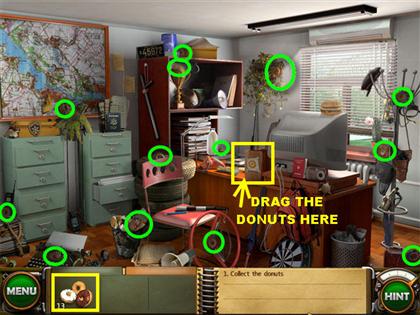
Collect 13 Donuts
Donut Mini-game

- Grab the donuts from inventory and place them on the picture of the sparkly donut on the desk.
- Your goal in this mini-game is to place the donuts in the right bag.
- As the donuts roll by, click on them and they will fall. Try to click on the donuts as they are approaching the matching bag so they can fall into the bag.
- I found it easier to just fill one type of a donut at a time, which reduced going back and forth too much.
- Once you place 5 of each donut into the bag you will win the round.
Assemble the Locator
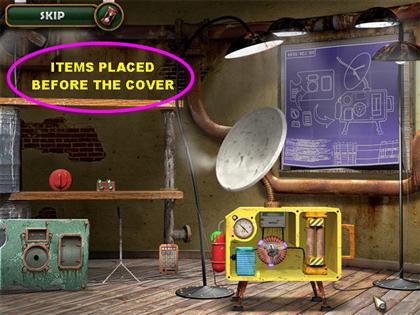
- Your goal is to assemble the locator according to the diagram on the wall.
- The first screenshot shows you the location of the pieces on the locator before the cover has been added.
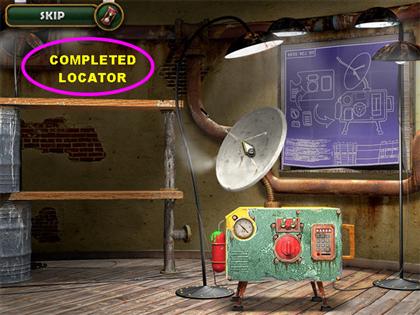
- The second screenshot shows you the locator after all the pieces have been assembled.
Level 20
Clean Up the Party
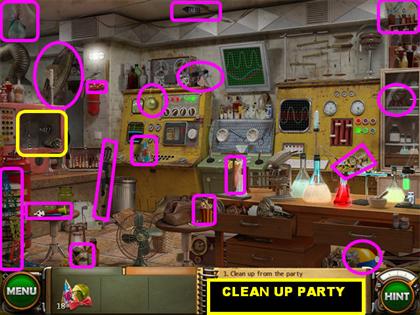
- Find all the party favors and food and drinks in the scene.
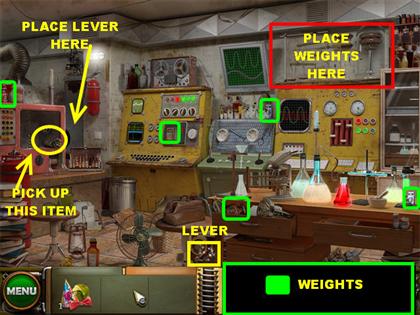
- Pick up the lever in the lower center of the scene.
- Place the lever on the red machine on the left side of the scene.
- Pull on the lever and pick up the last party item inside of the red box.
- The game will ask you to find 5 weights. The weights are highlighted in green.
- Place the weights in the upper right side to open a Mini-game.
Balance the Scales
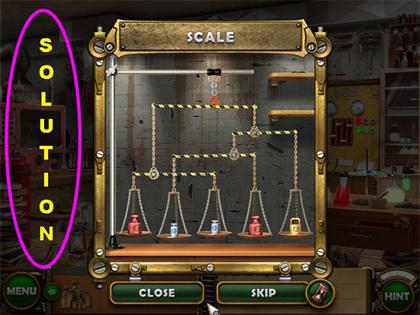
- Your goal is to balance the scales by placing the correct weights on the scale.
- Click on a weight and place it on the scale.
- If you want to remove a scale, pick it up and put it on another scale or on the shelf.
- The solution is as follows, place the weights in the following order on the scale, from left to right:RED SILVER SILVER RED GOLD
- At the end of this level the flask of fuel will go into your inventory.
Clean the Fuel Mini Game
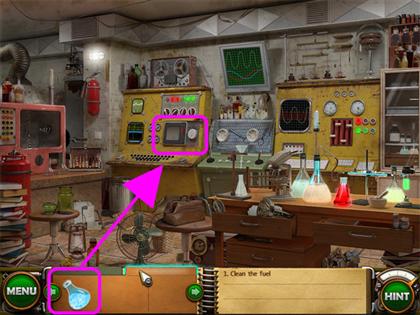
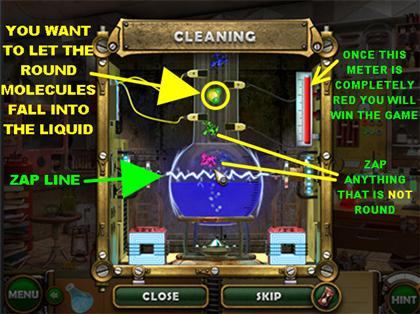
- Grab the flask from inventory and place it on the sparkly spot in the back of the room to open Mini-game.
- Your goal is to fill the flask with round molecules only.
Level 21
Collect 15 Stamps
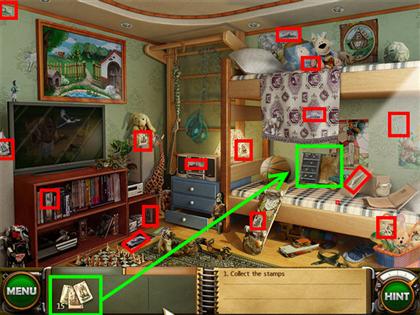
- Please look at the screenshot for the location of all the stamps.
- Once all the stamps have been collected, drag them over to the book of stamps on the bed to open a mini-game.
Stamps Mini-game
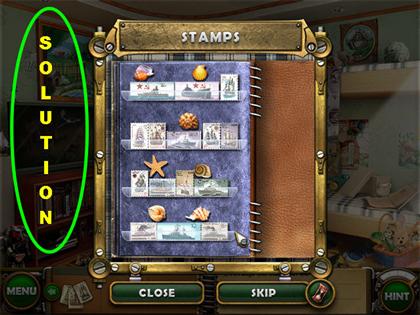
- The objective of this game is to place all the stamps on the board making sure that stamps do not touch each other or any of the shells on the board.
- If you try to put something in the wrong place, the item(s) will turn red, meaning they are touching each other.
- You can move the stamps really close together, if you see a gap in between stamps, move it so that you can barely see one.
- There are many combinations to solving this puzzle, the screenshot shows you one possible solution.
Collect 14 Animals
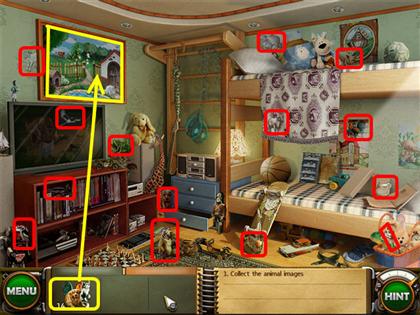
- Collect all the animals in the scene. Then, drag all the animals to the sparkly picture on the wall to open up a mini-game.
Put the Animals Back Where They Belong
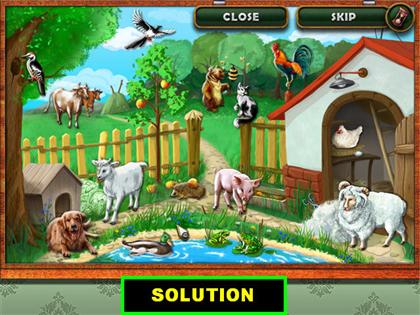
- The objective of this-mini-game is to put the animals back where they belong.
- Each black and white dot represents a spot for one of the animals.
- The animals should go next to a spot in which they belong. For example, a chicken goes with the eggs, a frog goes on a lily pad and a dog goes in the dog house.
- Animals will not stick into the wrong spots.
- Please look at the screenshot for the solution.
- Click on the statue that appears on the screen once the game is completed.
Level 22
Collect 10 Sticky Notes & 12 Tea Leaves
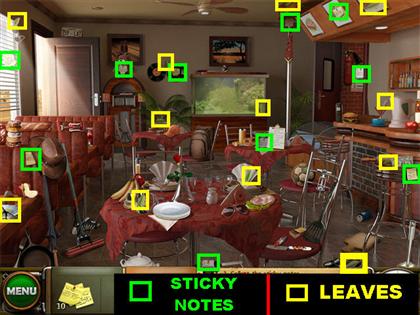
- The sticky notes are highlighted in yellow.
- Once you click on the last sticky note, you will be asked to find 12 tea leaves. The tea leaves are highlighted in green.
Use Tea Leaves and Teapot
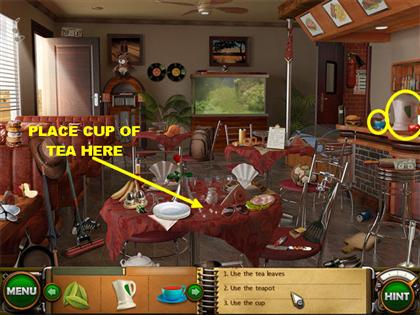
- Once all the tea leaves have been gathered, grab the teapot and the cup from the bar.
- The following two steps have to be performed in the order that is described otherwise, it will not work.
- From the inventory box, drag the teapot to the cup and you will now have a cup with water in your inventory.
- From the inventory box, drag the tea leaves to the cup and you will have a cup of tea in your inventory.
- Place the cup of tea in the sparkly spot on the table.
- Click on the aquarium to begin a mini-game.
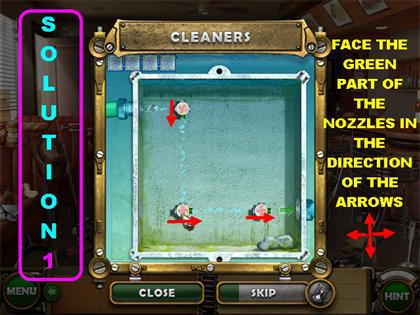
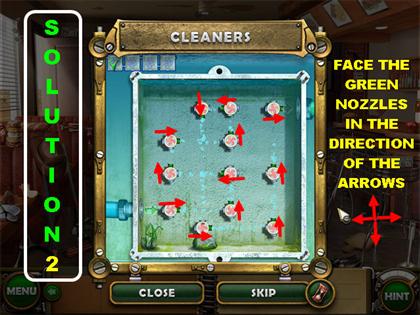
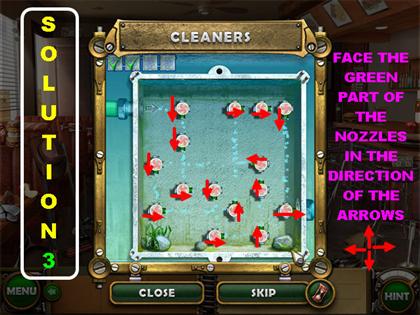
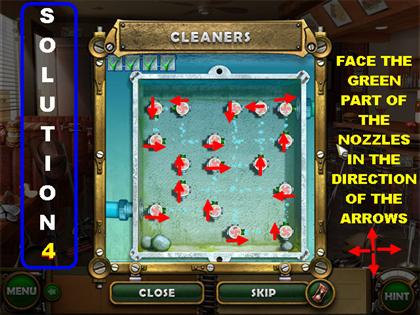
Direct Water to Filters Mini-game
- Your goal is to position the nozzles so the water flows through all the filters.
- Pay attention to the green end of the nozzles that is where the water comes out of.
- Turn the green part of the nozzles to the direction in which you want the water to flow.
- Use the arrows in the screenshots to position the direction of the green nozzles.
- There are 4 puzzles to solve in this section.
- Please look at the next set of screenshots for the solution to all 4 puzzles.
Solution 1
Solution 2
Solution 3
Solution 4
Level 23
Find 20 Footprints
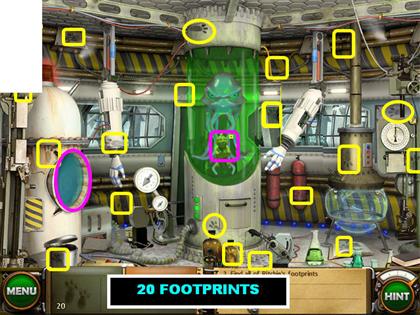
- Find the 20 footprints as shown in the screenshot.
- Click on the small green alien in the tank. Then, click on the molecule machine on the left to open a mini-game.
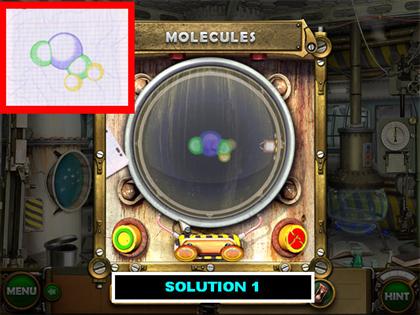
Create Molecules Mini-game

- Your goal is to recreate the molecule sketches shown on the paper.
- Click on the sketch to hide it and click on the edge of the sketch to see it again.
- Click on the green button in the lower left to drop an atom.
- Use the cannons at the bottom of the scene to move that particular atom around.
- You will notice that the atom will change shape and color as it moves around the scene.
- Stop moving the atom when it has the right color and is in the right position.
- Click on the green button when you are ready to drop the next atom. Follow the same steps as above for the remaining pieces.
- When you’ve completed the image and everything is correct, click on the green button and a new sketch will appear.
- If the image is incorrect, you may have to undo some moves so you can reposition the molecules correctly.
- To undo a move, click on the red button in the lower right corner.
- Complete three sketches to win this round. Please look at the next 3 screenshots for the solution.
Solution 1
Solution 2

Solution 3

- After the mini-game has been completed, click on the alien that appears in the drawer below the tank.
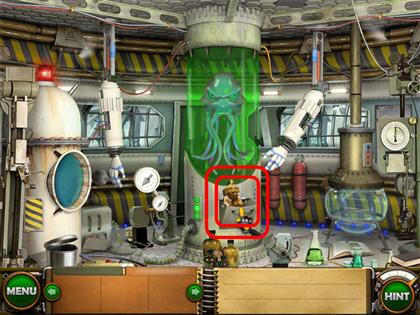
Collect 20 Tiles
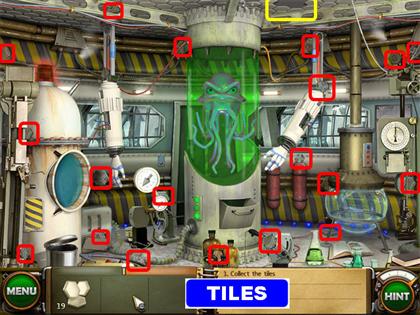
- After all the tiles have been collected, drag the tiles to the upper right side of the ceiling for a mini-game.
Tile Mini-game
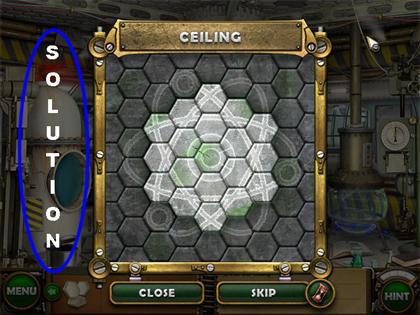
- Click on the tiles to rotate them. Please move the tiles according to the image on the screenshot.
Level 24
Collect 16 Pieces of Candy
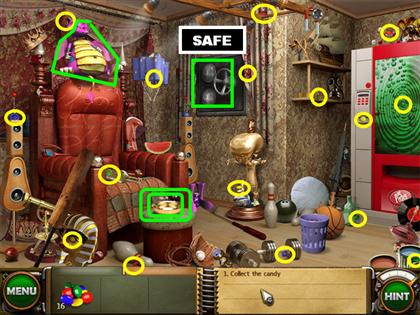
- Collect the 16 pieces of candy according to the markings on the screenshot.
- Then, place the candy on the sparkly gold bowl. Click on the bowl of candy and it will go into inventory.
- Give the candy bowl to the monster above the chair. The monster will eat the candy and will throw a sneaker on the floor as soon as it is done eating, click on the sneaker.
- Click on the safe on the back wall to open a mini-game.
Batteries Mini-game
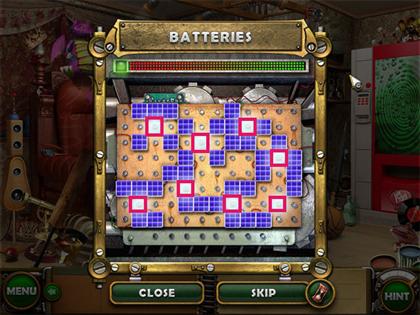
- Your goal is to arrange the bulbs so all the solar batteries work.
- Pick up the bulbs at the bottom of the panel and place them on any of the light bulb spots.
- As soon as you place a bulb a set of grids will light up.
- The meter above the puzzle measures how close you are to finishing the puzzle, the greener it is the closer you are.
- Please look at the screenshot for the solution. The pink squares represent where the bulbs need to be placed.
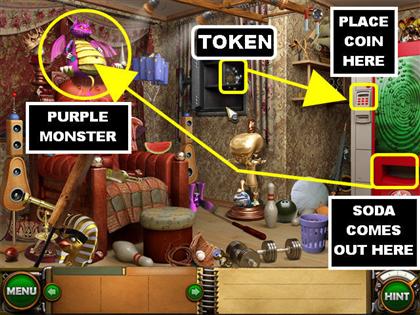
- Once the puzzle is solved, the safe will open, click on the token inside the safe.
- Place the token in the soda machine and a soda will come out of the dispenser, grab the soda can.
- Give the soda can to the purple monster above the chair and he will throw the second sneaker on the floor, click on the sneaker.
Collect 14 Soda Cans
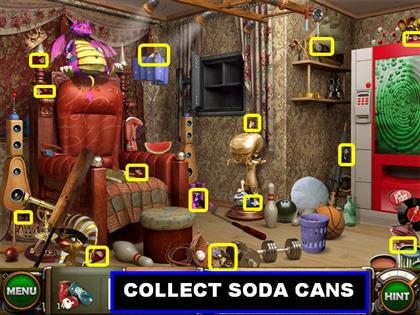
- Collect all the soda cans and place them in the sparkly trash bin on the floor.
Level 25
Collect 20 Pills
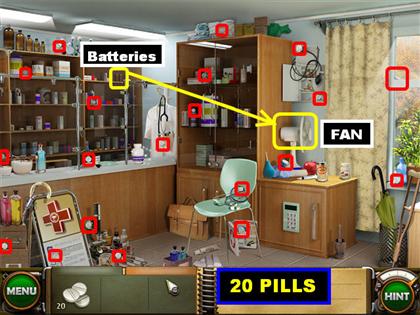
- Collect all the pills and place them in the sparkly pill bottle. The doctor will come out and ask you to find the scale.
- Grab the batteries in the upper left cabinets.
- Place the batteries on the fan close to the window. Once the fan is turned on it will knock over the bottle of capsules.
Find 19 Capsules
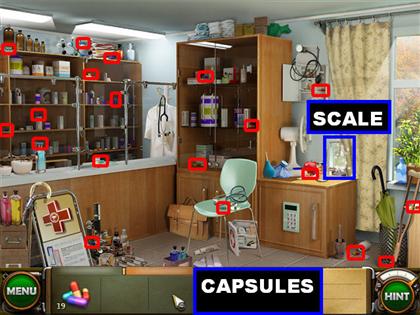
- Click on the scales that appear behind the curtain after the fan receives the batteries.
- All the capsules are circled in red in the screenshot.
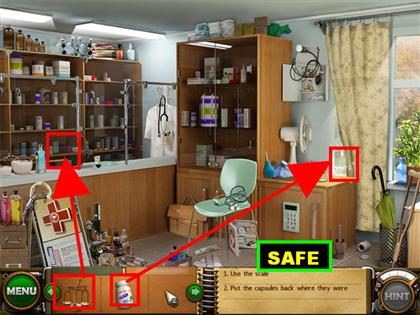
- Place the scales on the sparkly spot located on the left shelf.
- Place the capsules in the sparkly spot by the window.
- Click on the numeric padlock in the lower right corner.
Password Puzzle
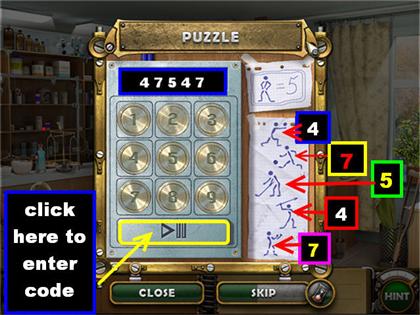
- You have to figure out a five digit code by looking at the sketches on the right.
- Each stick figure is connected in certain areas. Some figures have heads, balls or something in their hand.
- Each thing on or around the stick figure should be counted as one. On the first figure, you see two heads, a leg and a straight line form the torso to one of the legs so that counts as 4 pieces.
- On the second figure, the ball, the head, torso, 2 arms and 2 legs count as one, so the second number is seven.
- You can count the rest of the items on the other figures in the same manner.
- Enter the code 4-7-5-4-7, and then click on the button.
- Grab the bottle of syrup in the safe.
Level 26
Collect 12 packets
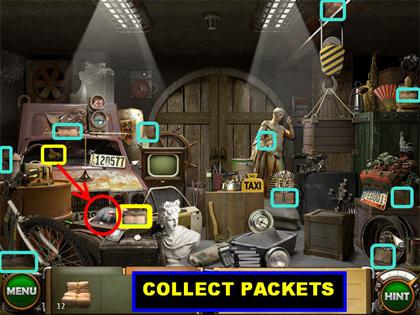
- Collect 12 packets according to the markings in the screenshot.
- You will not be able to click on the packet the rat is holding right away.
- Click on the packet in front of the rat.
- Grab the cheese on the left side.
- Give the cheese to the rat and it will let go of the packet, click on the packet.
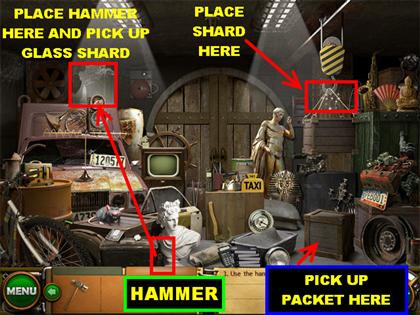
- Grab the hammer in the lower left side.
- Place the hammer on the glass in the upper left side. A glass shard will go into inventory.
- Place the glass shard on the rope being held by the hook in the ceiling. The crate will fall on the crate below.
- Grab the packet that appears on the floor.
Collect 16 Bits of Glass
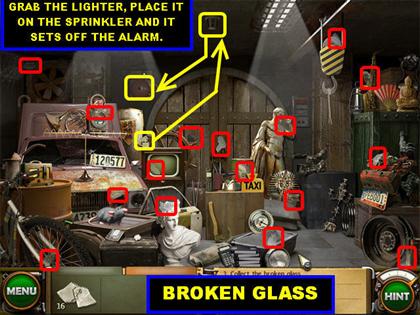
- Collect all the glass pieces.
- Grab the lighter on the car and place it on the sprinkler in the ceiling.
- Once the sprinkler goes off the alarm will go off as well.
Find Crossing Temporal Flow Currents
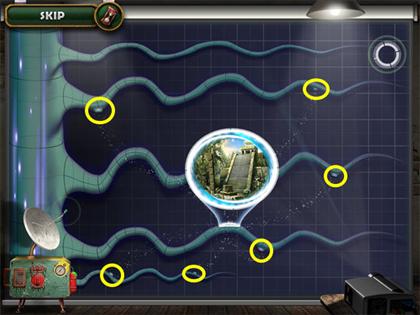
- Your goal in this game is to find the holes in the temporal flow.
- Move your mouse around the temporal flow and you will see circles appear in the spot you’re in. The more circles you see, the closer you are to finding an air current.
- If you usually keep your sound off during games, it is a good idea to keep the sound on during this mini-game. The faster the beeping, the closer you are to finding the hole.
- As soon as you see several circles, click on that spot and you will see air bubbles start flowing from the temporal flow.
- You will know the puzzle is complete when you see a picture appear in the middle of the scene.
Level 27
Collect 12 Coal Pieces
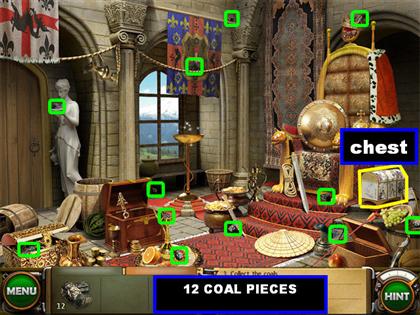
- Pick up all the coals in the scene, place them in the gold stand on the left.
- Click on the chest in the lower right side.
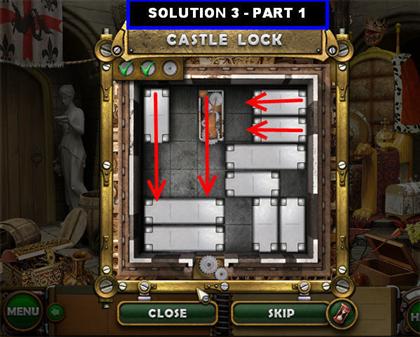
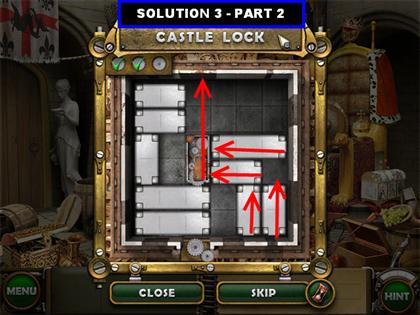
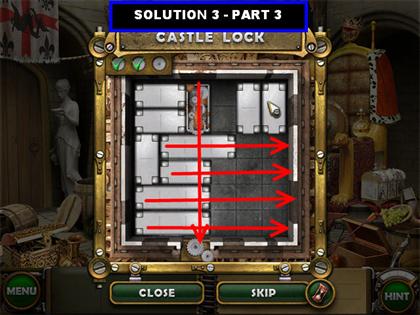
Castle Lock Mini-game
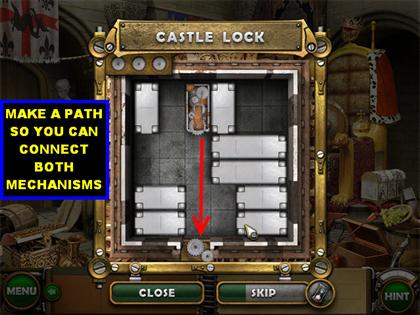
- Your goal in this puzzle is to move the lock pieces until you make a path that connects the top and bottom mechanisms.
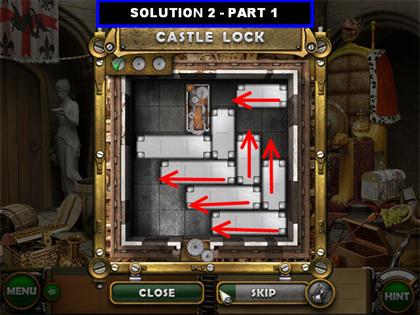
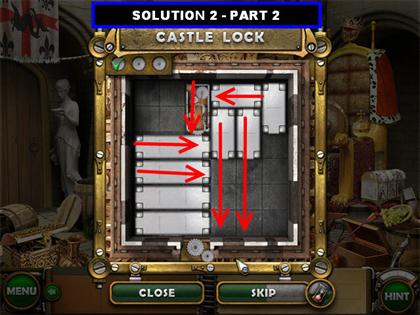
- Please look at the next set of screenshots to find the solutions for this puzzle.
Castle Rock Slider - Puzzle 1

Castle Rock Slider - Puzzle 2

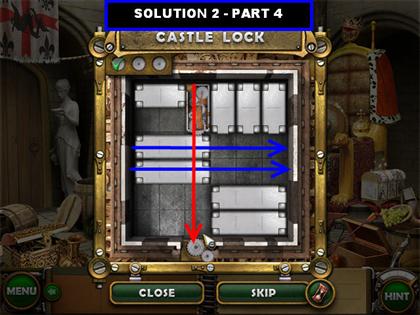
Castle Rock Slider - Puzzle 3 Solution
Collect the Butterflies
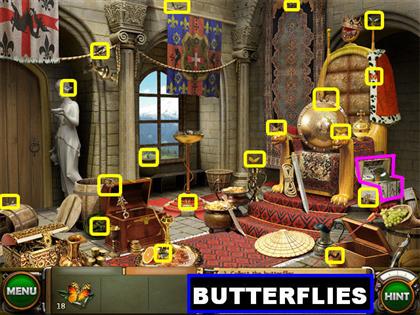
- Collect the butterflies and place them in the chest next to the throne.
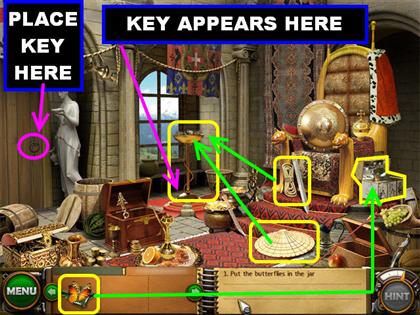
- Pick up the rope next to the throne.
- Pick up the hat on the floor, in front of the throne.
- Place the hat on the coals that are in the gold stand next to the window.
- The hat will not stay put and it lands on the basket next to the gold stand. Click on the hat so it will go back into inventory.
- Place the hat back on the coals and immediately after place the rope on top of the hat. This will ensure the hat stays in place.
- The gold stand will lift up in the air; grab the key that appears on the ground below the gold stand.
- Place the key on the lock to open the door.
Level 28
Collect Sporting Goods
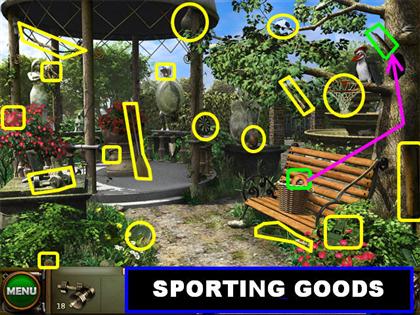
- Pick up the dumbbells on the lower left side and the statue will break.
- Click on the basketball net and the woodpecker will not let you pick it up.
- Pick up the bagel in the basket on the bench and place it on the branch that is sticking out of the tree behind the woodpecker.
- Grab the basketball net as soon as the woodpecker turns around to look at the bagel.
Collect Statue Fragments
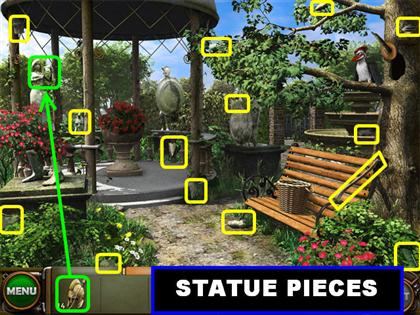
- Collect all the statue fragments and place them next to the female statue on left.
Assemble the Statue
- The first screenshot shows you the first 8 pieces that need to be placed. You have to start at the bottom of the statue and work your way up.
- Pieces will lock into place when they are in the right spot.
- The second screenshot shows you the completed statue.
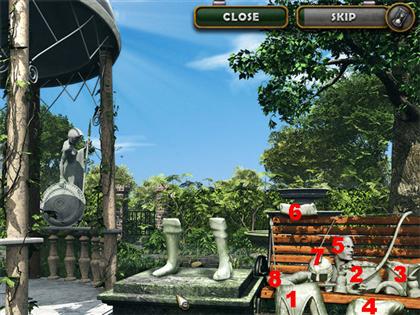
Level 29
Find Seashells
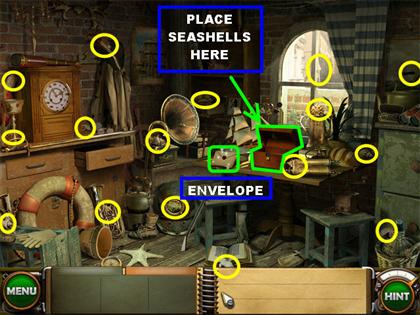
- Click on the sparkly letter on the table.
- Collect all the seashells in the scene and place them in the sparkly chest on the table.
- Click on the half picture the aliens left behind on the table.
- Click on the clock on the left, Sprill and Ritchie tell you to figure out how to open it.
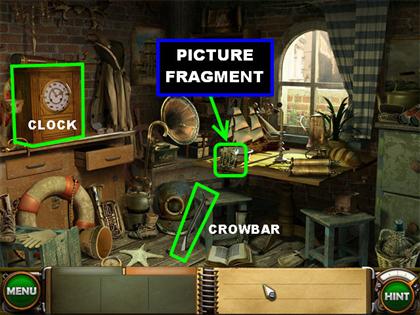
Roman Numerals
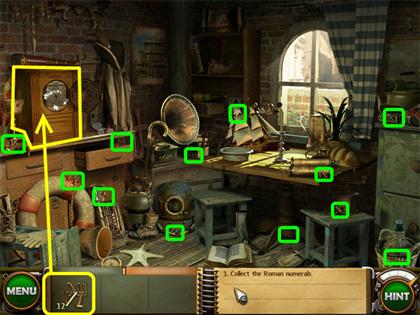
- Grab the crowbar in the lower center and place it on the large clock on the left.
- Collect all the Roman numerals in the room and place them on the clock to open a mini-game.
Clock Mini-game
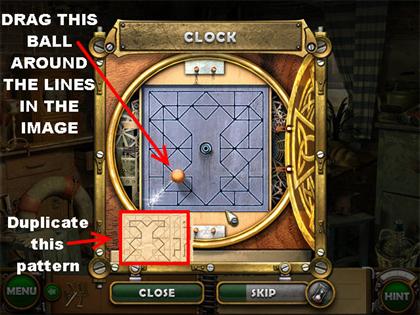
- Your goal is to move the ball around the puzzle in the same manner as the picture at the bottom of the puzzle.
- If you make one wrong move the ball will go back to the starting line.
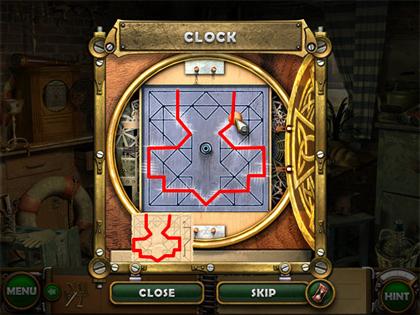
- Please look at the next 3 screenshots for the solutions.
Solution 1

Solution 2
Solution 3
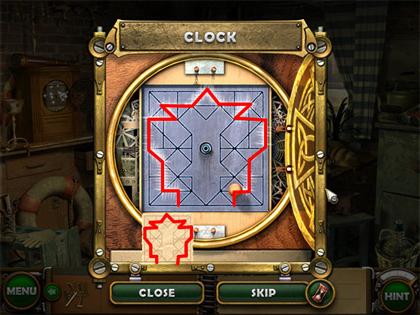
- Once the clock puzzles have been solved a picture fragment will appear at the bottom of the clock, pick it up.
Find the Differences

Level 30
Collect 20th Century Items – Erase the Modern Images
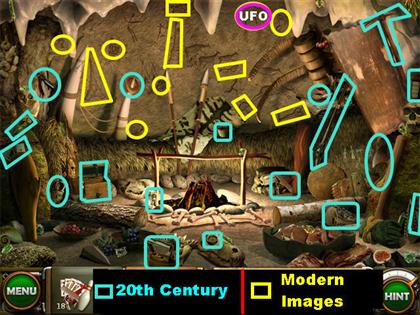
- The 20th century items are circled in blue.
- The modern items from the wall are in yellow.
- When you try to erase the UFO you will not be able to do it. Collect all the other items on the list.
Collect Crystals
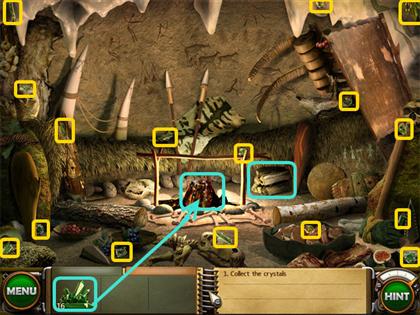
- Collect all the crystals and place them in the fire.
- Grab the firewood on the right and place it on the fire as well.
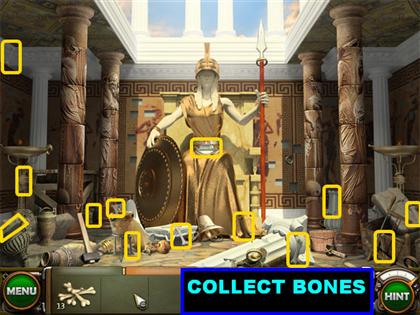
Level 31
Collect the Bones
Arrange the Columns

- You have to rotate the column pieces until they form a complete image.
- There are 2 columns in the scene, click on them to rotate them.
- The pieces at the top and bottom of the columns cannot be moved, use those as a frame of reference.
- Once a column has been arranged correctly, you will not be able to rotate the individual pieces.
- Please look at the screenshot for the final solution.
Collect Bracelets
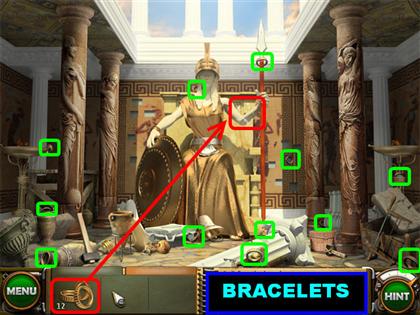
- Collect all the bracelets and place them on the right arm of the large female statue.
Level 32
Collect 12 Tiles
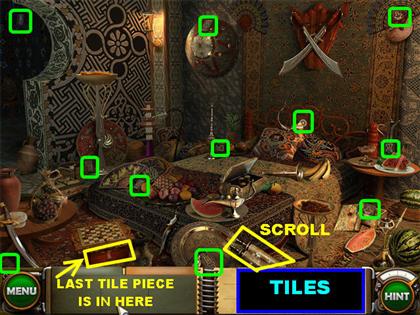
- Click on the scroll in the lower center.
- Look for the tile pieces. The game will only let you pick up the first 11 pieces.
- Click on the chess set in the lower left and grab the last tile piece. When you click on the chess set, the chess pieces will scatter all over the room.
Collect Chess Pieces
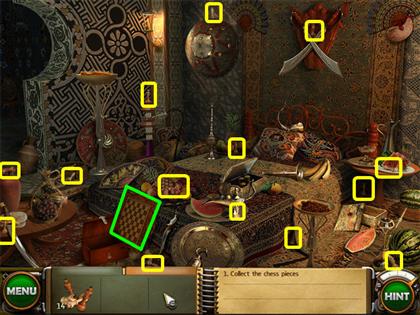
- Grab the chessboard next to the bed and it will go into inventory.
- Place the chessboard on top of the chest, and then place the chess pieces on top of the board.
Chess Pieces Mini-game
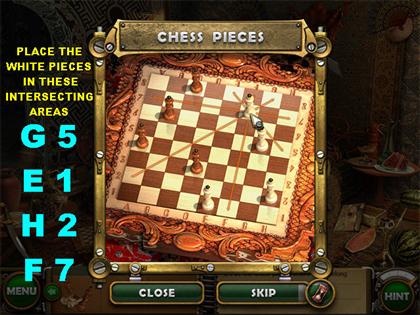
- Your goal is to arrange the white queen pieces so none of them are on the same vertical, horizontal or diagonal line.
- Grab one of the white queens and drag them around the board. The game will show lines which lead to all the areas they touch.
- Place the white pieces in the following intersecting areas:G5 E1 H2 F7
Level 33
Collect Plank Pieces
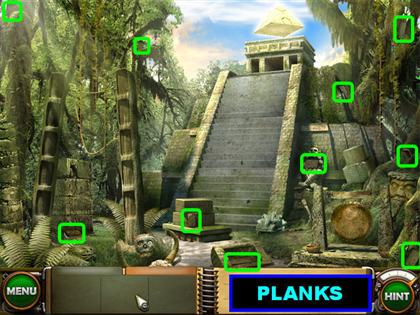
- Click on the left column and you will be asked to collect the plank pieces.
- Gather all the plank pieces and place them on the columns on the left.
Plank Mini-game

- Click on the columns and compartments will open up. Your goal is to find the matching symbols and click on them one after the other.
- When two matching pieces have been found the compartment will stay open.
- Find all 5 matches to win the round.
- Please look at the screenshot for the solution. The matching pieces are highlighted in the same color.
Collect the Runes
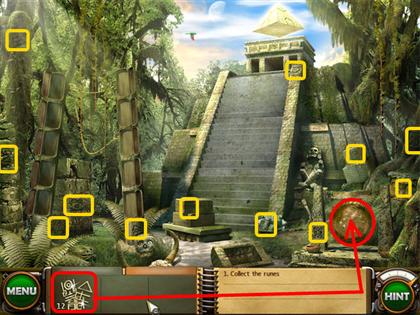
- Collect the runes and place them on the gong on the right to open a mini-game.
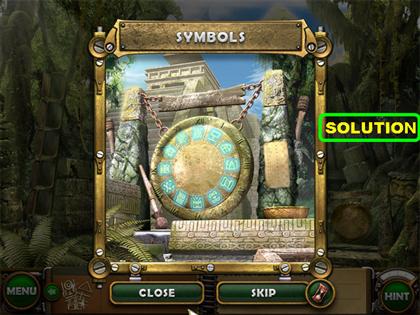
Arrange the Symbols Mini-game
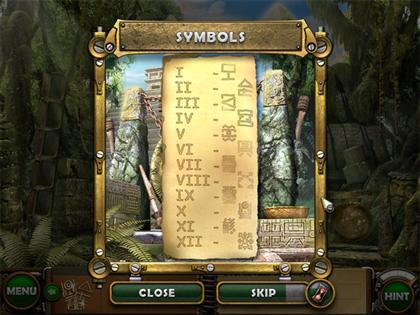
- Your goal is to arrange the symbols according to the images on the stone table.
- Click on the stone table on the right to get a closer view. The numbers on the table will show you where each symbol needs to be placed.
- Find the pieces you need on the rocks that surround the puzzle. Click them onto one of the slots in the middle.
- Once a piece is in the right spot it cannot be moved. Pieces that are placed incorrectly will not stick and will go back to their original spot.
- Please look at the screenshot for the solution.
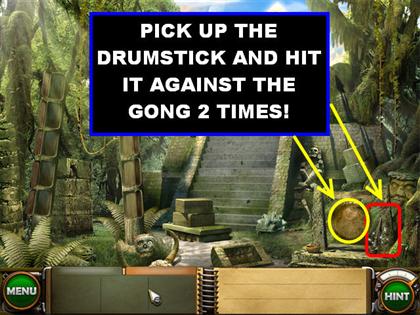
- Pick up the drumstick in the lower right corner and place it on the gong twice.
Created at: 2009-08-28