

Walkthrough Menu
General Tips
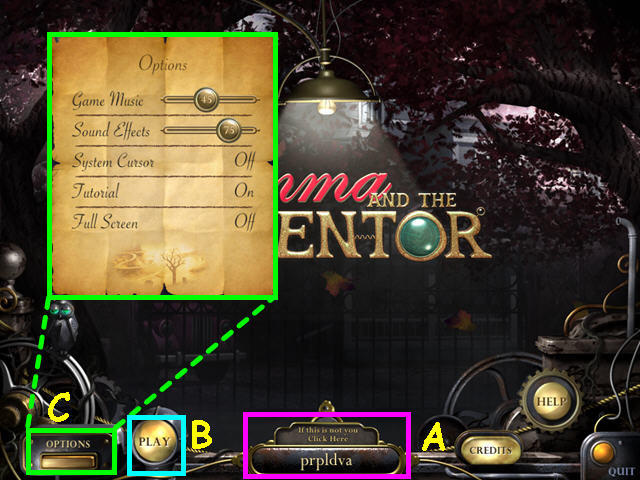
- Click on 'If this is not you click here' on the main screen to add or delete player profiles (A).
- Select 'Play' to begin or continue your game (B).
- You may play this game in full screen or windowed mode by changing the settings in the Options menu (C).
- You may adjust the volume of effects and music in the Options menu.
- You may also revert to the system cursor from the Options menu.
- The Options menu is accessible from both the main screen and the in-game menu.
- The best way to use this walkthrough is by clicking on the 'CTRL' and 'F' keys on your keyboard to simultaneously bring up a search box.
- Type the keyword into the search box at the bottom of your screen and click on 'NEXT' to find the section you need help with. Clicking 'NEXT' again will bring up all instances in which that keyword was mentioned in the guide.

- Hints are unlimited, but you must wait for the meter to re-fill (D).
- A hint will show an item in a Hidden Object scene, and will point you in the general direction of where you need to go outside the Hidden Object Scenes (E).
- Your inventory is in the bottom panel (F).
- Click on the 'Tray' button to view the parts and fuel inventory (G).
- You will not need this until the end of the game.
- Select the 'Help' button for an overview of the cursors and controls (H).
- Click the menu button to access the settings menu (I).
- Select the journal to view diagrams, combinations and other clues you collect (J).
Chapter 1
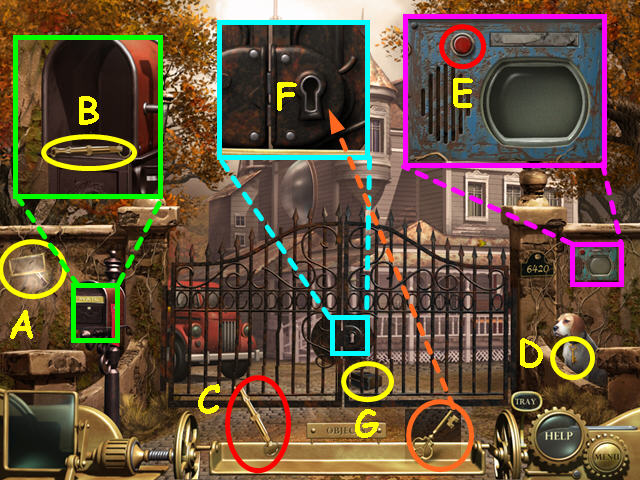
- Take the magnifying glass (A).
- Look at the mailbox and take the WHISTLE (B).
- Click on the WHISTLE in your inventory to call the dog (C).
- Take the KEY from the dog (D).
- Look at the intercom and press the red button (E).
- Look at the lock on the gate and use the KEY (F).
- Take the strange radio after you open the gate- this will now give game hints (G).
- Walk forward to the house for a Hidden Object Scene.

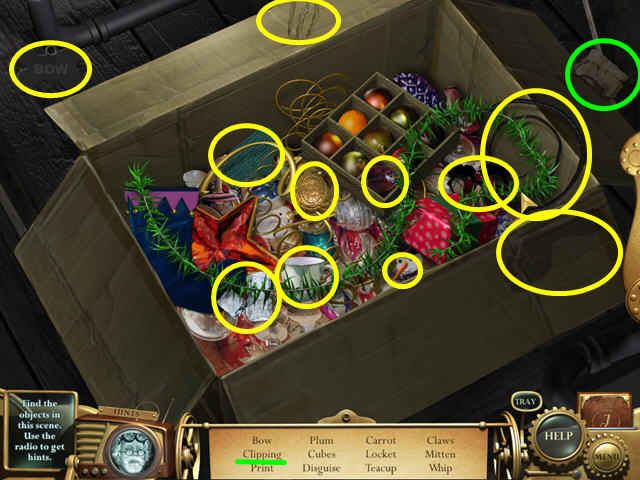
- Locate all the items on the list.
- You will earn the Journal.
- Look under the loose board in the porch and take the FLASHLIGHT (H).
- Walk to the left.
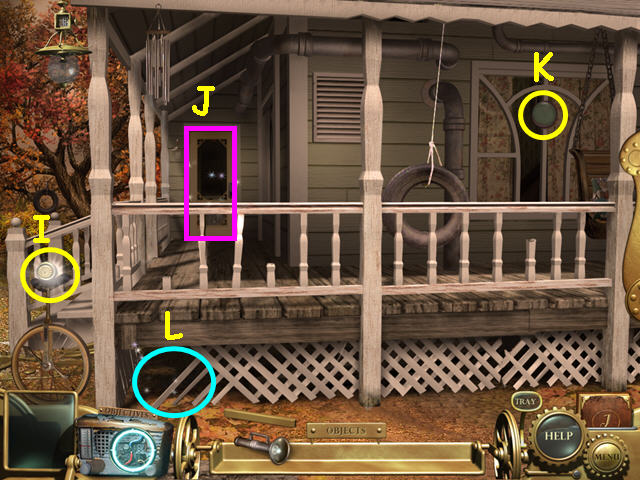
- Take the KNOB (I).
- Note the locked door (J).
- Take the SCREEN (K).
- Look under the porch for a Hidden Object Scene (L).
- Select the FLASHLIGHT from your inventory.
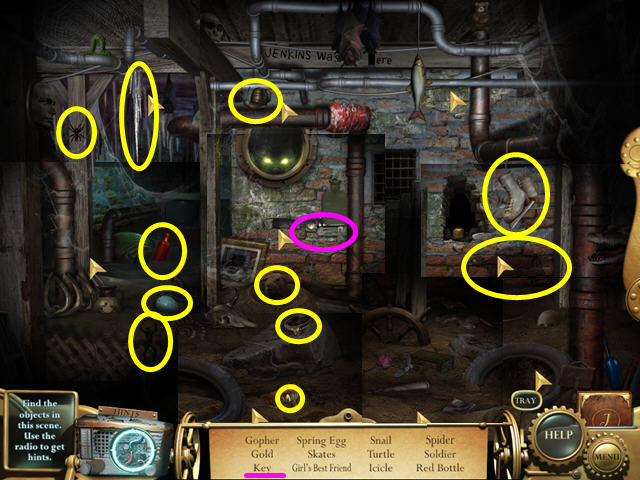
- Locate all the items on the list.
- You will earn the KEY.
- Use the KEY to open the locked door and enter the kitchen.
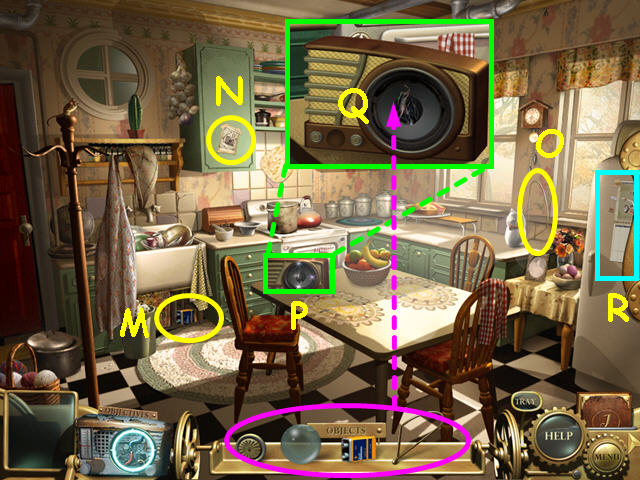
- Take the BATTERY (M).
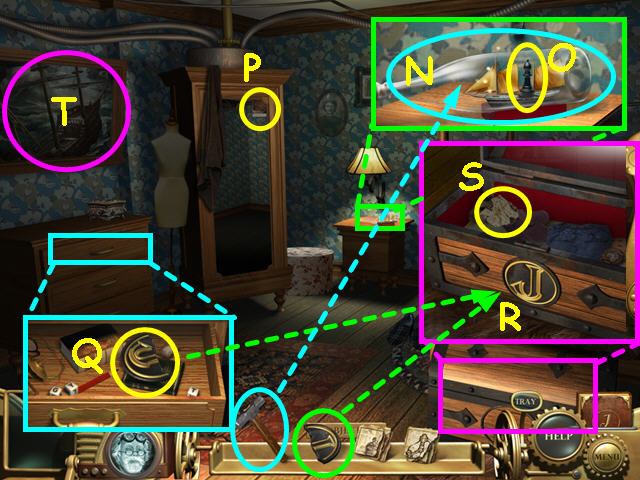
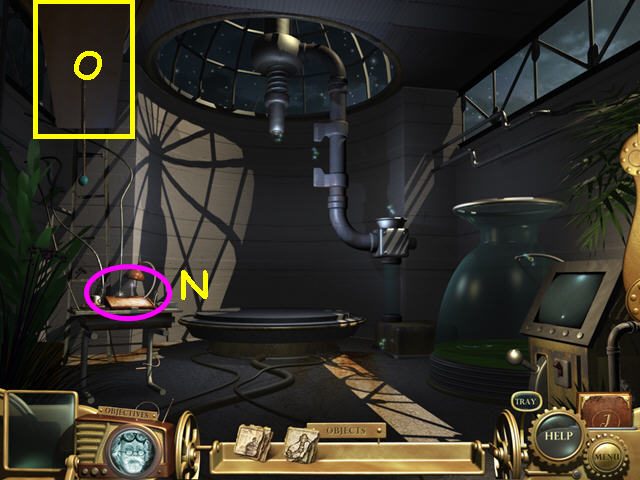
- Take the list of parts- this will go in your journal (N).
- Take the ANTENNA (O).
- Look at the close-up of the radio on the table (P).
- Use the BATTERY, ANTENNA, KNOB , and the SCREEN to repair the radio (Q).
- Take the radio from the table to upgrade your hint system.
- Select the calendar for a mini-game (R).
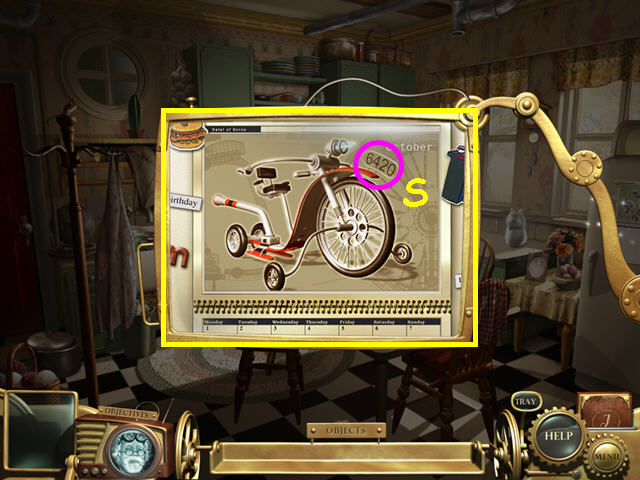
- The object of this mini-game is to swap pieces to restore the picture.
- Click on 2 adjacent pieces to swap positions.
- You will earn 1 of 9 MACHINE PIECES.
- Note the number (6420) in the picture (S).
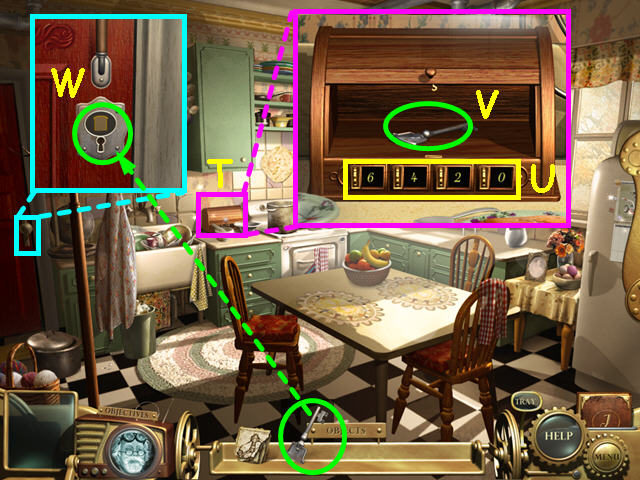
- Look at the breadbox (T).
- Enter the code from the calendar-6-4-2-0 (U).
- Take the KEY (V).
- Look at the close-up of the lock and use the KEY (W).
- Walk forward to the foyer.
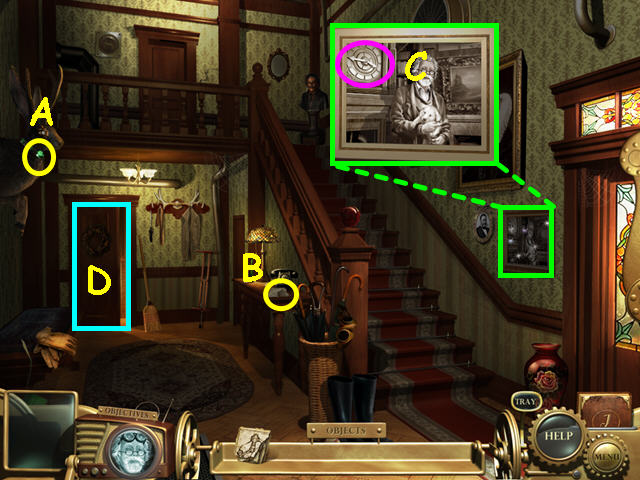
- Take the GEM (A).
- Take the 1 of 9 RECIPE PIECES (B).
- Look at the photo and note the time is 3:45 (C).
- Enter the study (D).
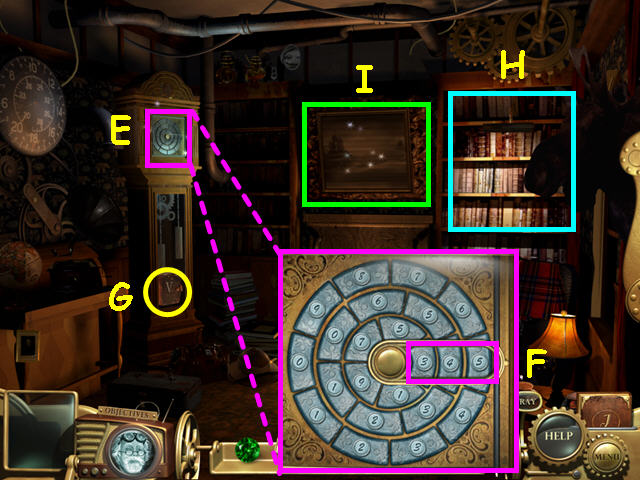
- Look at the close- up of the clock face (E).
- Turn the dials to 3-4-5 (F).
- Take the BOOK V from the bottom of the clock (G).
- Make note of the bookcase (H).
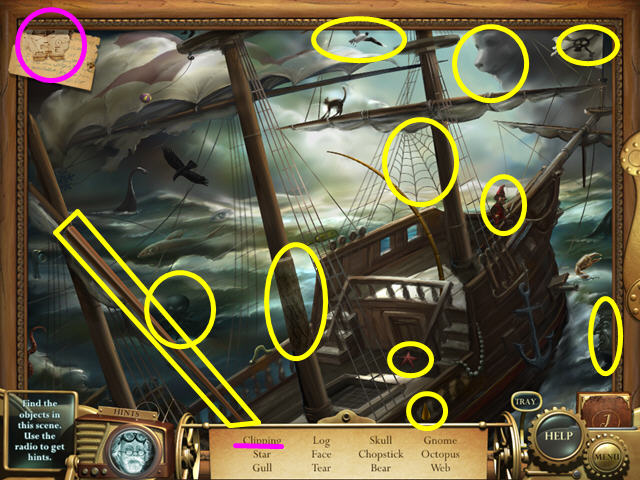
- Select the painting for a Hidden Object Scene (I).
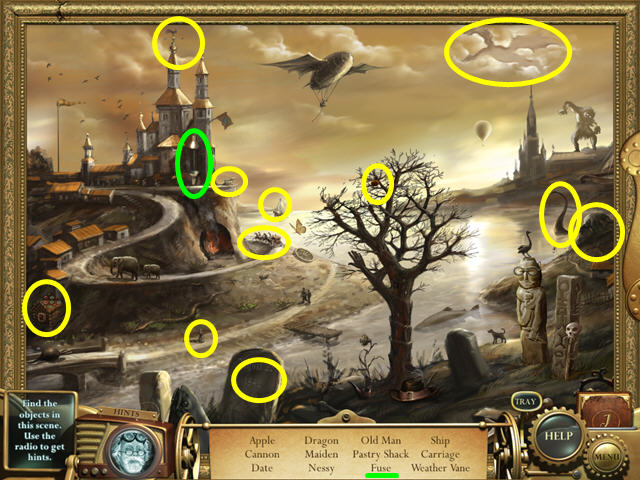
- Locate all the items on the list.
- You will earn the FUSE.
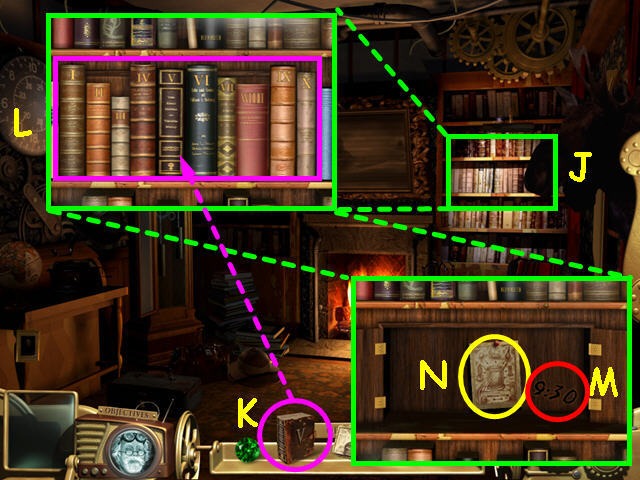
- Look at the close-up of the bookshelf (J).
- Place the BOOK V onto the shelf (K).
- Place the books in numerical order (L).
- Click on 2 books to swap positions.
- Note the time of 9:30 (M).
- Take the rare spice directions (N).
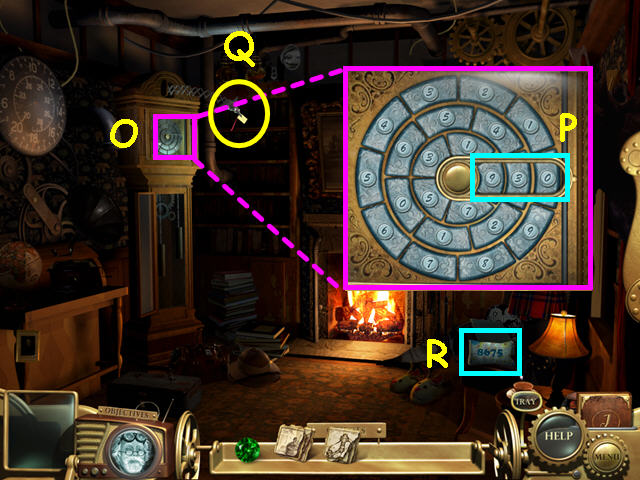
- Look at the close- up of the clock face (O).
- Turn the dials to 9-3-0 (P).
- Take the 2 of 9 MACHINE PIECES that appears (Q).
- Note the code on the pillow- 8-6-7-5 (R).
- Walk down twice to return to the kitchen.
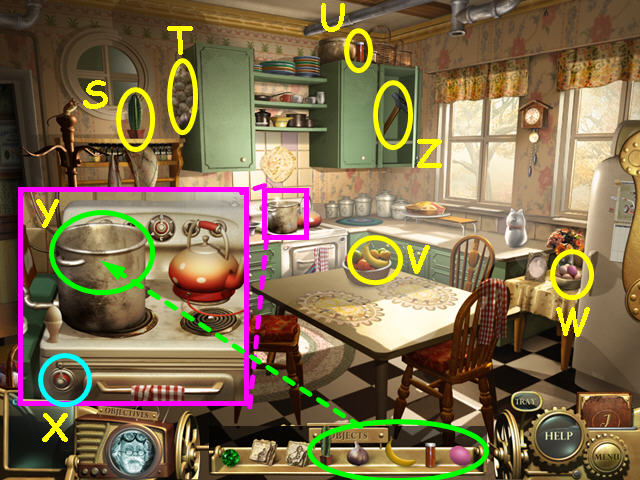
- Take the CACTUS (S).
- Take the GARLIC (T).
- Take the SPICES (U).
- Take the BANANA (V).
- Take the EGG (W).
- Look at the close-up of the stove, and click the knob to turn on the stove (X).
- Add the CACTUS, GARLIC, SPICES, BANANA, and EGG to the pot (Y).
- The RARE SPICE will go automatically into your inventory.
- Take the SLEDGEHAMMER that appears (Z).
- Walk forward twice to return to the study.
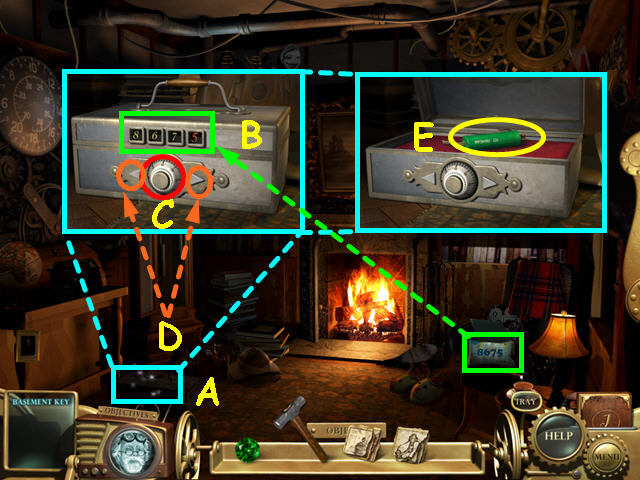
- Look at the close-up of the toolbox (A).
- Enter the code found on the pillow- 8-6-7-5 (B).
- Click on the center dial to change the numbers (C).
- The number in red is the one you can change.
- Click on the arrow buttons to change which number you are working on(D).
- Take the CONNECTOR (E).
- Walk down to exit the study.
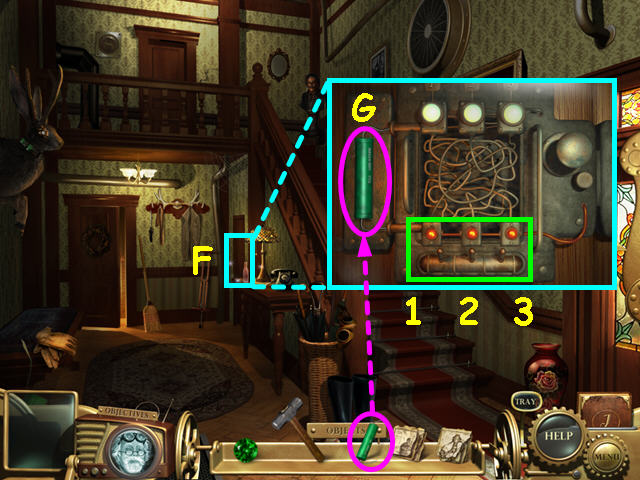
- Look at the close-up of the basement door lock (F).
- Place the CONNECTOR into the slot (G).
- Find the bottom switch that stays on, then flip the second switch that stays on, and finally, the third switch.
- If all the switches fall, start the sequence over.
- Flip the switches 2-1-3 (H).
- Enter the basement door.
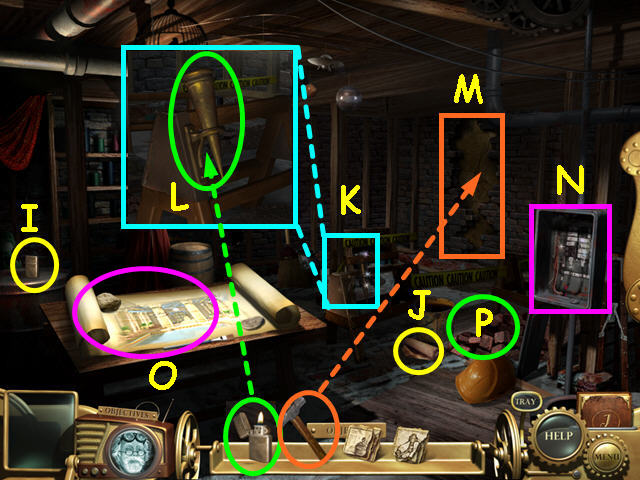
- Take the LIGHTER (I).
- Take the Egypt notes (J).
- Look at the close-up of the sawhorse (K).
- Use the LIGHTER on the TORCH (L).
- The TORCH will go automatically into your inventory.
- Note the bricked wall-you will use the sledgehammer here after the mini-game (M).
- Note the power box for a mini-game (N).
- Note the pile of bricks for a Hidden Object Scene (O).
- Select the table for a Hidden Object Scene (P).

- Locate all the items on the list.
- You will earn the 2 of 9 RECIPE PIECES.
- Select the pile of bricks for a Hidden Object Scene.
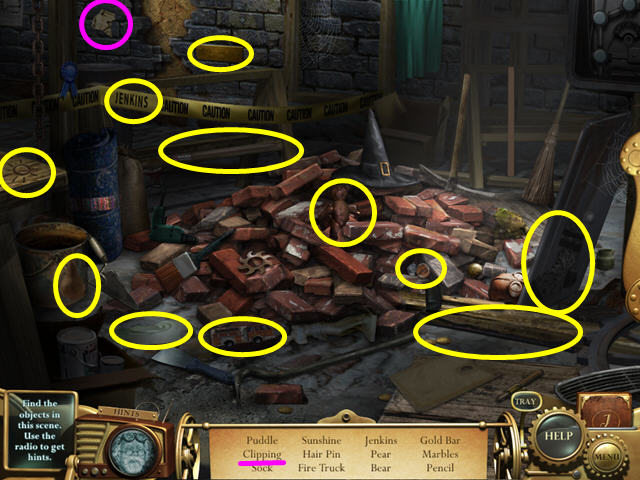
- Locate all the items on the list.
- You will earn the 3 of 9 MACHINE PIECES.
- Select the power box for a mini-game.
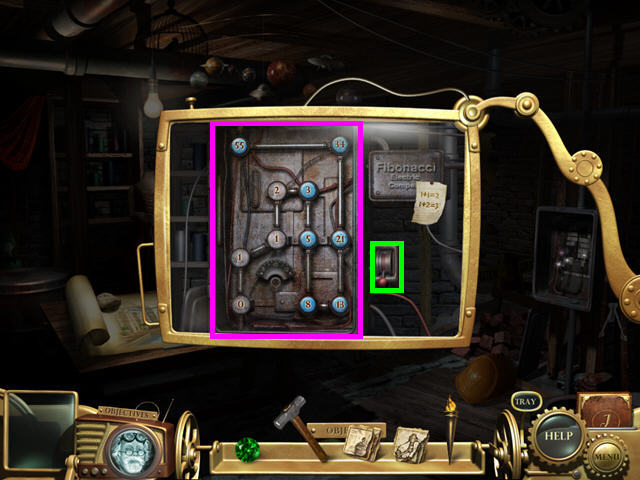
- The object of this mini-game is to change the numbers to reflect a Fibonacci sequence.
- The 2 preceding numbers in a sequence added together make the next number.
- Click on the blue numbers to change them.
- The correct sequence is: 0-1-1-2-3-5-8-13-21-34-55.
- Pull the switch to activate the sequence.
- Use the SLEDGEHAMMER on the bricked wall.
- Walk into the tunnel.
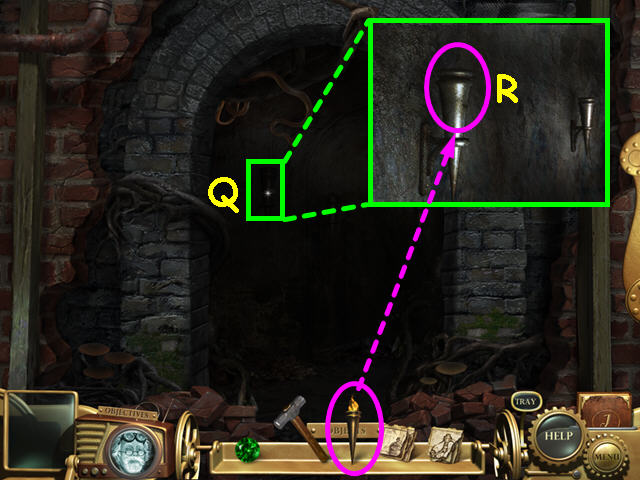
- Look at the close-up of the wall torch (Q).
- Use the TORCH to light the wall torch (R).
- All the other torches will automatically light.
- Walk forward into the catacombs.
Chapter 2
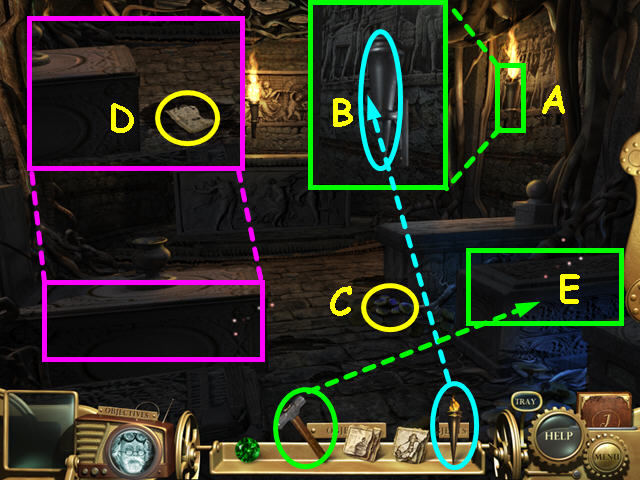
- Look at the close-up of the wall torch (A).
- Use the TORCH to light the wall torch (B).
- Take the MUSHROOM (C).
- Push the left sarcophagus and take the 4 of 9 MACHINE PARTS (D).
- Use the SLEDGEHAMMER on the right sarcophagus (E).
- Look inside the right sarcophagus for a Hidden Object Scene.
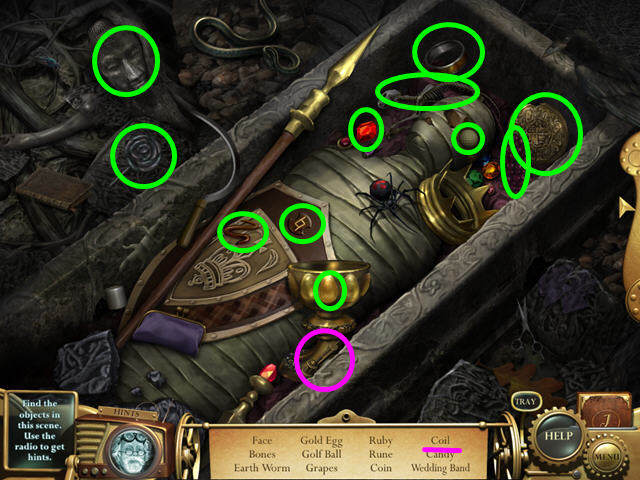
- Locate all the items on the list.
- You will earn the COIL.
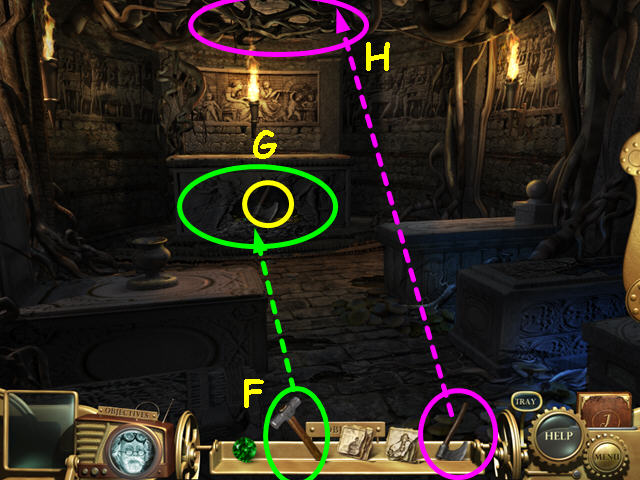
- Use the SLEDGEHAMMER on the front sarcophagus (F).
- Take the AX from the hole you created (G).
- Use the AX on the roots in the ceiling (H).
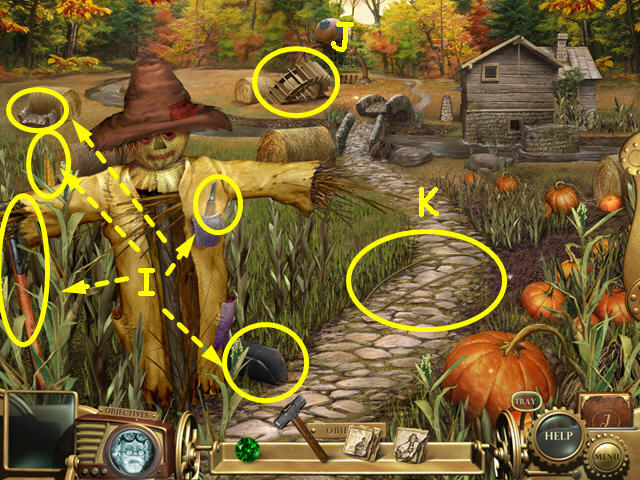
- Take the CORN, SHOVEL, KNIFE, BRIDGE PIECE and FUME near the scarecrow (I).
- Take the WATERWHEEL by the bridge (J).
- Take the BELT from the path (K).
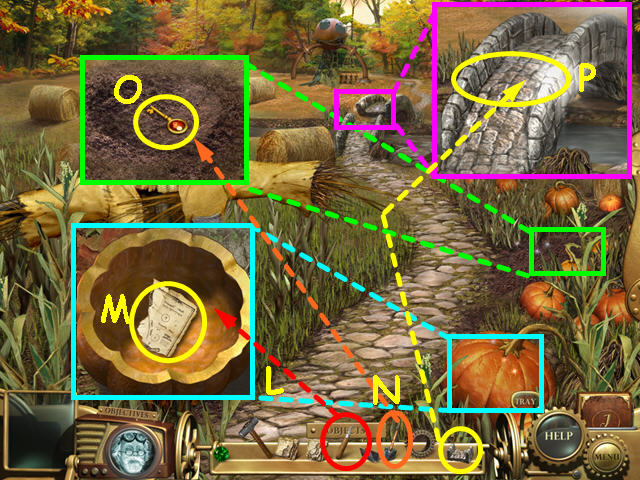
- Look at the close-up of the pumpkin and use the KNIFE to cut it open (L).
- Take the 3 of 9 RECIPE PIECES (M).
- Look at the close-up of the mound of dirt and use the SHOVEL to dig a hole (N).
- Take the KEY (O).
- Look at the bridge and use the BRIDGE PIECE to repair the bridge (P).
- Walk forward to the mill.
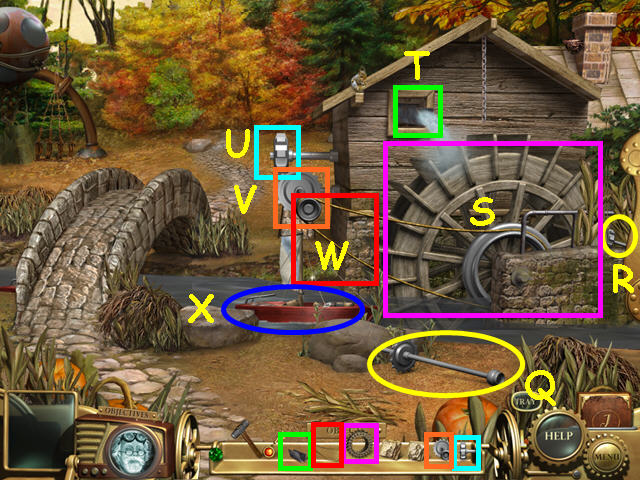
- Take the AXLE (Q).
- Take the GEAR (R).
- Place the WATERWHEEL on the wheel (S).
- Place the FUME on the window (T).
- Place the GEAR on the upper spoke (U).
- Place the AXLE on the lower spoke (V).
- Place the BELT on the axle (W).
- Select the boat for a Hidden Object Scene (X).

- Locate all the items on the list.
- You will earn the PIPE.
- Walk forward to the side porch.
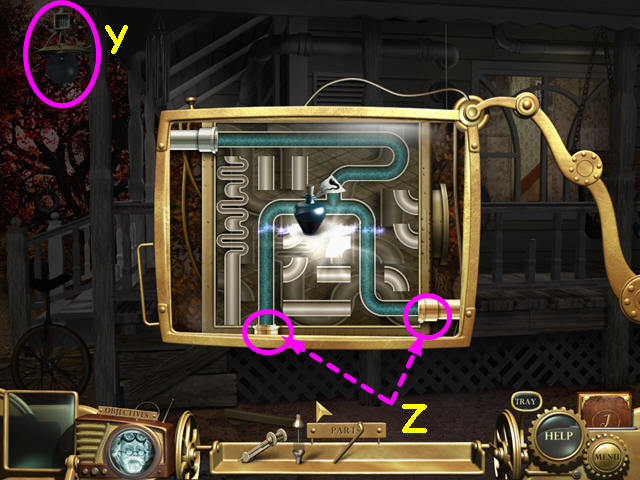
- Look at the lamp for a mini-game (Y).
- The object of this mini-game is to create a path from the upper pipe to both of the lower pipes (Z).
- Click on 2 pieces of pipe to swap locations.
- You do not have to use all the pieces.
- You will earn the SNAKE VENOM.
- Walk right to the front porch for a Hidden Object Scene.
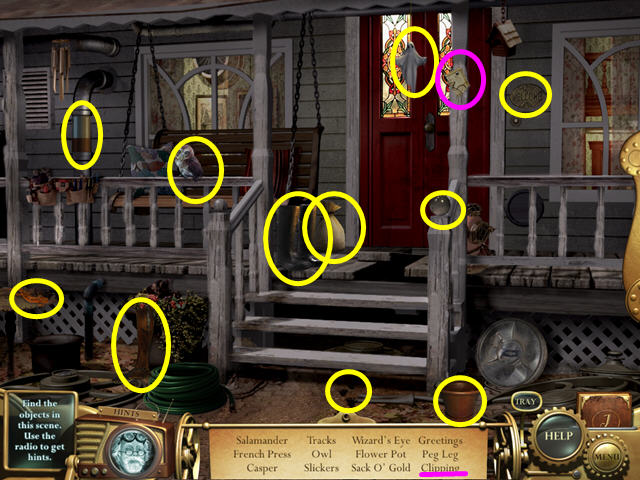
- Locate all the items on the list.
- You will earn the 5 of 9 MACHINE PIECES.
- Look at the front door and use the KEY in the lock.
- Walk forward to enter the house.
- Walk up the stairs to the second floor.
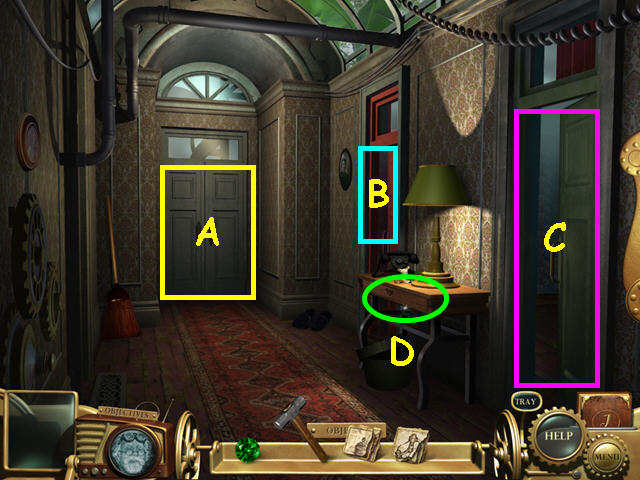
- Note the door to the 3rd floor (A).
- Note the door to Emma's old room (B).
- Note the door to Grandpa's room (C).
- Select the drawer for a Hidden Object Scene (D).
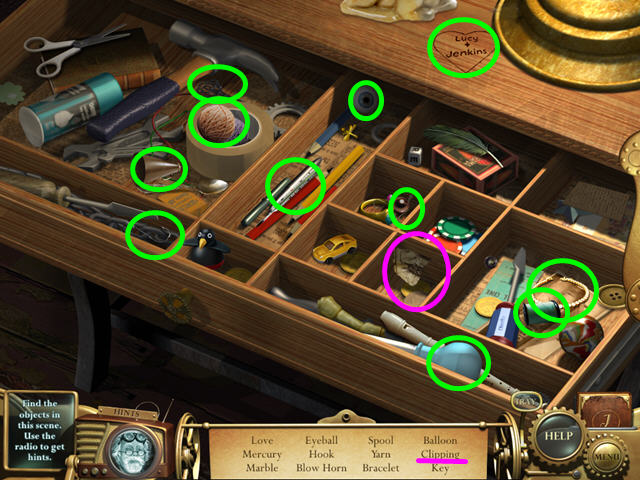
- Locate all the items on the list.
- You will earn the 4 of 9 RECIPE PIECES.
- Enter Emma's room.
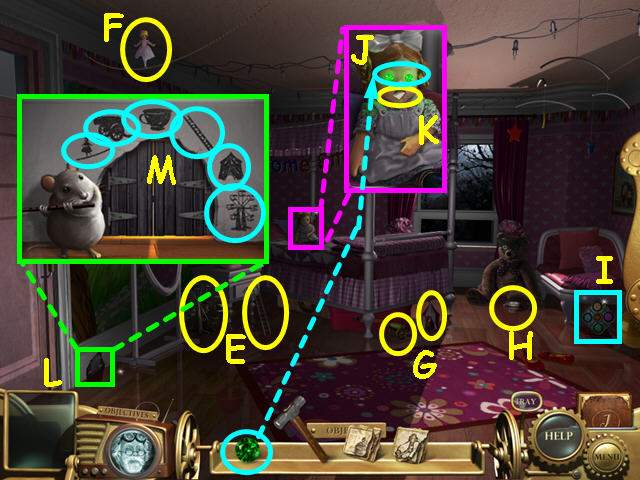
- Take the FERRISWHEEL and the LADDER (E).
- Take the TIGHTROPE (F).
- Take the CANNON and the TENT (G).
- Take the TEACUP from the bear (H).
- Note the mini-game (I).
- Look at the doll on the bed and place the GEM into her eye (J).
- Take the combination from her mouth (K).
- Look at the close-up of the mouse hole (L).
- Place the FERRISWHEEL, LADDER, TIGHTROPE, TENT, CANNON, and TEACUP onto the matching outlines (M).
- You will automatically receive the CREST TOP.
- Select the mouse hole again for a Hidden Object Scene.
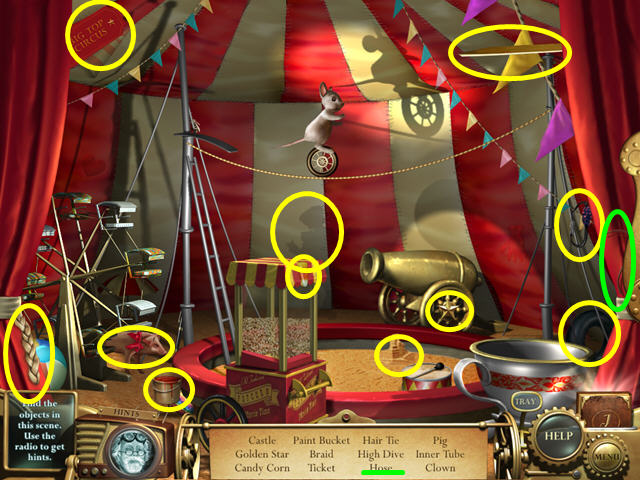
- Locate all the items on the list.
- You will earn the HOSE.
- Select the mini-game.
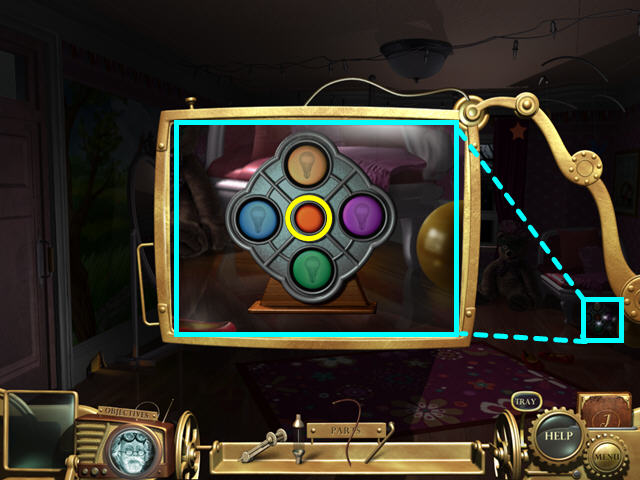
- The object of this Simon-like mini-game is to repeat the pattern that is played.
- Press the center button to start.
- The first sequence will have only one color.
- Press the colored button that lit up.
- After you repeat each sequence, another color will be added up to 5.
- Our final sequence was: yellow, yellow, purple, green, and yellow.
- If you make an error, a new sequence will start at the beginning.
- You will earn 5 of 9 RECIPE PIECES.
- Walk down to exit Emma's room, then go right into Grandpa's room.
- Look at the ship in the bottle and use the SLEDGEHAMMER to break the bottle (N).
- Take the KEY (O).
- Take the snapshot (P).
- Open the desk drawer and take the CREST BOTTOM (Q).
- Look at the chest and place the CREST TOP and CREST BOTTOM into the circle (R).
- Take the 6 of 9 RECIPE PIECES (S).
- Select the painting for a Hidden Object Scene (T).
- Locate all the items on the list.
- You will earn the 6 of 9 MACHINE PIECES.
- Walk down to exit the room.
- Look at the door to the 3rd floor and use the KEY to unlock the door.
- Walk forward to the 3rd floor.
- Take the diagram (U).
- Note the stairs to the attic (V).
- Note the doors to the greenhouse (W).
- Look at the viewer for a Hidden Object Scene (X).
- Locate all the items on the list.
- You will earn 7 of 9 MACHINE PIECES.
- Walk upstairs to the attic.
Chapter 3

- Look at the safe and use the combination found on the doll- R0-L4-R7 (A).
- Click on the center button to choose which number to change- the current position will be shown in red (B).
- Click on the right or left lever to change the number (C).
- Take the OWL (D).
- Place the OWL on the perch (E).
- Once the bat flies away, take the GUANO (F).
- Select the boxes for a Hidden Object Scene (G).
- Locate all the items on the list.
- You will earn the 7 of 9 RECIPE PIECES.
- Walk down to exit the attic, then walk to the right to enter the greenhouse.
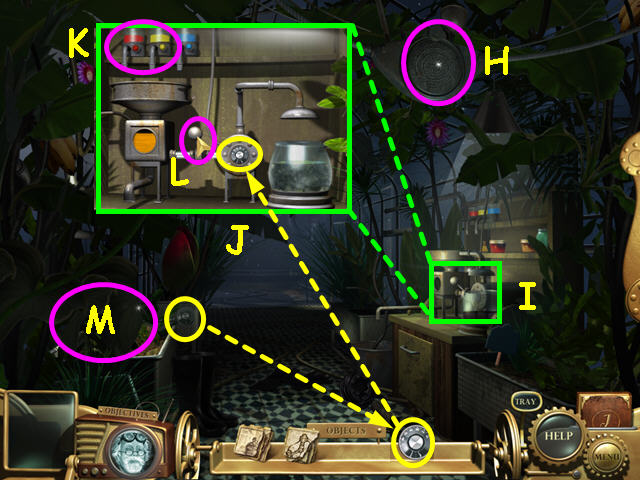
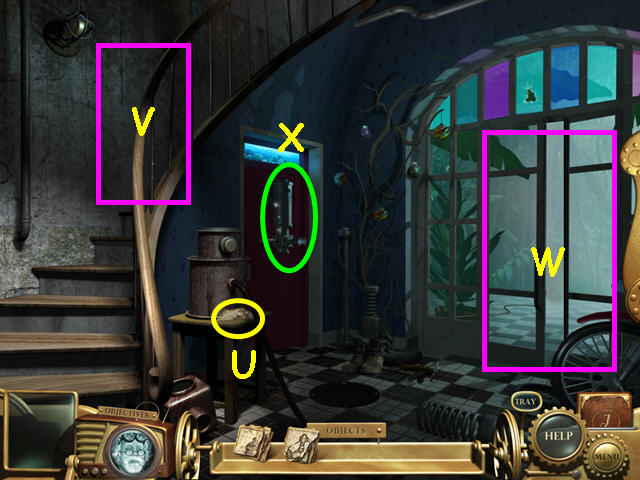
- Note the circular device (H).
- Look at the device on the right (I).
- Place the knob on the device (J).
- Press the yellow and red to make an orange mixture (K).
- Click the lever to move the mixture to the bowl (L).
- You will automatically receive the BOWL.
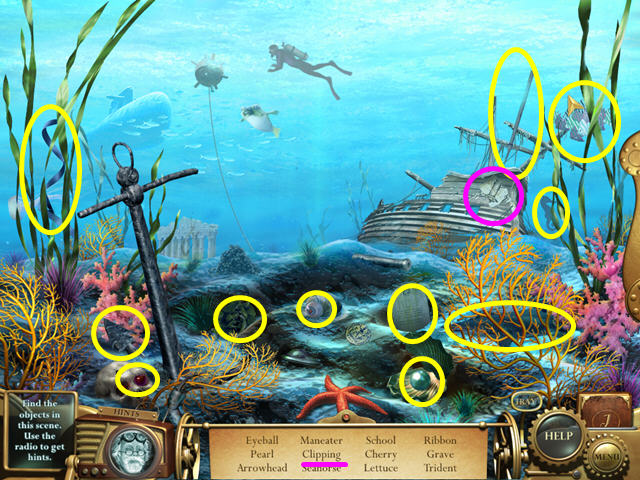
- Look at the leaves on the left for a Hidden Object Scene (M).
- Locate all the items on the list.
- You will earn the 8 of 9 MACHINE PIECES.
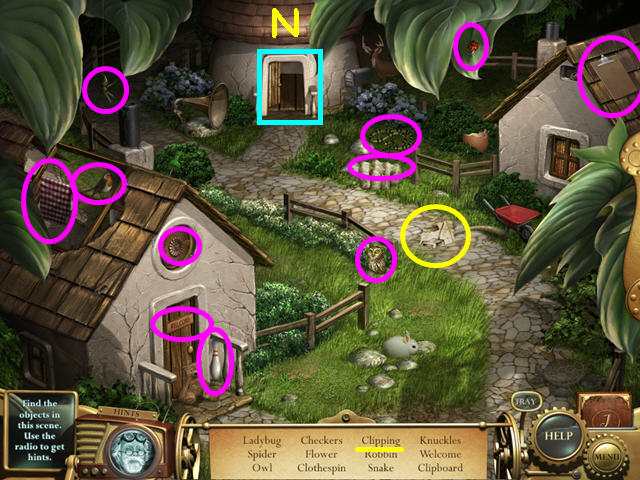
- Look at the open cottage door for a Hidden Object Scene (N).
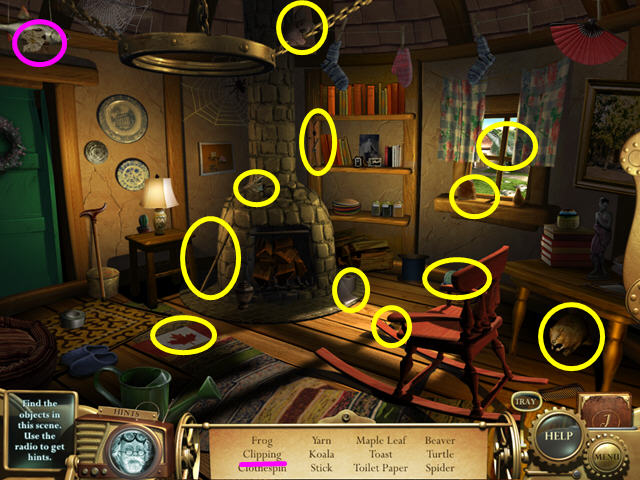
- Locate all the items on the list.
- You will earn the 8 of 9 RECIPE PIECES.
- Walk forward to the machine room.
- Note the desk area (N).
- Pull open the hatch to the observatory in the upper left corner (O).
- Walk up to the observatory.
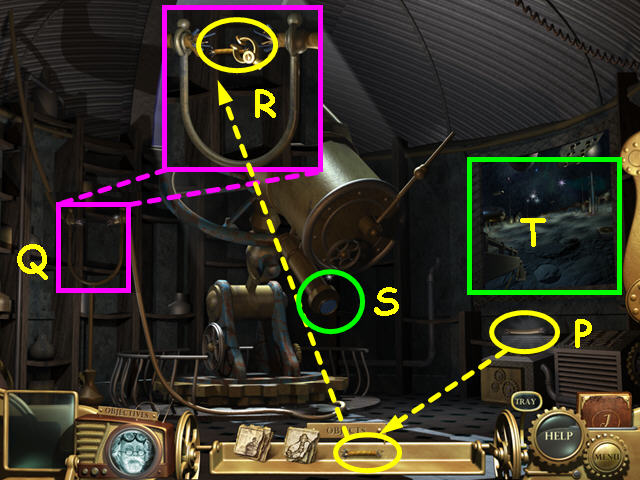
- Take the WIRE PIECE (P).
- Look at the close-up of the power cable (Q).
- Use the WIRE PIECE on the power cable (R).
- You will earn the 9 of 9 RECIPE PIECES.
- Note the eyepiece of the telescope (S).
- Select the picture for a Hidden Object Scene (T).
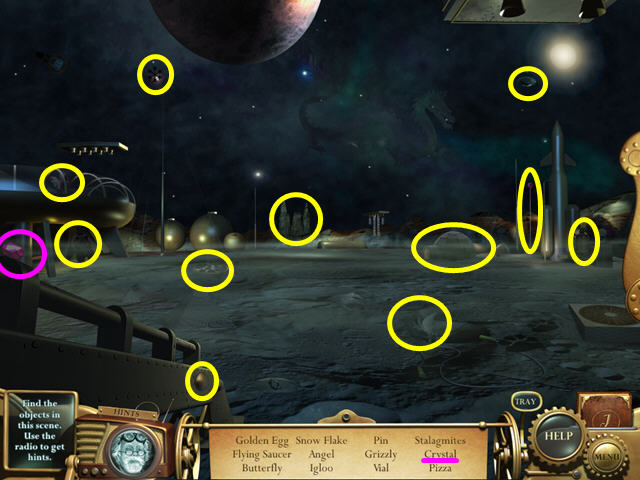
- Locate all the items on the list.
- You will earn the MOON CRYSTAL.
- Select the eyepiece of the telescope for s Hidden Object Scene.
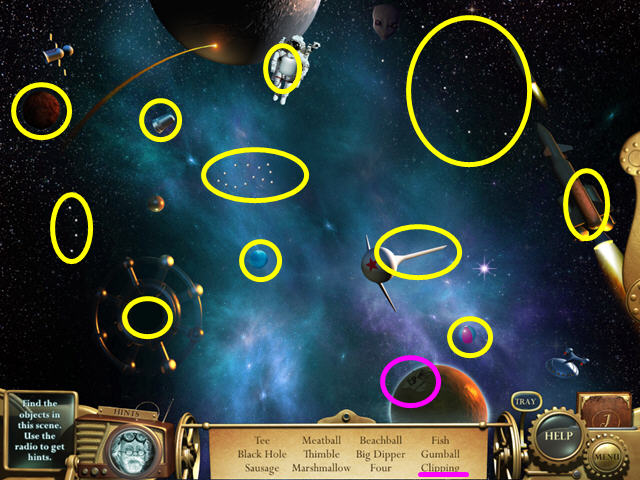
- Locate all the items on the list.
- You will earn the 9 of 9 MACHINE PARTS.
- Walk down twice to return to the greenhouse.

- Look at the device hanging from the ceiling (U).
- Press the button to open the device (V).
- Place the 9 RECIPE PIECES into the tray (W).
- Restore the recipe by dragging the pieces into position like a jigsaw-style mini-game (X).
- The pieces will lock into position when correct.
- Take the STAR DUST that appears (Y).
- Walk forward to the machine room.
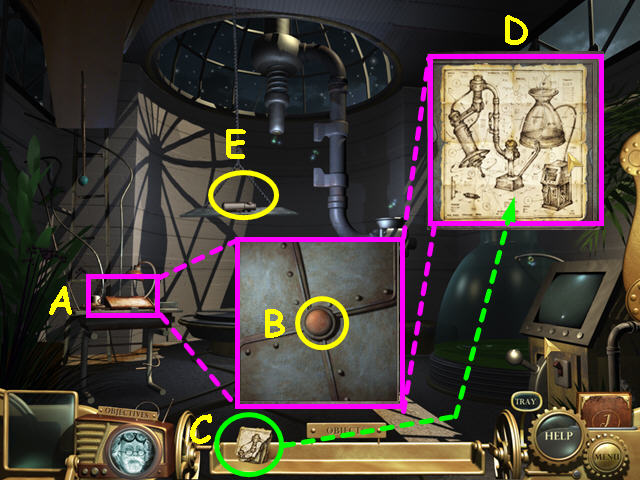
- Look at the table on the left (A).
- Press the button to open the device (B).
- Place the 9 MACHINE PIECES into the tray (C).
- Restore the recipe by dragging the pieces into position like a jigsaw-style mini-game (D).
- The pieces will lock into position when correct.
- Take the CANNISTER that appears (E).
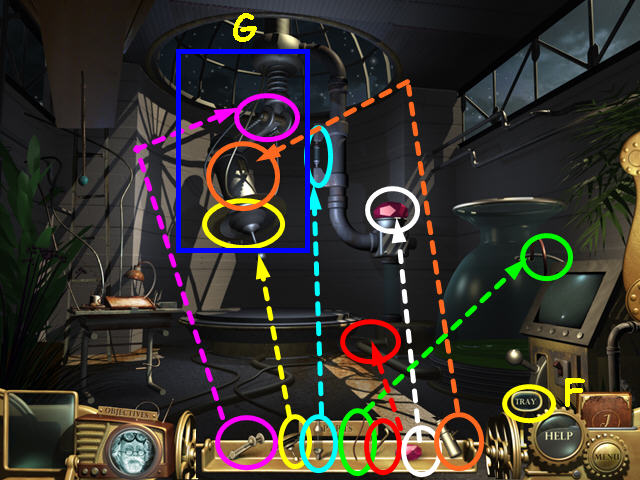
- Move your tray to the parts section (F).
- Place the parts as shown.
- The COIL must be placed before the CANNISTER and the CANNISTER must be placed before the bowl (G).
- Flip the switch to power up the machine (H).
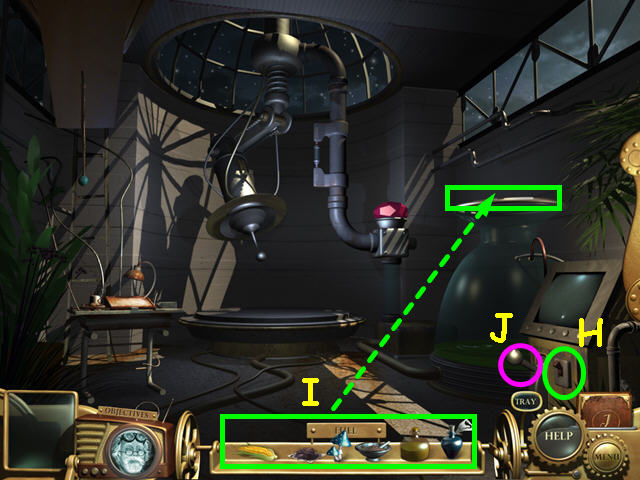
- Place the SNAKE VENOM, STAR DUST, RARE SPICE, GUANO, MUSHROOM, and CORN into the vat (I).
- Pull the lever to activate the machine (J).
- Congratulations! You have completed Emma and the Inventor!
Created at: 2011-05-20