

Walkthrough Menu
- General Tips
- Chapter 1: Awakening
- Chapter 2: Twisted Lands
- Chapter 3: Escape
- Chapter 4: Abandoned Hospital
- Chapter 5: Lighthouse Mysteries
- Chapter 6: Neglected Mansion
- Chapter 7: Locked Up
- Chapter 8: Back to Neglected Mansion
- Chapter 9: Search for Truth
- Chapter 10: Remember Everything
- Chapter 11: Success
- Antique Photo Album
General Tips
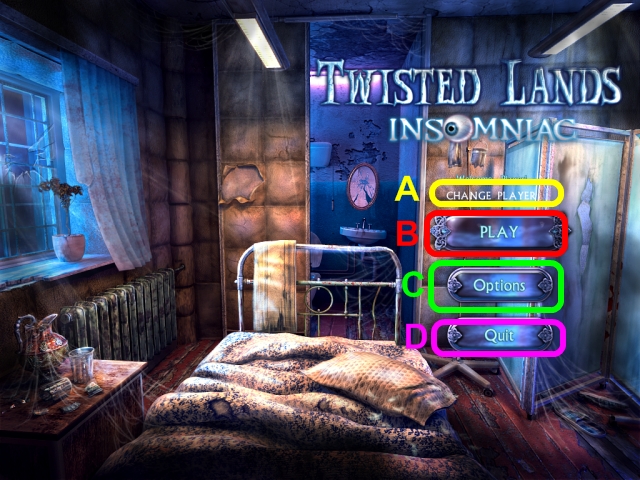
- Click on CHANGE PLAYER (A) to change the current player.
- Click on PLAY (B) to start playing.
- Click on OPTIONS (C) to change the screen resolution, sound effects volume, music volume, and cursor.
- To exit the game, click on QUIT (D).
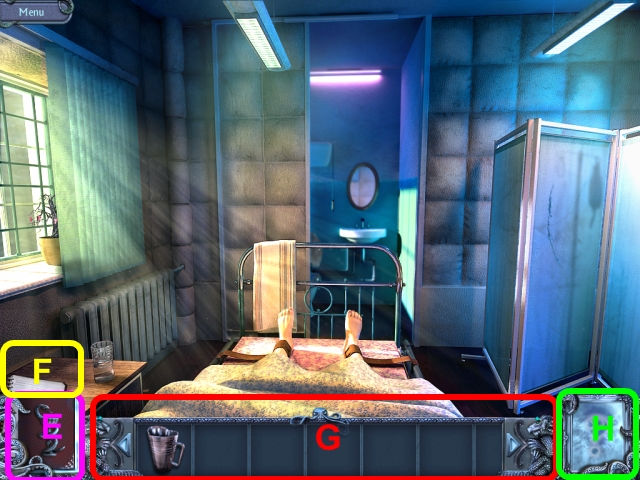
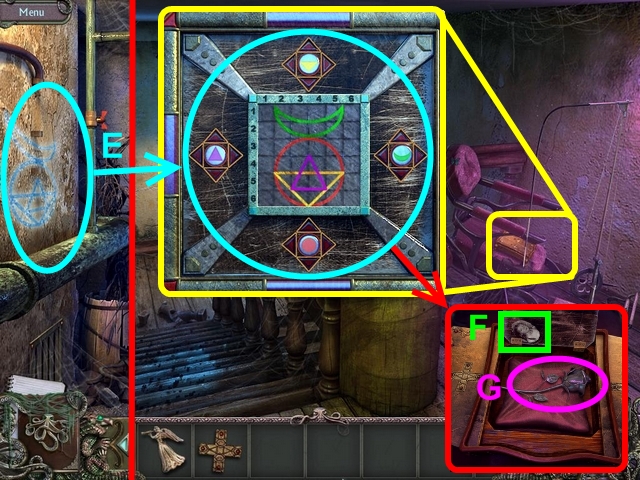
- Consult your Diary (E) often; it contains story points and puzzle hints.
- Click the Notebook (F) above your diary to watch your to-do list.
- Move your cursor to the bottom of the screen to access the Inventory Bar (G).
- Click on the Mirror (H) to get a hint in either the Hidden Object Scenes or regular gameplay.
- There is a penalty for random clicking in the Hidden Object Scenes.
- Solutions to most of the puzzles are random.
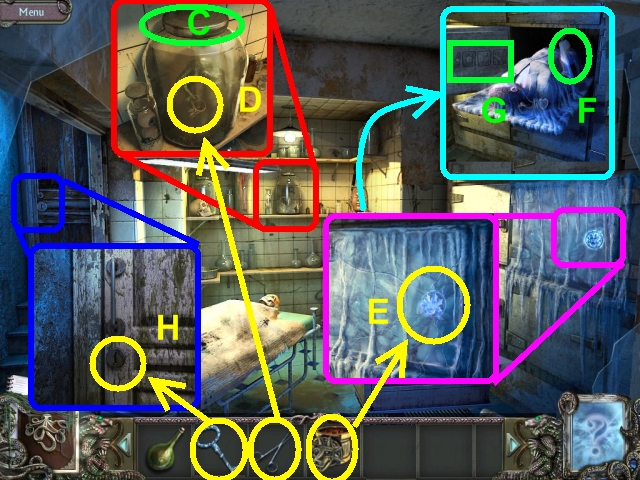
Chapter 1: Awakening
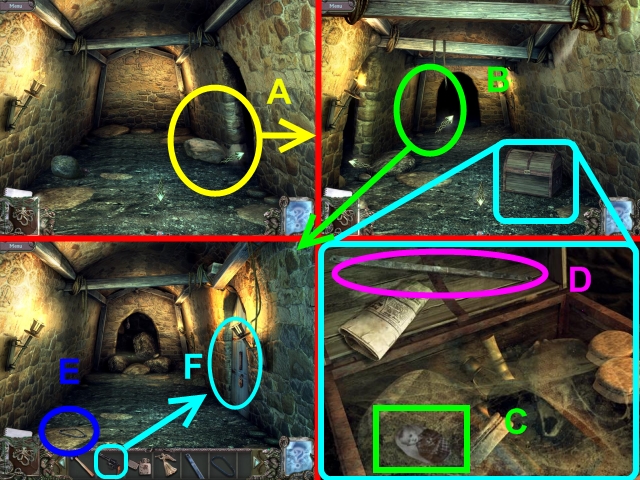
- Click on the doctor to start the dialogue.
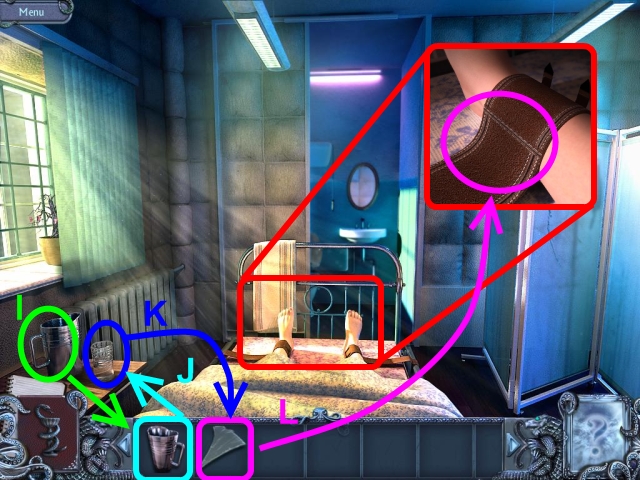
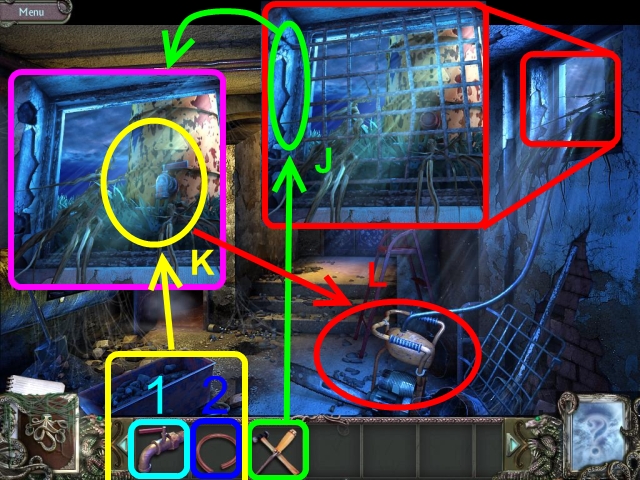
- Pick up the PITCHER (I).
- Use the PITCHER to break the glass (J).
- Grab the GLASS SHARD (K).
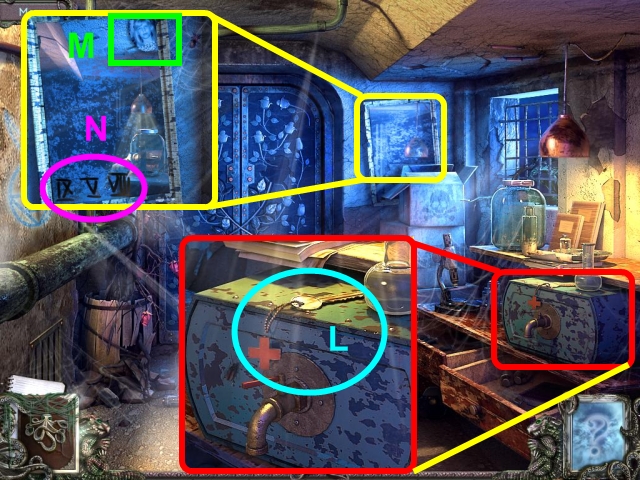
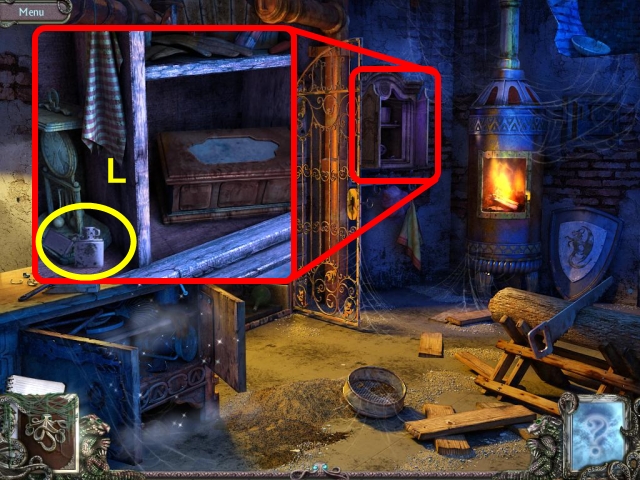
- Zoom in on your legs. Use the GLASS SHARD to cut the straps (L).
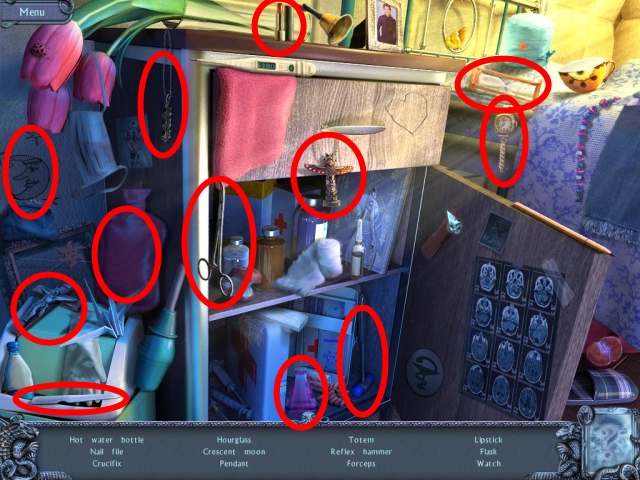
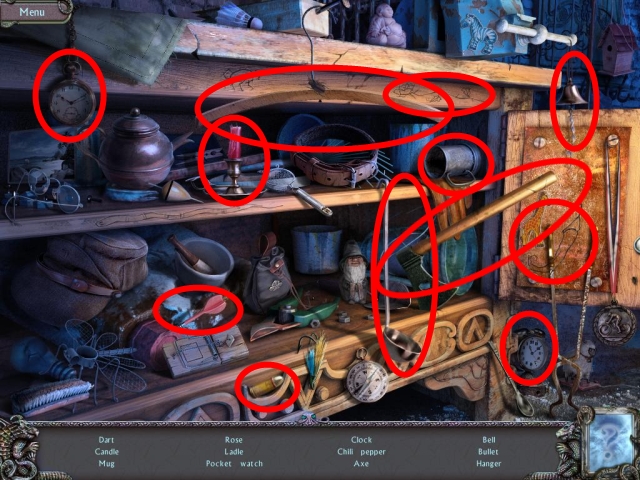
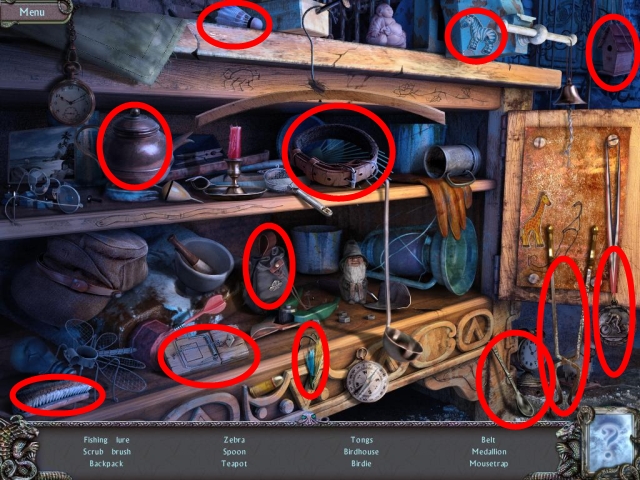
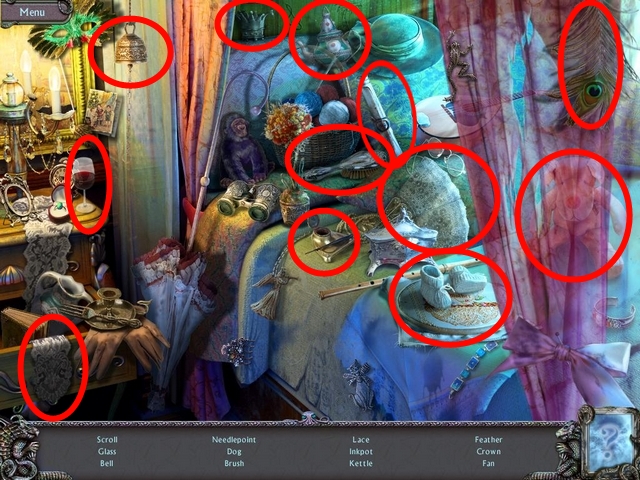
- Click on the sparkling area to access the hidden object area. Collect every object on the list at the bottom of the screen to acquire the NAIL FILE.
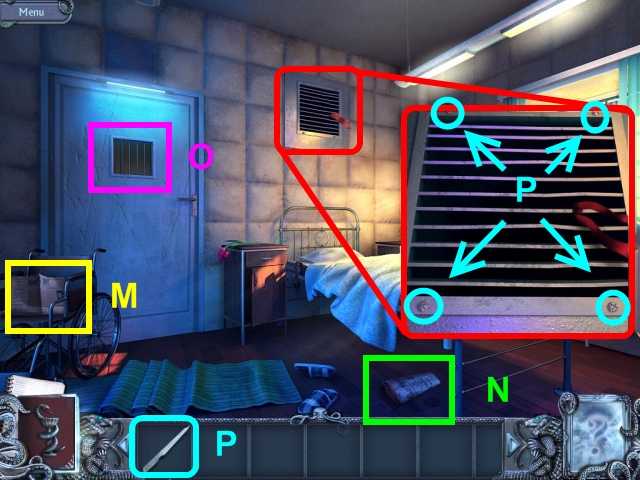
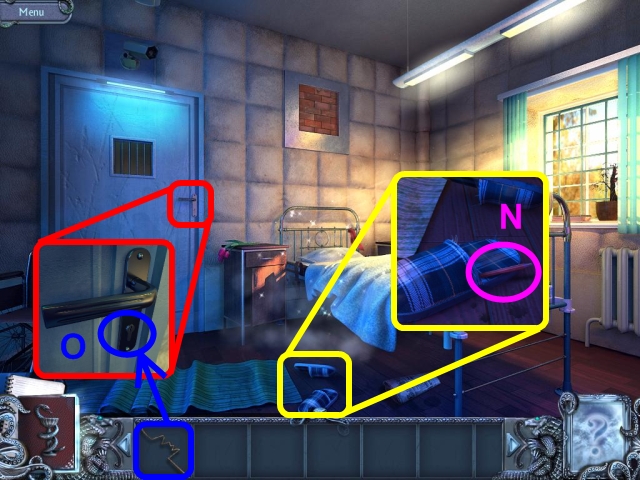
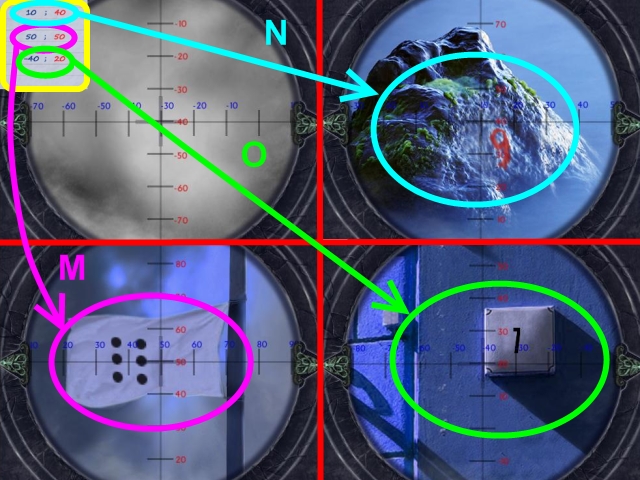
- Read the newspapers on the floor (N) and in the wheelchair (M). Click on the window on the door (O).
- Use the NAIL FILE to open the vent (P).
- Escape through the VENTILATION SYSTEM.
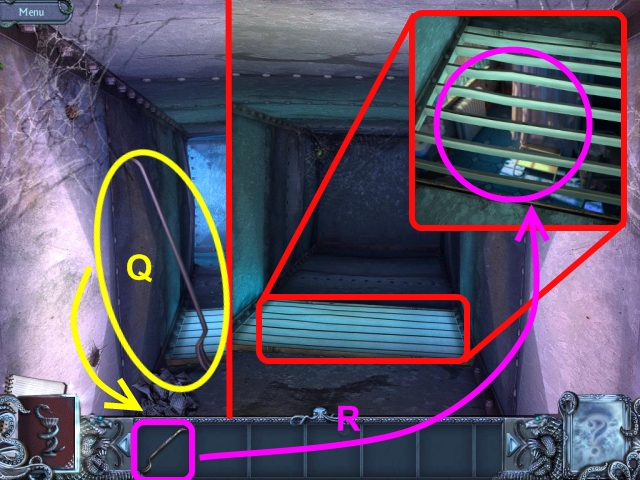
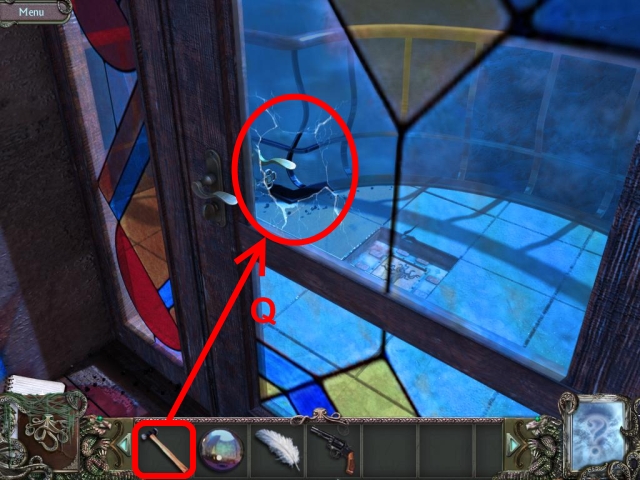
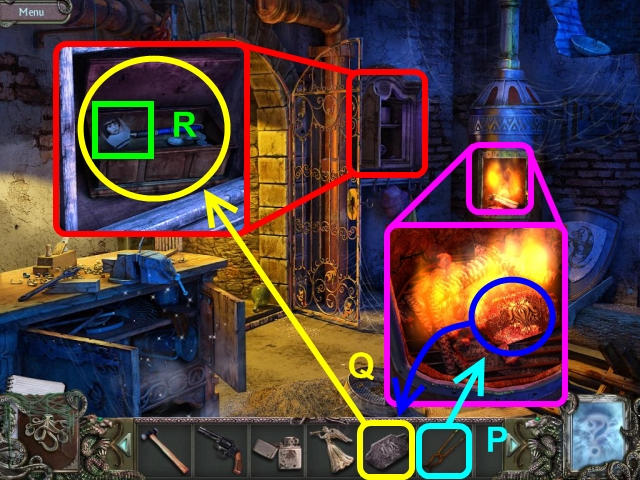
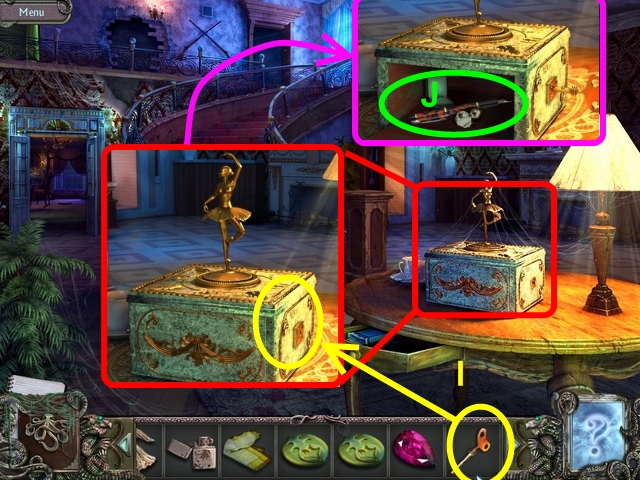
- Pick up the CROWBAR (Q).
- Use the crowbar to pry open the grate at the end of the ventilation system (R). Enter the BATHROOM.
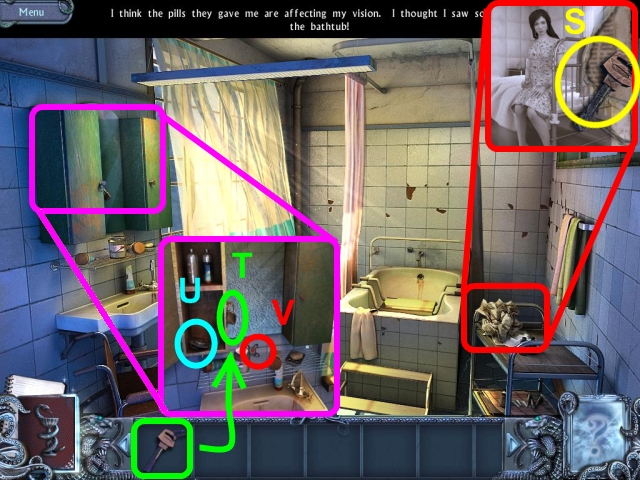
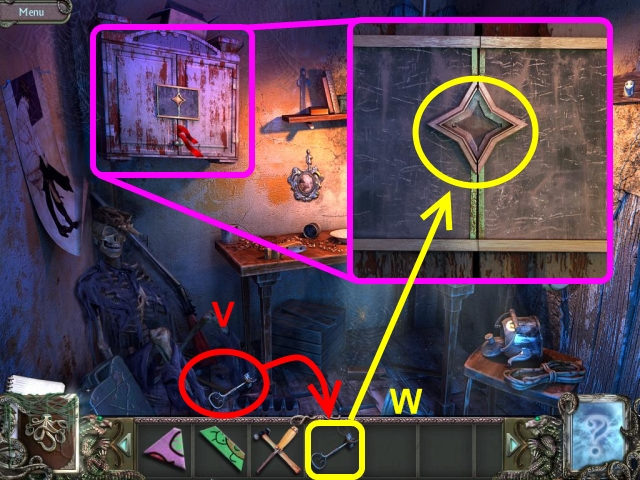
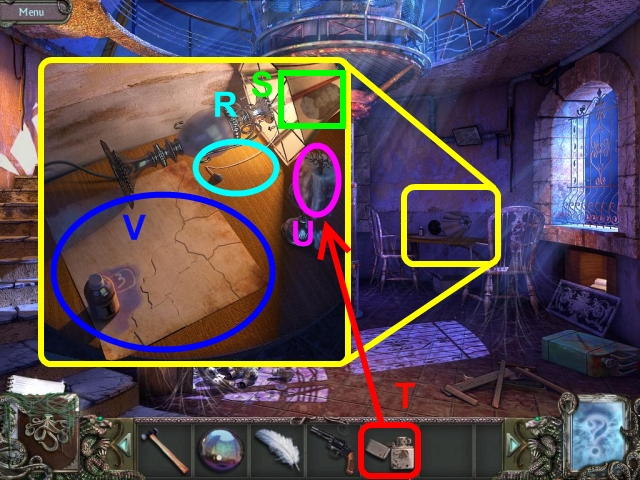
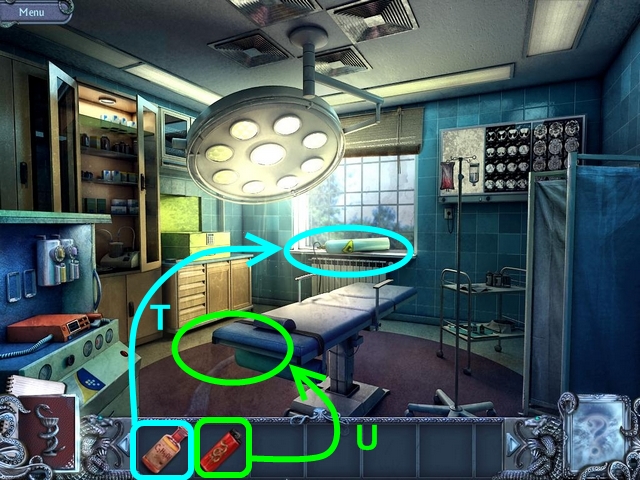
- Click on the crumpled up newspaper on the cart. Grab the KEY (S).
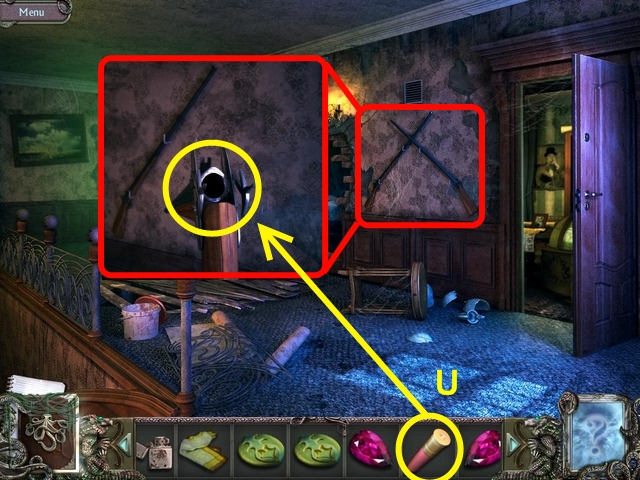
- Use the KEY to open the cabinet above the sink (T).
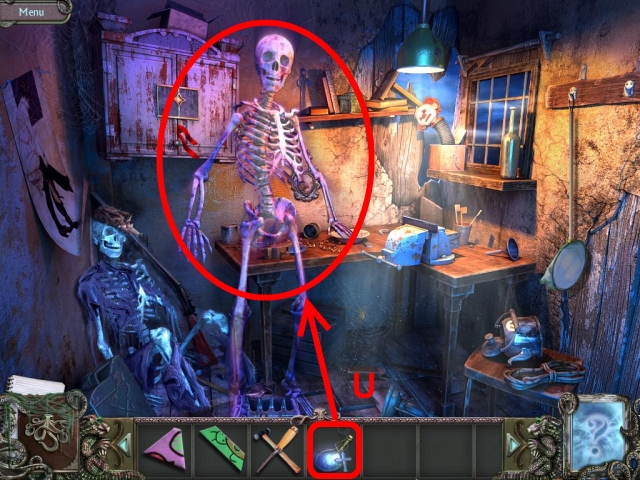
- Pick up the STOPPER (U) and the FAUCET HANDLE (V).
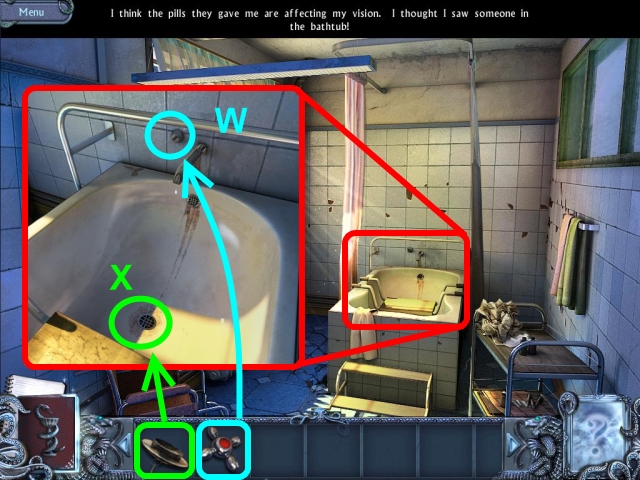
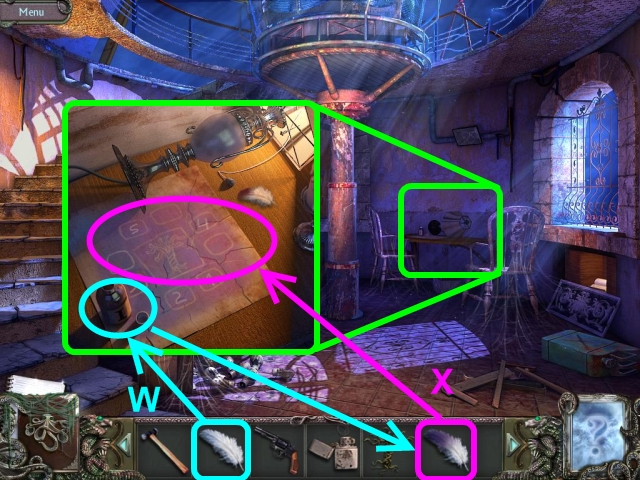
- Open the curtain.
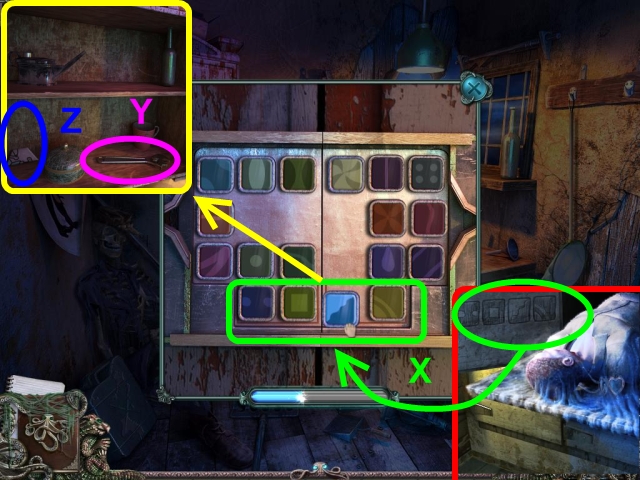
- Put the FAUCET HANDLE on the faucet (W). Click on the faucet to turn it on.
- Put the STOPPER in the drain (X).
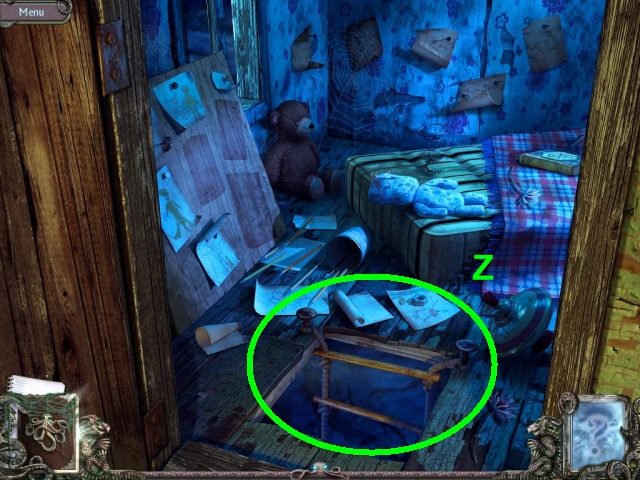
- Attempt to escape through the HOLE IN THE FLOOR.
Chapter 2: Twisted Lands
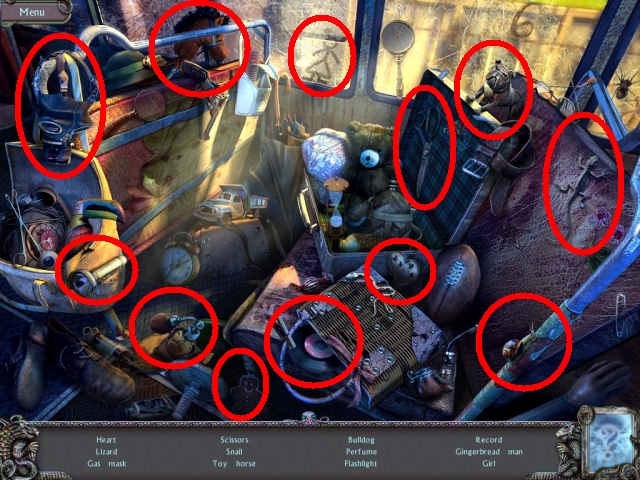
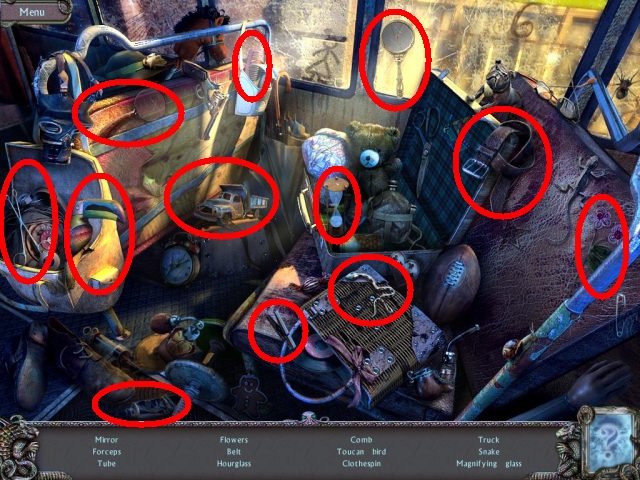
- You are on the BUS. Click on the sparkling area to access the hidden object area. Collect every object on the list at the bottom of the screen to acquire the FLASHLIGHT.
- Go to the front of the BUS.
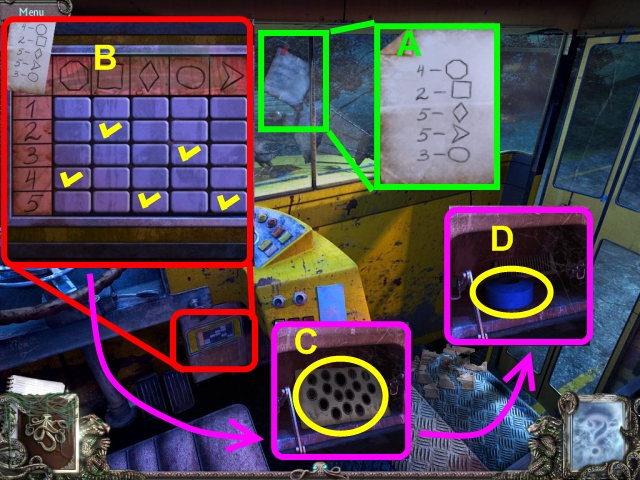
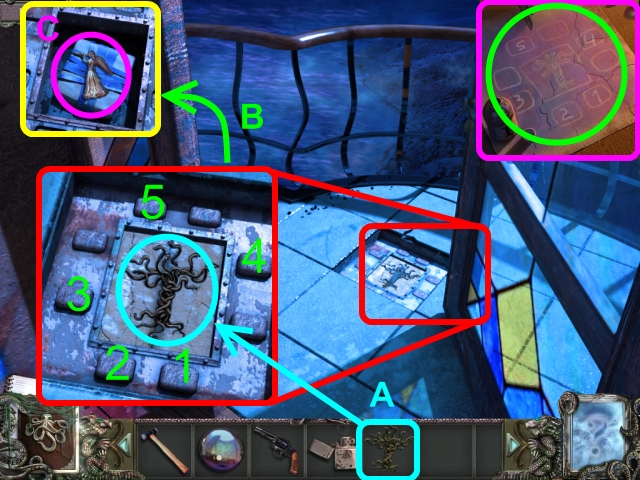
- Click on the note in the window to view the code (A).
- Use the code to open the glove compartment (B).
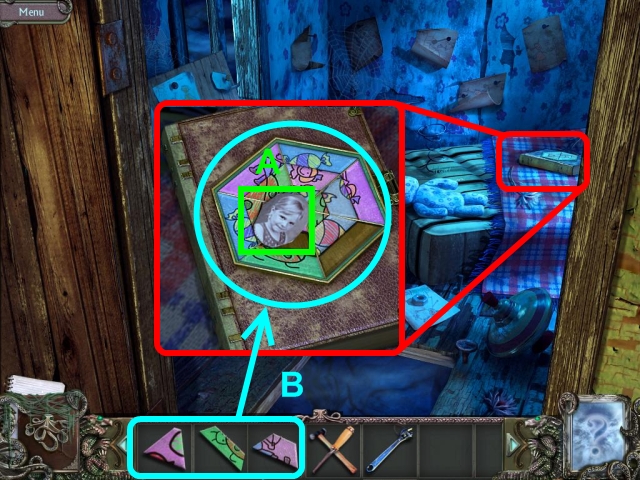
- Pick up the ANTIQUE PHOTO ALBUM (C).
- Pick up the INSULATING TAPE in the glove compartment (D).
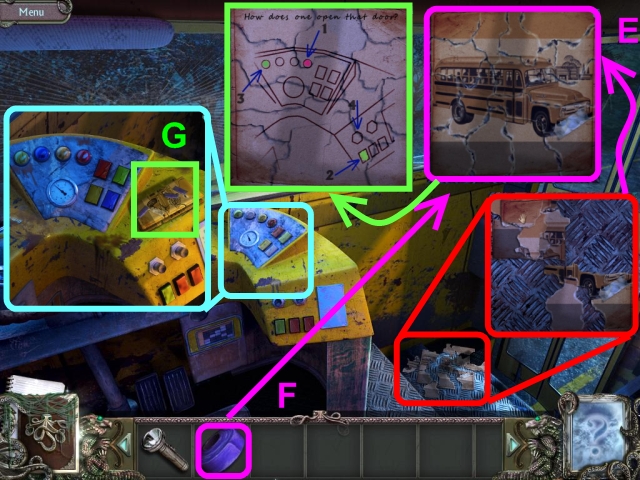
- Click on the torn bus manual. Assemble it (E).
- Fix the manual with the INSULATING TAPE (F). Read how to open the bus door.
- Click on the buttons on the control panel as shown in the manual to open the door (G).
- Exit the bus.
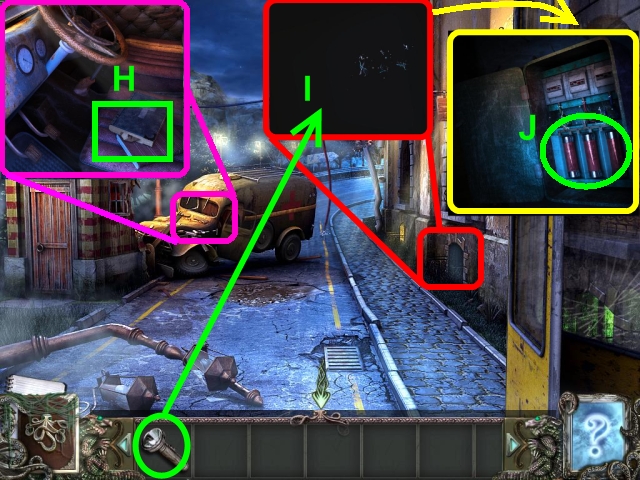
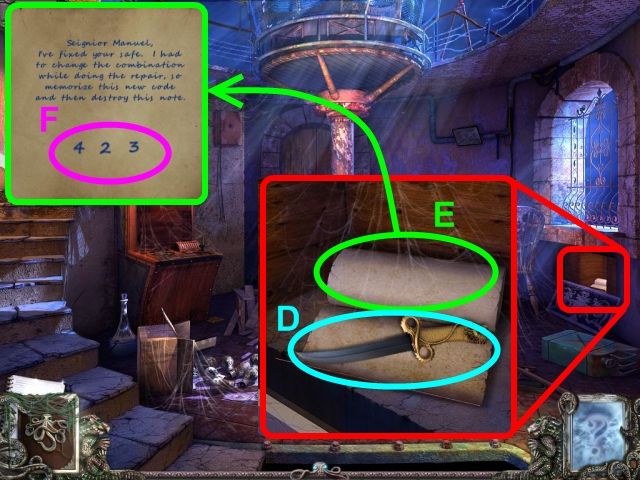
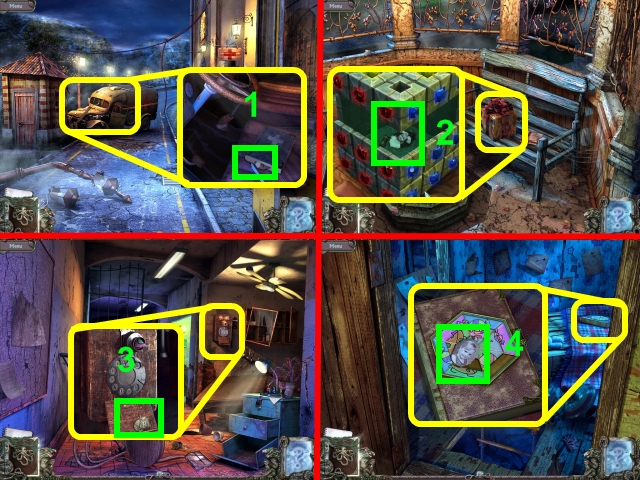
- Go to the AMBULANCE. Grab the Bible. Pick up the PHOTO (H).
- Use the FLASHLIGHT to illuminate the dark niche (I).
- Remove the fuses to cut off the power to the wire (J).

- Go to the CABIN. Pick up the SCISSORS on the windowsill (K).
- Leave the cabin. Go straight to go to the CROSSROADS. Go RIGHT.
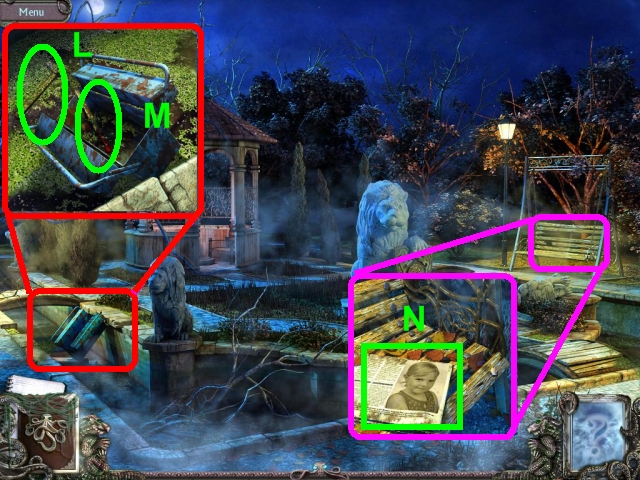
- Pick up the HAMMER (L) and the FILE (M).
- Click on the swing for a closer view. Read the newspaper (N).
- Go to the PAVILION.
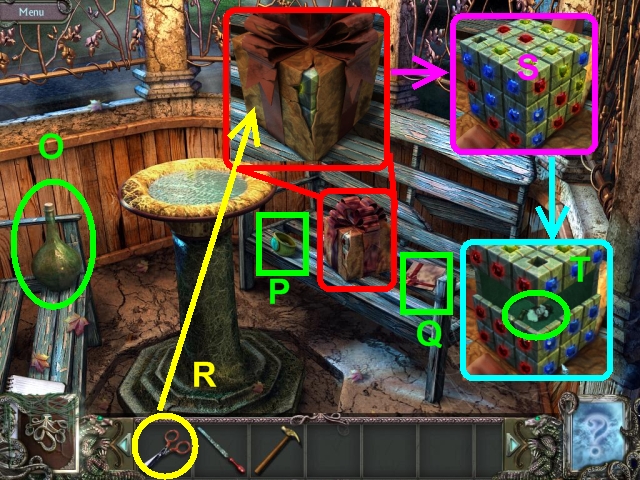
- Pick up the EMPTY BOTTLE (O).
- Click on the BRACELET (P).
- Read the card by the present box (Q).
- Use the SCISSORS to open the gift (R).
- Beat the mini-game on the cube (S). Arrange the gems so each visible side of the cube has one color. When a gem is next to the empty hole, click on it to move it into the hole. The start position of the gems is random.
- Grab the PHOTO and the HANDLE (T).
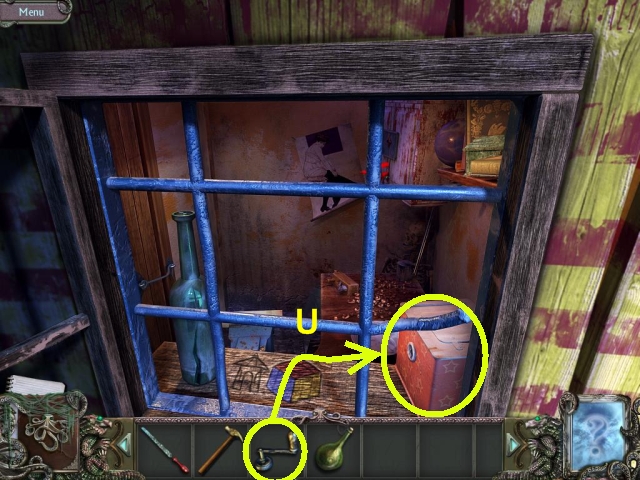
- Return to the CABIN.
- Place the HANDLE in the jack-in-the-box (U) to open the cabin door.
- Enter the CABIN.
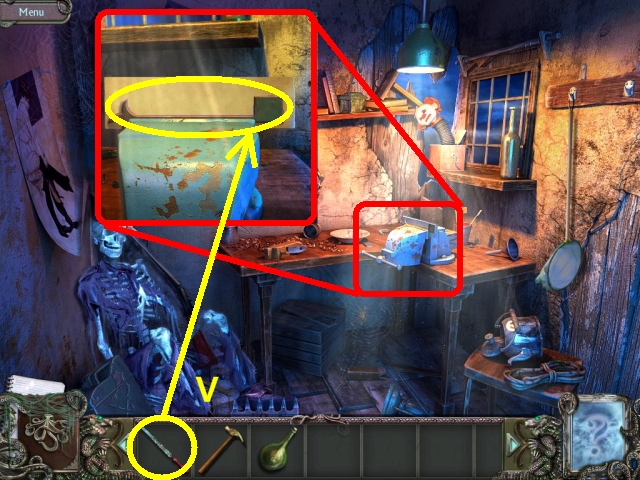
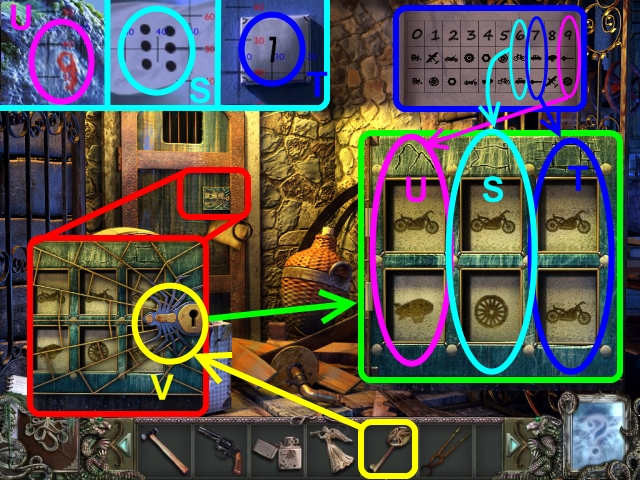
- Click on the key template on the table. Use the FILE to make the KEY (V).
- Click on the skeleton.

- Go to the CROSSROADS. Read the note by the ladder (W).
- Use the HAMMER to fix the ladder to the tree house (X).
- Use the KEY to open the TREE HOUSE door (Y).
- Pick up the ROPE LADDER (Z).
- Go to the back of the BUS. Click on the sparkling area to access the hidden object area. Collect every object on the list at the bottom of the screen to acquire the FORCEPS.
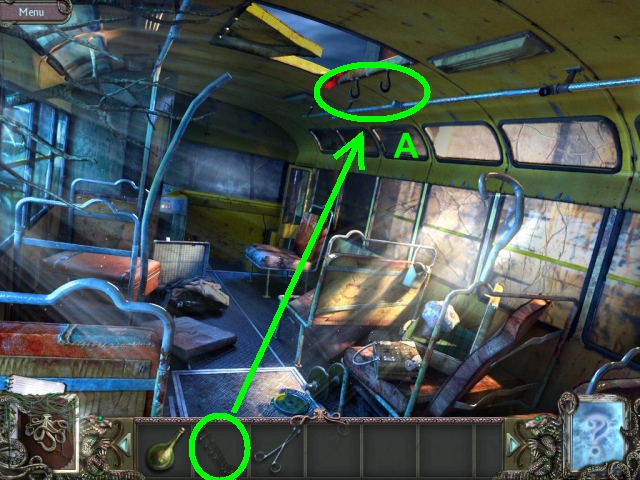
- Place the ROPE LADDER on the hooks below the hatch (A).
- Go to the ROOF.
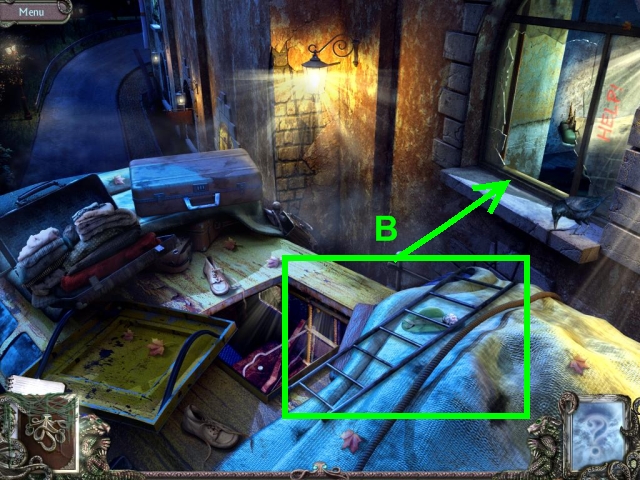
- Place the ladder between the bus and the window (B). Go through the WINDOW.
- In the MORTUARY, open the jar that contains the frog (C). Use the FORCEPS to acquire the DRAGON RING (D).
- Place the DRAGON RING in the slot in the frozen door to melt the ice (E).
- Click on the corpse. Remove the KEY from its hands (F).
- Note the symbols on the refrigerator door (G).
- Open the door to the HOSPITAL CORRIDOR with the KEY (H).
- Click on the flower on the cabinet (I).
Chapter 3: Escape
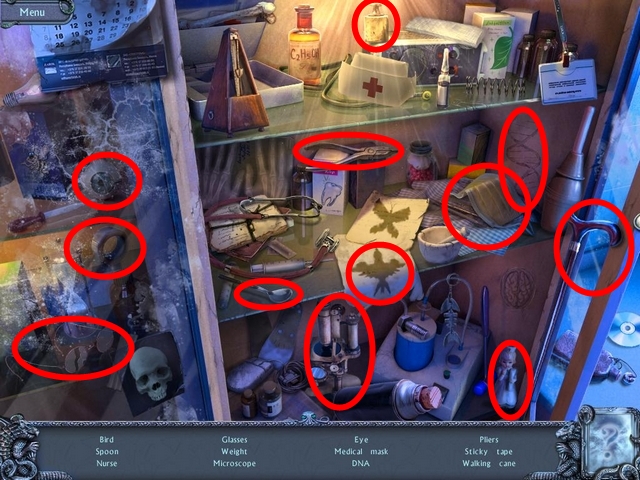
- Click on the sparkling area to access the hidden object area. Collect every object on the list at the bottom of the screen to acquire the NAIL CLIPPERS.
- Use the NAIL CLIPPERS to cut the WHEEL SPOKE off the wheelchair (J).
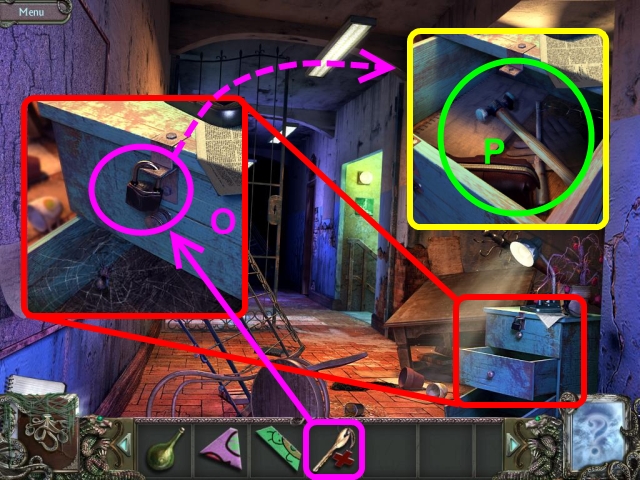
- Click on the nightstand. Grab the REFLEX HAMMER (K).
- Use the REFLEX HAMMER to hammer in the nails on the lock pick template (L).
- Use the WHEEL SPOKE on the nails to make the LOCK PICK (M).
- Pick up the BROKEN PENCIL that's inside one of the slippers (N).
- Use the LOCK PICK to open the door (O). Enter the HOSPITAL CORRIDOR.
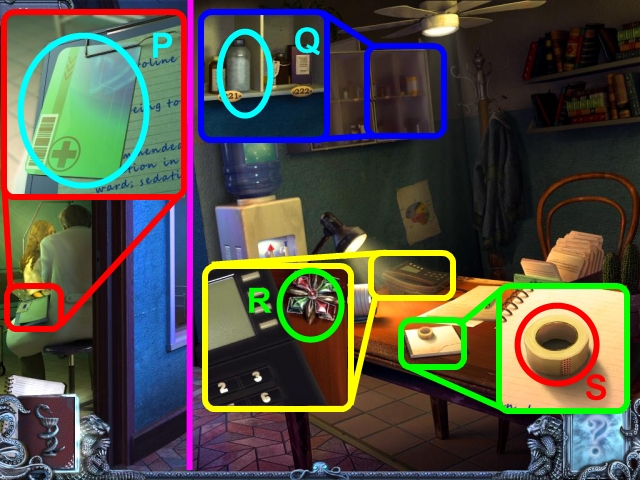
- Grab the doctor's ACCESS CARD (P). Go to the NURSE'S STATION.
- Grab the POWDER in the medicine cabinet (Q).
- Pick up the FLOWER KEY next to the phone (R).
- Pick up the STICKY TAPE from the nurse’s notebook (S).
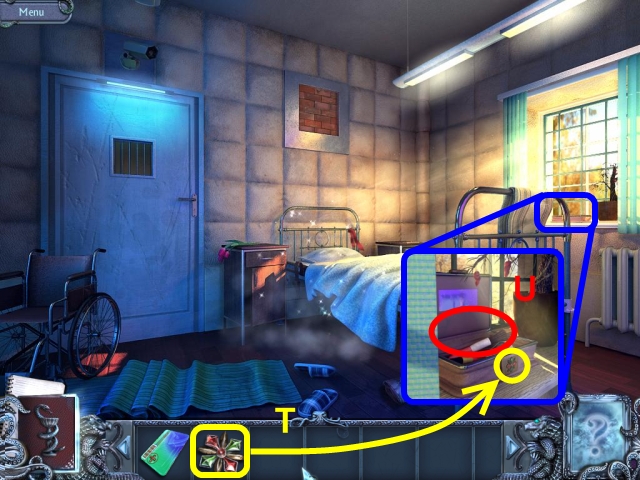
- Return to the WARD. Place the FLOWER on the box on the windowsill (T).
- Grab the MAKEUP BRUSH (U).
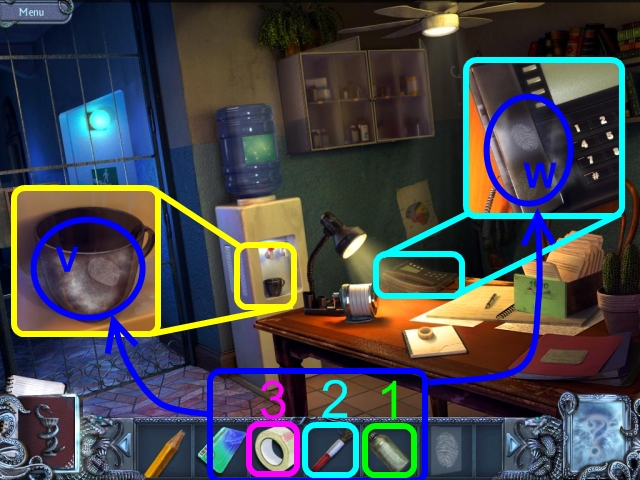
- Return to the NURSE'S POST. Use the POWDER on the mug (V1). Use the MAKEUP BRUSH on the mug (V2). Use the STICKY TAPE on the mug (V3).
- Use the POWDER on the phone (W1). Use the MAKEUP BRUSH on the phone (W2). Use the STICKY TAPE on the phone (W3).
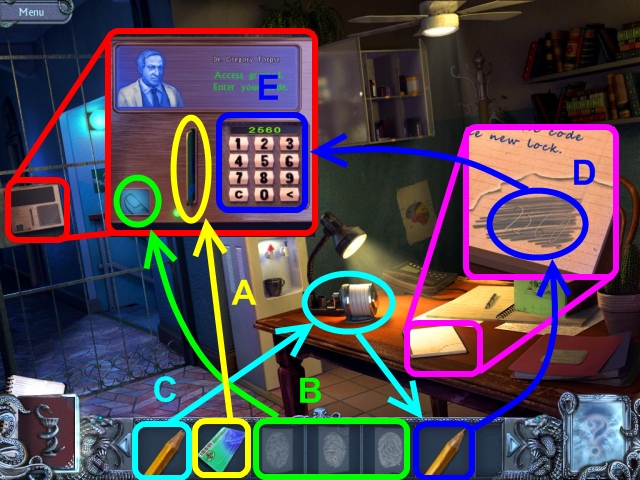
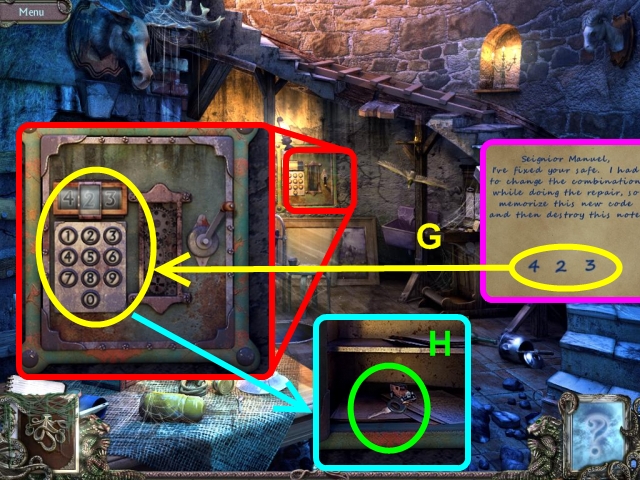
- Insert the ACCESS CARD in the lock on the gate (A).
- Use each FINGERPRINT on the lock (B).
- Sharpen the BROKEN PENCIL to acquire the PENCIL (C).
- Use the PENCIL on the nurse's notebook to reveal the lock code (D).
- Enter the code (E). Try to enter the stairwell.
Chapter 4: Abandoned Hospital
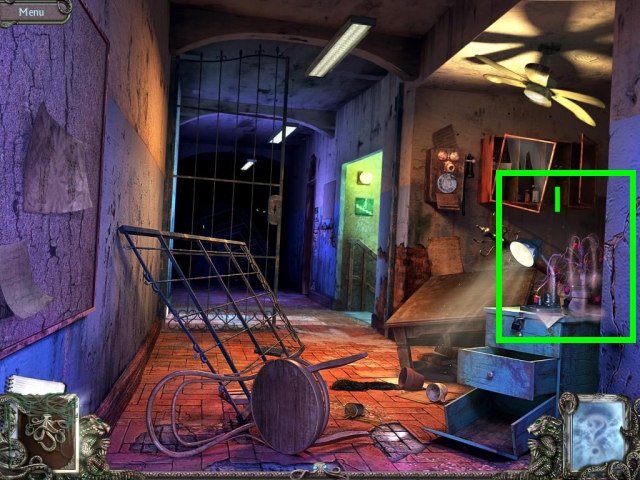
- You are in the HOSPITAL CORRIDOR. Zoom in on the phone. Pick up the DIARY LOCK FRAGMENT (F) and the PHOTO (G).
- Grab the MATCHES in the chest of drawers (H).
- Go to the STAIRWELL. Click on the photo on the case in the dental chair.
- Go downstairs. Use the MATCHES to light the TORCH (I).
- Use the LIT TORCH on the chain on the cellar door (J).
- Enter the CELLAR. Click on the window on the right. Pick up the DIARY LOCK FRAGMENT (K).
- Move toward the door at the far end of the room. Pick up the KEY on the tank (L).
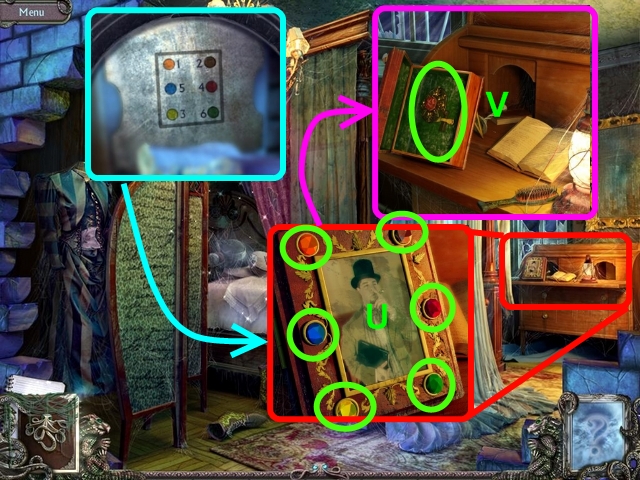
- Click on the mirror near the DOOR WITH ROSES. Pick up the PHOTO (M). Note the Roman numerals at the bottom of the mirror (N).
- Return to the HOSPITAL CORRIDOR. Use the KEY to open the chest of drawers (O).
- Grab the HAMMER and CHISEL (P).
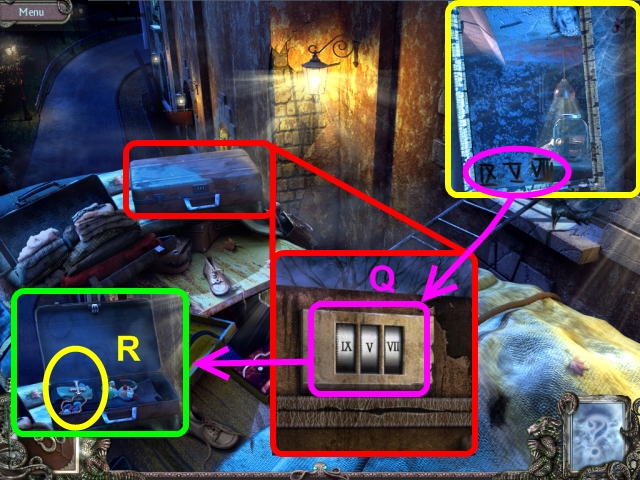
- Go to the BUS ROOF and enter the Roman numerals on the lock on the suitcase (Q).
- Pick up the SILVER CROSS (R).
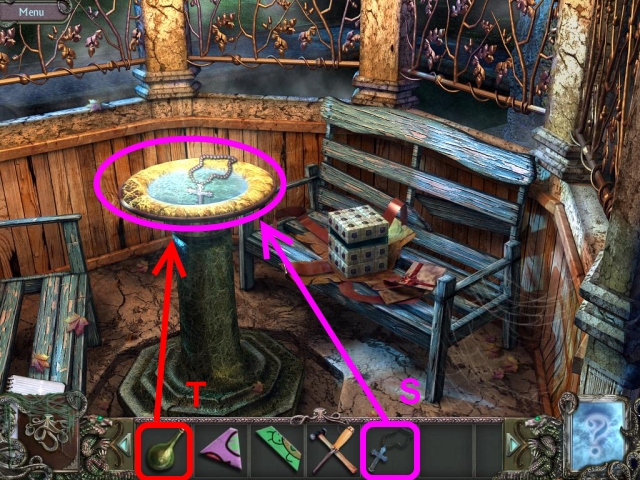
- Go to the PAVILION. Place the SILVER CROSS in the water (S).
- Fill the EMPTY BOTTLE with water to acquire HOLY WATER (T).
- Go to the CABIN. Use the HOLY WATER on the ghost (U).
- Pick up the KEY (V).
- Use the KEY to open the cabinet (W).
- Enter the correct sequence of tokens. The sequence is written on the refrigerator door in the MORTUARY (X).
- Pick up the DIARY LOCK FRAGMENT (Z) and the WRENCH (Y).
- Go to the TREE HOUSE and pick up the PHOTO (A) on the diary.
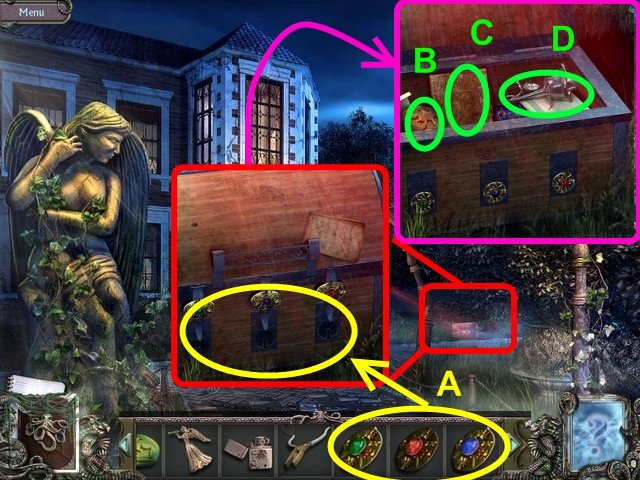
- Insert the three DIARY LOCK FRAGMENTS (B) into the diary lock.
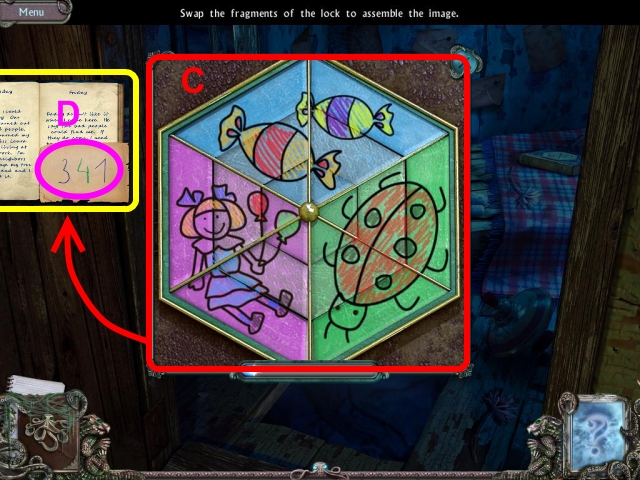
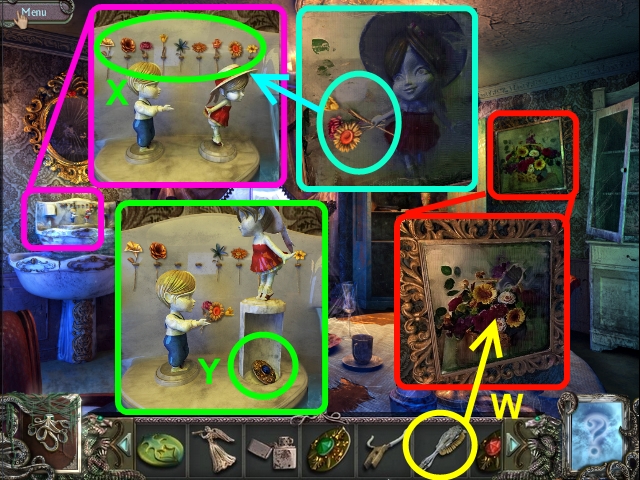
- Assemble the flower by swapping its parts (C).
- Take the code for the door in the hospital cellar (D).
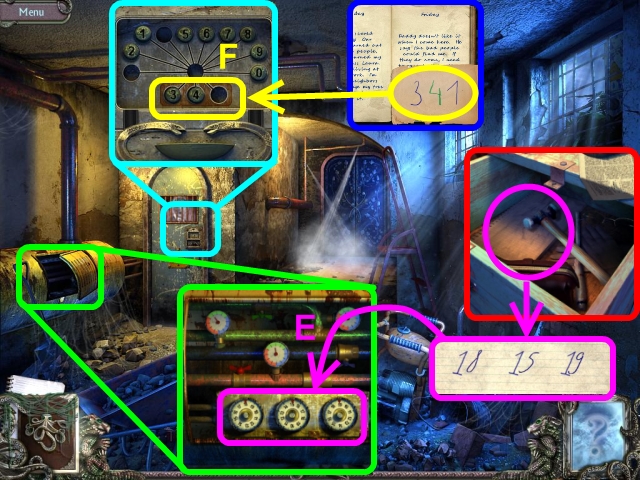
- In the HOSPITAL CORRIDOR, click on the notebook in the drawer. Note the pressure at which the pipes in the cellar should be set.
- Go to the CELLAR. Adjust the pressure in the pipes according to the parameters in the notebook to turn off the steam (E).
- Open the locked door using the code from the girl’s diary in the tree house (F).
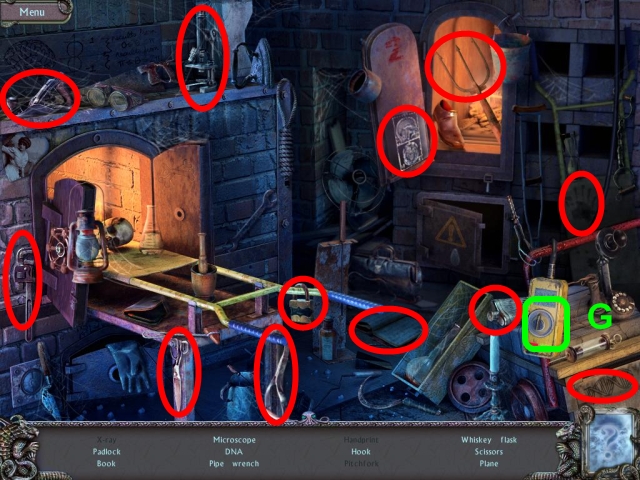
- Click on the sparkling area to access the hidden object area. Collect every object on the list at the bottom of the screen to acquire the SCISSORS. To see some of the objects you need to press the button (G).
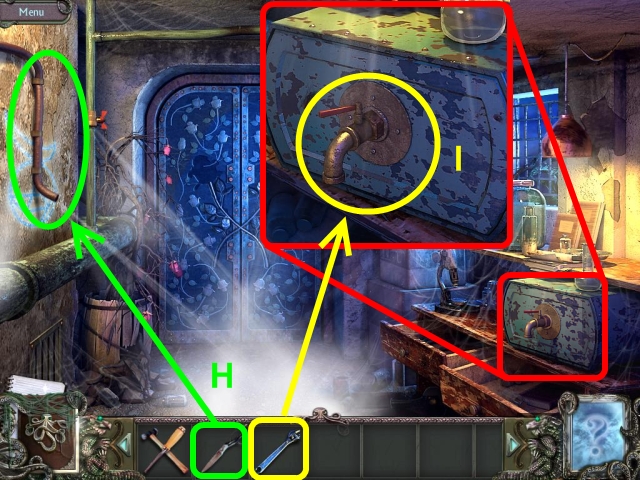
- Go to the DOOR WITH ROSES. Use the SCISSORS to cut the HOSE on the wall (H).
- Use the WRENCH to remove the TAP from the tank (I).
- Go BACK one step. Click on the window on the right. Use the HAMMER and CHISEL to break the grate (J). The HAMMER will go back to the inventory.
- Place the TAP on the barrel of gas behind the window (K1). Place the HOSE on the tap (K2).
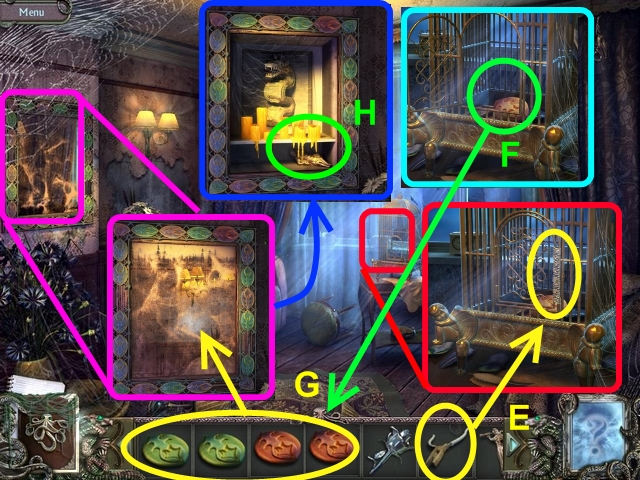
- Take the CHAINSAW (L).
- Click on the sparkling area to access the hidden object area. Collect every object on the list at the bottom of the screen to acquire the PHOTO. To see some of the objects you need to press the button (M).
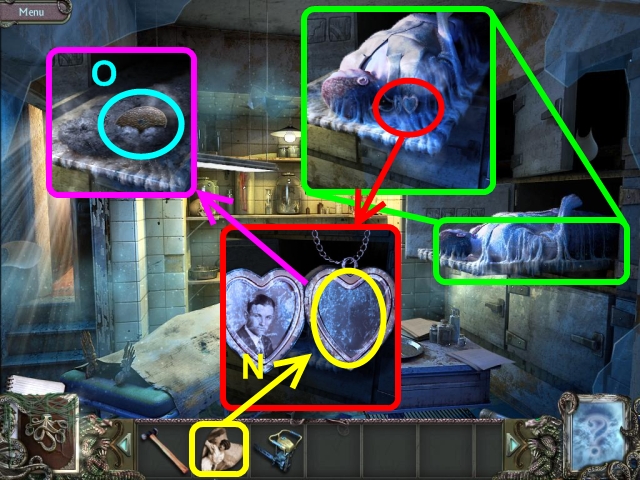
- Go to the MORTUARY. Insert the PHOTO in the locket (N).
- Remove the METAL DISC from the ashes (O).
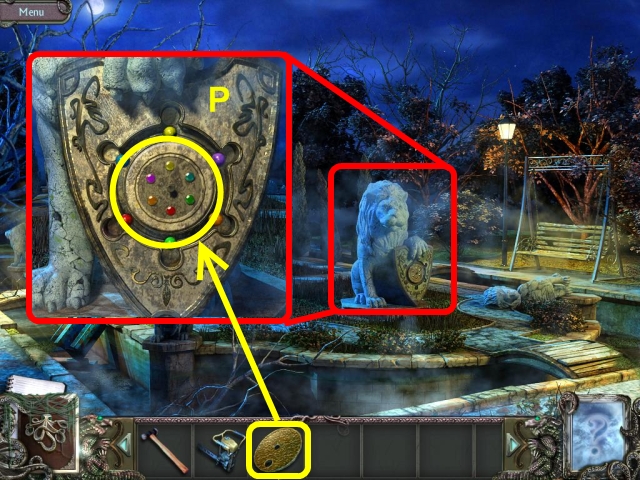
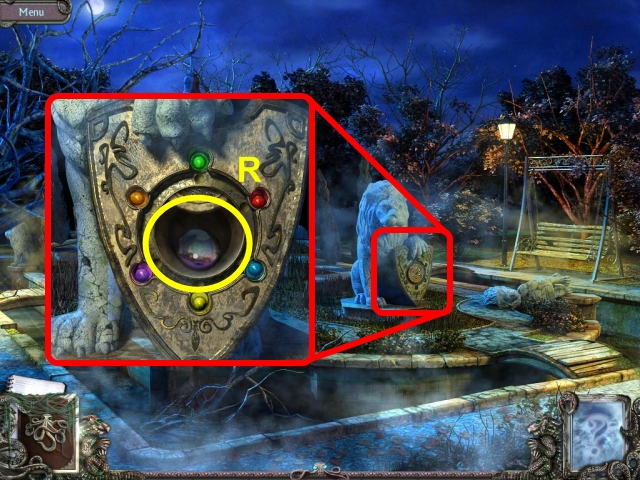
- Go to the POND. Place the METAL DISC in the lion's shield (P).
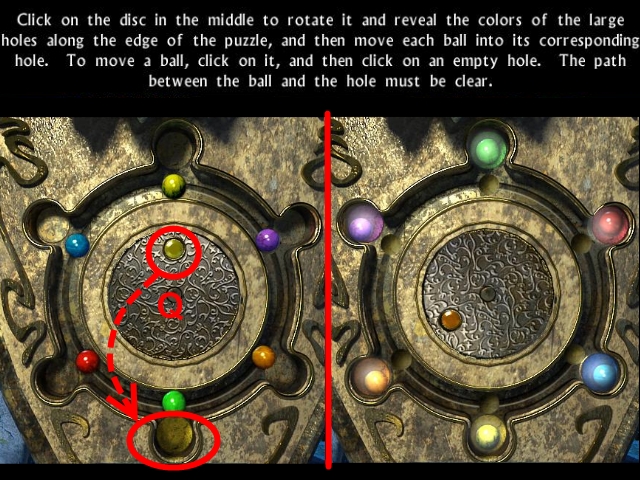
- Beat the mini-game on the shield. Click on the disc in the middle to rotate it and reveal the colors of the large holes along the edge of the puzzle (Q).
- Then move each ball into its corresponding hole. To move a ball, click on it, and then click on an empty hole. The path between the ball and the hole must be clear. The correct position of the balls is random.
- Pick up the LENS (R).
- Go to the CROSSROADS. Step up to the GAP. Use the CHAINSAW to cut down the tree (S).
Chapter 5: Lighthouse Mysteries
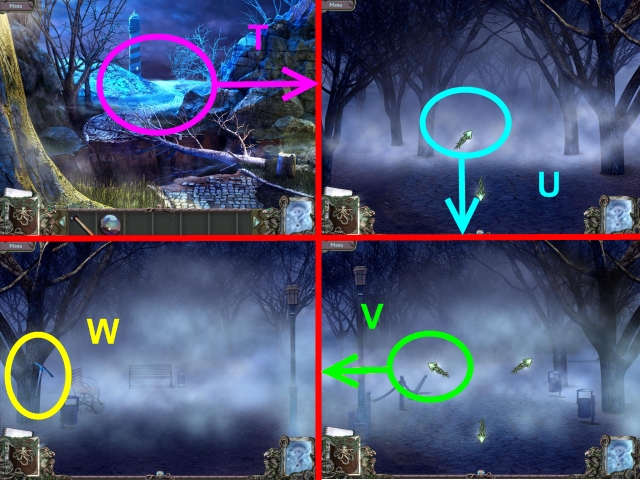
- Cross the gap (T). Go STRAIGHT (U). Go LEFT (V). Pick up the PICKAXE (W).
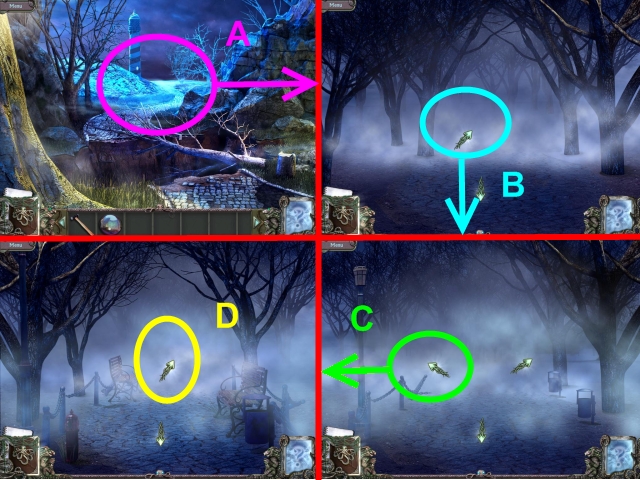
- Go BACK to the GAP. Cross the gap (A). Go STRAIGHT (B). Go RIGHT (C). GO STRAIGHT (D) to reach the LIGHTHOUSE.
- Encounter the monster. Return to the LIGHTHOUSE.
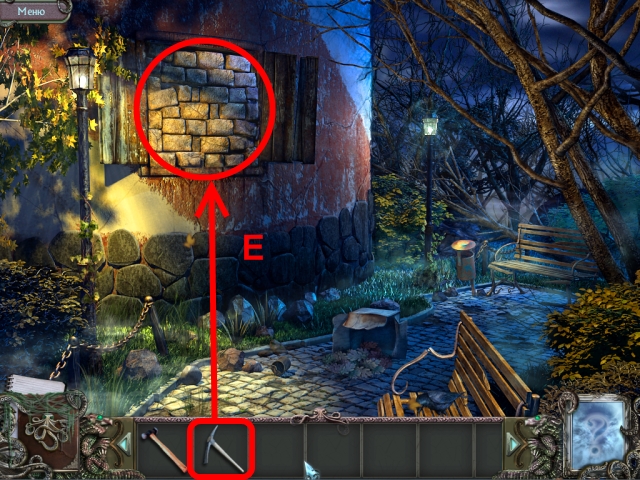
- Use the PICKAXE to break the bricks across the lighthouse window (E). Enter the lighthouse.
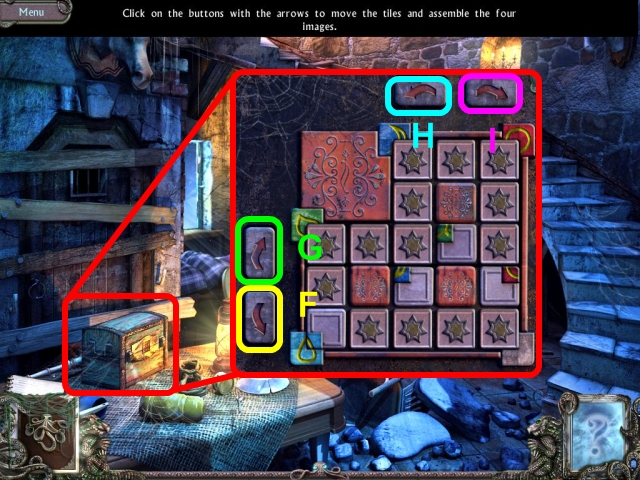
- Click on the chest on the table to start the mini-game. Click on the buttons with the arrows to move the tiles and assemble the four images.
- Click on the buttons (F), (G), (H), (I) in the following order:
- (F), (I), (G) three times, (H), (G) three times, (H) four times, (G), and (I) two times.
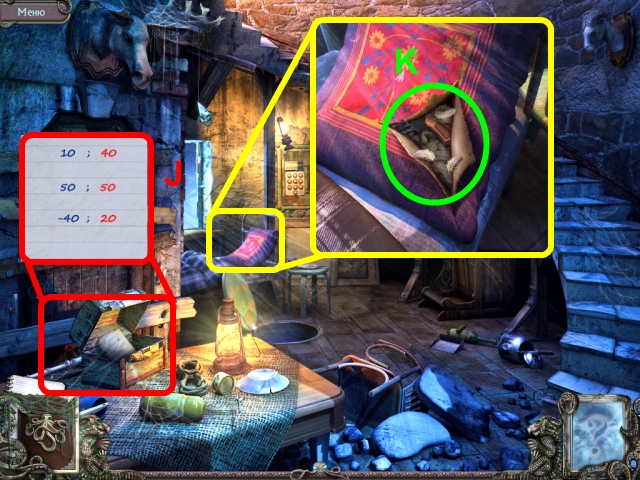
- Click on the note in the chest. The coordinates will be recorded in the journal (J).
- Zoom in on the pillow on the bed on the FIRST FLOOR.
- Click on the pillow to tear it open.
- Pick up the FEATHER and the GUN (K).
- Enter the LIGHTHOUSE CELLAR. Click on the sparkling area to access the hidden object area. Collect every object on the list at the bottom of the screen to acquire the AXE.
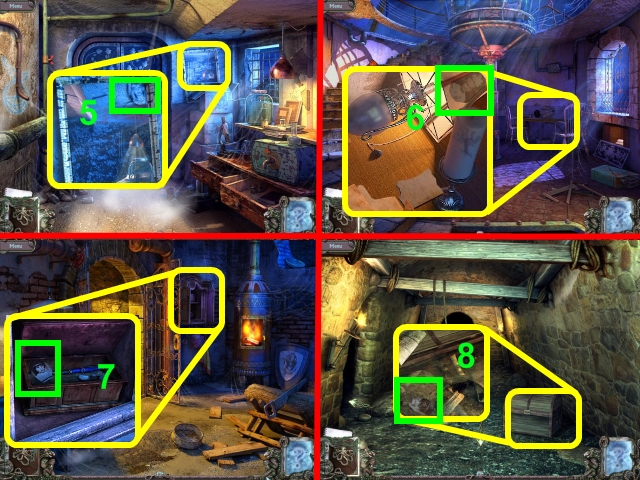
- Pick up the LIGHTER in the cabinet (L).
- Zoom in on the barrel blocking the hidden door.
- Use the AXE to break it (M).
- Zoom in on the image on the lock (N).
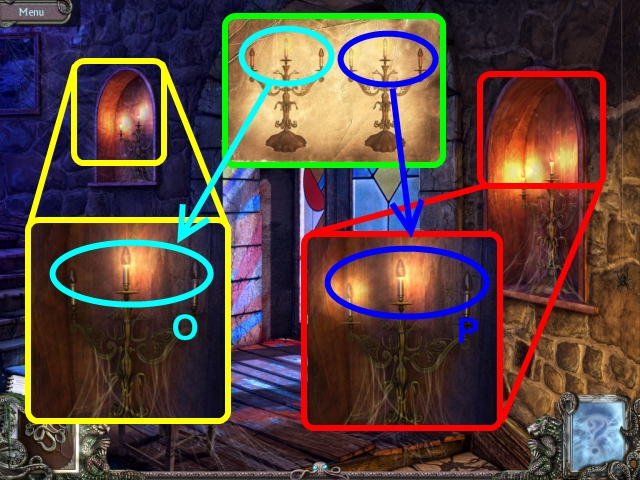
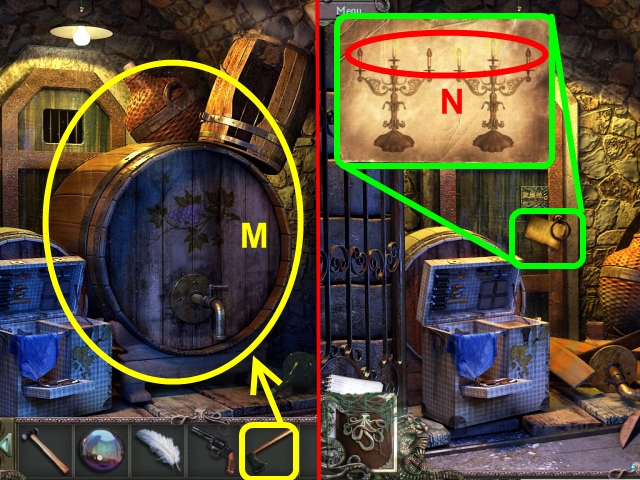
- Go to the BALCONY DOOR. Zoom in on each candelabra.
- Unscrew and screw in the light bulbs until the candelabras match the ones shown in the image in the cellar (O, P). This will open the cache on the balcony.
- Use the HAMMER to break the glass on the door. Turn the key (Q).
- Go UPSTAIRS. Zoom in on the table.
- Turn on the lamp (R).
- Pick up the PHOTO (S).
- Use the LIGHTER to light the candle on the table (T). Remove the CACHE KEY from the melted wax (U).
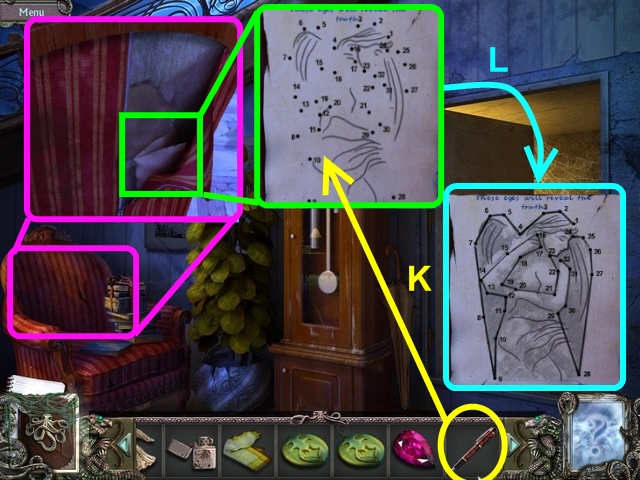
- Assemble the sheet of paper on the table (V).
- Open the bottle of iodine. Dip the FEATHER into it (W).
- Use the FEATHER on the piece of paper several times to reveal the image (X).
- Go to the BALCONY.
- Put the CACHE KEY into the cache lock to activate the lock (A).
- Press the buttons shown in the image on the table (B).
- Grab the ANGEL (C).
- Go to the LIGHTHOUSE TOWER. Zoom in on the niche under the window. Pick up the KNIFE (D).
- Zoom back in on the niche. Click on the scroll (E) to read the safe code (F).
- Go to the FIRST FLOOR. Enter the code on the lock to open the safe (G).
- Grab the IGNITION KEY (H).
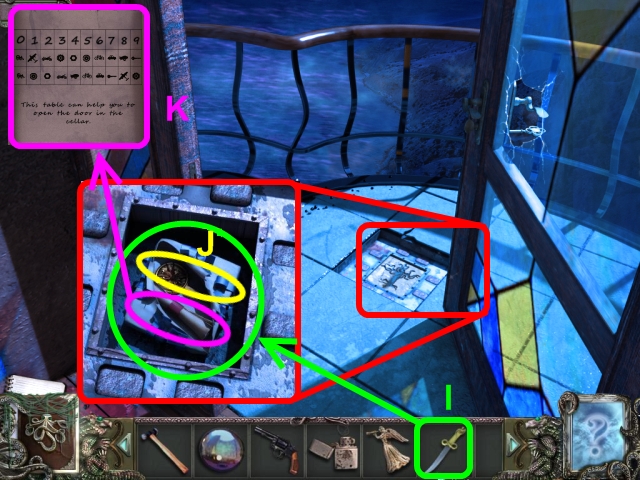
- Go to the BALCONY. Use the KNIFE to open the parcel (I).
- Grab the SPIDER KEY (J).
- Note the table in the scroll (K).
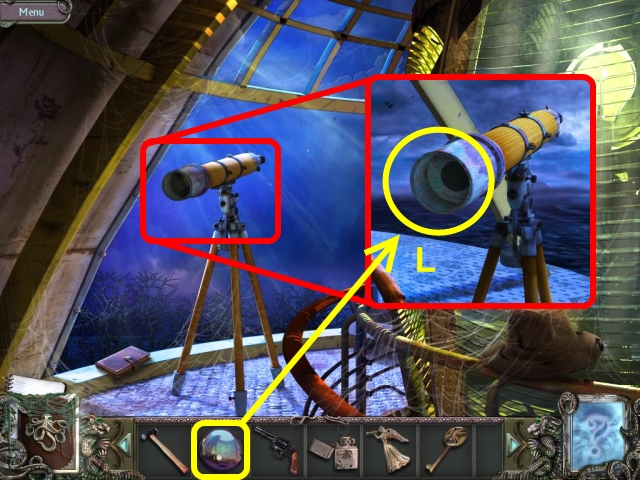
- Go UPSTAIRS to the tower. Zoom in on the telescope. Place the LENS on it (L).
- Set the telescope to the three coordinates mentioned in the note in the chest (M, N, O). The red number is the vertical position; the blue number is the horizontal position. At each coordinate, you will find a number. The numbers will be recorded in the journal.
- Zoom in on the journal on the floor near the telescope. Read the story of the island.
- Go to the LIGHTHOUSE CELLAR. Click on the sparkling area to access the hidden object area. Collect every object on the list at the bottom of the screen to acquire the TONGS.
- Use the TONGS to remove the JEWELRY CASE COVER from the oven (P).
- Put the JEWELRY CASE COVER on the jewelry case in the cabinet (Q).
- Grab the PHOTO (R).
- Use the SPIDER KEY to open the grate on the hidden door in the cellar (V).
- Enter the password to open the hidden door. The password corresponds to the numbers seen through the telescope and the table on the scroll in the cache on the balcony (S, T, U).
- Enter the CATACOMBS. Go RIGHT (A). Click on the chest to open it. Grab the SAW BLADE (D) and the PHOTO (C). Click on the newspaper to read it.
- Go forward to the location with the locked door (B).
- Pick up the CHAIN on the floor (E).
- Fire the GUN to break the lock (F). Enter the GARAGE.
Chapter 6: Neglected Mansion
- Place the CHAIN on the garage door controls to open the garage door (G).
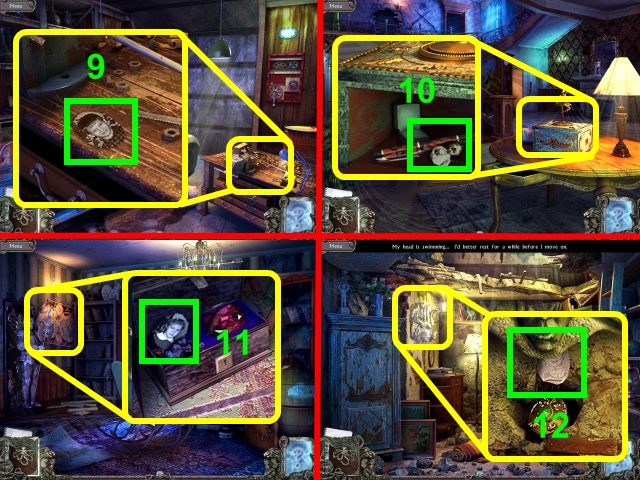
- Click on the table. Place the SAW BLADE on the HACKSAW (H).
- Grab the HACKSAW and the PHOTO (I).
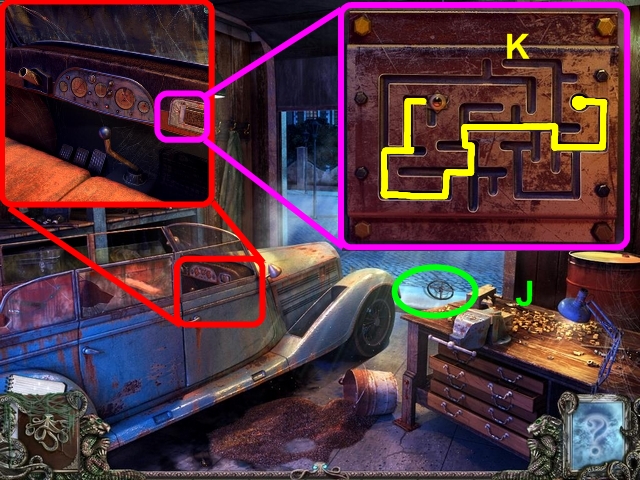
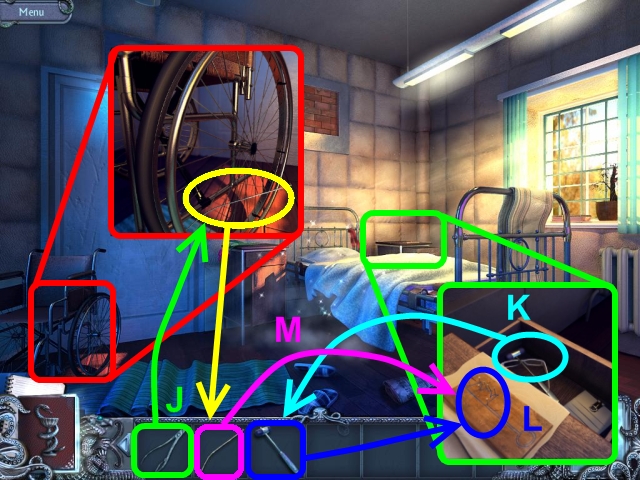
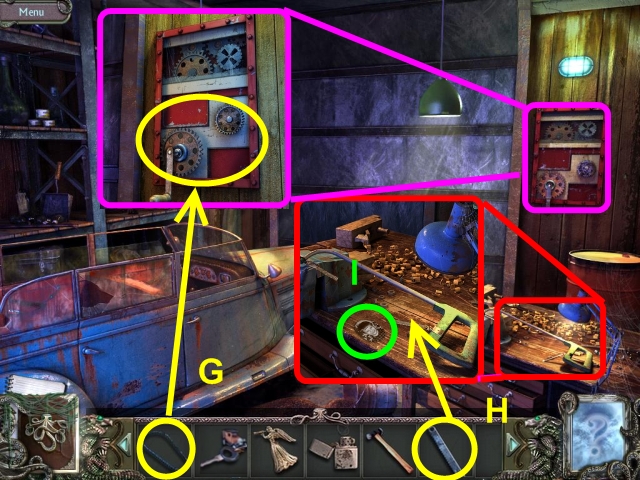
- Click on the STEERING WHEEL outside the garage door (J).
- Open the car door. Beat the mini-game on the glove compartment as shown in the screenshot (K).
- Take the DRAGON from the glove compartment (L).
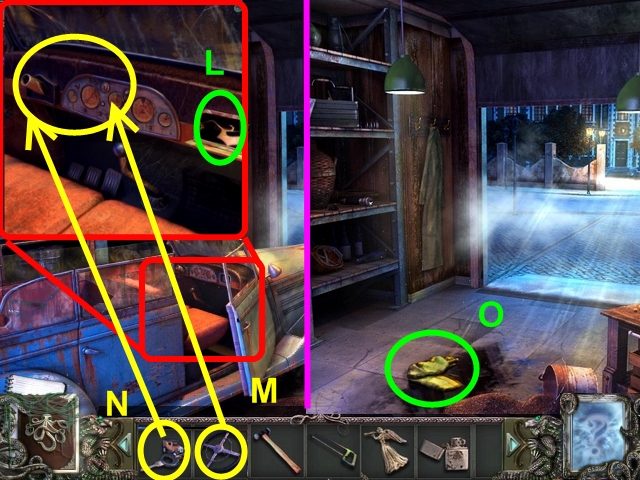
- Place the STEERING WHEEL in the car (M). Use the IGNITION KEY to start the engine (N). The car will break the gate leading to the mansion.
- Grab the CLOTH that was under the car (O).

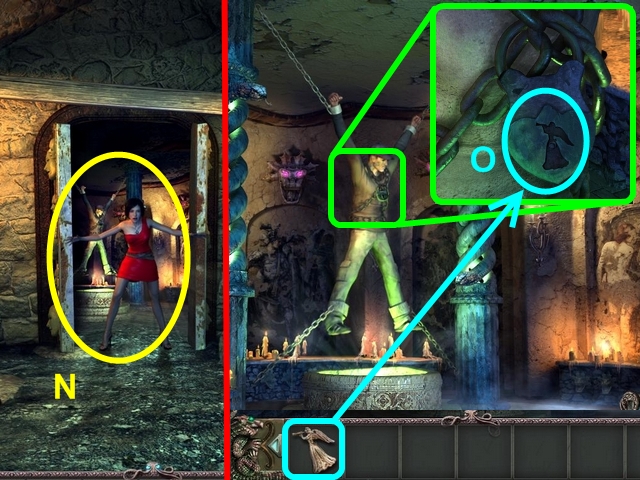
- Go toward the MANSION. Use the DRAGON to unlock the front door (P).
- Enter the MAIN HALL. Try to go upstairs. The chandelier will fall and block the way.
- Use the HACKSAW on the chandelier (Q).
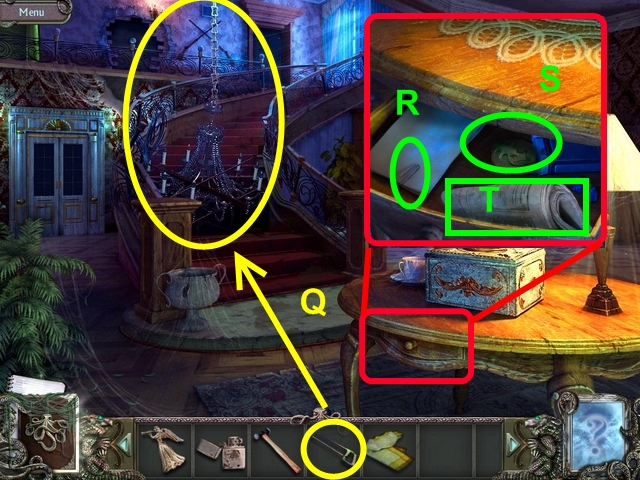
- Open the drawer of the table. Grab the WOODEN LEAF (S) and the PAPERCLIP (R).
- Read the newspaper in the drawer (T).
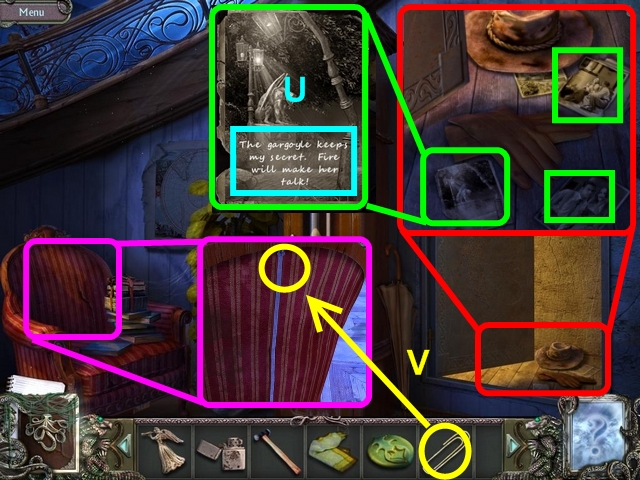
- Zoom in on the area under the stairs. Zoom in on the closet. Find the photo of the gargoyle (U).
- Zoom in on the armchair under the stairs. Place the PAPERCLIP on the zipper to fix it (V).
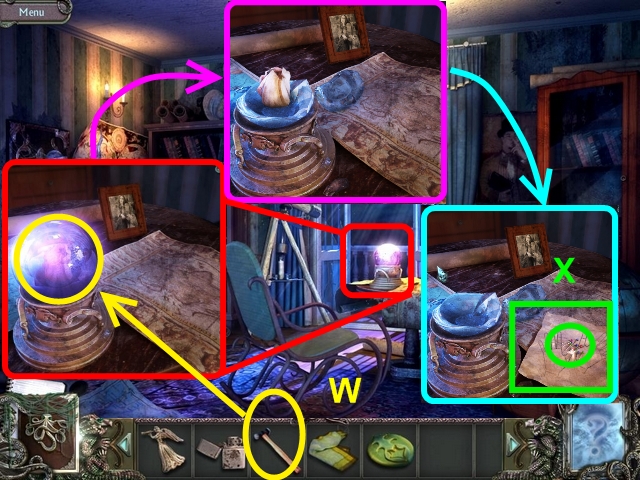
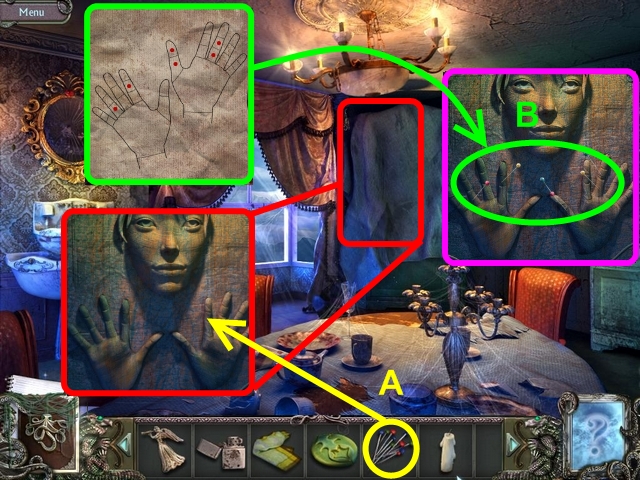
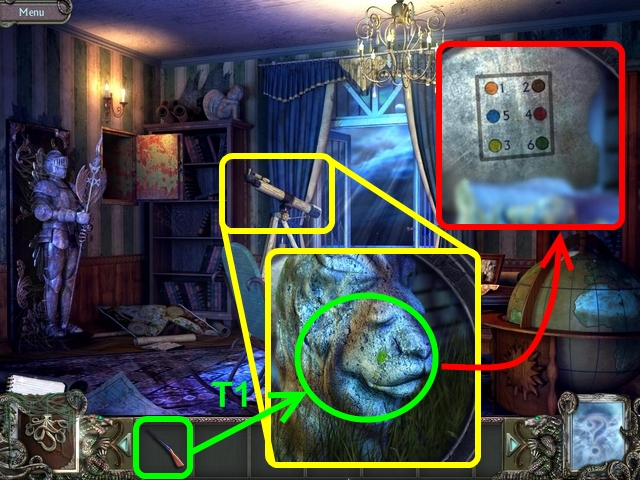
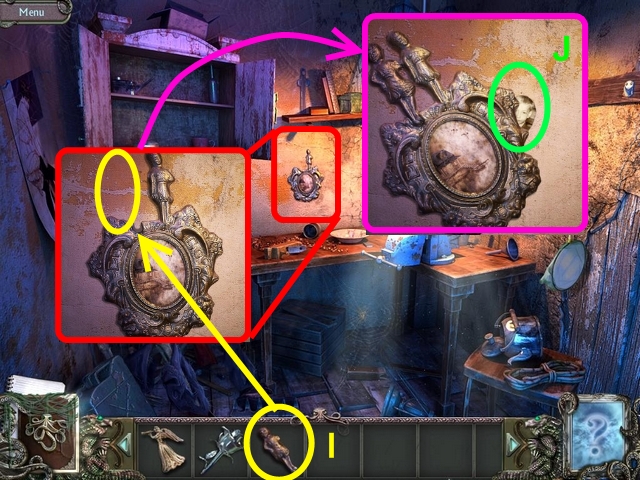
- Go UPSTAIRS. Enter the OFFICE. Use the HAMMER to break the crystal ball on the table (W).
- Click on the note. Pick up the PINS. Note the image of the palm (X).
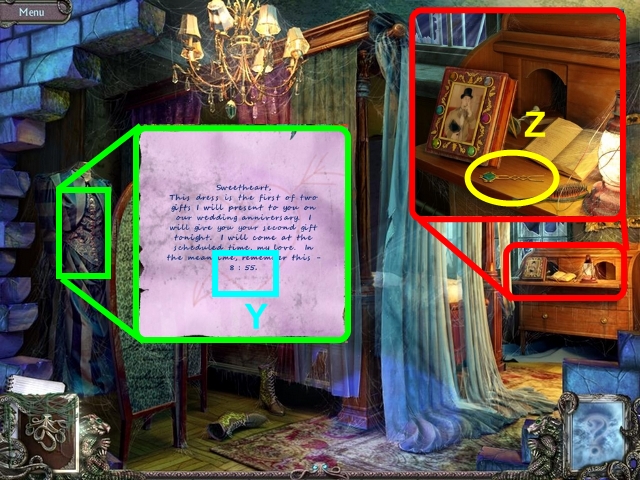
- Go BACK. Step into the BEDROOM through the gap in the wall. Click on the dress to unbutton it and read the note hidden inside of it. Remember the time (Y).
- Pick up the HAIRPIN on the table (Z).
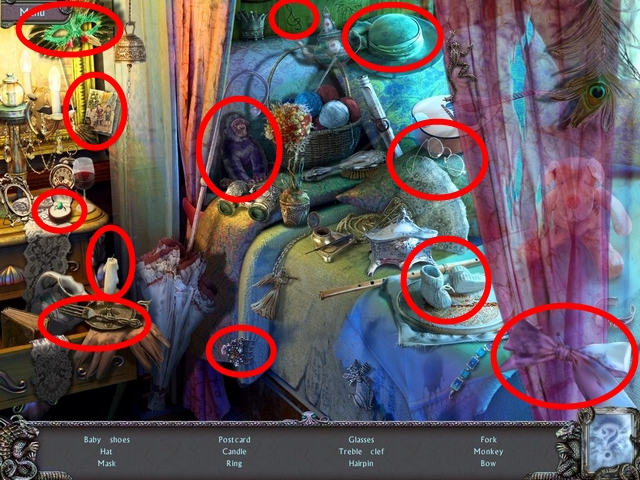
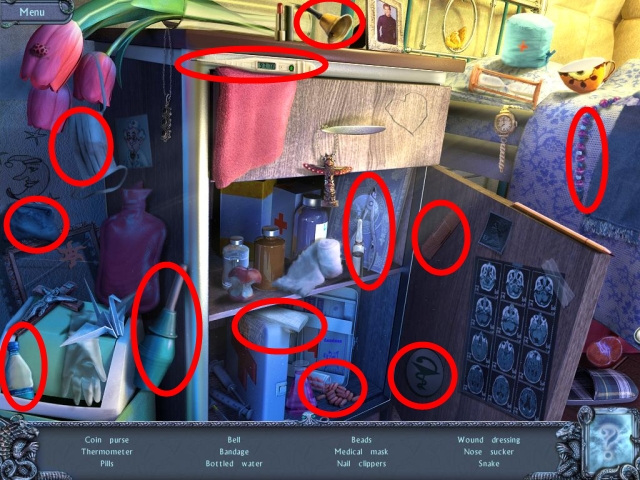
- Click on the sparkling area to access the hidden object area. Collect every object on the list at the bottom of the screen to acquire the CANDLE.
- Go down to the MAIN HALL. Open the door to the left of the stairs. Enter the DINING ROOM.
- Remove the sheet from the wardrobe.
- Stick the PINS in the fingers (A), as shown in the note in the crystal ball (B).
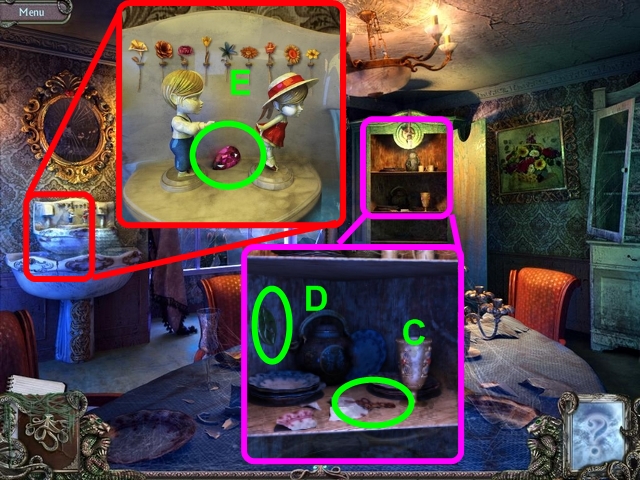
- Pick up the MINUTE HAND (C) and the WOODEN LEAF (D).
- Pick up the RUBY on the fountain (E).
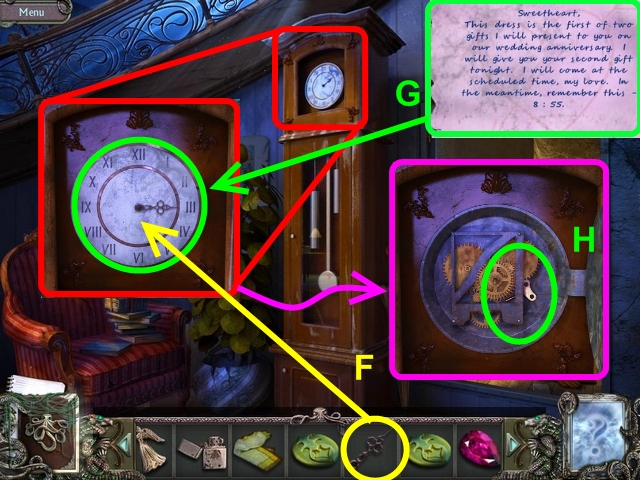
- Go to the MAIN HALL. Place the MINUTE HAND on the clock under the stairs (F).
- Set the time mentioned in the note in the bedroom (G). The time in the note is random.
- Grab the WIND-UP KEY (H).
- Step back into the MAIN HALL. Place the WIND-UP KEY in the music box (I).
- Pick up the PEN and the PHOTO (J).
- Zoom in on the armchair under the stairs. Use the PEN to connect the numbers (K, L).
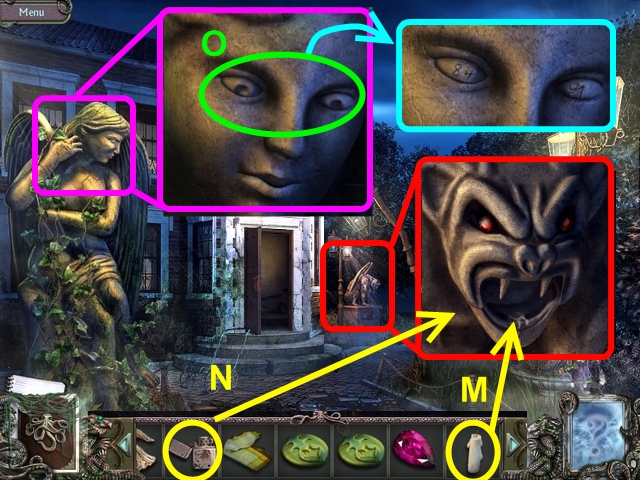
- Go OUTSIDE. Put the CANDLE in the gargoyle's mouth (M).
- Light the candle with the LIGHTER (N). The rays from its eyes will point to a spot on the ground.
- Zoom in on the angel's face. Click on the eyes to reveal the safe code (O).
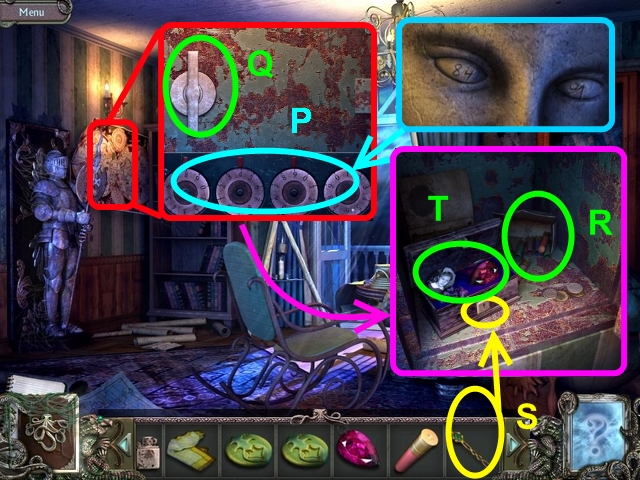
- Go to the OFFICE. Click on the map on the wall to remove it. Click on the built-in safe.
- Enter the code from the angel's eyes (P). Turn the handle to open the safe (Q).
- Use the HAIRPIN to open the case (S).
- Pick up the BULLET (R), the RUBY and the PHOTO (T).
- Go to the top of the STAIRS. Grab the rifle. Put the BULLET in the RIFLE (U).
- Go around the corner.
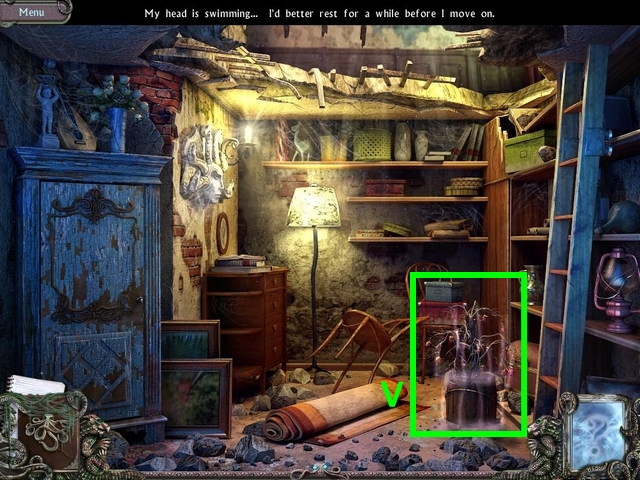
- Fall into the STOREROOM. Click on the plant (V).
Chapter 7: Locked Up

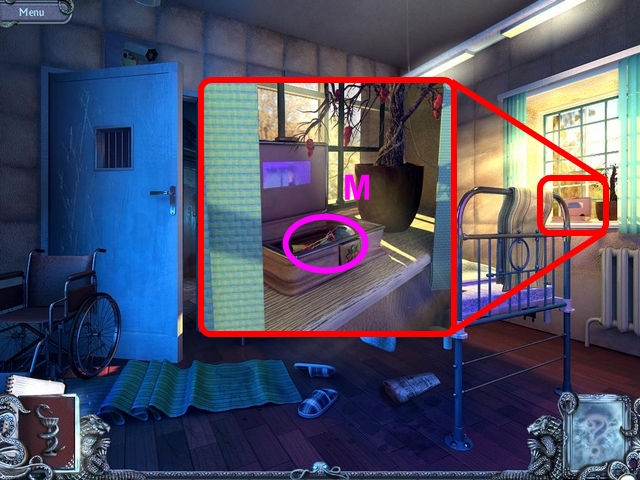
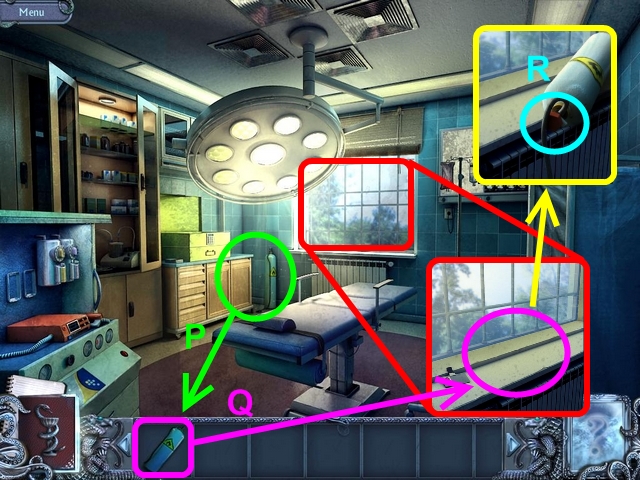
- You are in the OPERATING ROOM. Pick up the IRON (A).
- Open the shutters. Pick up the BATTERY on the windowsill (B).
- Find the code on the back of the ID badge (C).
- Enter the code on the lock on the toolbox (D).
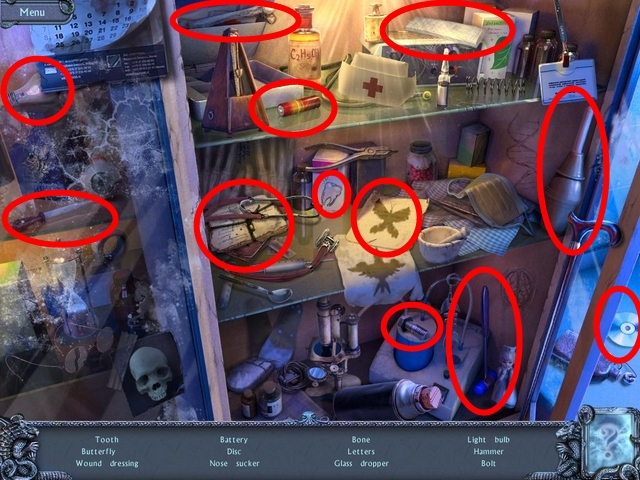
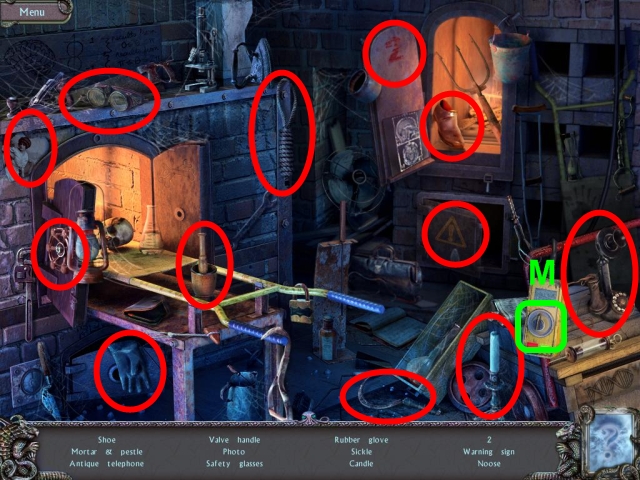
- Click on the sparkling area twice to access the hidden object area. Collect every object on the list at the bottom of the screen to acquire the BATTERY.
- Pick up the BATTERY (E).
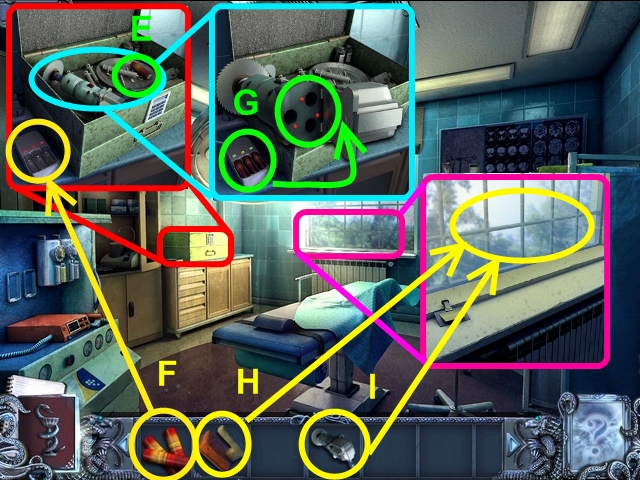
- Place all three BATTERIES in the charger (F).
- Grab the CHARGED BATTERIES. Insert them into the BONE SAW (G).
- Use the IRON to break the window (H).
- Use the SAW on the window (I).
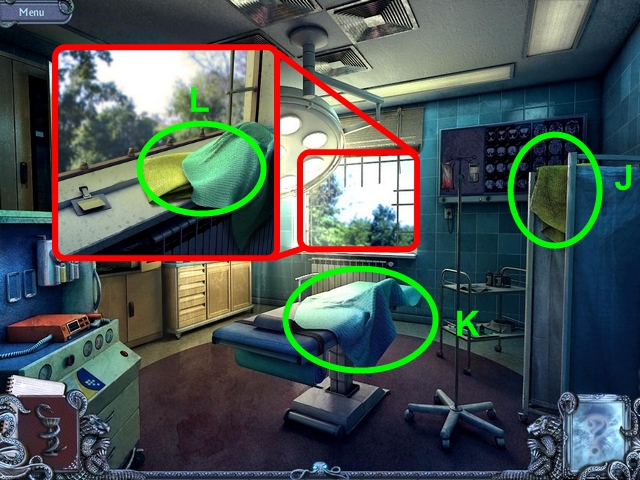
- Click on the sheet (K) and the towel (J) several times to make a rope (L).
Chapter 8: Back to Neglected Mansion
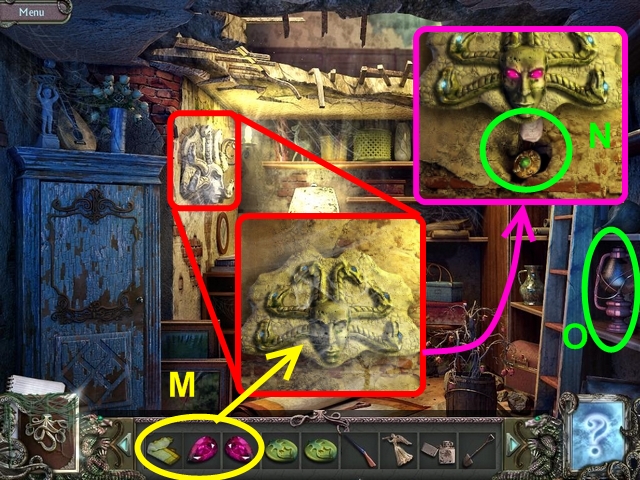
- Use the CLOTH to clean Medusa. Place both RUBIES in her eyes (M).
- Beat the mini-game to open the cache. Click the snakes to find out the correct sequence. If you have selected the next head in the sequence, then all of the heads on which you have clicked will remain down. If you click on the wrong head, you'll have to start over. The correct sequence is random.
- Grab the KEY and the PHOTO (N).
- Pick up the OIL LANTERN on the shelf (O).

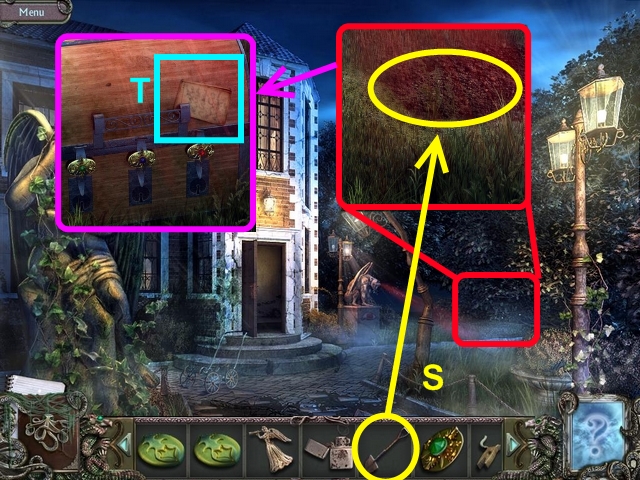
- Click on the carpet. Pick up the SHOVEL (P).
- Zoom in on the ladder. Pick up the WIRE CUTTERS (Q).
- Use the OIL LANTERN on the ladder wheel (R). Climb back upstairs.
- Use the SHOVEL to excavate the chest (S).
- Read the notes on the chest (T).
- Go to the OFFICE. Zoom in on the telescope. Use the RIFLE to shoot the lion (T1). Note the image behind the lion.
- Go to the BEDROOM. Click on the sparkling area to access the hidden object area. Collect every object on the list at the bottom of the screen to acquire the BRUSH.
- Click on the gems in the photo frame in the order shown on the image behind the lion (U).
- Grab the KEY (V).
- Go to the DINING ROOM. Use the BRUSH to clean the painting on the wall (W). Note which flowers the girl has in her hands.
- Go to the FOUNTAIN. Click on the three flowers you saw in the painting (X).
- Grab the KEY (Y).
- Go OUTSIDE. Use the three KEYS to open the chest (A).
- Pick up the WOODEN LEAF (B) and the SILVER ROSE (D).
- Read the diary written by the owner of the mansion (C).
- Go UPSTAIRS. Turn the corner. Use the LIGHTER to burn away the cobwebs.
- Use the WIRE CUTTERS to open the bird cage (E).
- Grab the WOODEN LEAF (F).
- Place the four WOODEN LEAVES on the frame of the mirror (G). Grab the HUMAN FIGURINE (H).
- Go to the CABIN. Place the HUMAN FIGURINE on the photo frame (I). Grab the PHOTO (J).
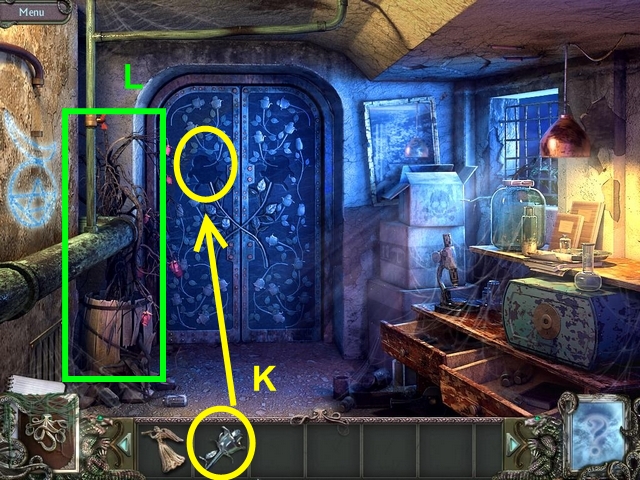
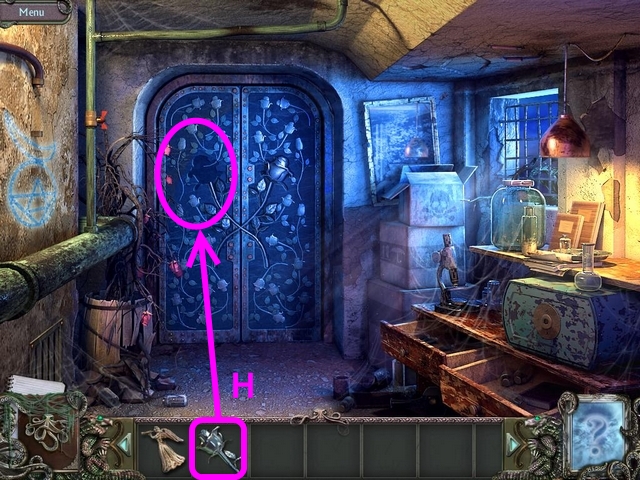
- Go to the HOSPITAL CELLAR. Place the SILVER ROSE on the door (K).
- Click on the plant to the left of the door (L).
Chapter 9: Search for Truth
- Pick up the HAIRPIN from the box on the windowsill (M).
- Click on the sparkling area in the OPERATING ROOM to access the hidden object area. Collect every object on the list at the bottom of the screen to acquire the PLIERS.
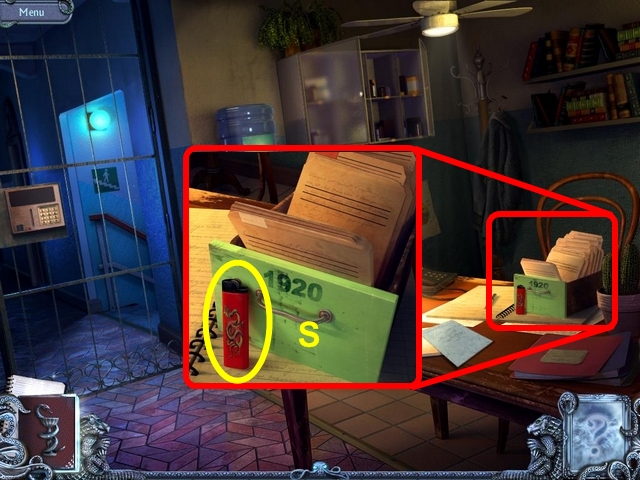
- Enter the HOSPITAL CORRIDOR. Read the newspaper on the chair.
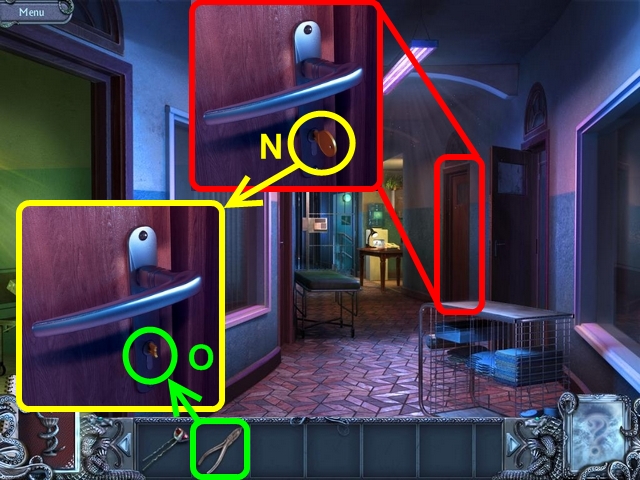
- Turn the key in the keyhole to break it (N).
- Use the PLIERS to turn the key in the keyhole (O).
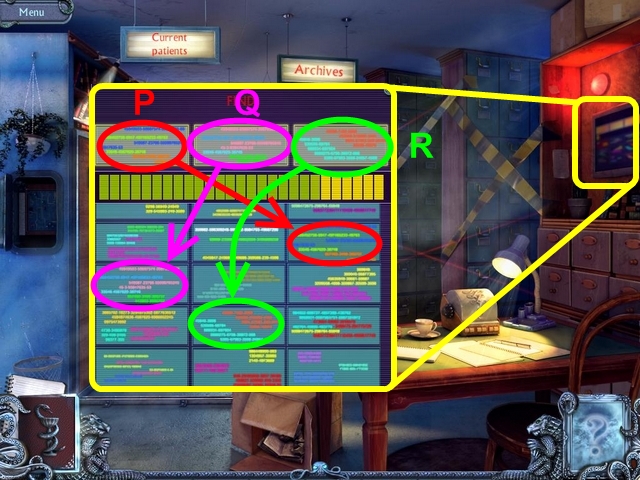
- Enter the FILE ROOM. Beat the mini-game, as shown in the video, to disable the alarm system. To do that, find the text shown at the top of the puzzle in the columns of scrolling text below and then click on it (P, Q, R). If you make a mistake, you will have to start over with new text.
- Complete the equation on the box on the table (S) to open it and identify the location of Angel's medical records (T).
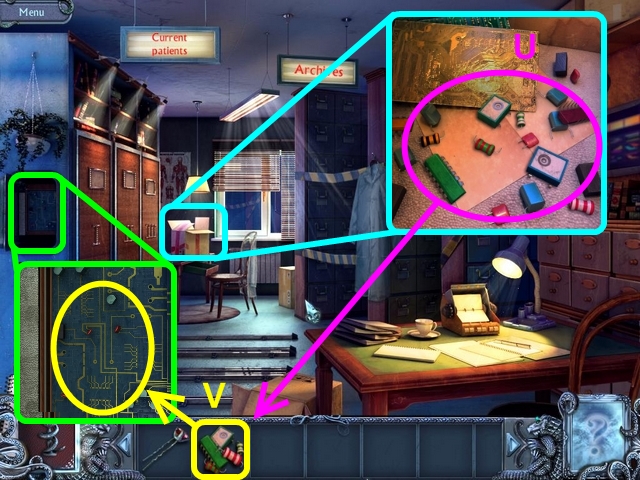
- Remove the CIRCUIT BOARD PARTS from the box at the far end of the room. (U)
- Click on the CIRCUIT BOARD. (It's located under the plant.) Place the CIRCUIT BOARD PARTS on the circuit board (V).
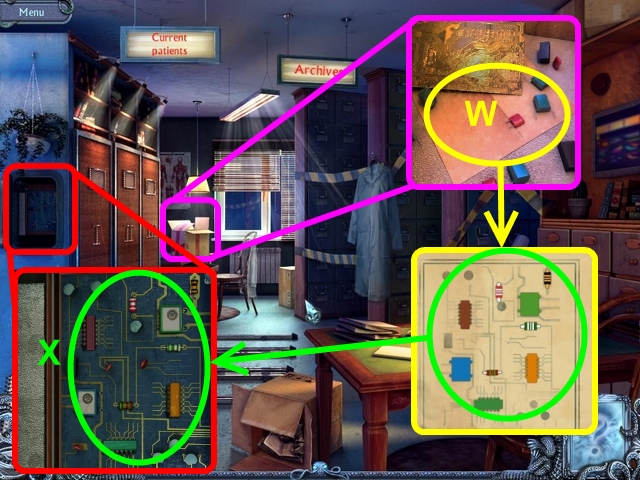
- Click on the schematic at the bottom of the box to learn the correct positions of the parts (W). This schematic is random.
- Place the each CIRCUIT BOARD PART where it belongs, as shown on the schematic, to fix the cabinets (X).
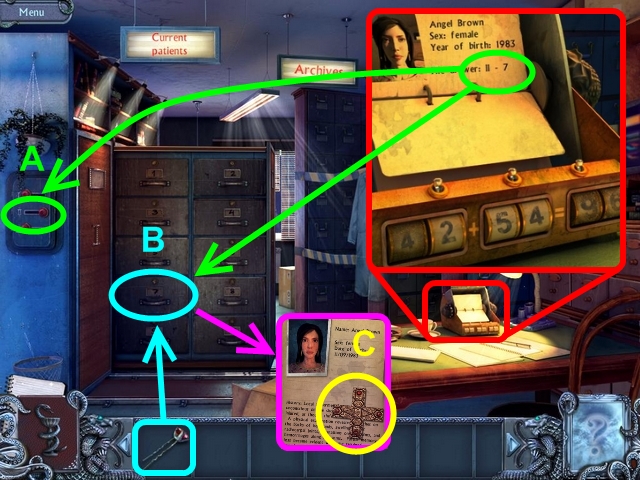
- Use the HAIRPIN to open the drawer with Angel's medical records (A, B).
- Pick up Angel's medical records. Grab the CROSS (C).
Chapter 10: Remember Everything
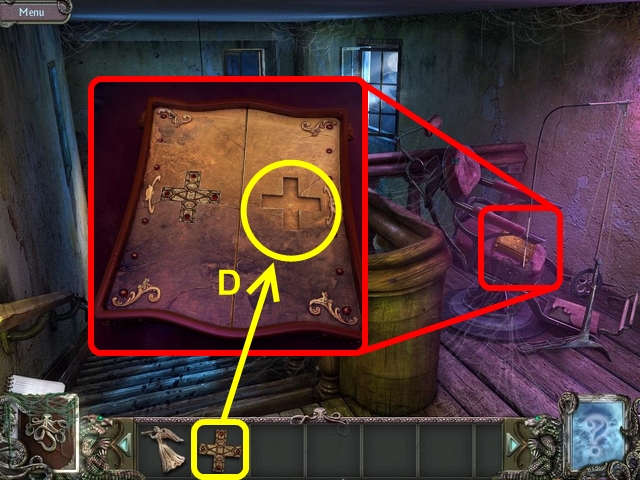
- Go to the DENTAL CHAIR. Place the CROSS on the case to launch a mini-game (D).
- Re-create the symbol you saw on the cellar wall to beat the mini-game (E).
- Grab the SILVER ROSE (G) and the PHOTO (F).
- Go to the HOSPITAL CELLAR. Place the SILVER ROSE on the door to open the door (H).
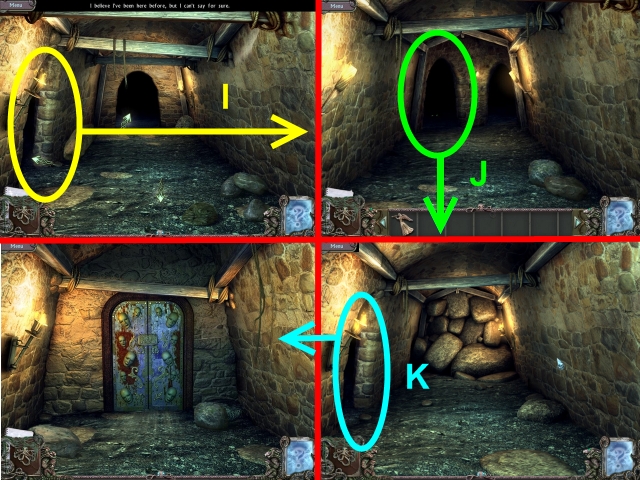
- Enter the MAZE. Go LEFT three times (I, J, K) to reach the DOOR WITH MASKS.
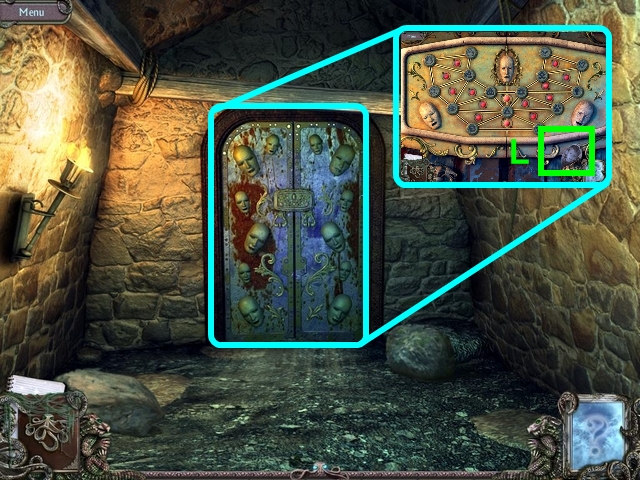
- Remove the last PHOTO from the door (L).
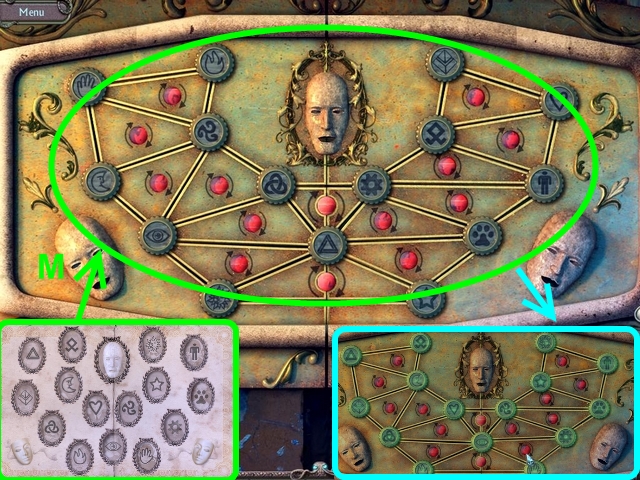
- Open the journal. Look at the symbols on the antique photo album.
- Arrange the symbols as shown in the antique photo album to open the door (M).
- Speak to your double. Step through the door (N).
- Put the ANGEL in the lock to set Mark free (O).
Chapter 11: Success
- Go to the OPERATING ROOM. Pick up the OXYGEN TANK (P).
- Place the OXYGEN TANK on the windowsill (Q). Turn the valve (R).

- Click on the sparkling area to access the hidden object area. Collect every object on the list at the bottom of the screen to acquire the CHEMICAL COMPOUND.
- Go to the NURSE'S POST. Pick up the LIGHTER (S).
- Return to the OPERATING ROOM. Pour the CHEMICAL COMPOUND on the floor (T). Light it with the LIGHTER (U).
Antique Photo Album
- Click on the Bible in the AMBULANCE to acquire PHOTO 1.
- Click on the opened cube in the PAVILION to acquire PHOTO 2.
- Click on the girl's diary in the TREE HOUSE to acquire PHOTO 3.
- Click on the phone at the NURSE'S STATION to acquire PHOTO 4.
- Click on the mirror near the DOOR WITH ROSES to acquire PHOTO 5.
- Switch on the light in the LIGHTHOUSE TOWER and then click on the lamp to acquire PHOTO 6.
- Click on the case in the closet in the LIGHTHOUSE CELLAR to acquire PHOTO 7.
- Click on the chest in the CATACOMBS to acquire PHOTO 8.
- Click on the table in the GARAGE to acquire PHOTO 9.
- Click on the music box in the HALL to acquire PHOTO 10.
- Click on the case in the OFFICE to acquire PHOTO 11.
- Click on the area behind Medusa in the STOREROOM to acquire PHOTO 12.
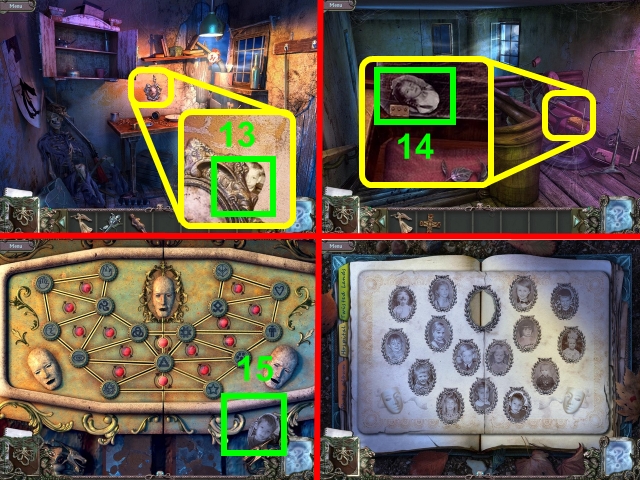
- Click on the photo frame in the CABIN to acquire PHOTO 13.
- Click on the opened case on the DENTAL CHAIR to acquire PHOTO 14.
- Click on the DOOR WITH MASKS to acquire PHOTO 15.
- Congratulations! You have completed Twisted Lands: Insomniac!
Created at: 2011-09-16