

Walkthrough Menu
- General Tips
- Chapter 1- Alps
- Chapter 2 - Secret Base
- Chapter 3 - Museum
- Chapter 4 - Aegean Sea
- Chapter 5 - Village
- Chapter 6- Destroyed Laboratory
- Chapter 7 - Catacombs of Rome
- Chapter 8 - Ancient Archive
General Tips
- This is an Interactive Hidden Object Game.
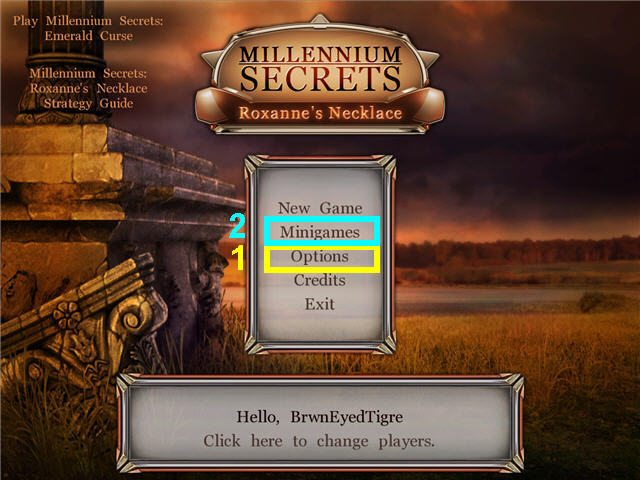
- Click on Options (1) to adjust the SFX and Music Volume. There is a choice of Full Screen, Tutorial, Advanced Mode and Location Labels.
- This guide is written using the names given in the location labels. Some puzzle solutions are random; our solutions may vary from yours.
- You may replay the 21 puzzles when you have finished the game by choosing minigames (2).
- A hand cursor means you can move, interact with, or open the object.
- A magnifying glass cursor signifies an item or area you can inspect closer.
- Items in green in your inventory are available for use.
- Items in red in your inventory mean you still need to locate the item or a piece of it.
- Right-click on an inventory item to drop it back into inventory.
- When you have more items in your inventory bar than spaces, the items cannot be seen, but will be there when needed.
- All inventory items are circled in yellow in the screenshots.
- Click on the arrows on the left and right to move to the next area.
- Click on the arrow on the bottom to return to the main area.
- Items in blue in a Hidden Object Scene require an extra step to complete.
- When starting a puzzle click on Info in the lower right to get directions. Puzzles may be skipped.
- Click on the book in the lower left to access the Map/Journal/Tasks.
- The Map will show you completed locations and areas which have an available task. Clicking on an area of the Map will transport you to that area.
- Your current task will be posted on the top of the screen.
Chapter 1 - Alps
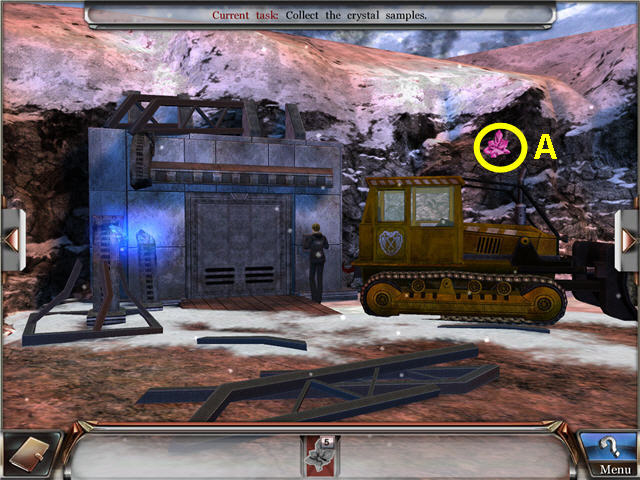
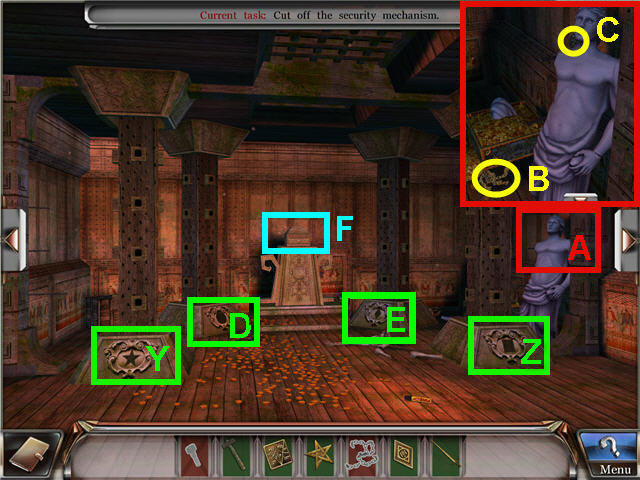
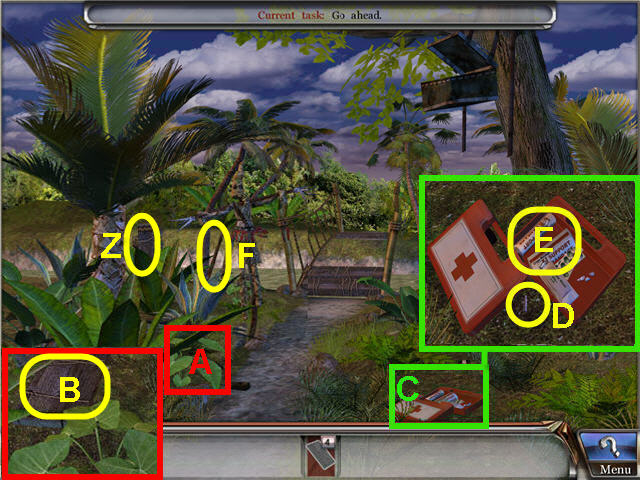
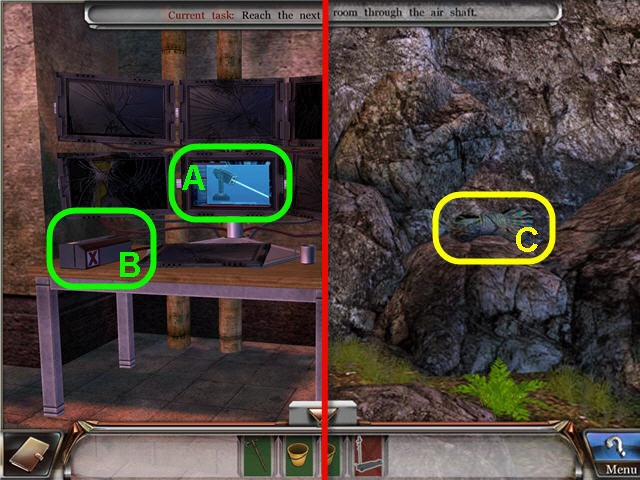
- Take the CRYSTAL (A).
- Turn right.
- Look close at the ground (B) and take the CRYSTAL (C).
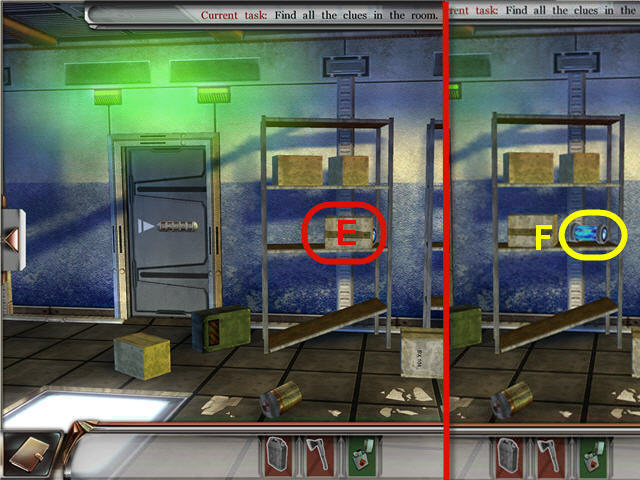
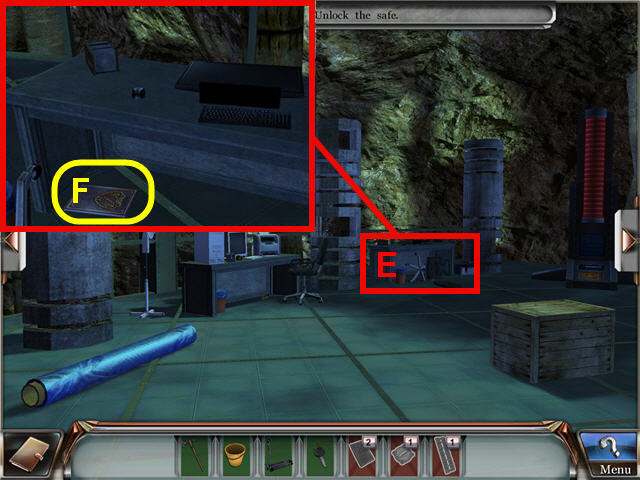
- Head straight to the Bunker wall (D).
- Take the MICROCHIP (E) and the HOOK (F).
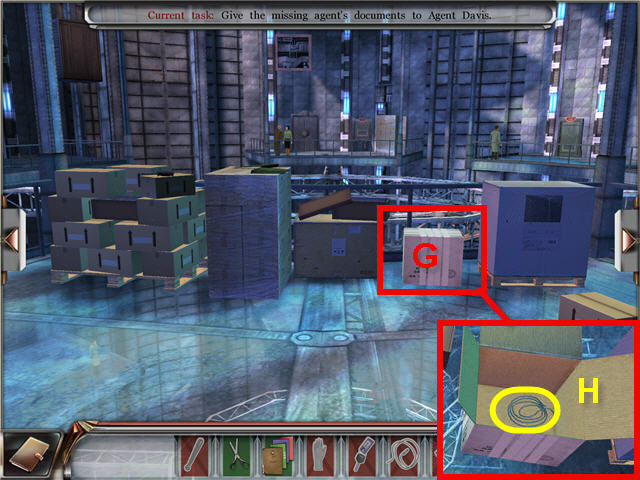
- Back out and look close at the wooden crate (G).
- Take the MICROCHIP (H).
- Back out and turn right.
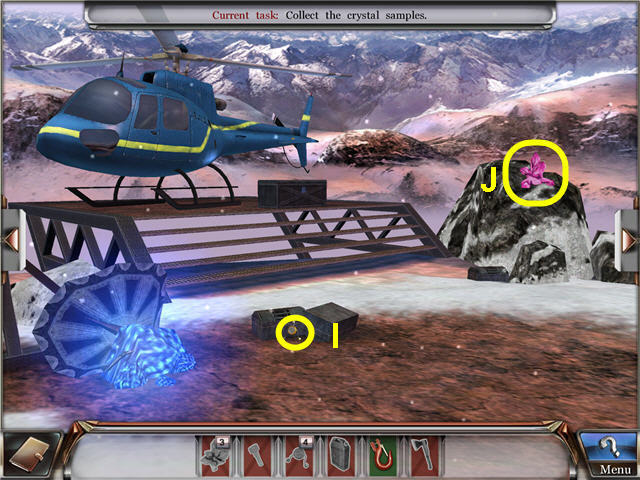
- Take the MICROCHIP (I) and the CRYSTAL (J).
- Turn right.
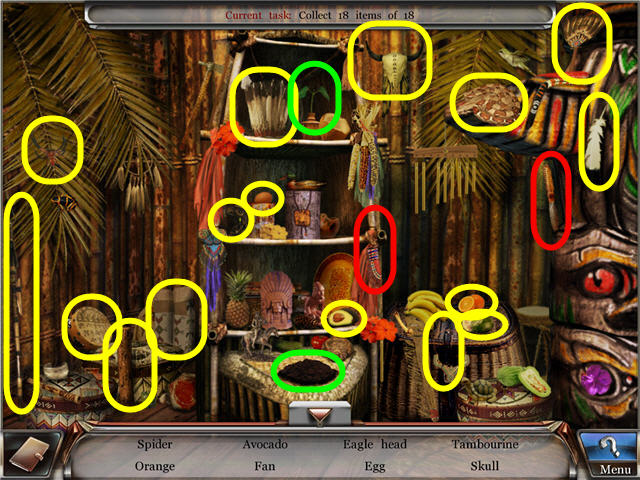
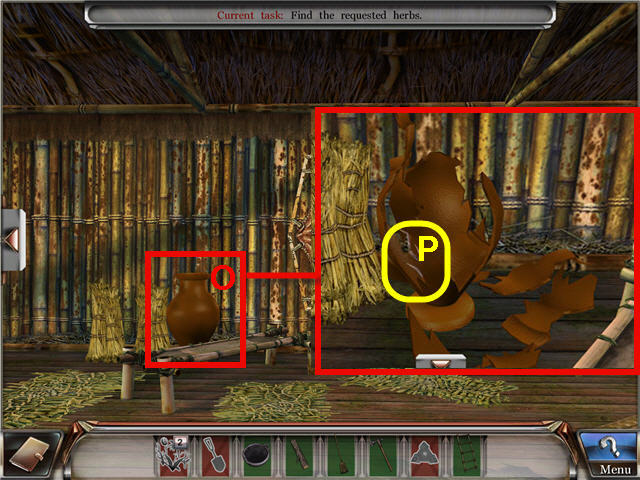
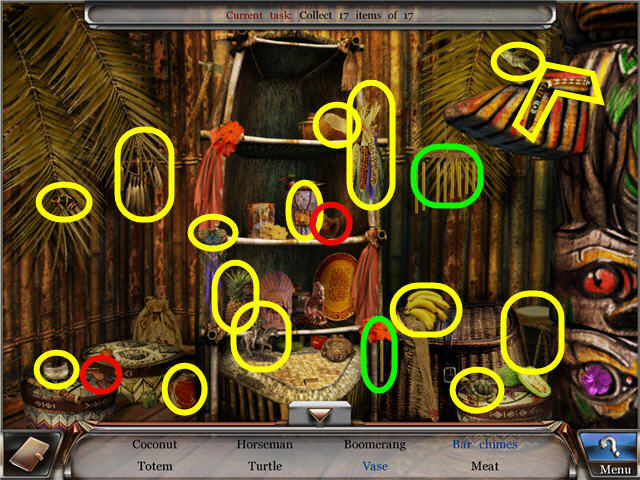
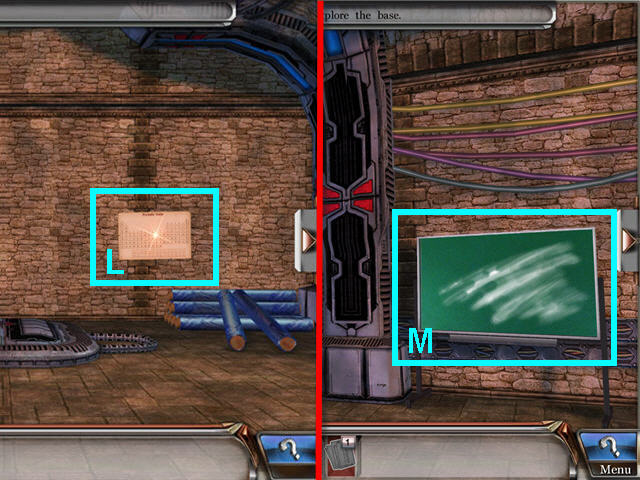
- Look close at the shed to access a Hidden Object Scene.
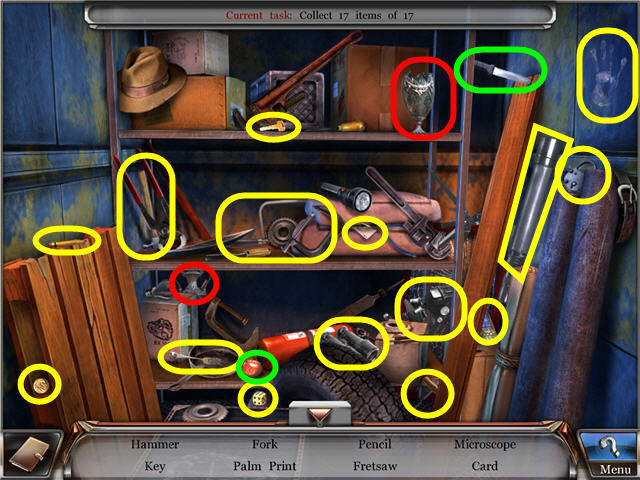
- Marked in red; place the top of the vase on the bottom to get a vase.
- Marked in green; use the knife on the apple to get apple slices.
- Find the items listed and get a BULLDOZER KEY.
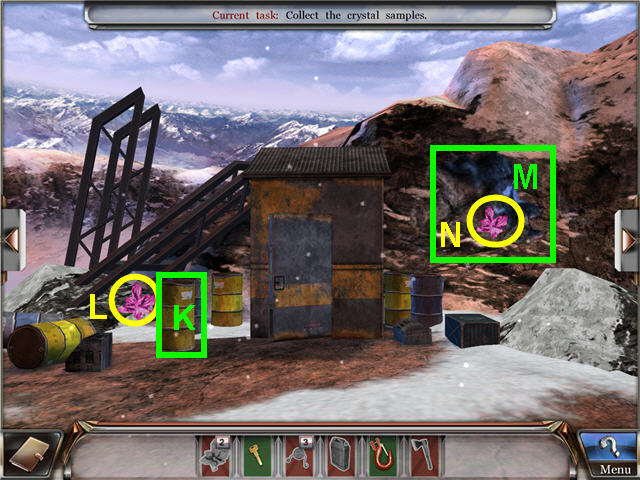
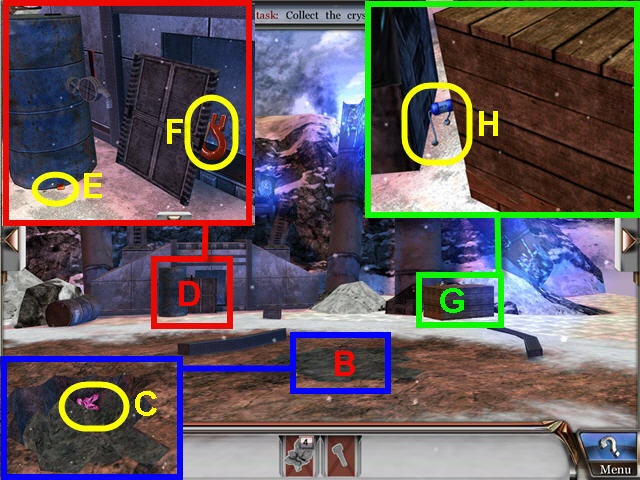
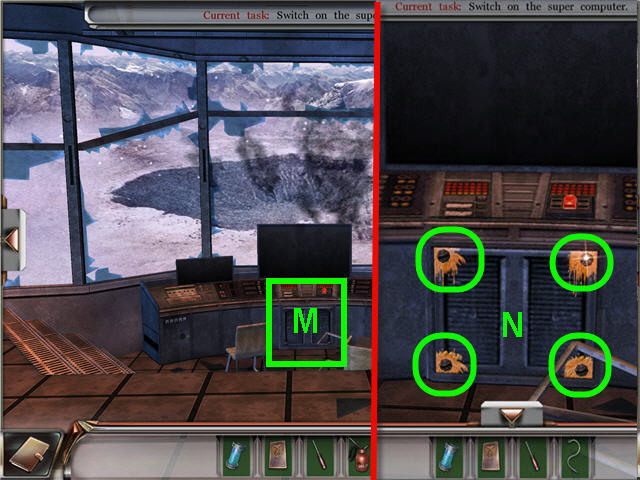
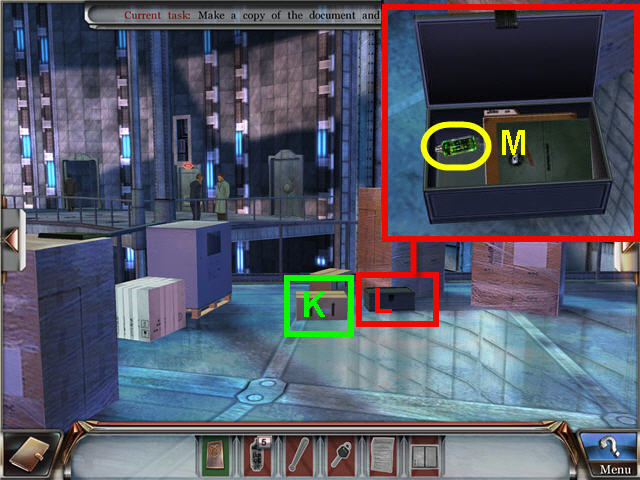
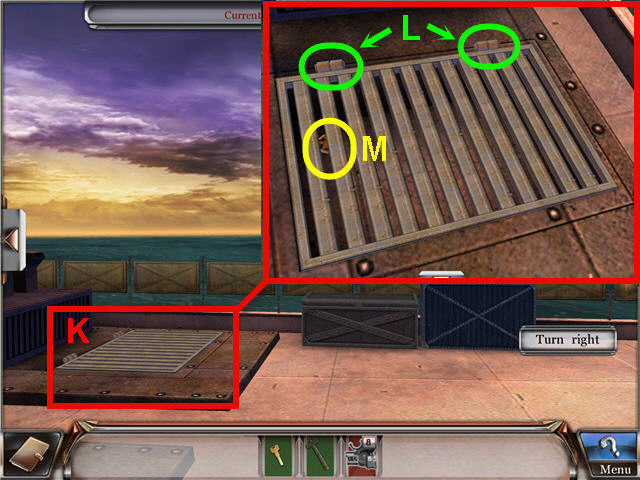
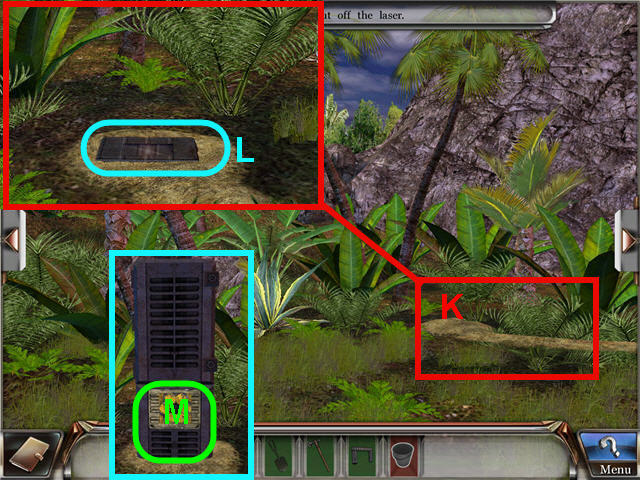
- Move the barrel (K) and take the CRYSTAL (L).
- Click on the rocks (M) and take the CRYSTAL (N).
- Turn right one time.

- Give the CRYSTALS to Agent Davis (O).
- Get a code added to your notes in the bottom left. This code is random.
- Turn left two times.
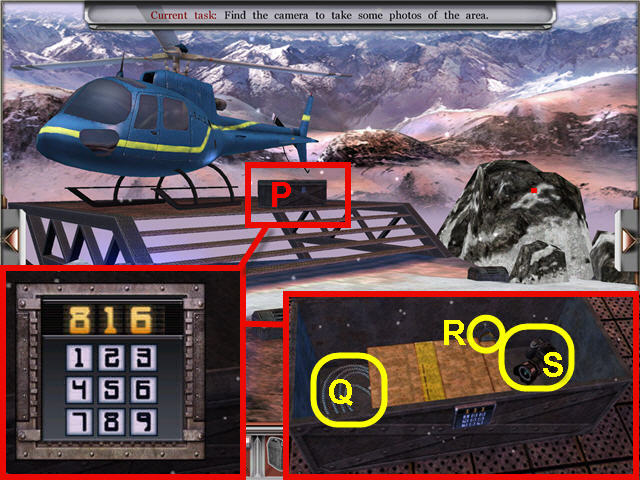
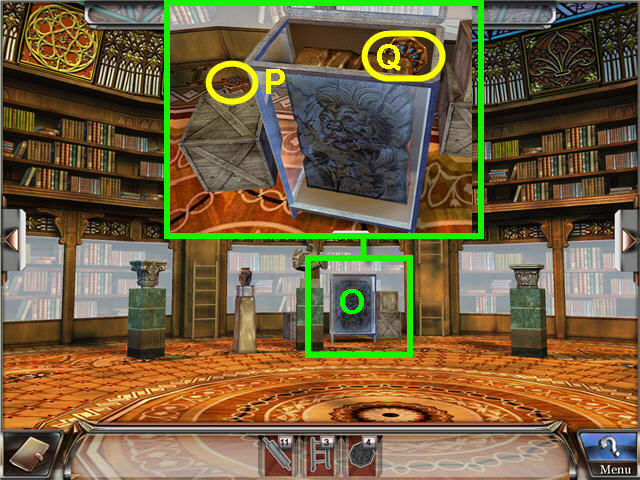
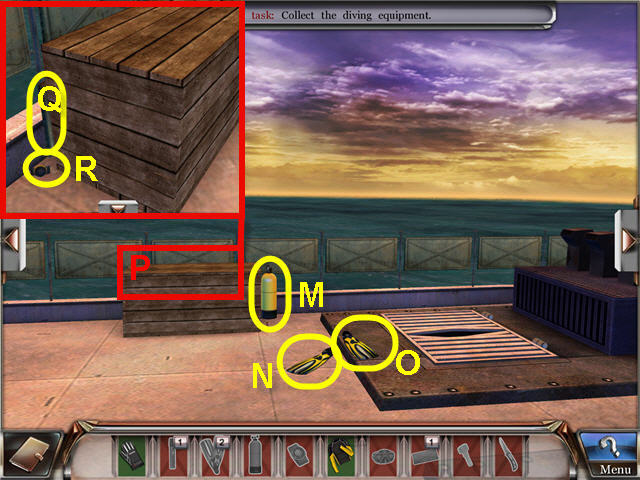
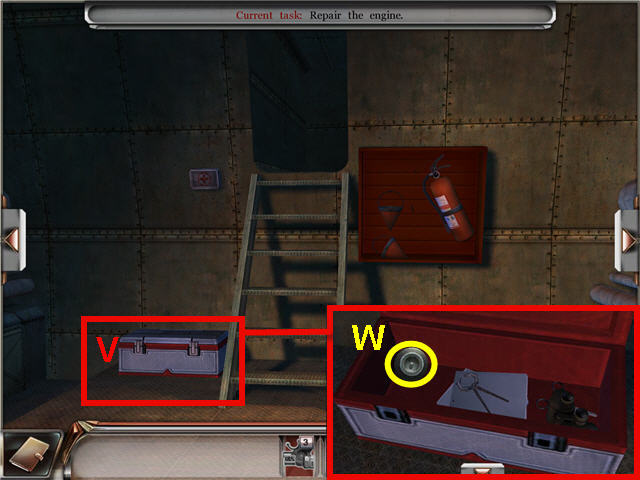
- Look close at the locked chest (P).
- Use the code from Agent Davis; my code was 816, yours may be different.
- Move the top box.
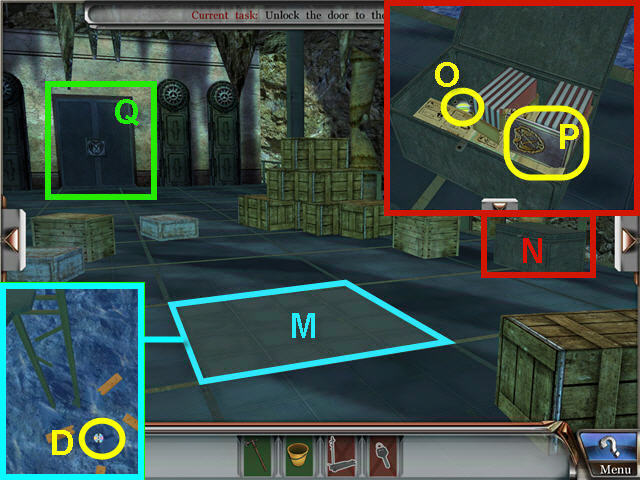
- Take the WIRE ROPE (Q) and the MICROCHIP (R).
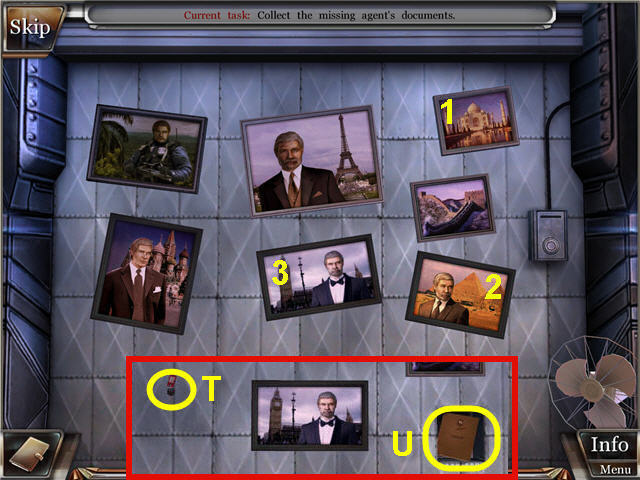
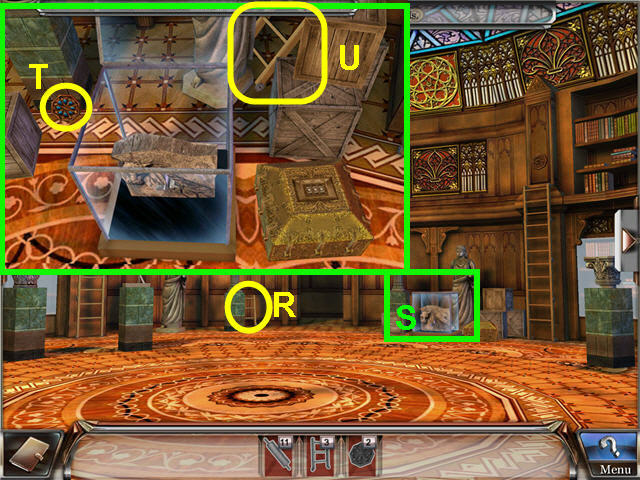
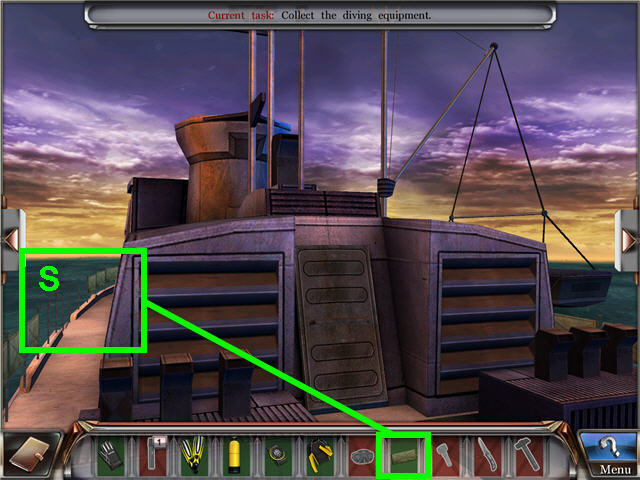
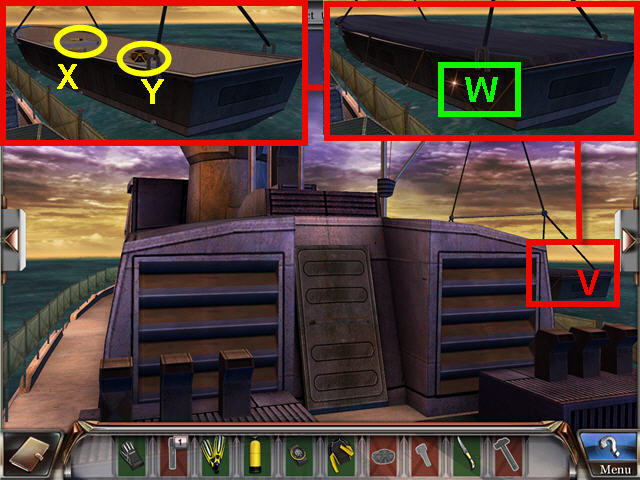
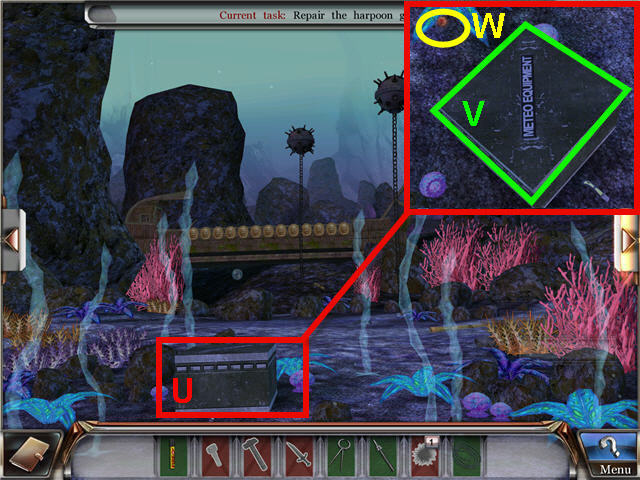
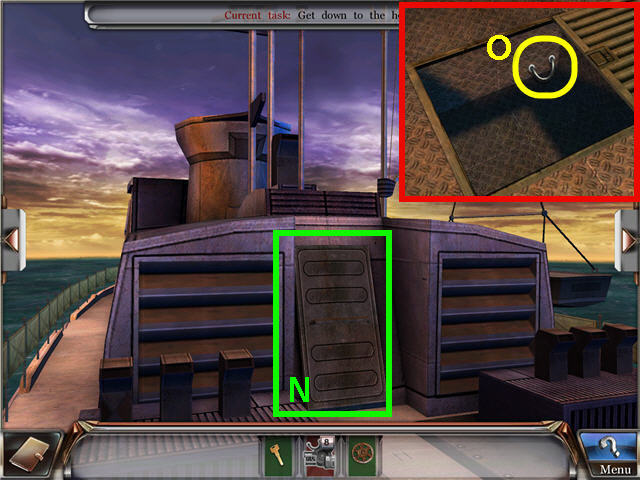
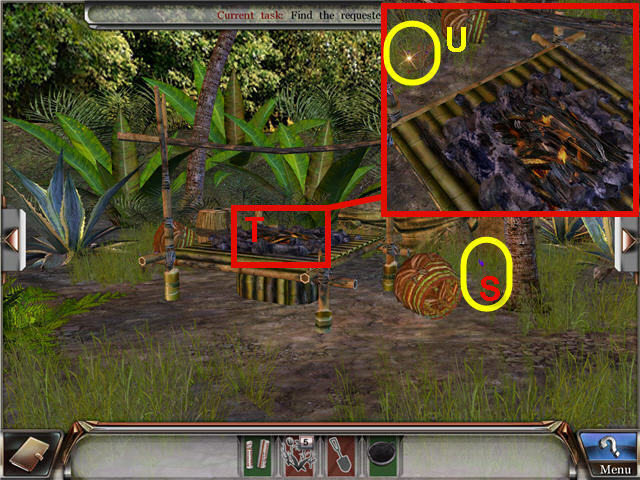
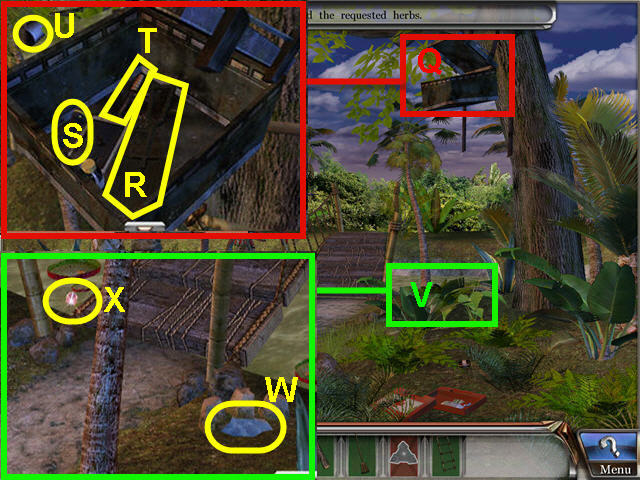
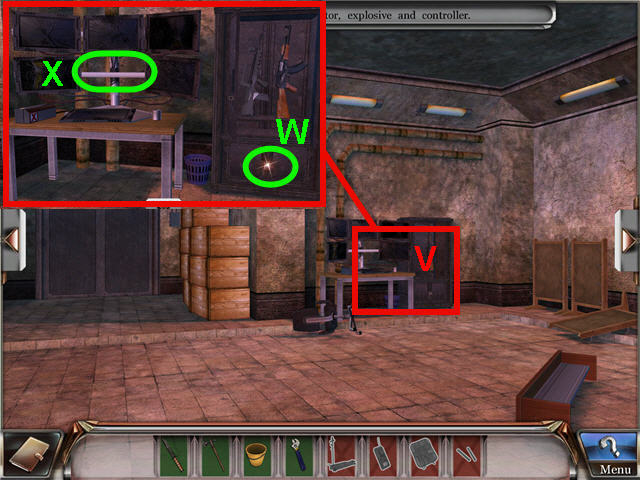
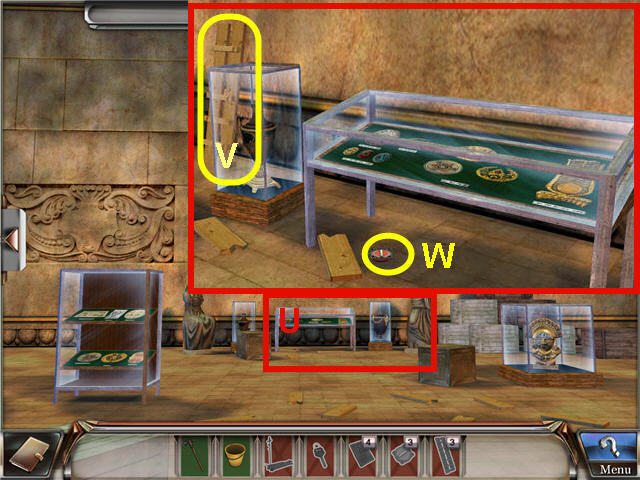
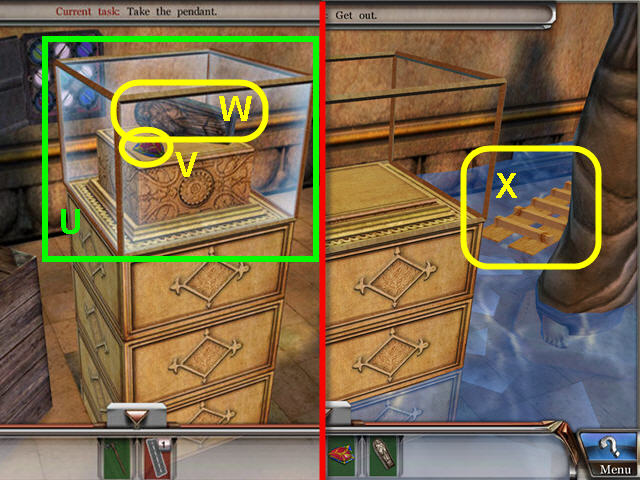
- Take the CAMERA (S) to trigger a puzzle.
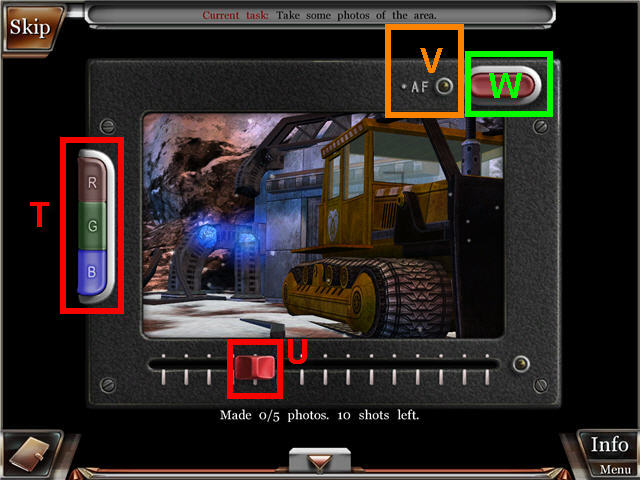
- The goal is to take 5 photos of the area.
- Use the colored buttons (T) on the left to switch the color filters.
- Use the red sliding button (U) on the bottom to focus the photo.
- When the auto-focus button (V) in the upper right is blinking you have it focused correctly.
- Click on the red button (W) on the upper left when you are ready.
- Solution; see screenshot for 1st photo; see next screenshot for remaining photos.
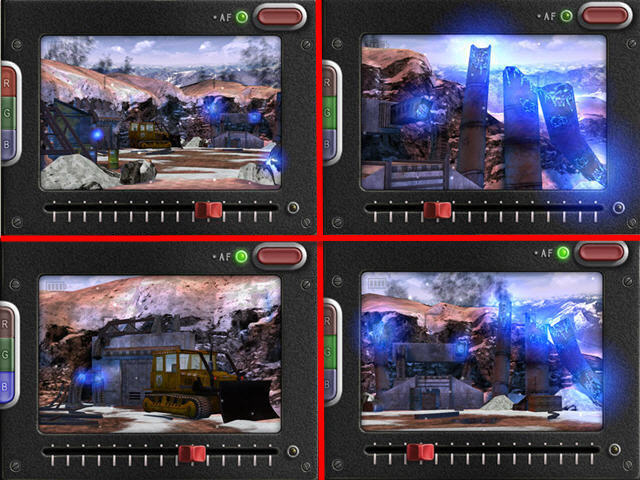
- Solution; see previous screenshot for 1st photo; see screenshot for final four photos.
- The position of where the sliding button lands for the picture to be focused is random.
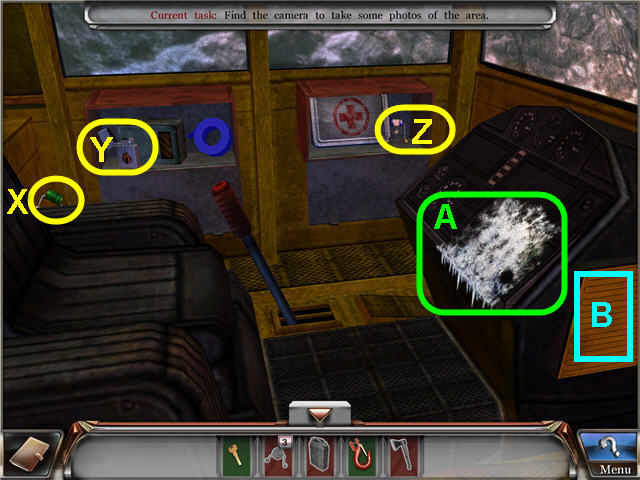
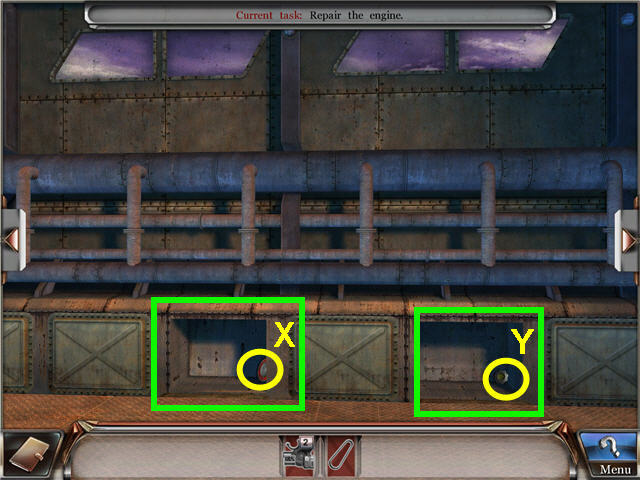
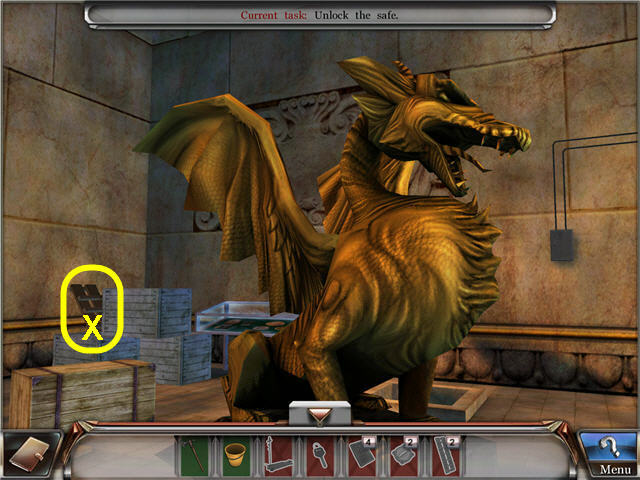
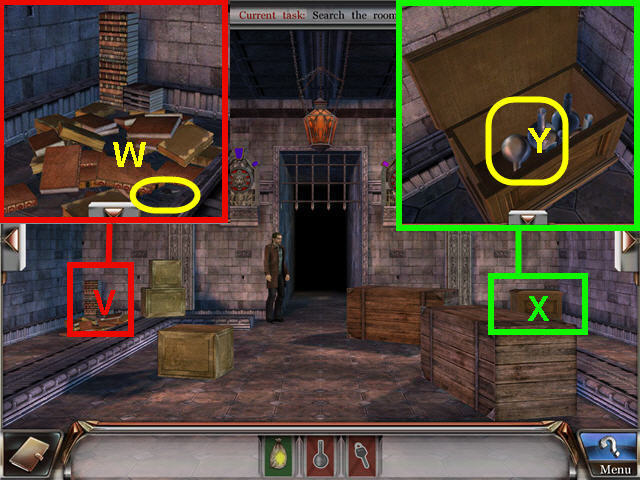
- Use the BULLDOZER KEY on the bulldozer door.
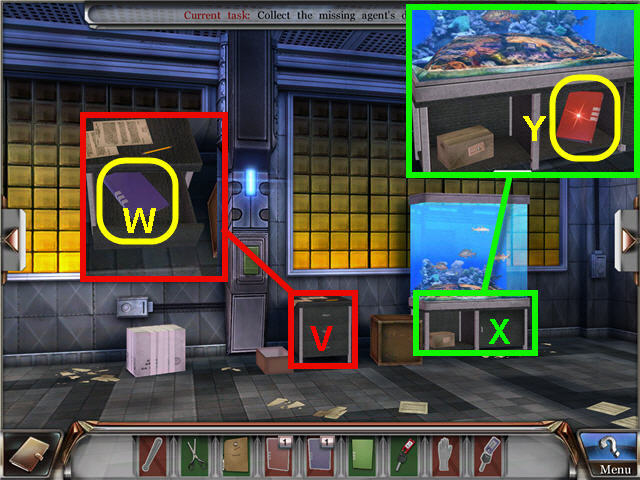
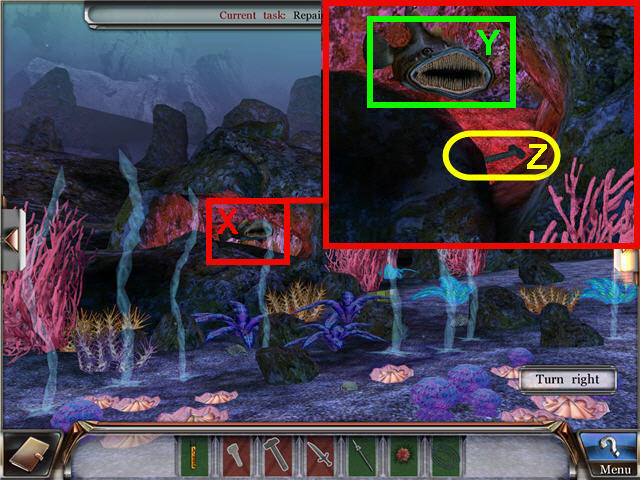
- Take the MICROCHIP (X).
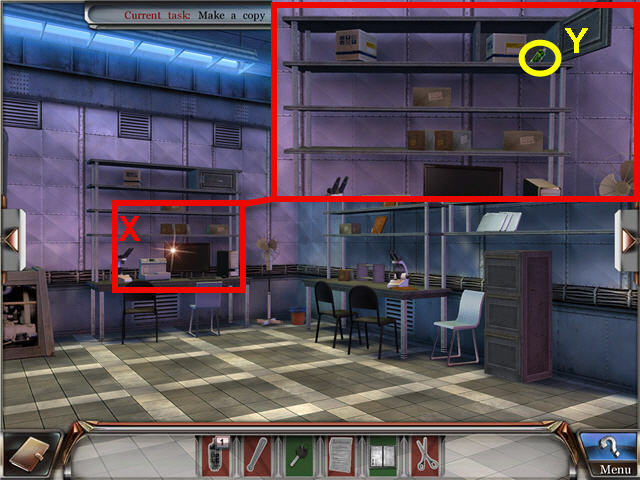
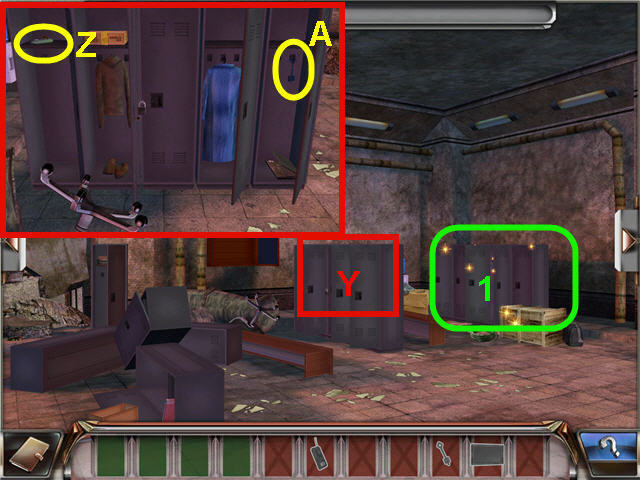
- Open the left compartment and take the LIGHTER (Y).
- Open the right compartment; move the first aid kit and take the MICROCHIP (Z).
- Use the LIGHTER on the frozen ignition (A).
- Place the BULLDOZER KEY in the ignition.
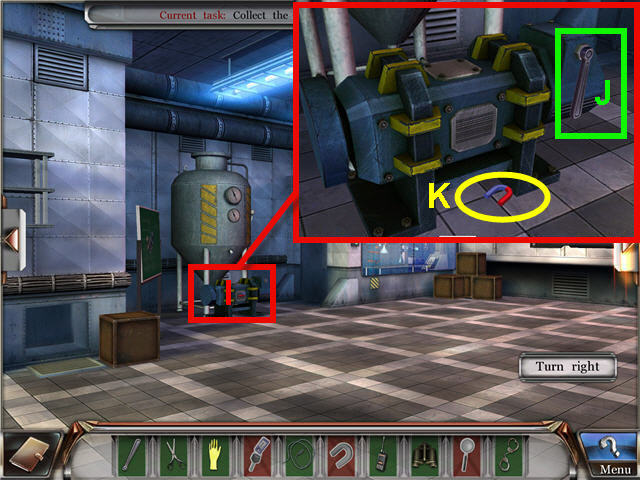
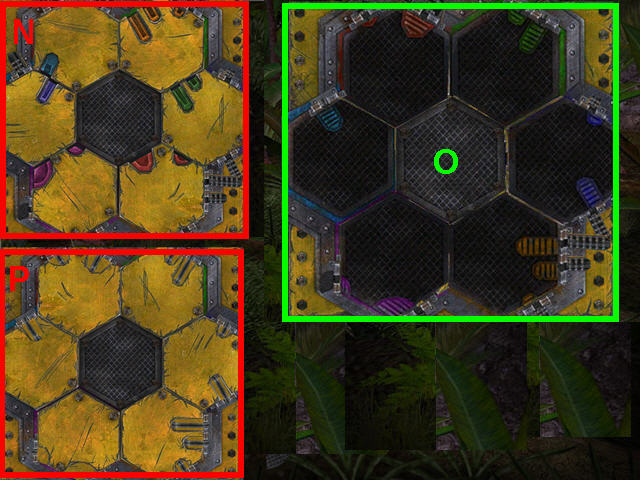
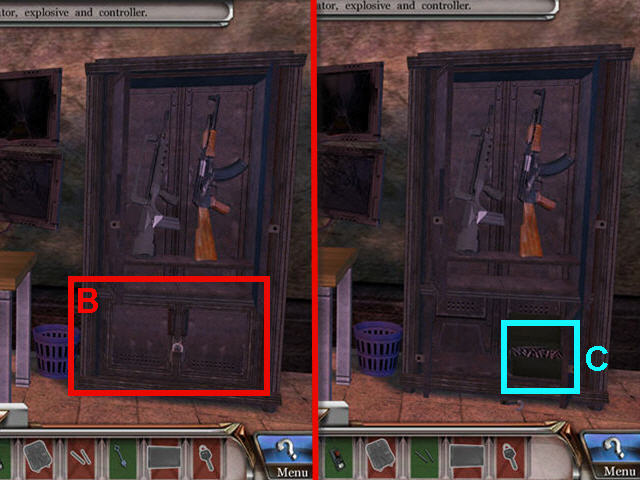
- Place the MICROCHIPS on the circuit panel (B) to trigger a puzzle.
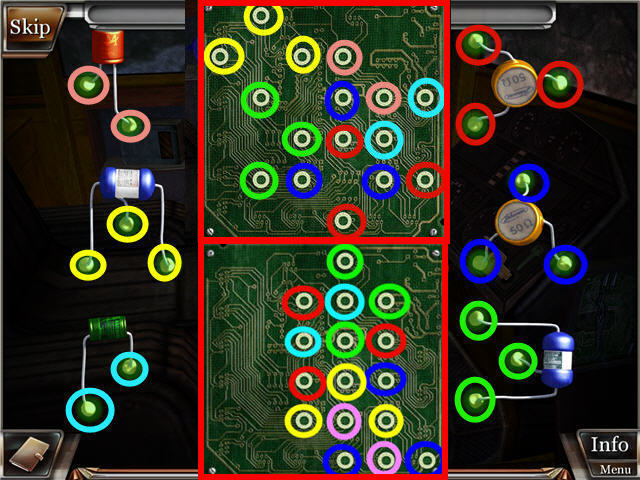
- The goal is to place all the microchips on the circuits so that each connection is covered.
- See screenshot for two possible layout solutions; your layout may different.
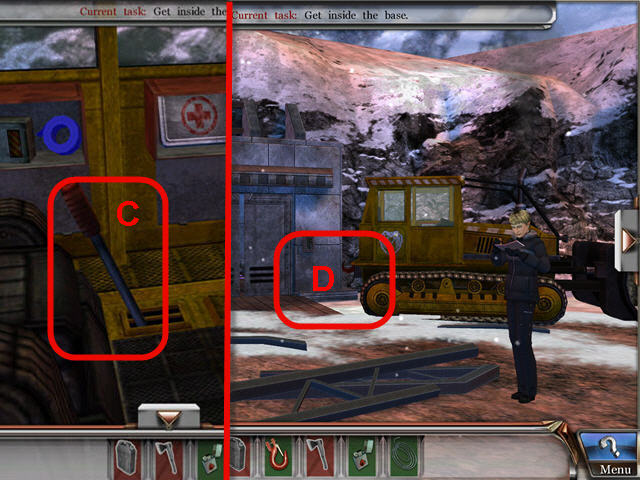
- Exit the bulldozer.
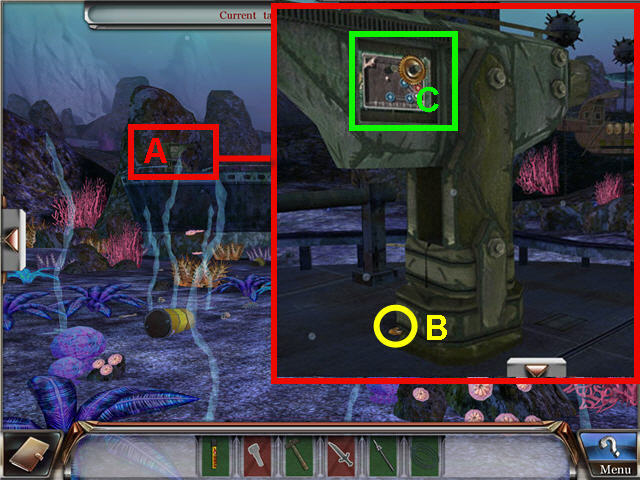
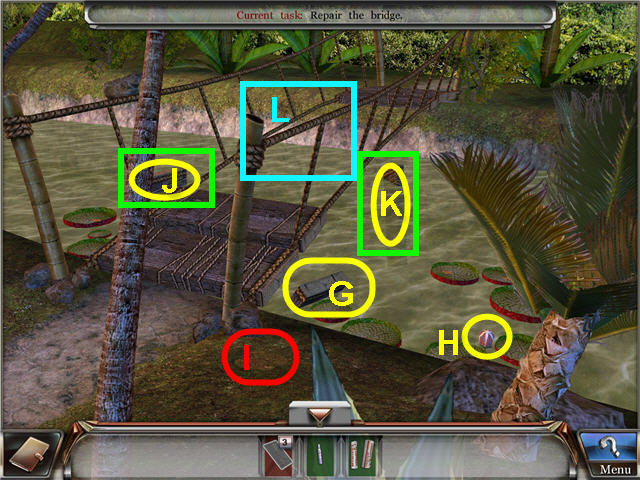
- Use the WIRE ROPE and HOOK on the back (D) of the bulldozer.
- Enter the bulldozer and click on the gear shift (C).
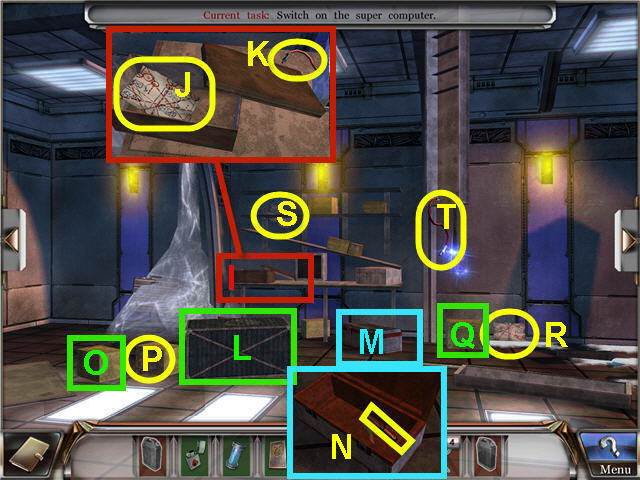
- Enter the Bunker.
- Move the box (E) and take the ENERGY CAPSULE (F).
- Turn left.
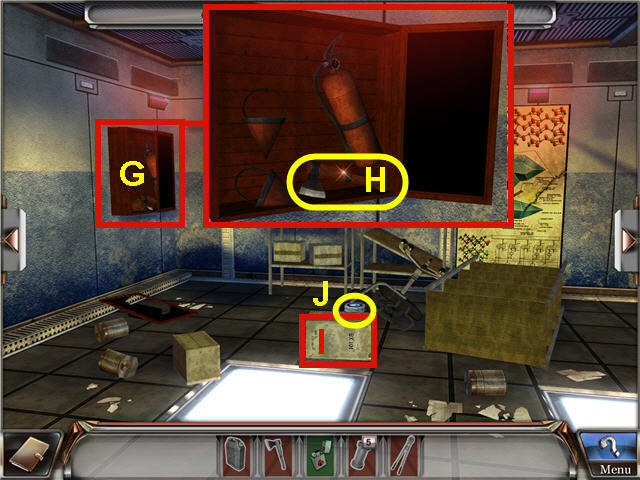
- Look close at the fire-fighting tools (G).
- Open the right side of the cabinet and take the AXE (H).
- Move the box (I) and take the ENERGY CAPSULE (J).
- Turn left, exit out the door and turn left.

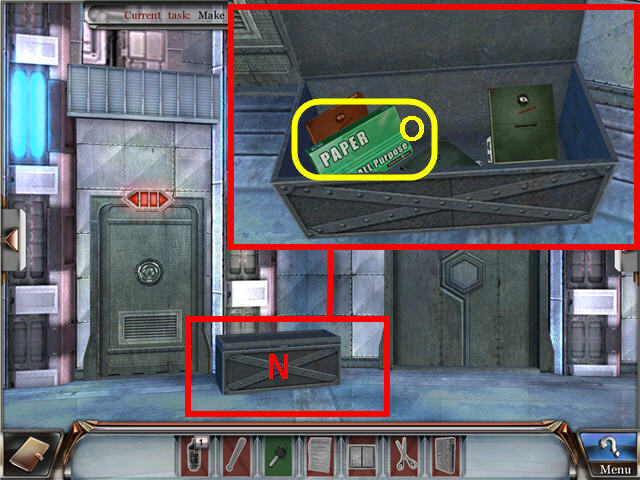
- Look close at the wooden crate (K).
- Use the AXE on the crate.
- Take the WIRE CUTTERS (L).
- Turn left, enter the bunker and turn right.

- Open the cabinet and take the ENERGY CAPSULE (M).
- Open the bottom cabinet and take the ENERGY CAPSULE (N).
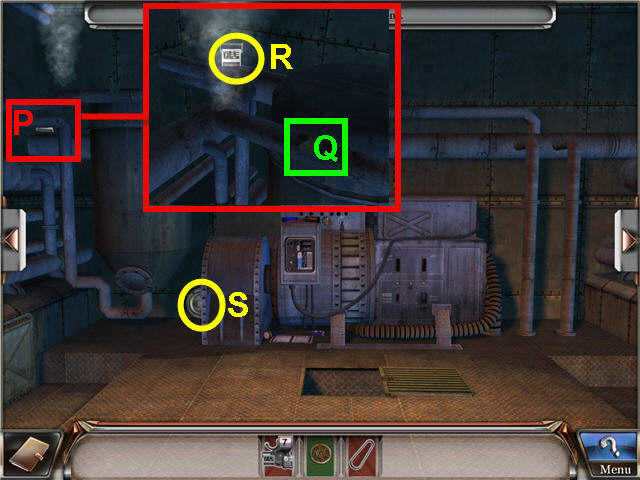
- Look close at the crate (O); use the AXE and take the ENERGY CAPSULE (P) and the PUNCH CARD (Q).
- Look close at the wires (R) and use the WIRE CUTTERS on them.
- Take the ENERGY CAPSULE (S) and PUNCH CARD (T).
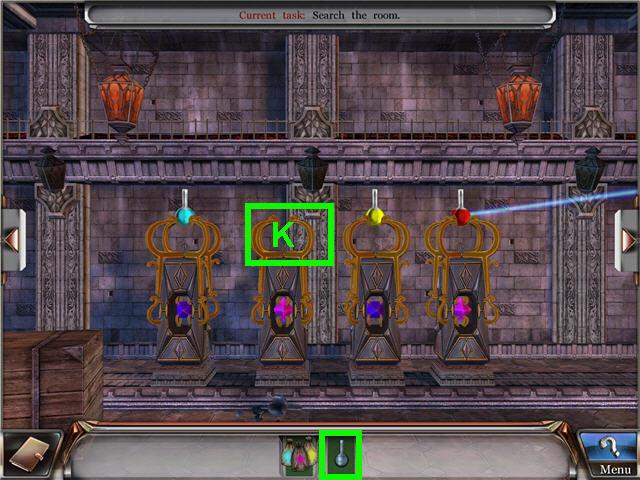
- Look close at the floor tile (U) and click on the briefcase to access a puzzle.
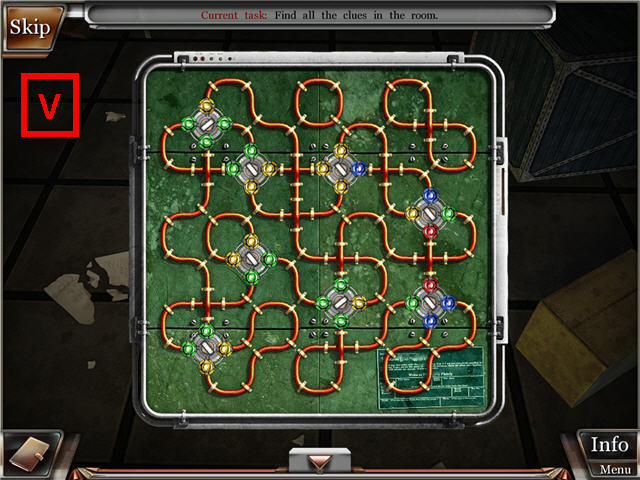
- The goal is to turn the connectors to match up the colored ends so that each one lights up.
- The puzzle is random. See screenshot for our solution (V).
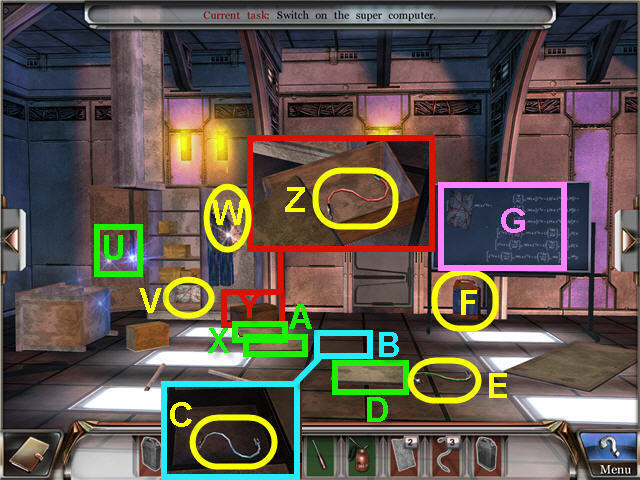
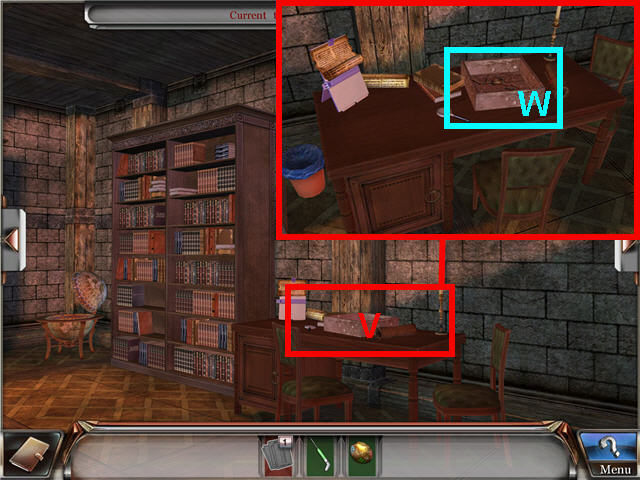
- Take the DOCUMENT and the PUNCH CARD.
- Turn right.
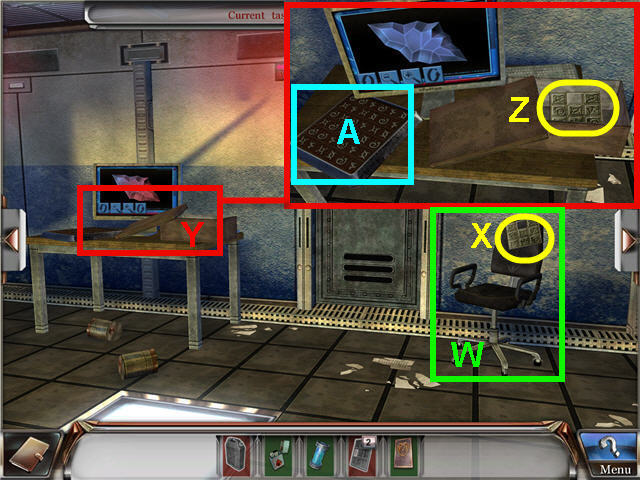
- Turn the chair (W) and take the PUNCH CARD (X).
- Look close at the table (Y), open the box and take the PUNCH CARD (Z).
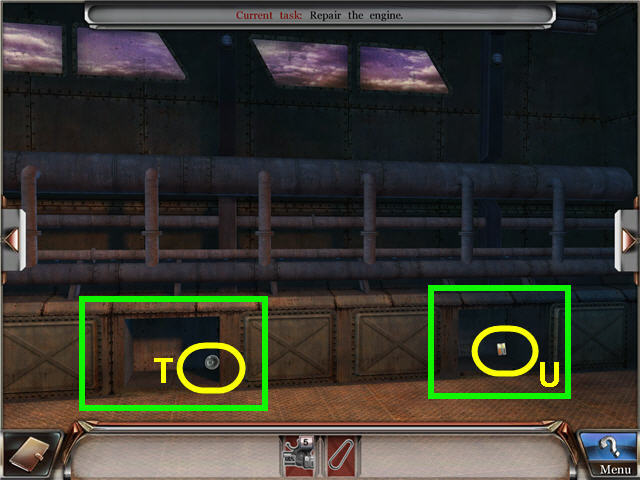
- Use the PUNCH CARDS on the symbol board (A) to trigger a puzzle.
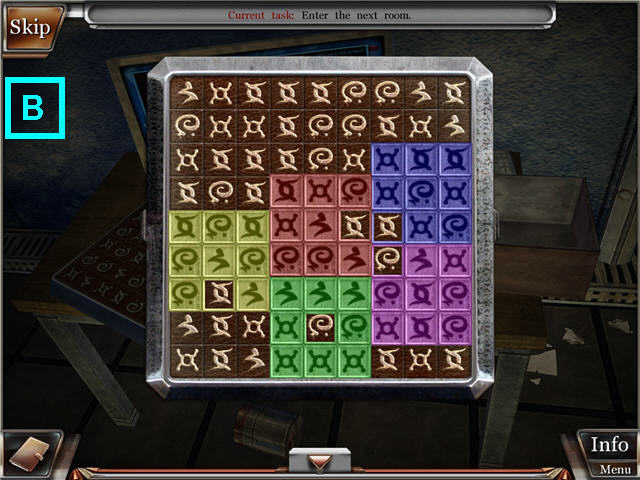
- The goal is to place the punch cards on the board to match the symbols underneath.
- The puzzle is random. See screenshot for our solution (B).
- Turn left two times.
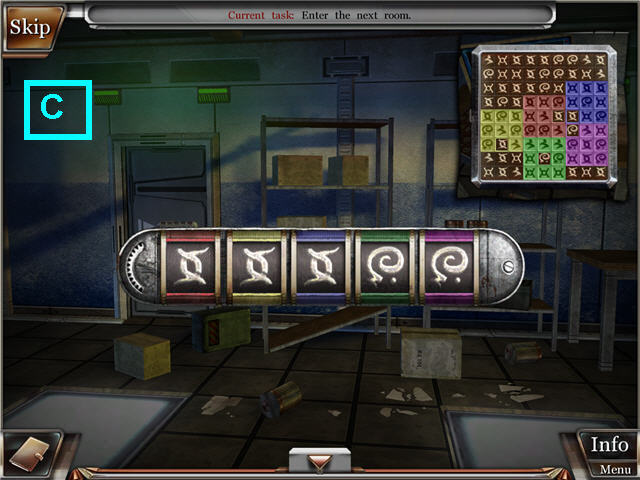
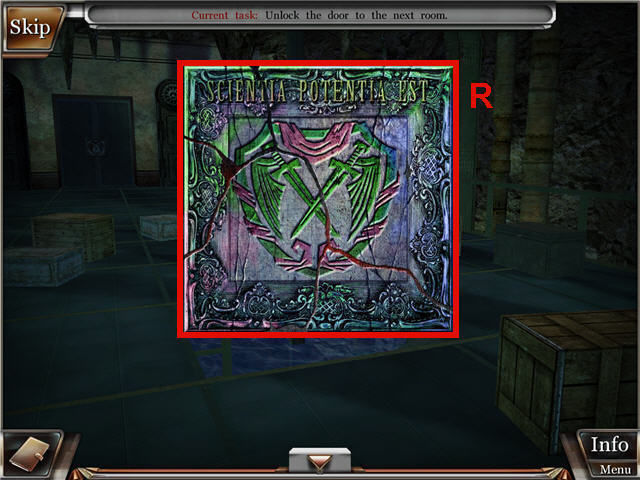
- Click on the door to trigger a puzzle.
- Match the symbol in the hole in the colored box on the board to the same colored dial on the door lock.
- The puzzle is random; see screenshot (C) for my solution.
- Exit through the newly-opened door and turn right.
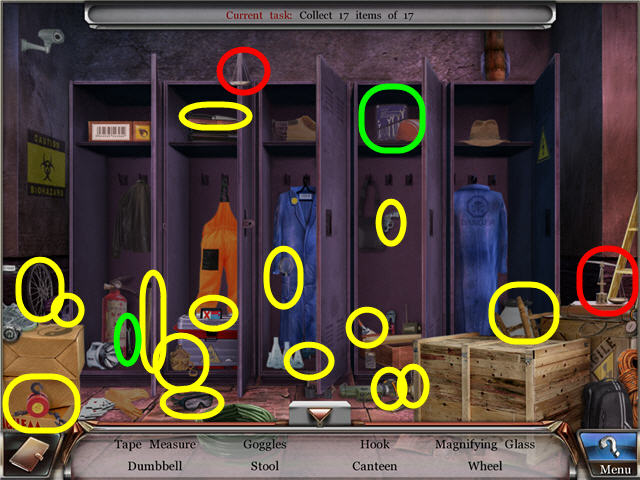
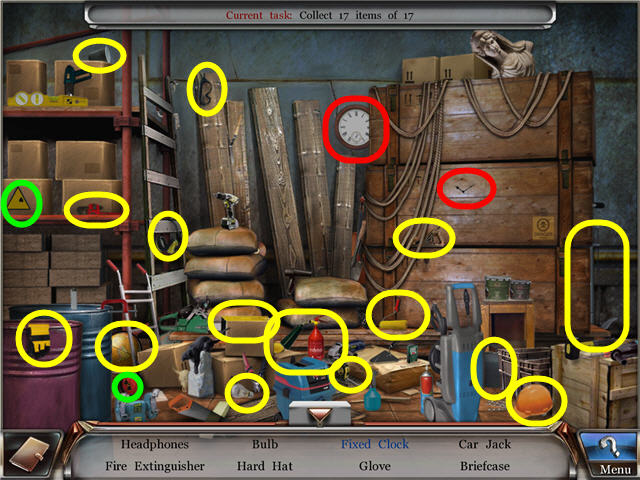
- Click on the wardrobe to access a Hidden Object Scene.
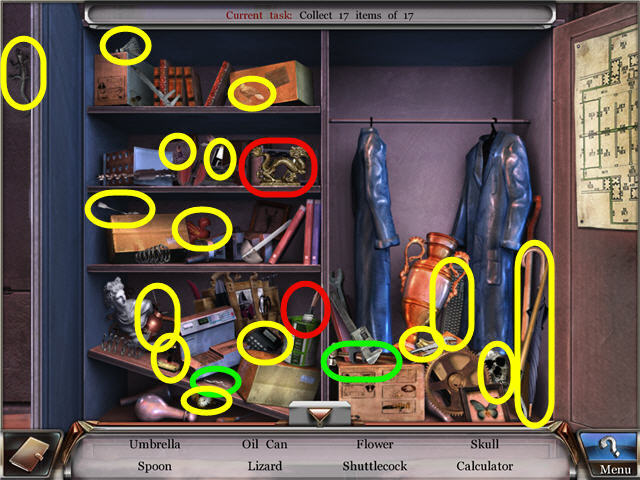
- Marked in red; dip the paintbrush in the green paint and place it on the gold dragon to create a green dragon.
- Marked in green; use the hammer on the bent nail to get a straight nail.
- Find the items listed and get an OIL CAN.
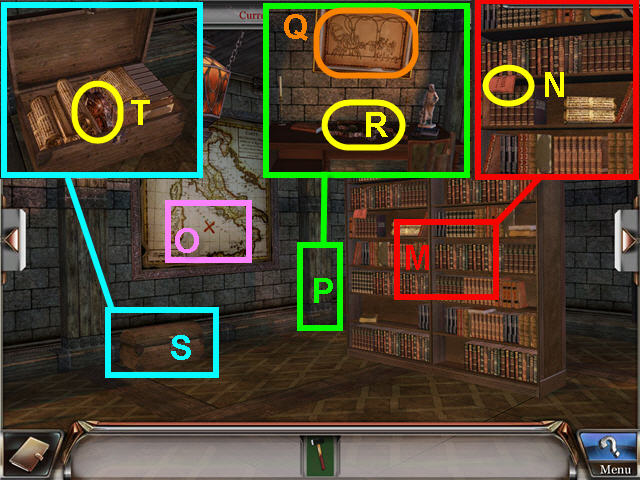
- Move the cabinet and take the DIAGRAM PART (D).
- Move the panel; look close at the chest (E) and take the DIAGRAM PART (F).
- Look close at the floor tile (G) and take the DIAGRAM PART (H).
- Turn left two times.
- Look close at the box (I); take the DIAGRAM PART (J) and WIRE (K).
- Move the crate (L) and look close at the chest (M) and take the SCREWDRIVER (N).
- Move the box (O) and take the DIAGRAM PART (P).
- Move the box (Q) and take the DIAGRAM PART (R).
- Take the DIAGRAM PART (S) and the WIRE (T).
- Turn left.
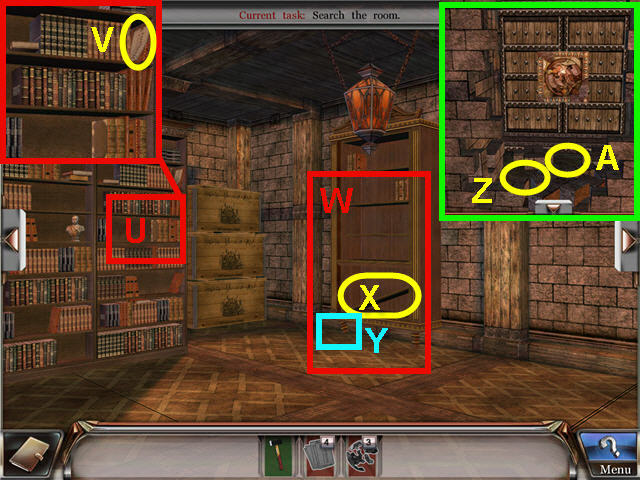
- Open cabinet door (U) and take the DIAGRAM PART (V).
- Take the DIAGRAM PART (W).
- Move the tile (X) and look close at the box (Y); take the WIRE (Z).
- Move the tile (A) and look close at the floor (B) and take the WIRE (C).
- Move the tile (D) and take the WIRE (E).
- Take the EMPTY GAS CAN (F).
- Place the DIAGRAM PARTS on the chalkboard (G) to trigger a puzzle.
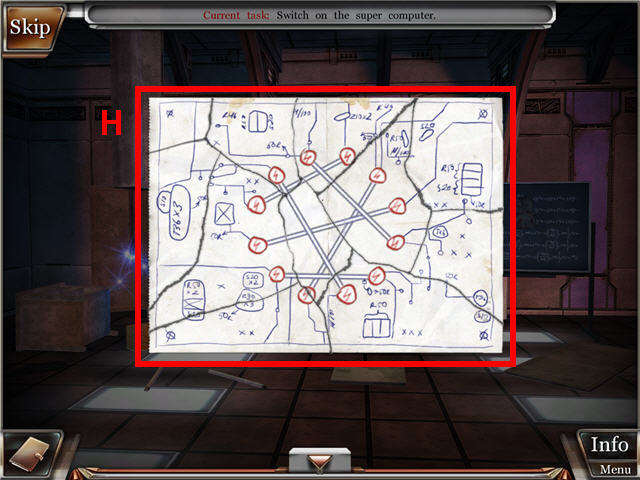
- Arrange the DIAGRAM PARTS to complete the picture.
- The pieces will click together when correct. See screenshot for solution (H).
- Go forward twice through the doors and turn left.
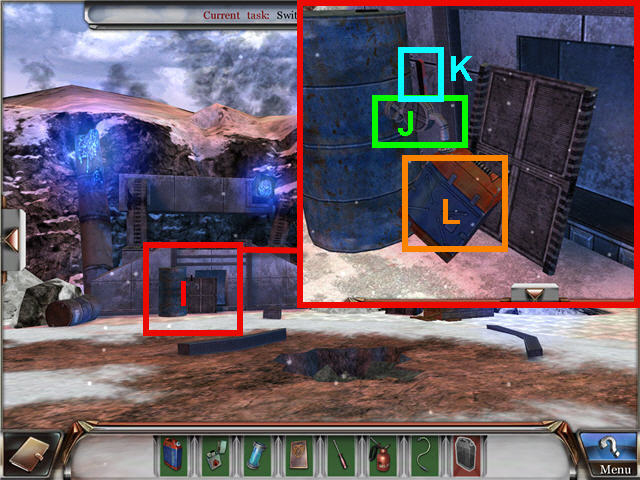
- Look close at the bunker wall (I); use the EMPTY GAS CAN on the spigot (J).
- Pull the lever (K) and take the FULL GAS CAN (L).
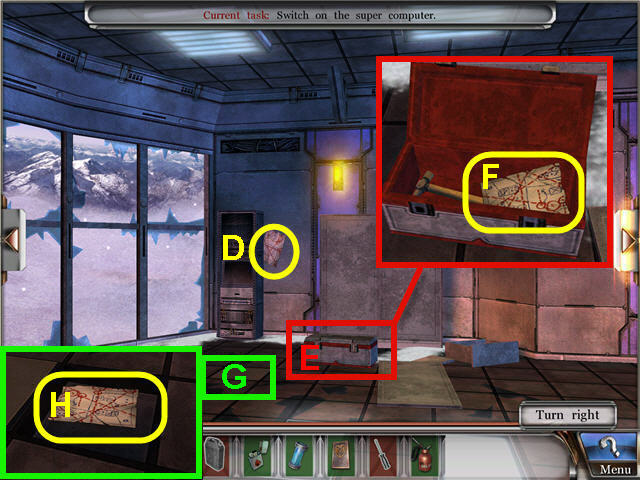
- Turn left and enter into the bunker and through the next door to the supercomputer.
- Look close at the supercomputer (M).
- Use the OIL CAN and then the SCREWDRIVER on each of the 4 screws (N).
- Use the WIRES on the opened panel to trigger a puzzle.
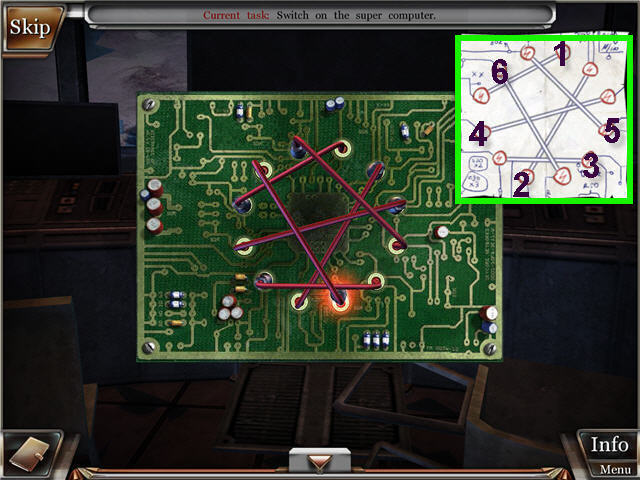
- Duplicate the wire pattern from the diagram on the right by dragging the wires into place.
- Pay careful attention to the order of the wires and note which are on the top and which are at the bottom.
- This puzzle is random; see screenshot for our solution.
- Press the red button on the computer console and get a random code entered in your journal.
- Turn left.

- Use the FULL GAS CAN and the LIGHTER on the ice (O).
- Look close at the briefcase and click on the lock to trigger a puzzle.
- Rotate the tumblers to set them at the code from the super computer (P); these codes are random.
- Click on the pendant to get the BRIEFCASE.
- Turn left, go forward through the two doors and then left two times to Agent Davis.
- Give the BRIEFCASE to Agent Davis.
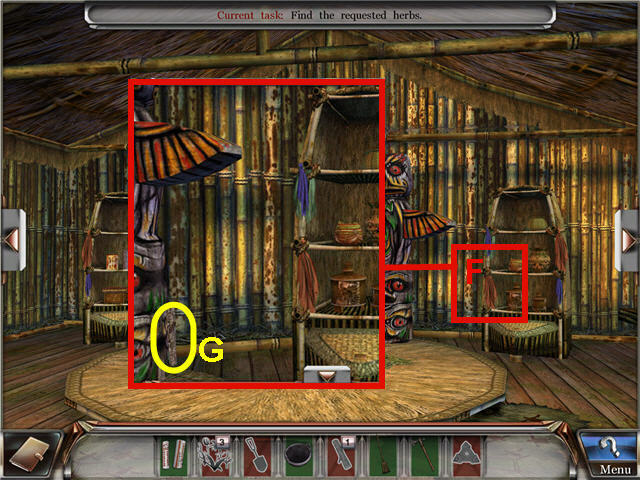
Chapter 2 - Secret Base
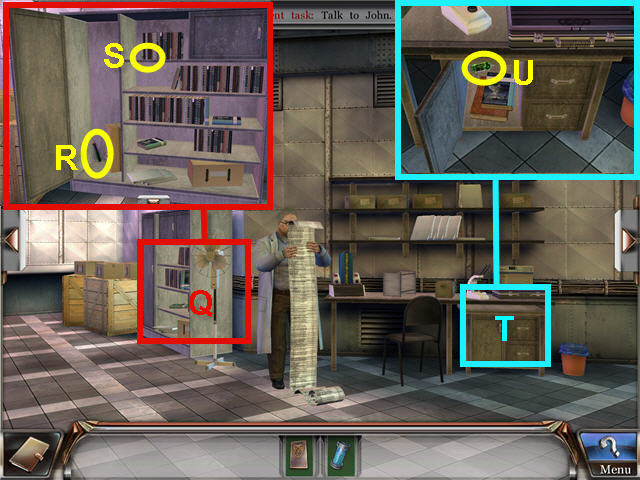
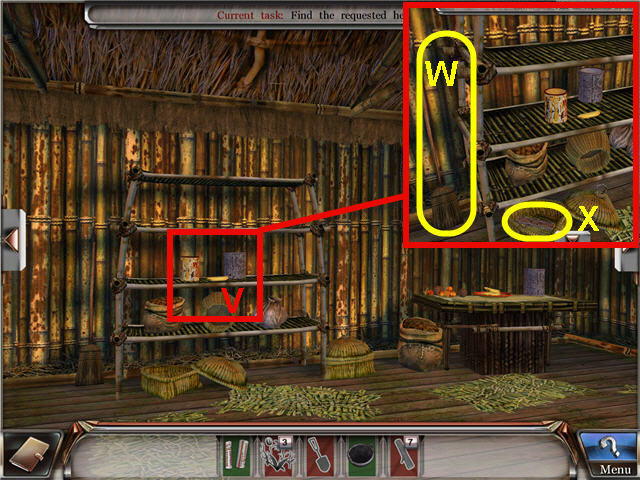
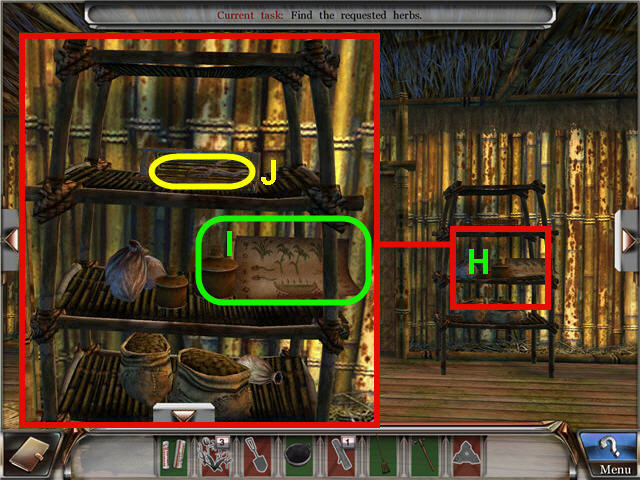
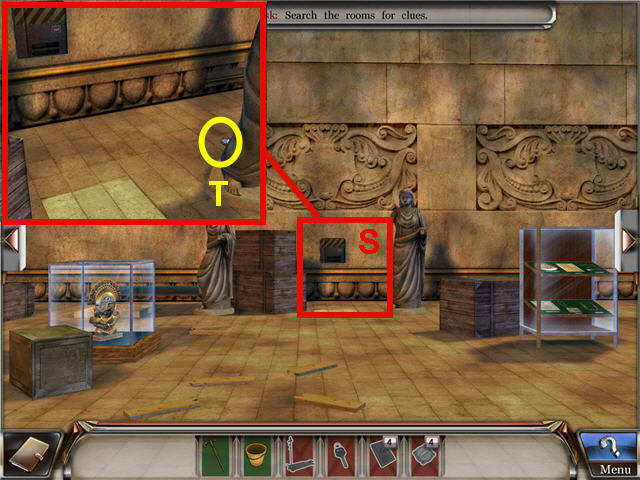
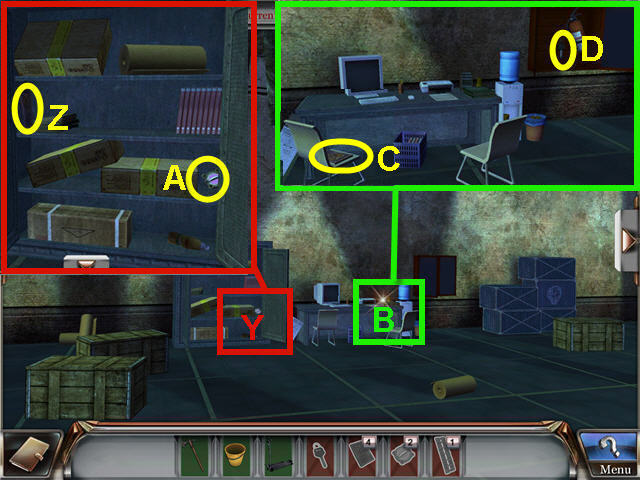
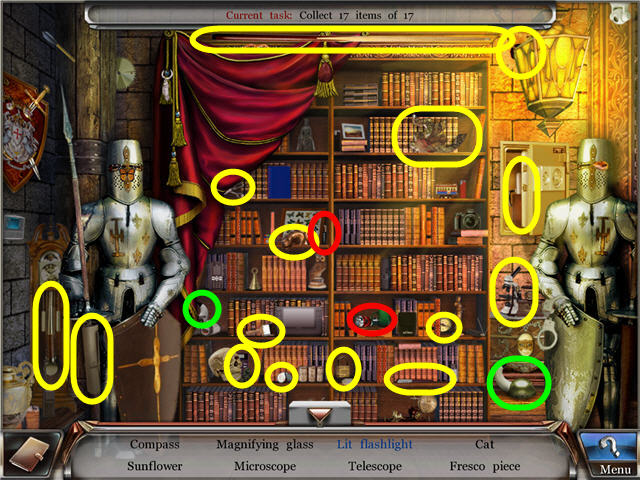
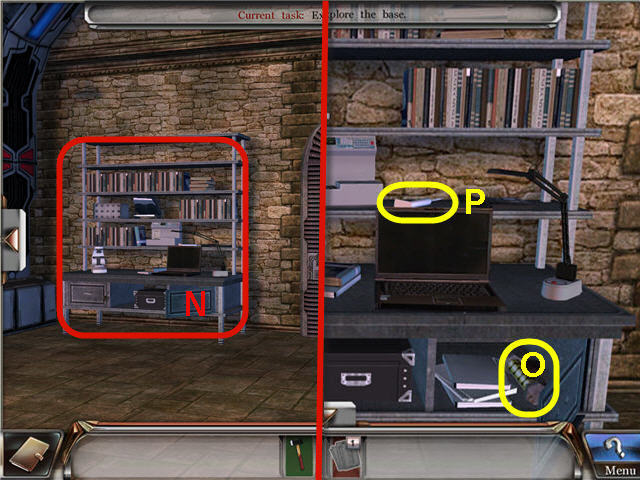
- Look close at the bookcase (Q); open the left door, move the box and take the CHEMICALS (R).
- Open the upper left cabinet, move the books and take the DECODER PART (S).
- Look close at the desk drawers (T); open the left side and take the DECODER PART (U).
- Turn left.
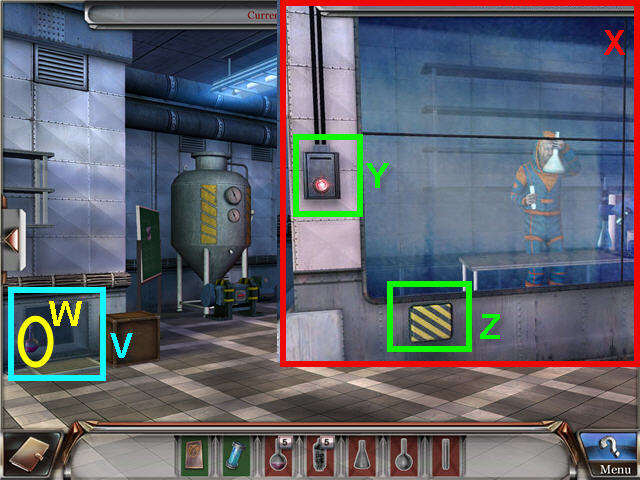
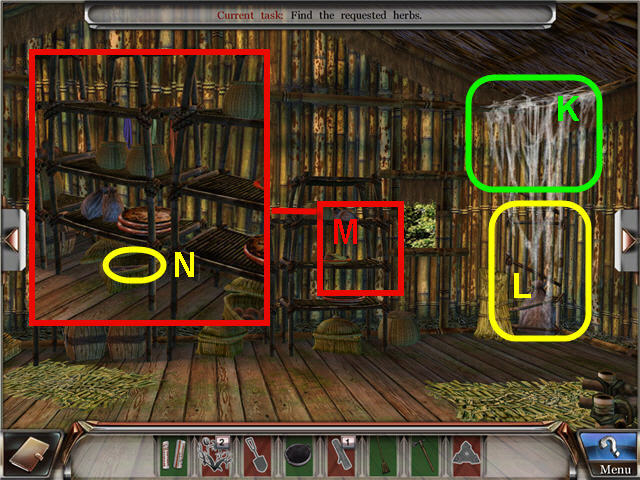
- Look close at the grate (V) and take the CHEMICAL (W).
- Look close at the clean room (X), click on the glass and then push the intercom button (Y).
- Click the drawer (Z) and place the SAMPLES inside and get a note.
- Back out and turn left.
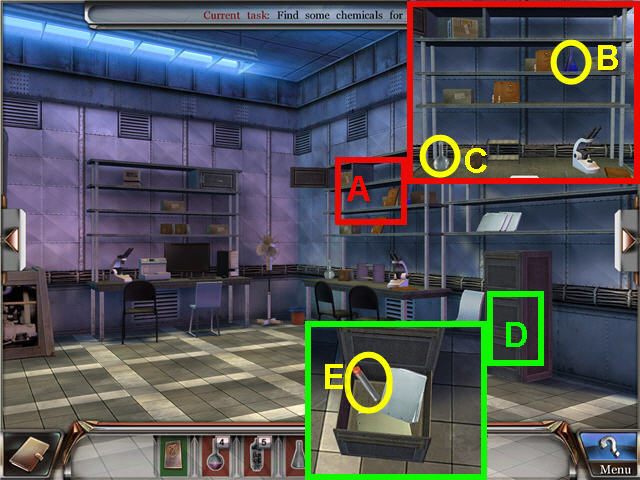
- Look close at the shelves (A); move the document and take the CHEMICAL (B).
- Take the EMPTY FLORENCE FLASK (C).
- Look close at the chest of drawers (D), open the bottom drawer and take the EMPTY TUBE (E).
- Turn left and look close at the wardrobe to access a Hidden Object Scene.
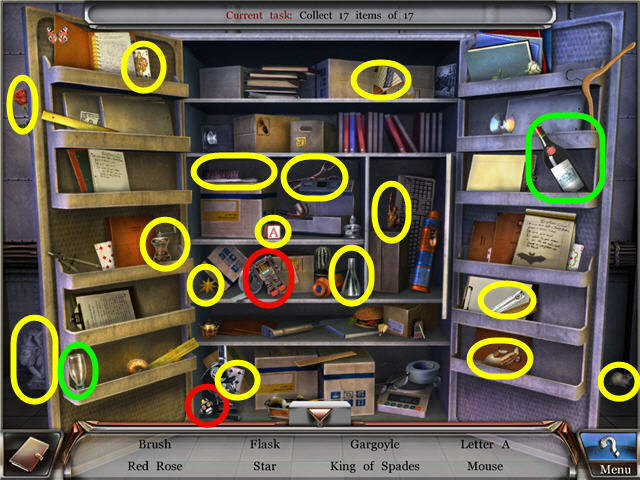
- Marked in red; place the robot head on the robot to get a fixed robot.
- Marked in green; use the wine bottle on the wine glass to get a glass of wine.
- Find the items listed and get an EMPTY CONICAL FLASK.
- Look close at the substance mixer in the corner.

- Place the EMPTY CONICAL FLASK on the right, the EMPTY TUBE in the middle and the EMPTY FLORENCE FLASK on the left to trigger a puzzle.
- Use the code from John to set the dials with the correct amount of each colored chemical.
- Follow the hoses from the flasks to see which switch controls the flow to the flask.
- When set, press the red button on the upper left.
- The code given to you is random; your solution may be different from ours.
- My solution; set the dials from left to right; 1, 2, 3, 1, 1, 2, 3, 1, 1. See screenshot for solution.
- Take the 3 CHEMICALS.
- Turn left two times.
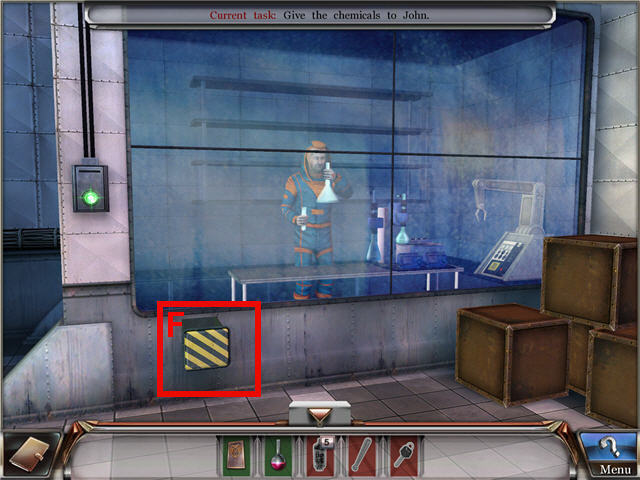
- Look close at the clean room and open the drawer (F).
- Place the CHEMICALS in the drawer to trigger a puzzle.
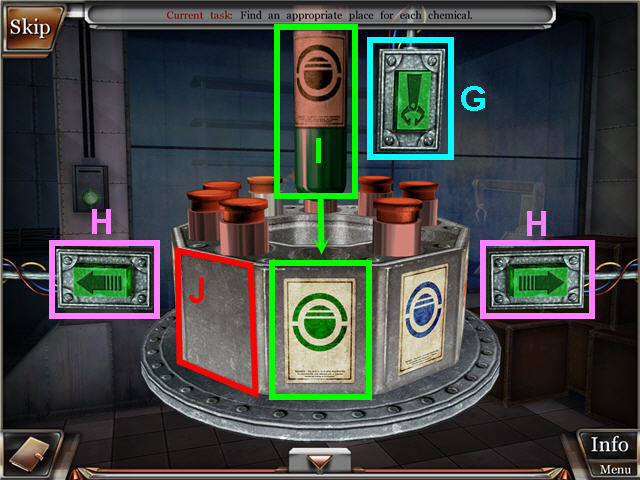
- The goal is to move the tubes into their matching spot by using the mechanical arm (G) to lift them out of the holder. Use the arrows (H) to turn the holder left or right.
- Note that the symbols and the color on the tray must match the tube (I).
- Use the space in the holder without a color or symbol (J) as a holding area for moving the tubes.
- The starting locations of the tubes are random.
- Click on the video screen on the far right wall to get your next task.
- Turn right, talk to Dr. Erie and enter through the newly-opened door.
- Move the box (K) and look close at the chest (L); move the documents and take the DECODER PART (M).
- Turn right.
- Look close at the chest (N) and take the PAPER (O).
- Turn right.
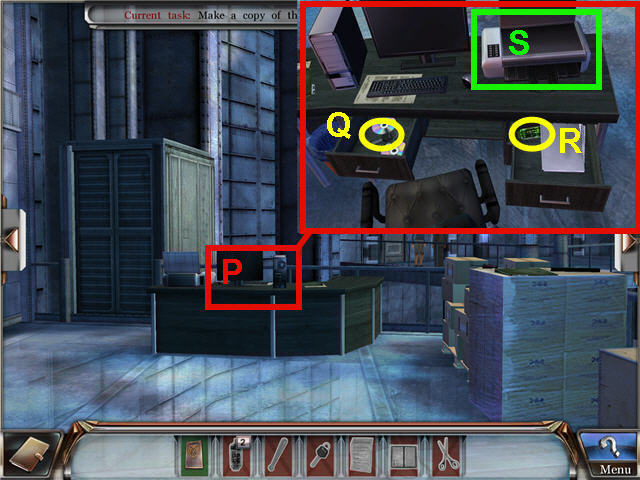
- Look close at the desk (P); open the left drawer and take the KEY (Q).
- Open the right top drawer; move the documents and take the DECODER PART (R).
- Place the DOCUMENT and the PAPER on the copier (S) and take the DOCUMENT COPY.
- Turn right.
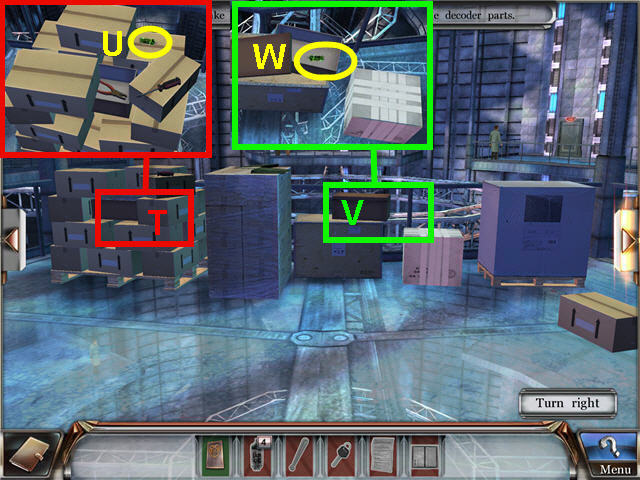
- Look close at the boxes (T); move the top box and take the DECODER PART (U).
- Look close at the boxes (V) and take the DECODER PART (W).
- Back out and turn right two times.
- Head through the laboratory door on the right and turn right two times.
- Look close at the shelves (X) and use the KEY on the cabinet (Y).
- Move the box and take the DECODER PART.
- Turn left two times.
- Give the DOCUMENT COPY AND DECODER PARTS to Dr. Erie.
- Turn right and click on the wardrobe to access a Hidden Object Scene.
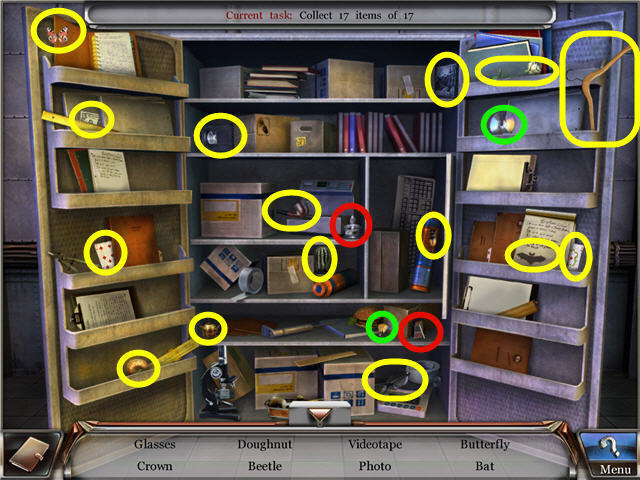
- Marked in red; use the match on the burner to get a lit portable stove.
- Marked in green; place the disk piece on the broken disk to get a disk.
- Find the items listed and get a PHOTO.
- Turn right.
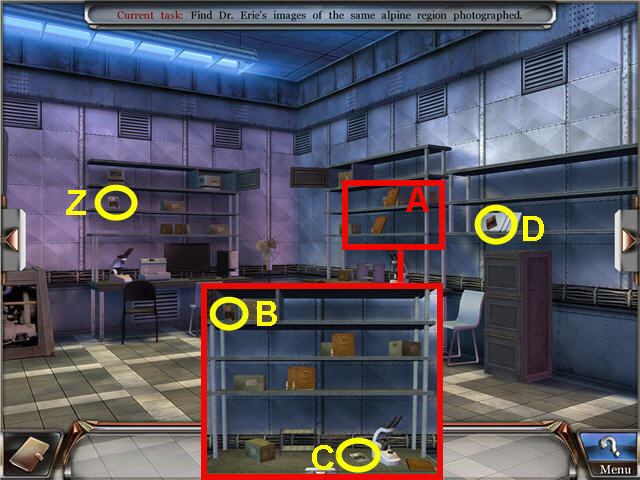
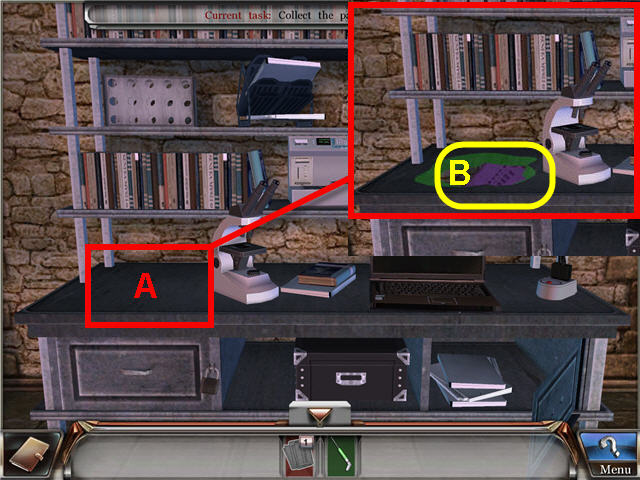
- Look close at the left shelf, move the box and take the PHOTO (Z).
- Look close at the shelf (A); open the compartment, move the box and take the PHOTO (B).
- Move the microscope and take the PHOTO (C).
- Take the PHOTO (D) from the right shelf.
- Turn right.
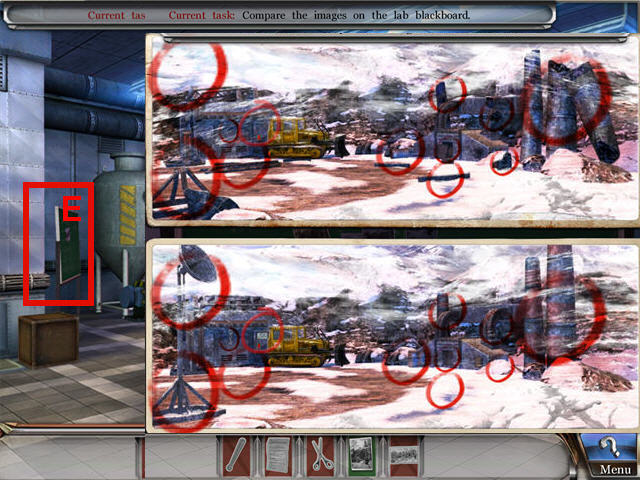
- Look close at the chalk board (E) and place the PHOTO'S on the board to trigger a puzzle.
- Find the 12 differences and get the COMPARED IMAGE. See screenshot for solution.
- Turn right.
- Give the COMPARED IMAGE to Dr. Eric (F).
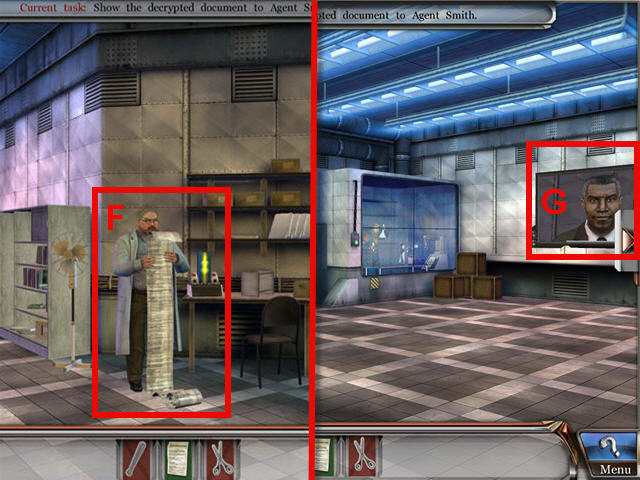
- Take the DECRYPTED DOCUMENT.
- Turn left and give the DECRYPTED DOCUMENT to Agent Smith (G).
- Turn right two times, go through the door and right one time.
- Click on the left door to trigger a puzzle.
- The goal is to rotate the disks so that all outer lights are lit green.
- There can only be one yellow light in each row from the outer light to the inner dial.
- The puzzle is random; your solution may be different. See screenshot for our solution (H).
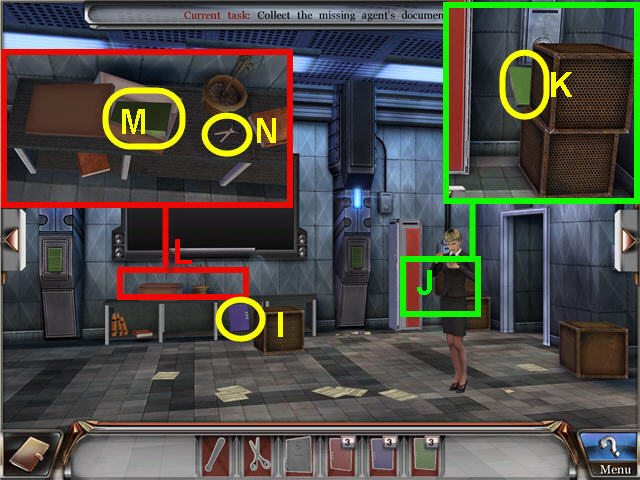
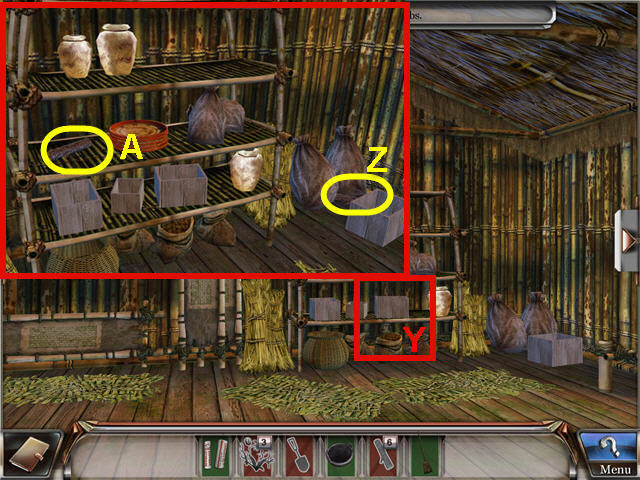
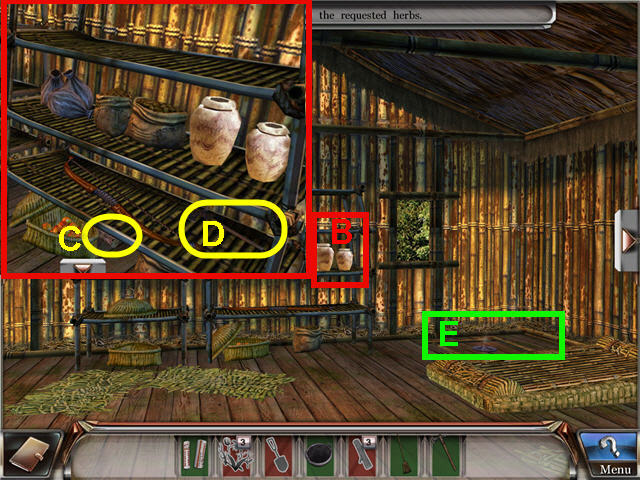
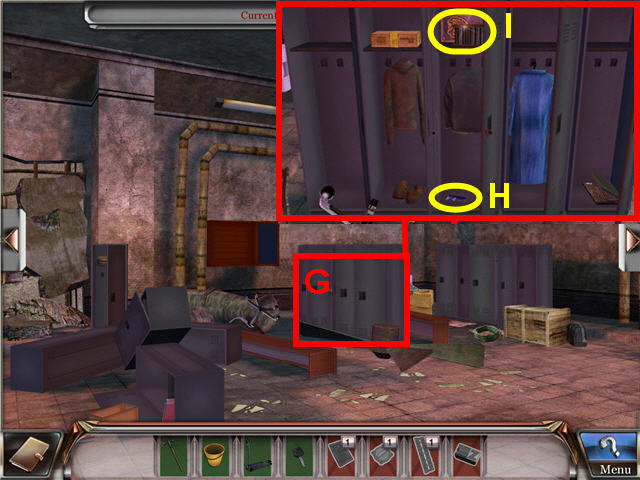
- Move the crate and take the BLUE FOLDER (I).
- Look close at the locker (J); move the crate and take the GREEN FOLDER (K).
- Back out and look close at the box (L) and take the GREEN FOLDER (M).
- Move the book and take the SCISSORS (N).
- Turn left.
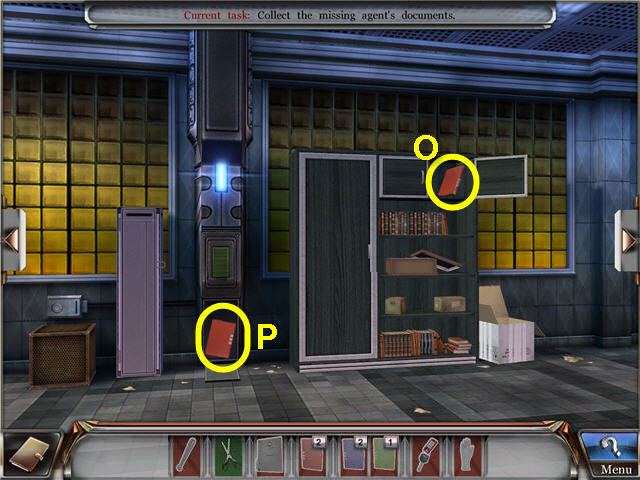
- Open the upper right cabinet and take the RED FOLDER (O).
- Look close at the grey lockbox; remove the bottom panel of the pillar to the right and take the RED FOLDER (P).
- Turn left.

- Look close at the desk; open the bottom left drawer and take the BLUE FOLDER (Q).
- Take the GREEN FOLDER (R) on the chair.
- Look close at the pictures on the wall (S) to trigger a puzzle.
- The goal is to straighten up all the pictures.
- Moving one picture will also move others.
- The puzzle is random; you may have a different starting layout.
- Our solution; click on the top right, bottom right and the bottom middle.
- Take the RED TAG KEY (T) and the INFORMATION ABOUT AGENT X (U).
- Turn left.
- Look close at the drawers (V); open the top drawer and take the BLUE FOLDER (W).
- Look close at the aquarium; open the cabinet (X) and take the RED FOLDER (Y).
- You should now have all folders and in inventory you should have AGENT X'S DOCUMENTS.
- Back out and turn left.

- Give the AGENT X'S DOCUMENTS to Agent Davis and get a GLOVE.
- Look close at the red lockbox (Z) and use the RED TAG KEY on the lock (A).
- Use the GLOVE on the WALKIE TALKIE (B).
- Turn left.
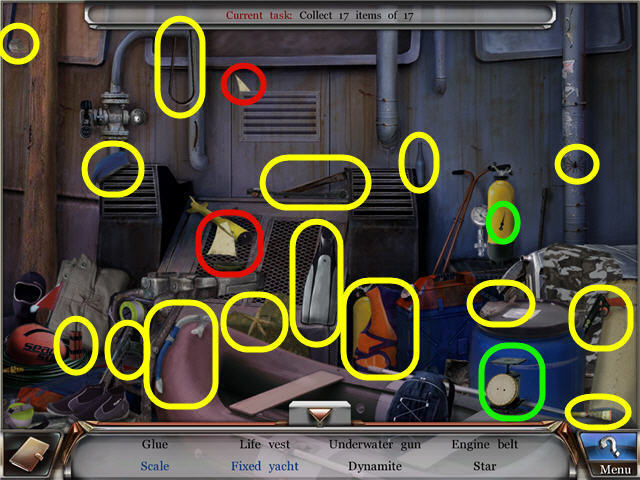
- Look close at the opened box to the right of the cabinet to access a Hidden Object Scene.
- Marked in red; place the pipe stem on the pipe bowl to get a pipe.
- Marked in green; place the lens on the glasses to get fixed glasses.
- Find the items listed and get a LEVER.
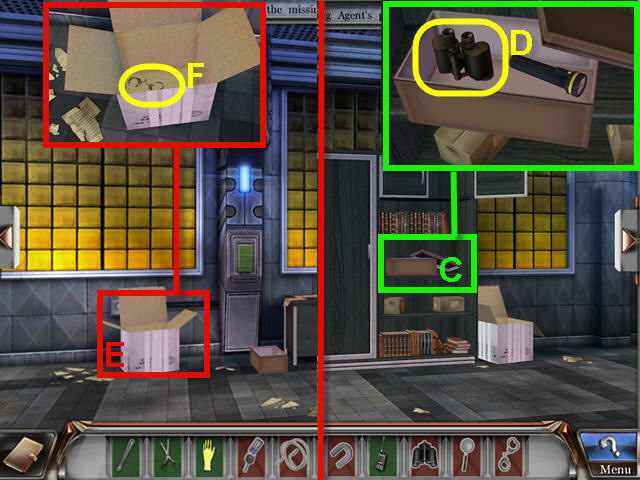
- Look close at the box (C) and use the GLOVE to get the BINOCULARS (D).
- Turn left two times and look close at the box (E).
- Use the SCISSORS on the box then use the GLOVE on the HANDCUFFS (F).
- Turn left and exit to the hall via the door behind Agent Davis.
- Look close at the box (G) and use the SCISSORS on it and take the STRING (H).
- Turn right two times and enter the Laboratory and turn left.
- Look close at the engine (I).
- Place the LEVER on the right (J).
- Take the MAGNET (K) and it is automatically combined with the STRING to create a MAGNET ON A STRING.
- Turn right two times, out the door, left three times, head into Agent X's office and turn left.
- Look close at the aquarium.
- Use the MAGNET ON A STRING on the aquarium to trigger a puzzle.
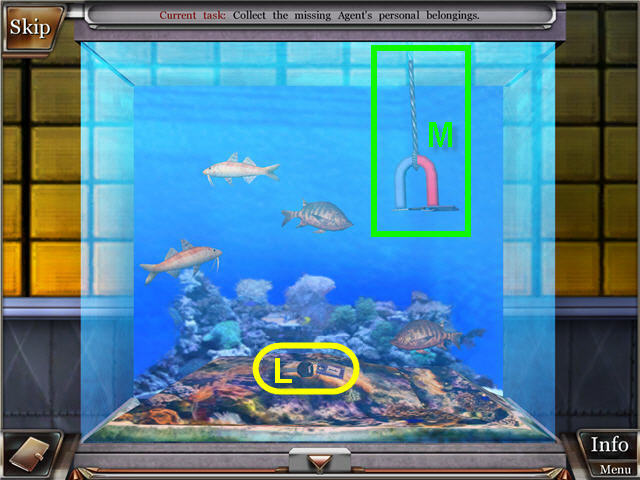
- The goal is to get the key (L).
- Click on the magnet (M) to get it down to the key and back up without touching a fish or you will need to start over.
- You can touch a fish with the rope and not have to start over; just be careful to avoid the fish with the magnet.
- You can swing the magnet with your mouse to avoid the fish.
- Get a BLUE TAG KEY when completed.
- Turn right.
- Look close at the blue lockbox (N) and use the BLUE TAG KEY on the lock.
- Use the GLOVES to take the MAGNIFYING GLASS (O).
- You should have all the items collected and automatically get AGENT X'S PERSONAL BELONGINGS.
- Turn right two times and give AGENT X'S PERSONAL BELONGINGS to Agent Davis.
- Turn left two times.
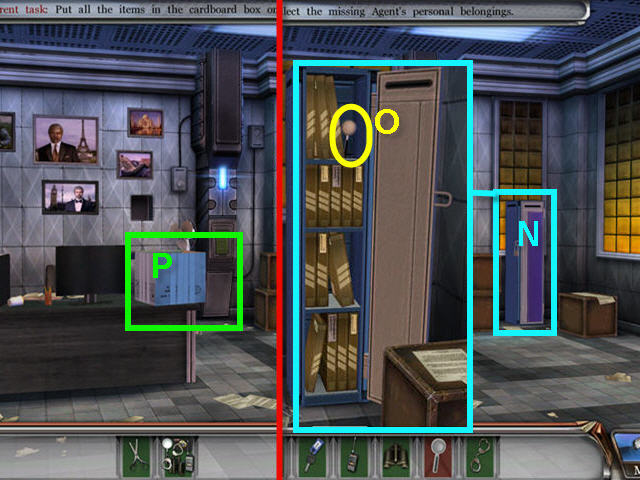
- Place the AGENT X'S PERSONAL BELONGINGS in the box (P) to trigger a puzzle.
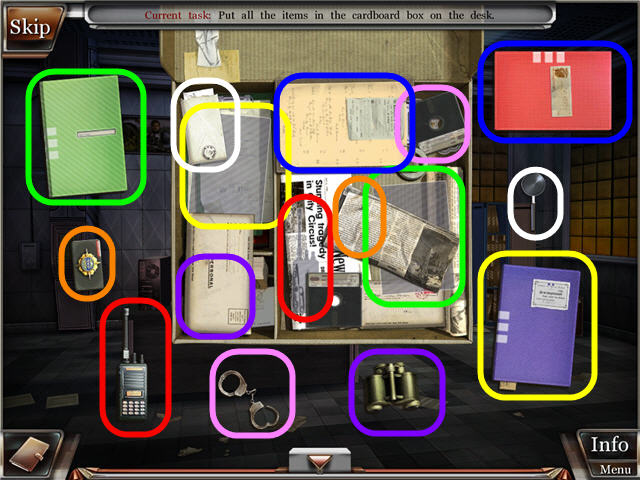
- The goal is to place all the items into the correct spots in the box.
- Click on the disk in the upper right to move it and place the HANDCUFFS in the upper right.
- Click on the newspaper to move it and place the badge in the center.
- Click on the envelope in the lower left and place the BINOCULARS in the corner.
- Click on the envelope in the upper left and place the MAGNIFYING GLASS in the corner.
- Click on the clipboard to move it and place the FOLDERS in its spot.
- See screenshot for solution.
Chapter 3 – Museum
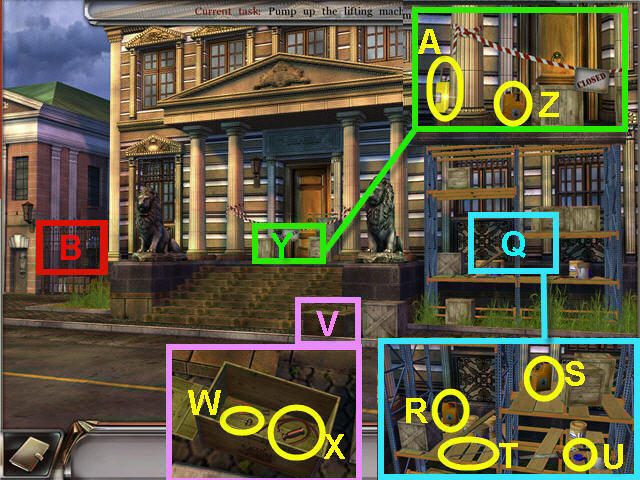
- Look close at the scaffolding (Q); move the paint can and two crates and take the OIL x 2 (R – S), CROWBAR (T) and INSULATING TAPE (U).
- Look close at and use the CROWBAR on the crate (V) and take the KEY (W) and the PUMP HOSE (X).
- Look close at the entrance (Y); move the left crate and take the OIL (Z).
- Take the PUMP (A).
- Look close at and use the KEY on the gate (B).
- Use the CROWBAR on the grate and take the OIL (C).
- Move the crate and take the OIL (D).
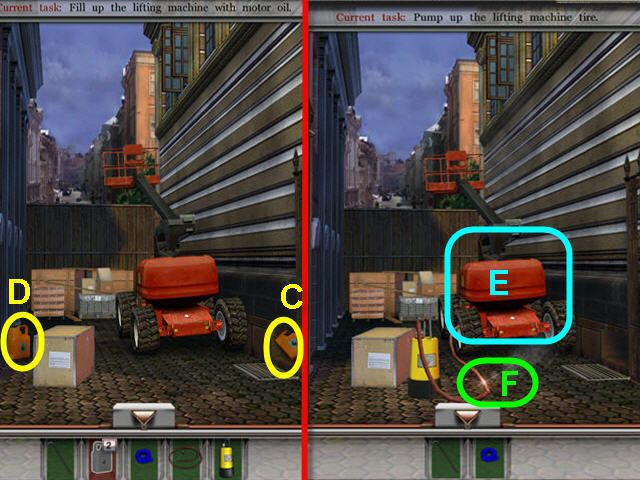
- Use the OIL on the lift (E).
- Use the PUMP on the lift.
- Use the PUMP HOSE on the PUMP.
- Use the INSULATING TAPE on the PUMP HOSE (F) to trigger a puzzle.
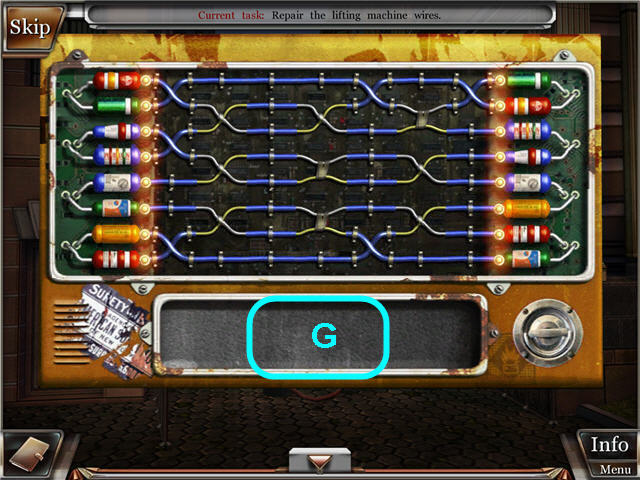
- The goal is to connect the wires so that all lights are lit.
- The puzzle is random; your solution may be different from ours.
- Place the connectors from the bottom noting that some connectors will cross the wires and others will keep going straight. See screenshot for our solution (G).
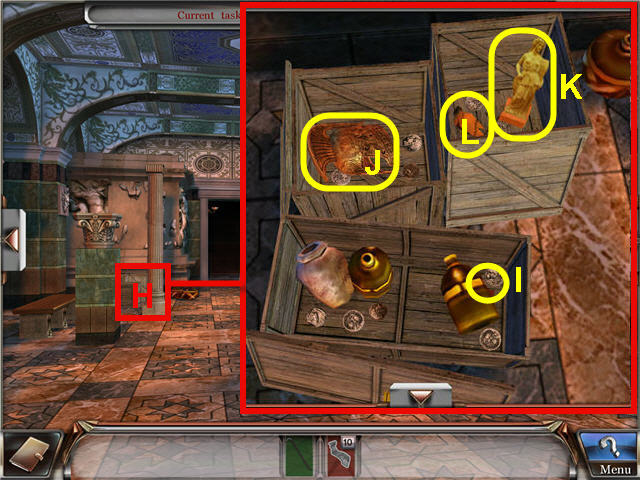
- Look close at the wooden crates (H) and use the CROWBAR on each of them.
- Move the jug and take a VASE SHARD (I) from the bottom crate.
- Take a HELMET (J), the STATUE and the VASE SHARD (K).
- Turn right.

- Look close at and use the CROWBAR on the wooden crate (L) and take the VASE SHARD (M).
- Open the box on the left and take the VASE SHARD (N).
- Take the BUST (O), the STOOL (P) and the STATUE (Q).
- Move the crate and take the VASE SHARD (R).
- Turn right.
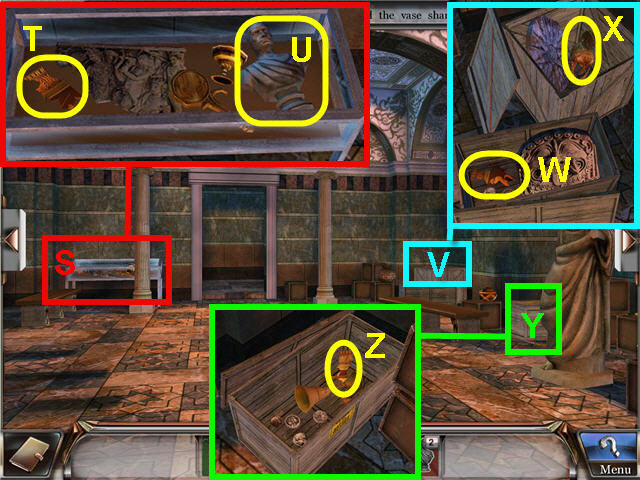
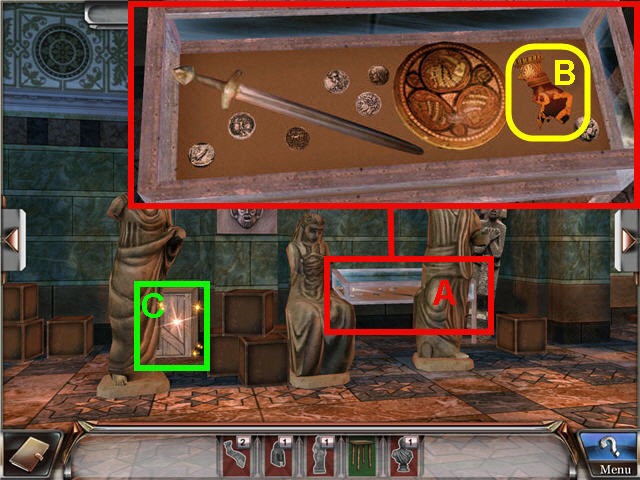
- Look close at the display case (S) and take the VASE SHARD (T) and BUST (U).
- Look close at and use the CROWBAR on the wooden crates (V).
- Move the stone face in the lower crate and take the VASE SHARD (W) and take the HELMET (X) from the top crate.
- Look close at and use the CROWBAR on the crate (Y) and take the VASE SHARD (Z).
- Turn right.
- Look close at the display case (A); move the shield and take the VASE SHARD (B).
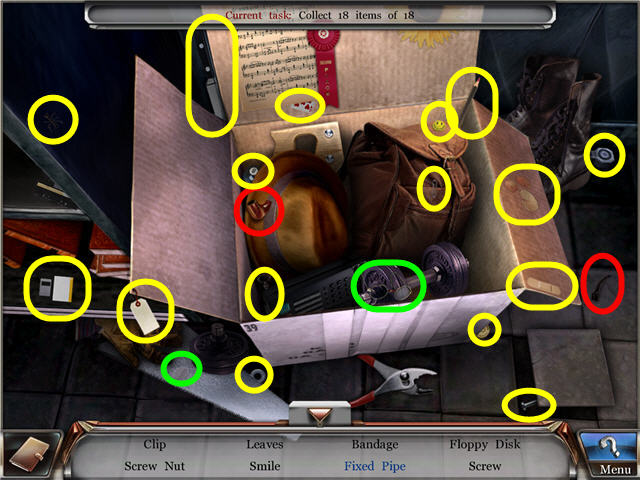
- Look close at the crate (C) to access a Hidden Object Scene.
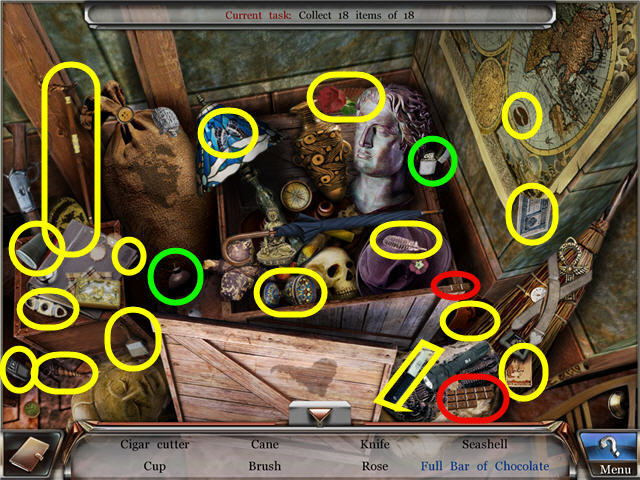
- Marked in red; place the chocolate piece on the chocolate bar to create a full bar of chocolate.
- Marked in green; use the lighter on the bomb to create a lit bomb.
- Find the items listed and get a VASE SHARD.
- Turn right and give the VASE SHARDS to the Professor to trigger a puzzle.
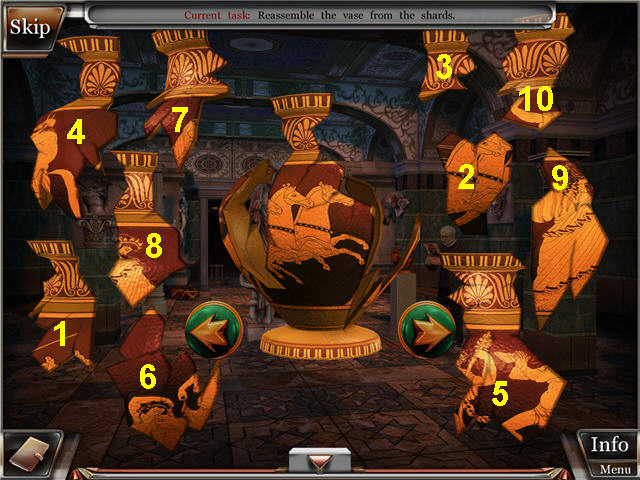
- Assemble the vase by using the arrows to turn the vase; place the pieces in the broken areas.
- The pieces will lock into place when correct.
- The starting point on the vase is random, but if you turn the vase to the starting point in the screenshot, you can follow the solution.
- Solution; right, place 1 and 2, right, place 3, right, place 4, right, place 5, right, place 6 and 7, right, place 8, right, place 9 and 10.
- Get a BULB when complete.
- Head straight into the storeroom.
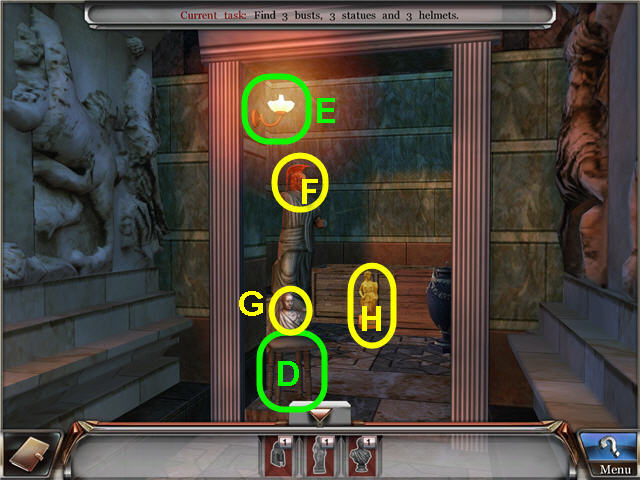
- Place the STOOL (D) under the lamp and place the BULB in the lamp (E).
- Move the crate on the left and the panel on the right rear.
- Take the HELMET (F), the BUST (G) and the STATUE (H) to complete the set and get EXHIBITS.
- Give the EXHIBITS to the Professor.
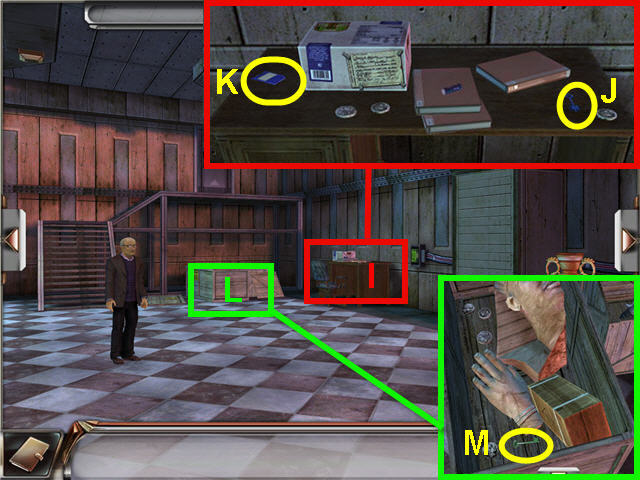
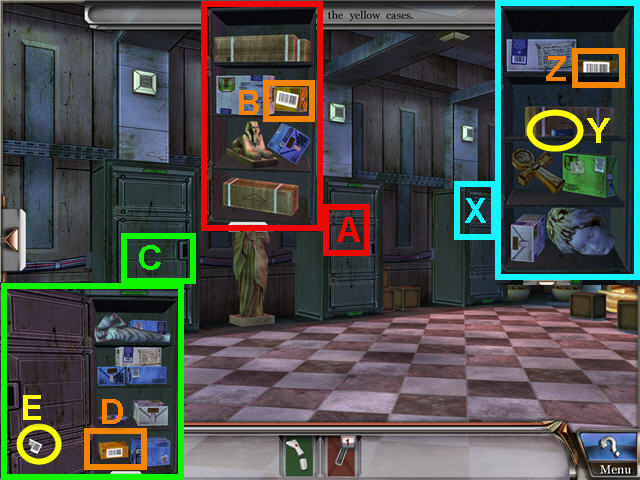
- Look close at the desk (I); move the book on the right and take the blue KEY (J); move the box on the left and take the ACCESS CARD (K).
- Back out and look close at the crates (L); move the hand and take the green KEY (M).
- Turn right two times.

- Look close at the drawers (N); move the angel and take the ACCESS CARD (O).
- Use the blue KEY on the bottom drawer, move the left book and take the ACCESS CARD (P).
- Use the green KEY on the top drawer, move the book and take the ACCESS CARD (Q) and BARCODE READER WITHOUT BATTERIES (R).
- Open the left cabinet; move the box and take the red KEY (S).
- Turn right two times.
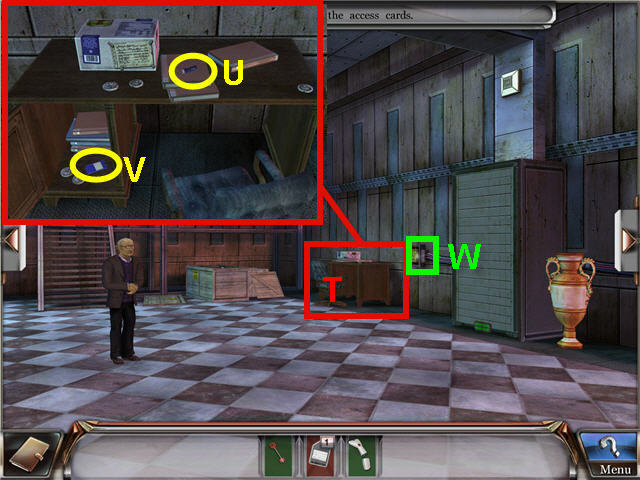
- Look close at the desk (T) and take the BATTERY (U).
- Use the red KEY on the cabinet and take the ACCESS CARD (V).
- Use the ACCESS CARDS on the card reader (W) to trigger a puzzle.
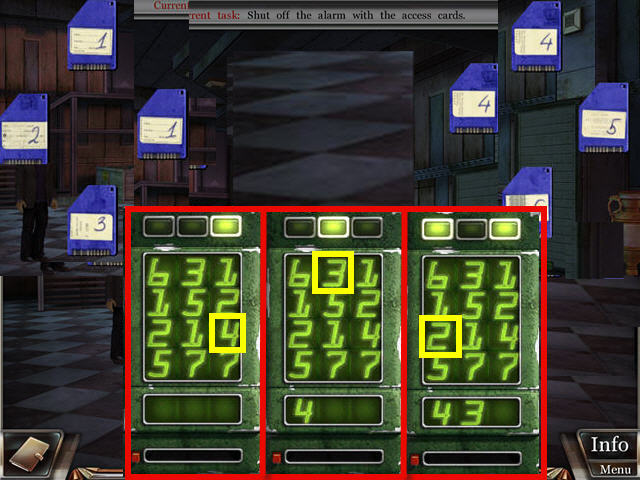
- The goal is to use the access cards in the correct order to unlock the lockboxes.
- Watch the lights above and insert the card that matches the number that is in the column that has a light lit above.
- If only one light is on at the top, the correct number can only be in that column.
- If two lights are on at the top, the correct number has to be a number that can be found in both of those columns.
- Place the access card that matches the number desired in the slot below to read it.
- The puzzle is random; your solution may be different from ours. See screenshot for our solution.
- Turn right.
- Look close at the lockbox on the right (X); take the 2nd BATTERY (Y) and get a BARCODE READER.
- Move the package on the top shelf and use the BARCODE READER on the barcode of the yellow package (Z).
- Look close at the lockbox in the middle (A); move the package on the 2nd from top shelf and use the BARCODE READER on the barcode of the yellow package (B).
- Look close at the lockbox on the left (C); move the package on the bottom shelf and use the BARCODE READER on the barcode of the yellow package (D).
- Take the BARCODE PART (E) from the inside of the lockbox door.
- Turn right.
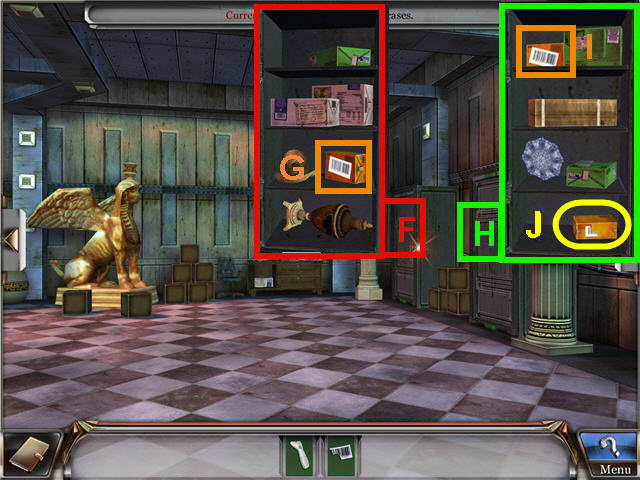
- Look close at the lockbox on the far right (F); use the BARCODE READER on the barcode of the yellow package (G).
- Look close at the lockbox on the right (H); move the box on the top shelf and use the BARCODE READER on the barcode of the yellow package on the top shelf (I).
- Place the BARCODE PART on the yellow package on the bottom shelf.
- Use the BARCODE READER on the yellow package and get the YELLOW CASE IV BC (J).
- Turn right two times and give the YELLOW CASE IV BC to the Professor.
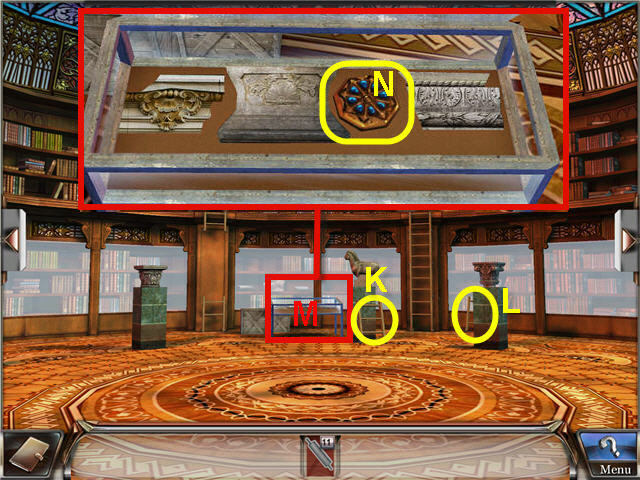
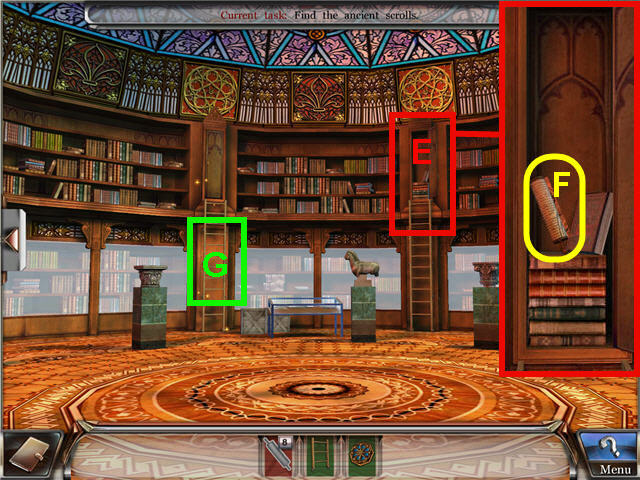
- Take the two LADDER (K-L) parts.
- Look close at the display case (M) and take the KEY (N).
- Turn left.
- Look close at the display case (O); move the crate and take the KEYS (P-Q).
- Turn left.
- Take the LADDER (R).
- Look close at the display case (S); take the LADDER (U), move the crate and take the KEY (T).
- Back out and turn left.
- Look close at the display case (V); take the last LADDER (W), move the stone slab and take the last KEY (X).
- Place the LADDER on the left ladder (Y).
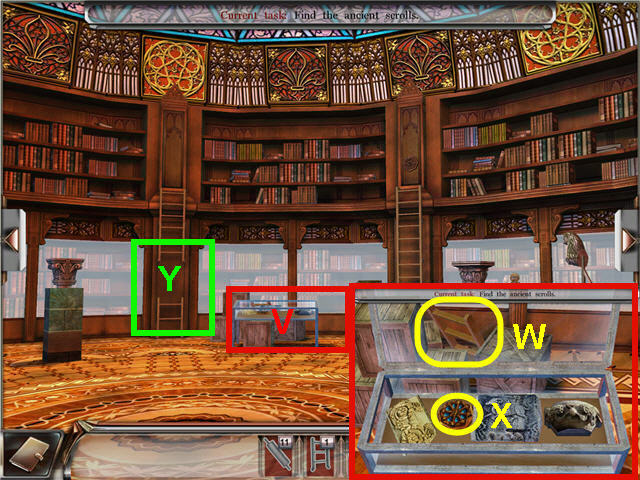
- Look close at the bookcase (Z) and take the ANCIENT SCROLL (A).
- Click on the open book (B) to get updated notes.
- Look close at the bookcase (C); use a KEY on the lock and take the ANCIENT SCROLL (D).
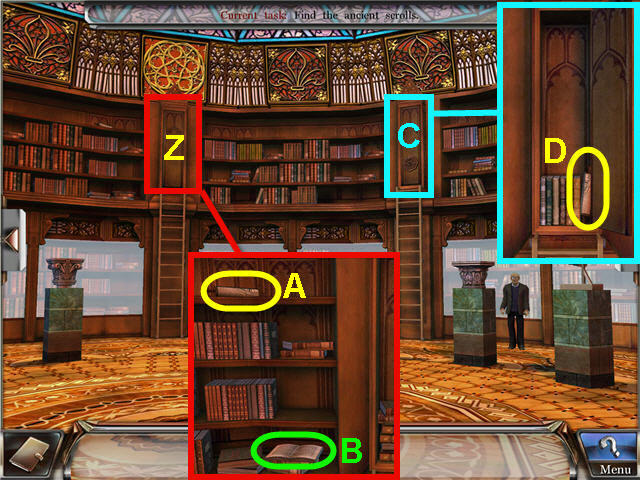
- Turn left.
- Look close at the bookcase (E); use the KEY on the lock and take the ANCIENT SCROLL (F).
- Place two LADDER parts on the left ladder (G).
- Click on the left ladder to access a Hidden Object Scene.
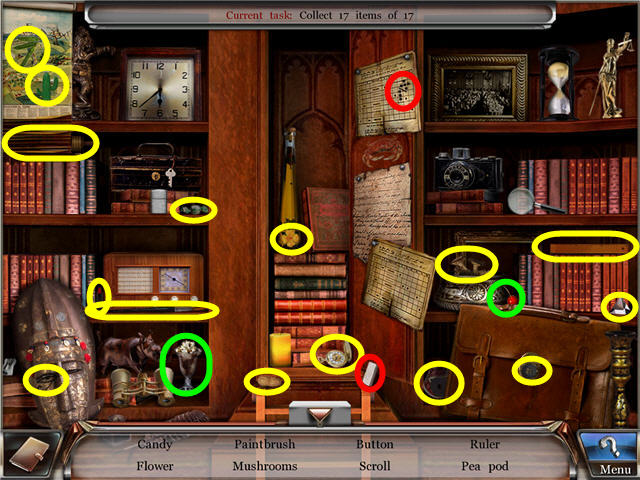
- Marked in red; place the dots on the tile to create the dominoes.
- Marked in green; place the cherry on the sundae to get a cherry dessert.
- Find the items listed and get an ANCIENT SCROLL.
- Turn left.
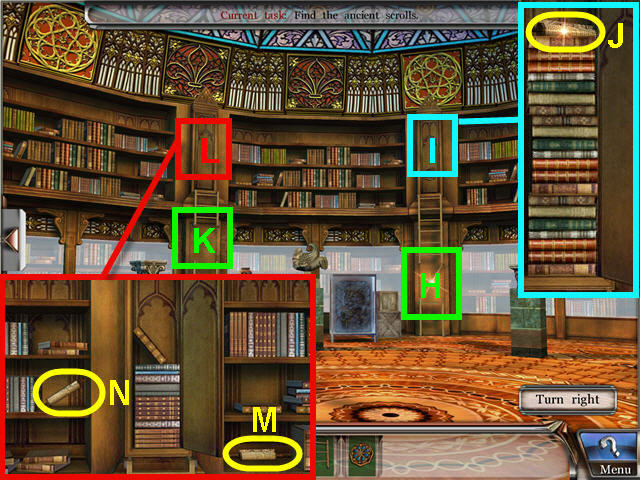
- Place the LADDER on the broken right ladder (H).
- Look close at the bookcase (I); place the KEY on the lock and take the ANCIENT SCROLL (J).
- Place the LADDER on the broken left ladder (K).
- Look close at the bookcase (L); move the books on the bottom right and take the ANCIENT SCROLL (M).
- Move the books on the middle left shelf and take the ANCIENT SCROLL (N).
- Turn left.

- Look close at the bookcase (O); place the KEY on the lock and take the ANCIENT SCROLL (P).
- Look close at the bookcase (Q); place the KEY on the lock and take the ANCIENT SCROLL (R).
- Move the books on the top left and take the ANCIENT SCROLL (S).
- Look close at the display case (T) and click on the chest to trigger a puzzle.
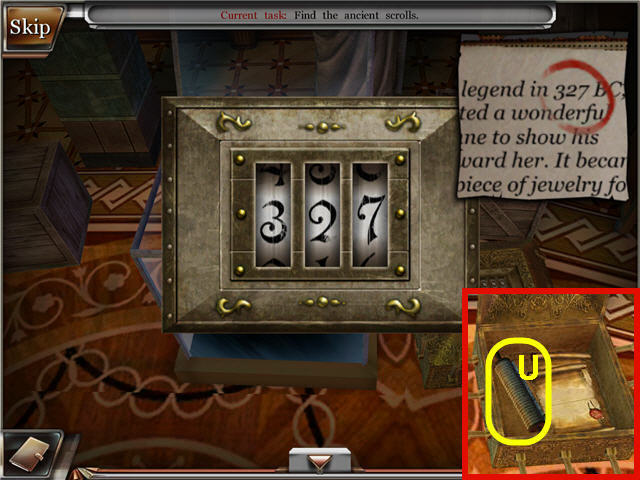
- Put the correct code in the tumblers to open the chest.
- The clue can be found in the open book found on the shelves.
- Solution; the code is 327. This may be random and your code could be different.
- Take the final ANCIENT SCROLL (U) to trigger a puzzle.
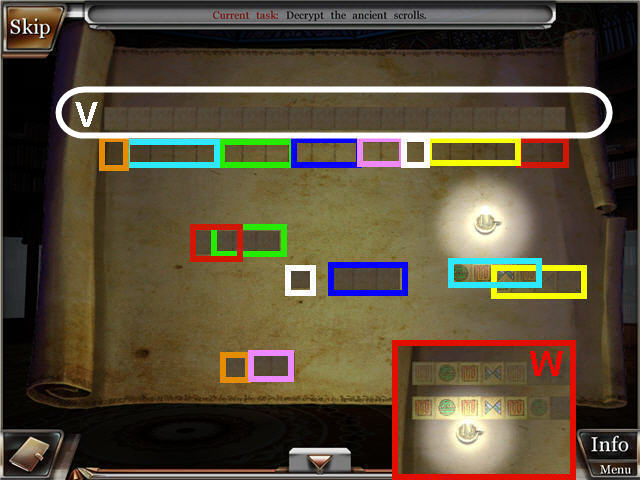
- Duplicate the top line (V) into the line below it by using the pieces scattered below.
- Move the candle around to see the writings in the light (W).
- Click on a piece below to drag it up and place it on the correct squares.
- This puzzle is random. See screenshot for our solution.
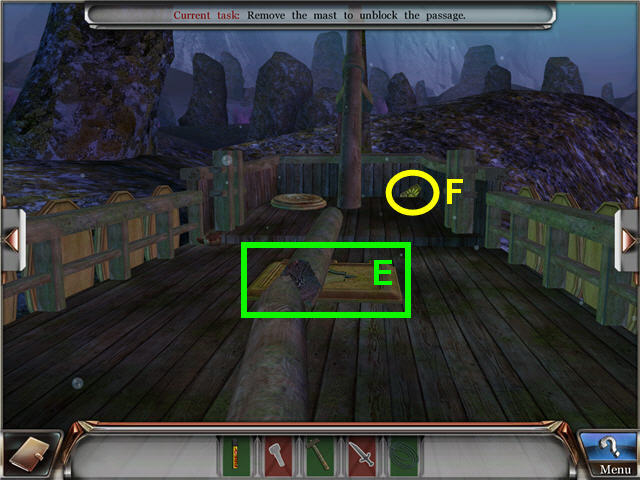
Chapter 4 - Aegean Sea
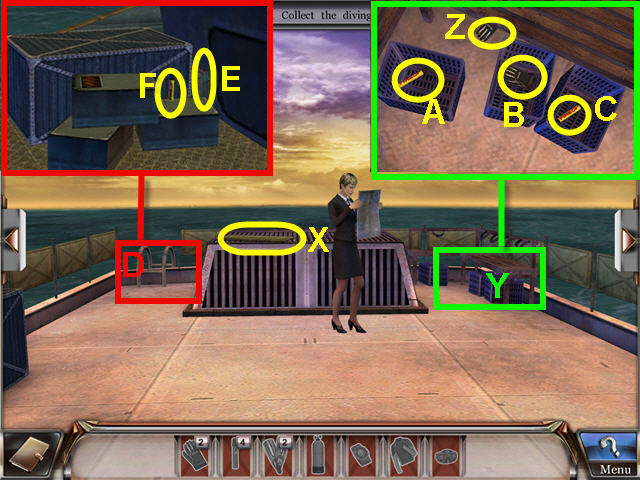
- Take the SIDE (X).
- Look close at the bins (Y) and take the GLOVE (Z).
- Move the three bins and take from left; the SIGNAL LIGHT (A), GLOVES (B), and SIGNAL LIGHT (C).
- Click on the ladder (D); take the SIDE (E); move the top crate and take the SIGNAL LIGHT (F).
- Turn left.
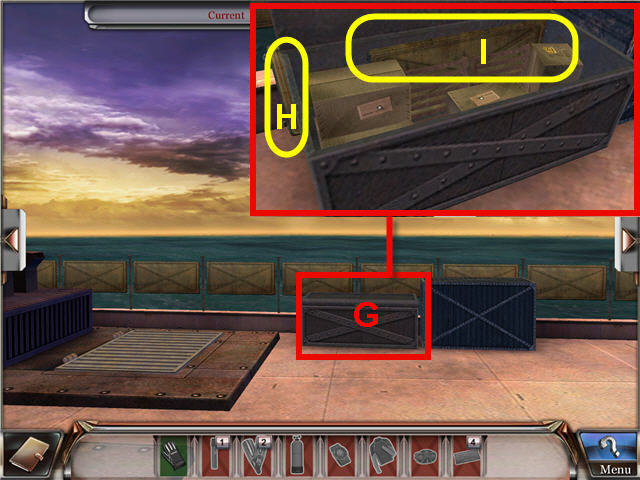
- Look close at the chest (G); take the two SIDES (H - I).
- Turn left.
- Take the SIDE (J).
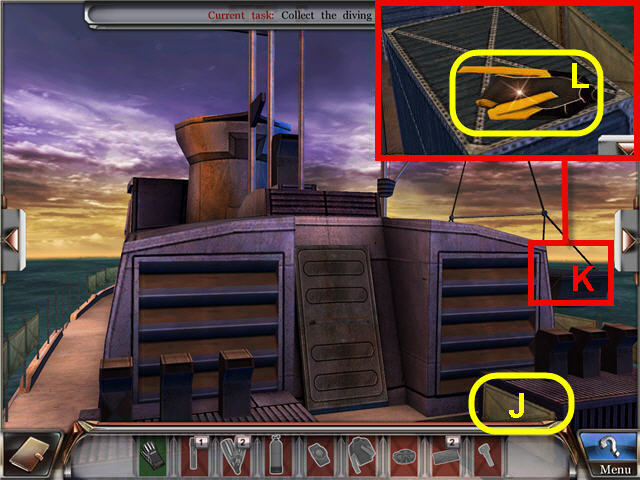
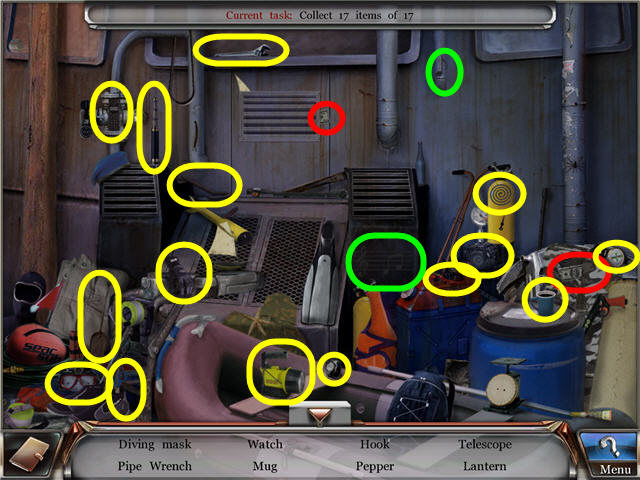
- Look close at the lifeboat (K) and take the DIVING SUIT (L).
- Back out and turn left.
- Take the DIVING CYLINDER (M) and the 2 SWIMFINS (N-O).
- Look close at the wooden box (P); take the final SIDE (Q) and the DIVING WATCH (R).
- Back out and turn right.
- Place the SIDE on the ships side (S).
- Click on the ships side to access a Hidden Object Scene.
- Marked in red; place the dollar bill half on the other half to create money.
- Marked in green; place the note on the staff and get the notes.
- Find the items listed a get a HOOK.
- Turn left.
- Look close at the grate (T); use the HOOK to get a KNIFE (U).
- Turn right.
- Look close at the lifeboat (V); use the KNIFE on the ropes (W) and take the SIGNAL LIGHT (X) and DIVING MASK (Y).
- You should now have all the diving equipment.
- Turn right and look close at the stern (Z); move the grate and take the PINCERS (A).
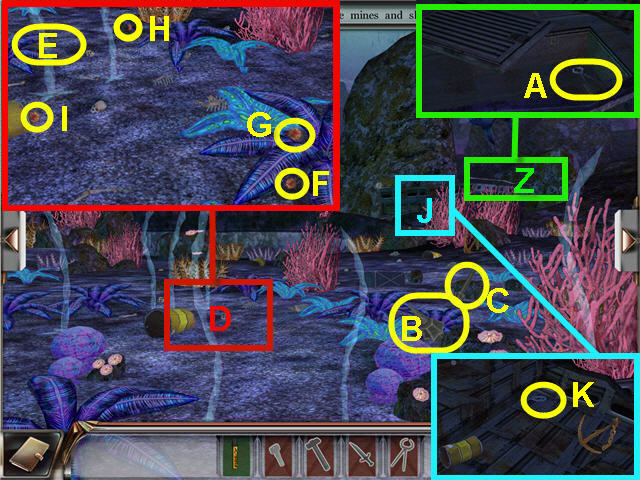
- Take the 2 HARPOONS (B-C).
- Look close at the algae (D) and take the HARPOON (E).
- Move the skull and use the PINCERS to get the SEA URCHINS (F-I).
- Look close at the sunken ship (J) and get the WIRE ROPE (K).
- Turn right.
- Take the 2 HARPOONS (L-M).
- Look close at the predatory fish (N) and use the PINCERS to take the 3 SEA URCHINS (O-P-Q).
- Back out and turn right.
- Take the HARPOON (R).
- Use the PINCERS on the 2 SEA URCHINS (S-T).
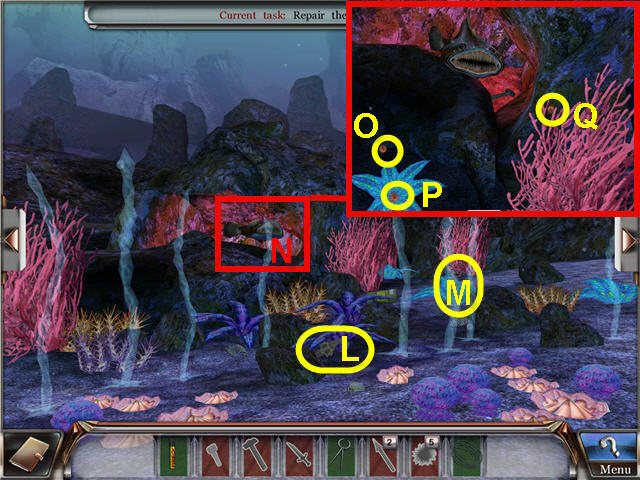
- Turn right.
- Look close at the chest (U) and use the KNIFE on the lid (V).
- Use the PINCERS on the last SEA URCHIN (W).
- Back out and turn left two times.
- Look close at the predatory fish (X); give the SEA URCHIN to the predatory fish (Y) and take the SLEDGEHAMMER (Z).
- Turn left.
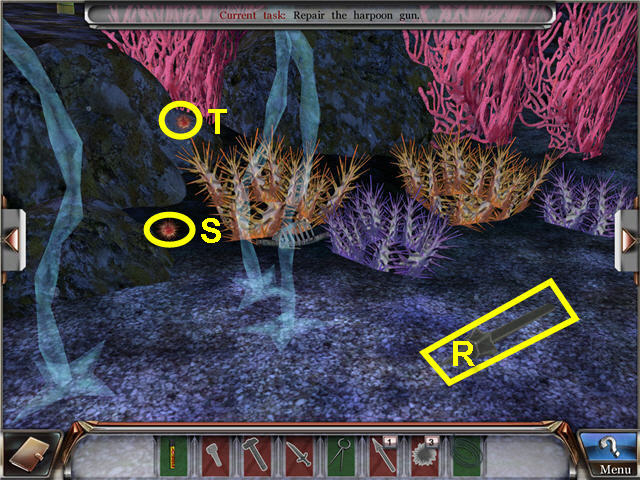
- Look close at the harpoon gun (A) and take the GEAR (B).
- Place the HARPOON on the gun.
- Place the GEAR on the panel (C).
- Use the SLEDGEHAMMER on the GEAR to trigger a puzzle.
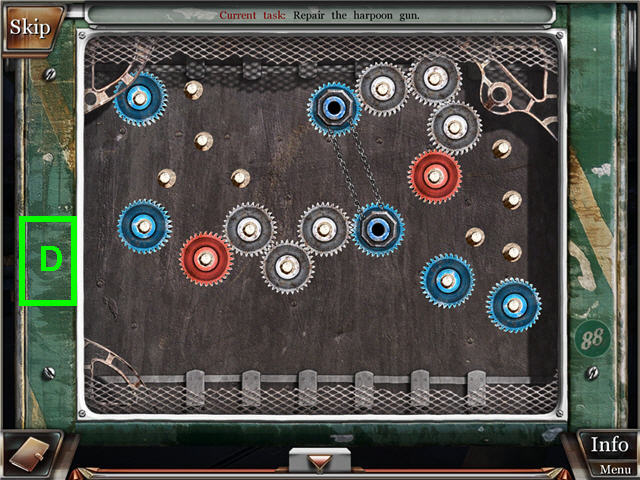
- Arrange the silver gears on the left so that both red gears spin.
- You can click on a blue gear and chain it to another blue gear.
- This puzzle is random. See screenshot for our solution (D).
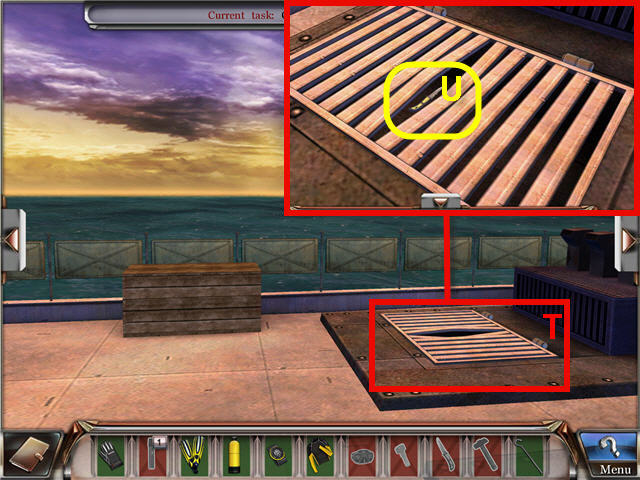
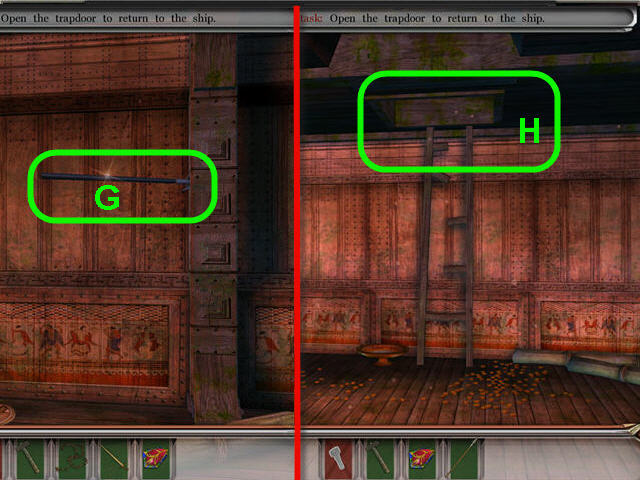
- Head straight to the sunken ship deck.
- Click on the trapdoor (E).
- Take the TRAPDOOR KEY (F).
- Turn right.
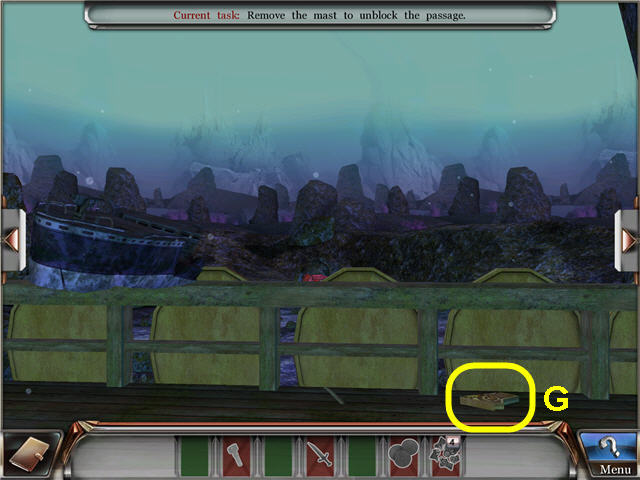
- Take the TRAPDOOR KEY (G).
- Turn right.
- Take the TRAPDOOR KEY (H).
- Click on the stern (I) to trigger a Hidden Object Scene.
- Marked in red; place the ruby on the ring and get a ruby ring.
- Marked in green; place the fish head on the fish skeleton to get a fixed fish.
- Find the items listed and get a BROKEN SWORD.
- Turn right.
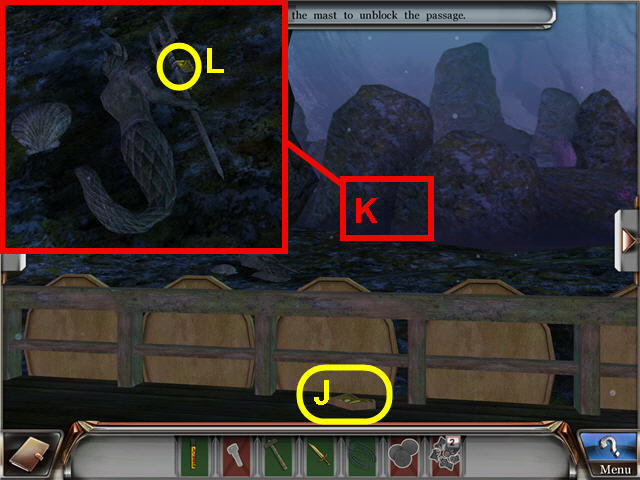
- Take the TRAPDOOR KEY (J).
- Look close over the side of the ship (K) and take the TRAPDOOR KEY (L).
- Turn right two times.
- Head straight out to the open sea and turn right twice.
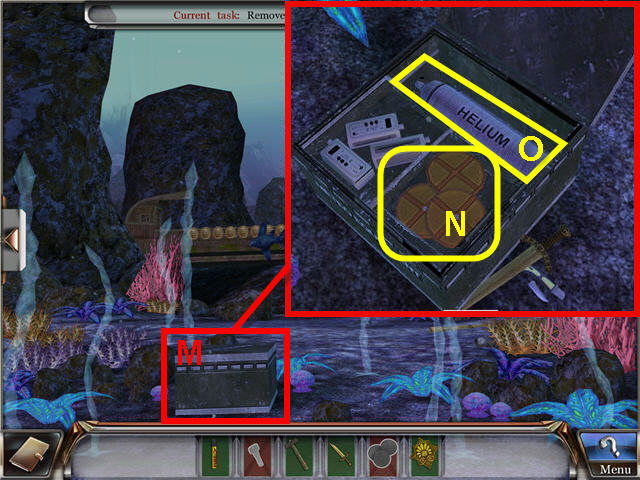
- Look close at the chest (M); use the BROKEN SWORD on the lid and use the SLEDGEHAMMER on the BROKEN SWORD.
- Take the AIR CUSHION (N) and move the top tray and take the HELIUM CYLINDER (O).
- Head forward to the sunken ship deck.
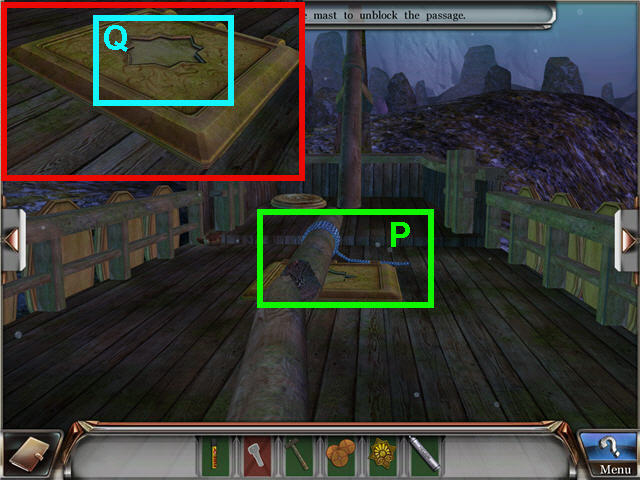
- Place the WIRE ROPE, AIR CUSHION and HELIUM CYLINDER on the broken mast (P).
- Place the TRAPDOOR KEY on the trapdoor (Q).
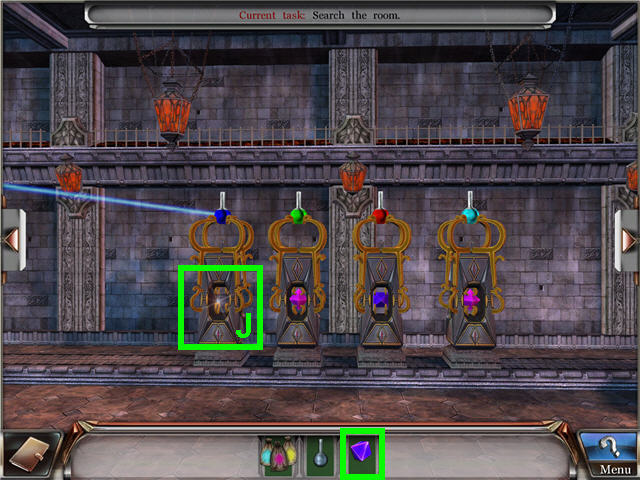
- Look close at the secret mechanism to trigger a puzzle.
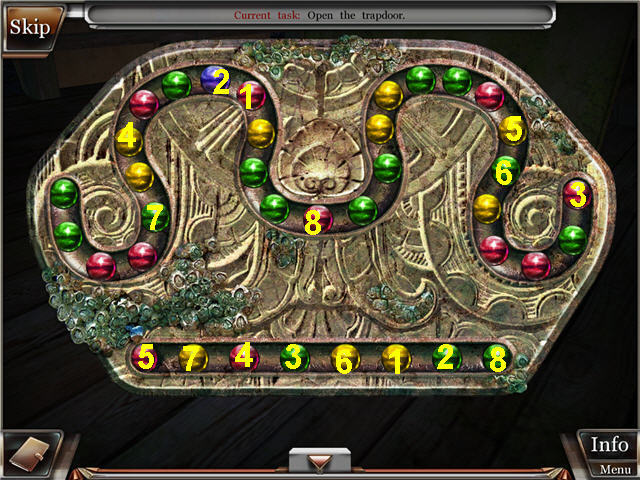
- Place a bottom ball on a ball in the line above to change its color. Make a line of 3 or more of the same color to eliminate all the balls.
- It is easiest to try and make both ends mirror images of each other and then placing the final ball in the center to eliminate them all.
- This puzzle is random; see screenshot for our solution.
- Place the SIGNAL LIGHT in the hold.
- Head down into the hold.
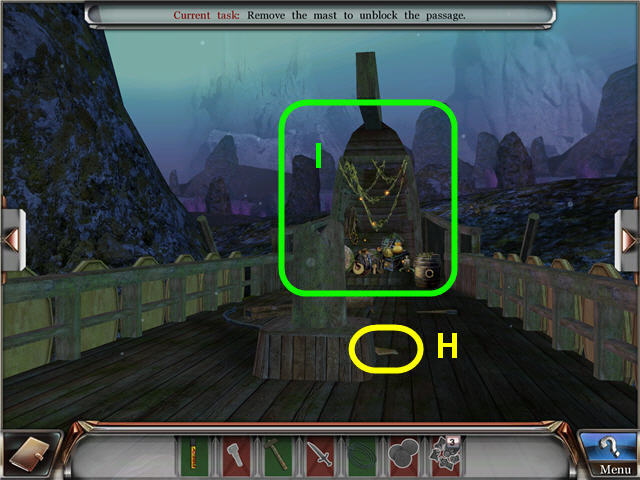
- Click on the ancient chest (R).
- Look close at the pillar mechanisms (S – T) and click on the square and star shaped slots.
- Turn right.
- Take the SQUARE PILLAR KEY (U) and click on the spear (V).
- Turn right.
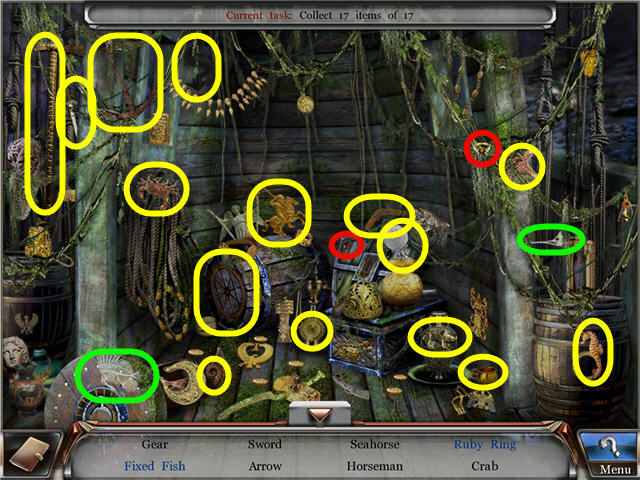
- Click on the chest in the left corner to access a Hidden Object Scene.
- Marked in red; place the wings on the horse and get a Pegasus.
- Marked in green; place the half a boat on the half of boat to get a boat.
- Find the items listed a get a STAR PILLAR KEY.
- Turn right.
- Take the RHOMBIC PILLAR KEY (W) and the SWORD (X).
- Turn right.
- Look close at the left pillar mechanism (Y) and place the STAR PILLAR KEY in the slot.
- Look close at the right pillar mechanism (Z) and place the SQUARE PILLAR KEY in the slot.
- Look close at the statue (A) and take the CHAIN (B) and the ROUND PILLAR KEY (C).
- Look close at the left rear pillar mechanism (D) and place the ROUND PILLAR KEY in the slot.
- Look close at the right rear pillar mechanism (E) and place the RHOMBIC PILLAR KEY in the slot.
- Look close at the ancient chest (F) and click on the top to trigger a puzzle.
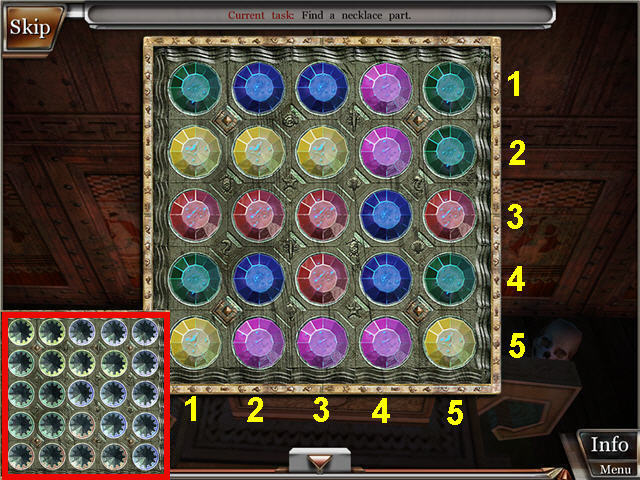
- The goal is to arrange the colors so that all 5 of the same color are grouped together.
- The same colors do not need to be in the same row, they only need to be touching sides.
- Click and drag any row or column to insert it where you wish; the remaining rows and columns will move over.
- This puzzle is random.
- Our Solution is; the first number is the one to move and the second number is the location to move it to; Row 3-5, Row 3-4, Row 1-3, Column 5-1, Row 1-2, Column 3-4.
- Take the NECKLACE.
- Turn right.
- Use the CHAIN and the SWORD on the spear (G) to get a SPEAR.
- Turn right and use the SPEAR on the trapdoor (H).
- Turn right.
- Look close at and use the SLEDGEHAMMER on the crate (I) and take the ENGINE PART (J).
- Turn right two times.
- Look close at the grate (K); use the SLEDGEHAMMER on the two hinges (L) and take the VALVE (M).
- Turn left.
- Use the HOLD KEY on the door (N).
- Take the ENGINE PART (O).
- Look close at the pipes (P) and place the VALVE on the stem (Q) and take the ENGINE PART (R).
- Take the ENGINE PART (S).
- Turn right.
- Open the second from left cover and take the ENGINE PART (T).
- Open the second from right cover and take the ENGINE PART (U).
- Turn right.
- Look close at the chest (V) and take the ENGINE PART (W).
- Turn right.
- Open the second from left cover and take the ENGINE PART (X).
- Open the second from right cover and take the ENGINE PART (Y).
- Turn left and head up to the deck and turn left two times.
- Click on the left ship side to access a Hidden Object Scene.
- Marked in red; place the sail piece on the sailboat to get a yacht.
- Marked in green; place the dial hand on the scale to get the scale.
- Find the items listed and get a STRING.
- You should have all the parts needed for the engine repair now and they will automatically combine.
- Place the ENGINE PARTS on the engine to trigger a puzzle.
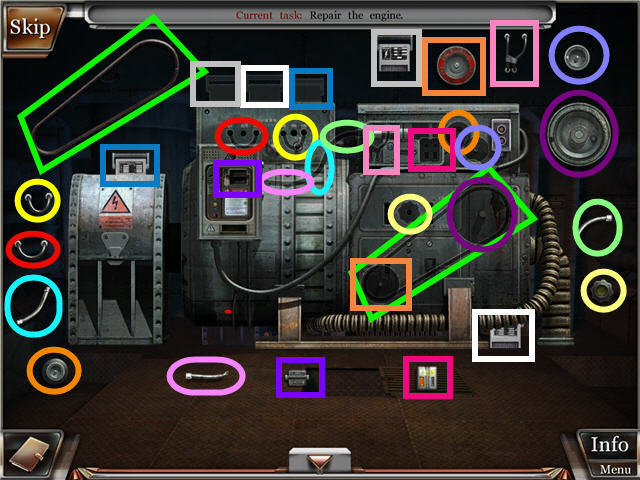
- Place the ENGINE PARTS in their correct spots to repair the engine.
- Click on a part to drag it to the correct spot.
- See screenshot for solution.
- Turn right two times and exit to the upper deck.
Chapter 5 - Village
- Take the BOARD (Z) and the STICK (F).
- Look close at the shrubs (A) and take the BOARD (B).
- Look close at the first aid kit (C); move the lid and take the AMPOULE (D) and the BANDAGE (E).
- Head forward to the bridge.
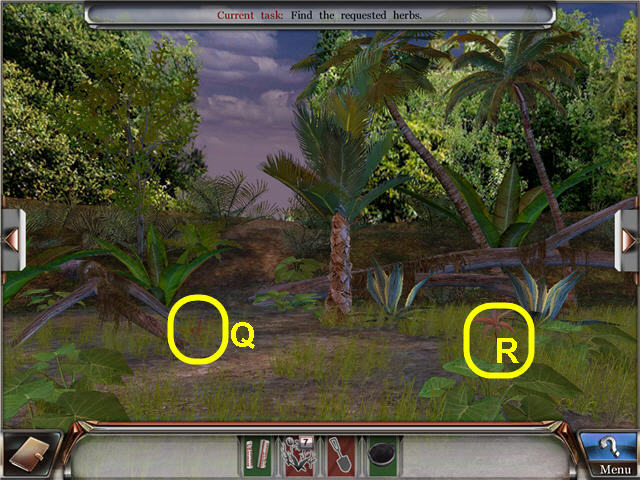
- Take the BOARD (G) and the HERB (H).
- Look close at the ground (I).
- Use the STICK on the boards (J-K) and take the BOARDS.
- Place the BOARD on the broken bridge (L) and cross the bridge.
- Use the AMPOULE on the villager (M).
- Take the EMPTY POT (N) and the two HERBS (O-P).
- Turn right.
- Take the two HERBS (Q-R).
- Turn right two times.
- Move the basket and take the HERBS (S).
- Look close at the fire (T) and take the HERBS (U).
- Back out, turn right and enter the villager's hut.
- Look close at the shelves (V); take the BROOM (W) and the LOG (X).
- Turn right.
- Look close at the shelves (Y).
- Take the two LOGS (Z-A).
- Turn right two times.
- Look close at the shelves (B).
- Take the LOG (C) and the AXE (D).
- Click on the bed and look close at the trapdoor (E) and click on the lock.
- Back out and turn left and head straight to exit.
- Enter the Priest's hut.
- Click on the shelves on the left to access a Hidden Object Scene.
- Marked in red; place the knife in the sheath and get a knife in sheath.
- Marked in green; place the seedling in the dirt and take the plant.
- Find the items listed and get a LOG.
- Look close at the shelves (F) and take the LOG (G).
- Turn right.
- Look close at the shelves (H); click on the note (I) and get a journal update, open the cylinder and take the HERBS (J).
- Turn right.
- Use the BROOM on the spider web (K); use the BANDAGE on the ladder and take the LADDER (L).
- Look close at the shelves (M); move the top of the basket and take the LOG (N).
- Turn right.
- Look close and use the AXE on the jug (O) and take the HERB (P).
- Turn left two times, exit the hut, turn right and head forward to the bridge.
- Use the LADDER on the chest (Q) and take the SPADE (R), FLASHLIGHT (S) the KNIFE (T) and the CUP (U).
- Look close at the bridge (V) and use the SPADE on the dirt.
- Use the EMPTY POT on the water in the hole (W) to get a POT FILLED WITH WATER.
- Click on the lily pad and take the last HERB (X).
- Head across the bridge to the village.
- Turn right and show the HERBS to the villager.
- Turn left.
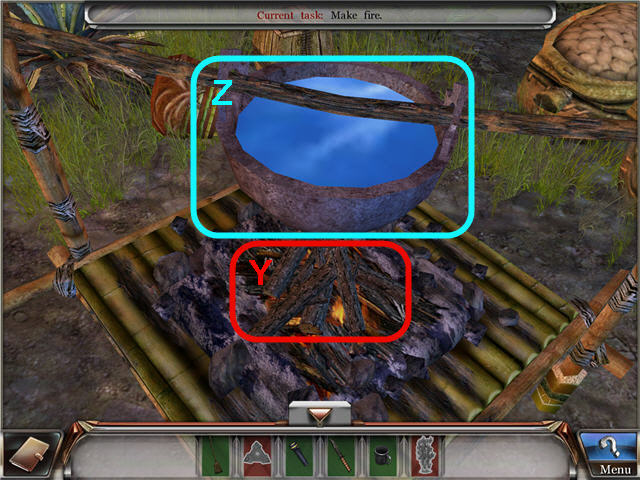
- Look close at the fire pit and place the LOG on the fire (Y).
- Hang the POT FILLED WITH WATER over the LOG and add the HERBS to the POT FILLED WITH WATER (Z).
- Back out and turn left.
- Use the KNIFE on the cane to get KINDLING (A).
- Enter the PRIEST'S HUT.
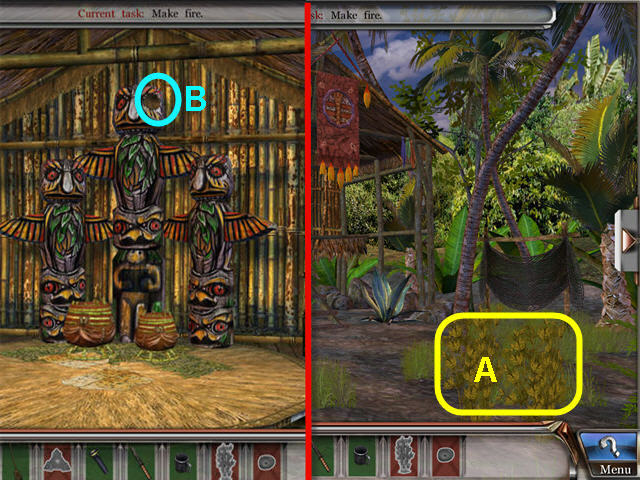
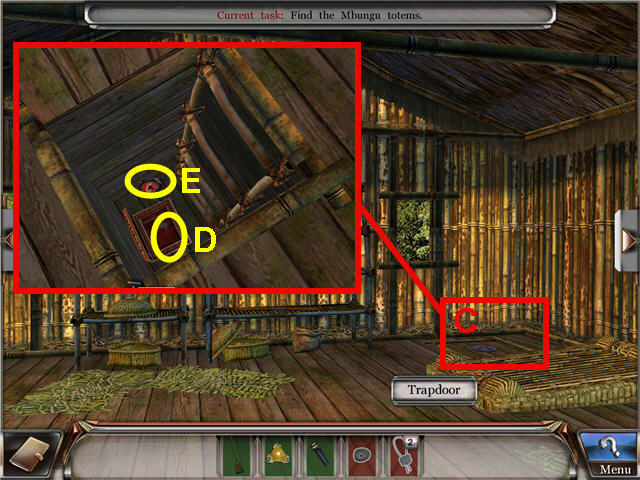
- Look close at the missing eye (B) of the middle totem.
- Turn right and exit, turn left and look close at the fire.
- Place the KINDLING on the LOGS and use the CUP on the decoction to get a CUP FILLED WITH DECOCTION.
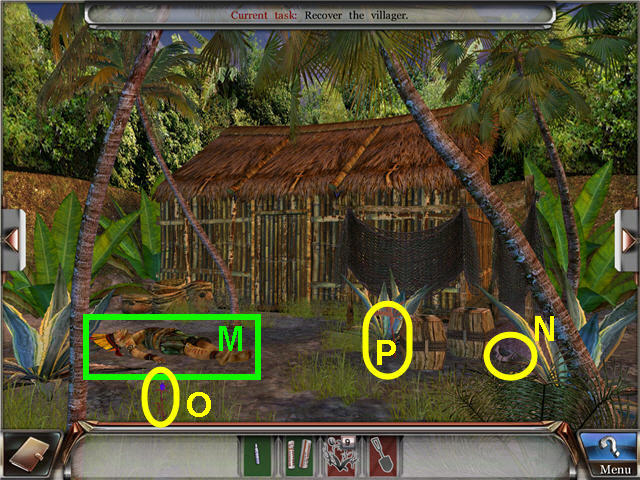
- Turn right and give the CUP FILLED WITH DECOCTION to the villager and get a BASEMENT KEY.
- Turn left two times and into the Priest's hut.
- Look close at the shelf to the left of the totems to trigger a Hidden Object Scene.
- Marked in red; place the vase piece on the broken vase and get a vase.
- Marked in green; place the chime on the set of chimes to get a bar chime.
- Find the items listed and get a MBUNGU TOTEM.
- Turn right, exit the hut; enter into the villager's hut and turn left.
- Look close and the BASEMENT KEY on the trapdoor (C).
- Use the BROOM on the cobwebs and use the FLASHLIGHT in the hole.
- Take the IDOL'S EYE (E); open the case and take the MBUNGU TOTEM (D).
- Turn left, exit the hut and enter the Priest's hut.
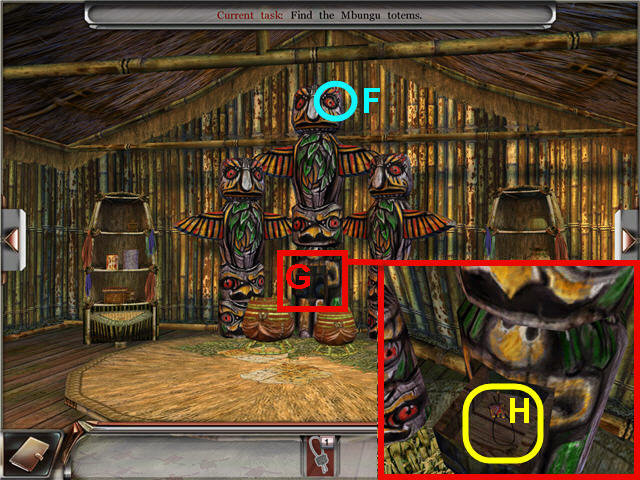
- Place the IDOL'S EYE in the eye slot (F).
- Look close at the secret chute (G) and take the MBUNGU TOTEM (H).
- Turn right and exit.
- Give the MBUNGU TOTEM to the villager.
Chapter 6 - Destroyed Laboratory
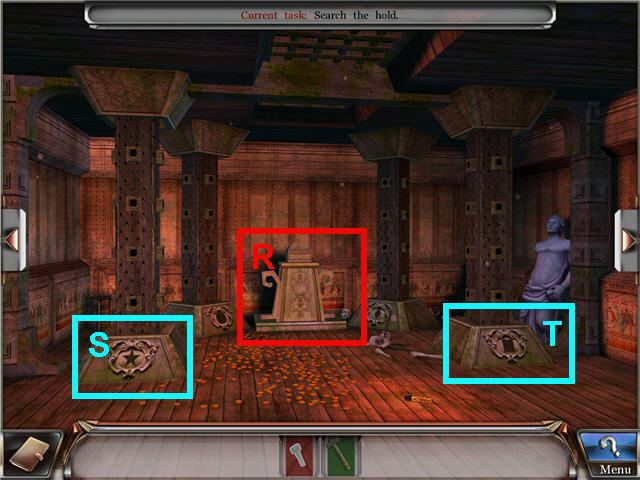
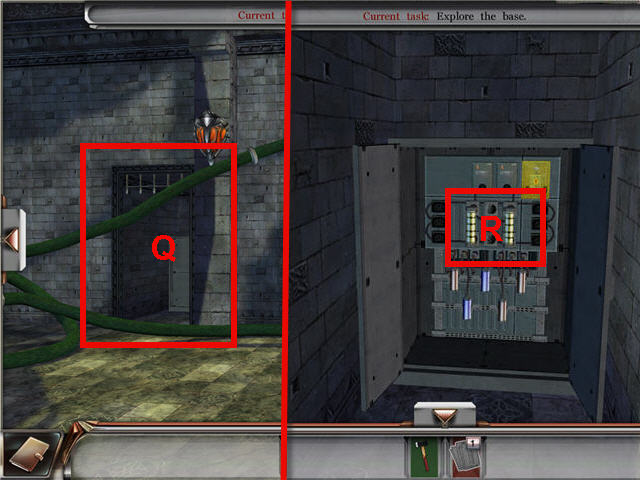
- Turn right and look close at the destroyed access control system (I).
- Use the KNIFE on the handle to get a HANDLE (J).
- Back out and turn left two times.
- Look close at the shrubs (K) and use the SPADE on the dirt pile.
- Use the HANDLE on the secret mechanism (L).
- Click on the secret mechanism (M) to trigger a puzzle.
- The goal is to flip the hexagons so that the connecting mechanism matches the mechanism on the board underneath (O); they must lock in place (P).
- Click on any hexagon that has an adjacent empty space and flip it by moving it to an adjacent section.
- The layout of the starting hexagons (N) is random.
- See screenshot (O) for the layout of how the hexagons should be placed. This is not random.
- Back out, turn right, and enter straight into the laboratory.
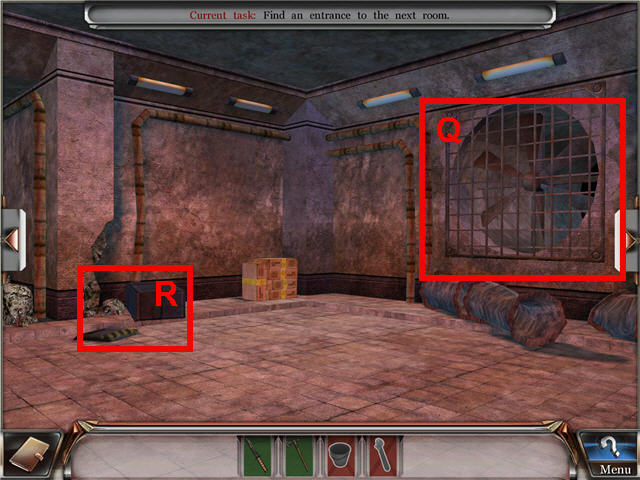
- Click on the large fan (Q) and look close and click on the overturned lockbox (R) and the key stuck underneath.
- Back out and turn right.
- Look close at the bookcase (S); move the box in front of the cabinet and close the right door.
- Take the BUCKET (T) and the PIPE WRENCH (U).
- Turn right.
- Look close at the desk (V); click on the cabinet (W) and the center bar of the monitors (X).
- Back out and turn right.
- Look close at the lockers (Y); click on all the lockers, and move the chair.
- Take the DETONATOR REMOTE CONTROL (Z) and the KEY (A).
- Back out and click on the right set of lockers (1) to access a Hidden Object Scene.
- Marked in red; place the balance pan on the balance scale and take the scale.
- Marked in green; place the wrench in the wrench set and take the bunch of wrenches.
- Find the items listed and get the ACCESS CARD X.
- Back out and turn left.
- Look close at the desk.
- Use the KEY on the lock (B).
- Open the doors and click on the box (C) to trigger a puzzle.
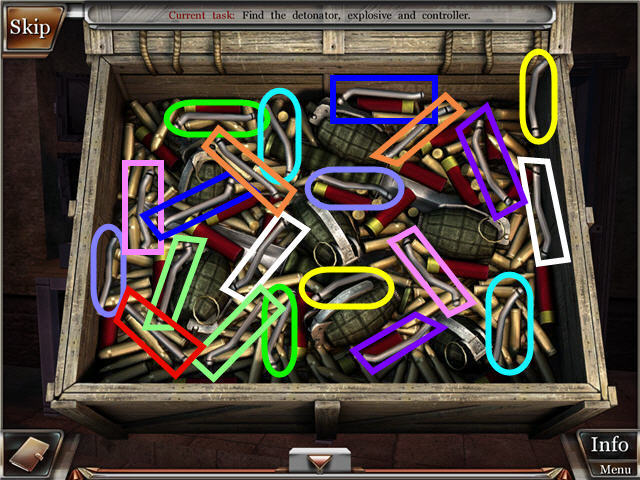
- Remove the detonators from the box by matching the pairs.
- Take the last remaining unpaired DETONATOR (marked in red).
- Back out and exit through the door on the left.
- Turn left.
- Look close at the destroyed access control system (D); use the BUCKET on the water (E) to get a BUCKET FILLED WITH WATER.
- Turn right.
- Use the BUCKET FILLED WITH WATER on the fire (F).
- Look close at the shrubs (G) and take the EXPLOSIVES (H) and get the EXPOSIVE+DETONATOR+REMOTE CONTROL.
- Turn right.

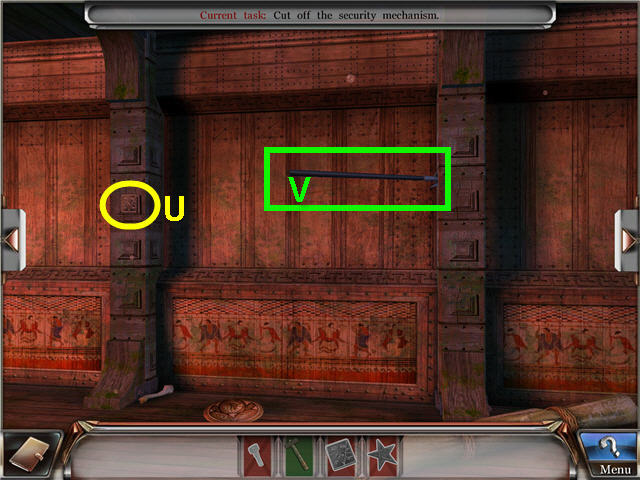
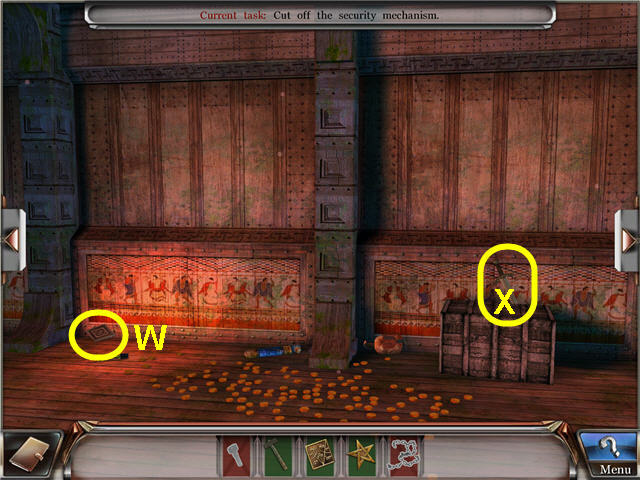
- Look close at the access control system and use the PIPE WRENCH on the two nuts (I).
- Use the KNIFE on the orange clamps (J) and take the MONITOR (K).
- Turn right and head straight into the lab.
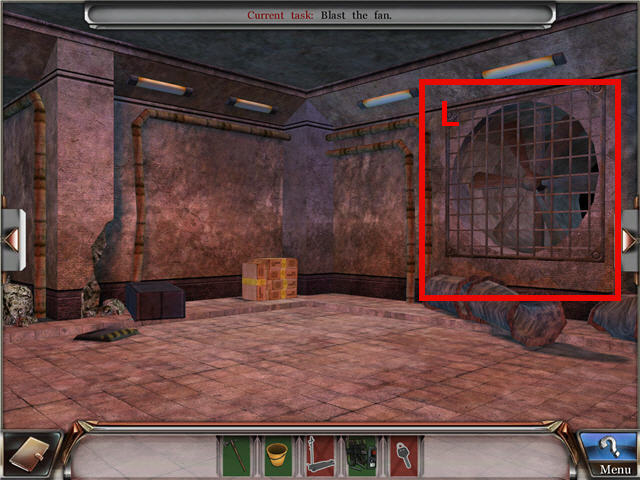
- Use the EXPLOSIVE+DETONATOR+REMOTE CONTROL on the fan (L).
- Turn right two times and look close at the desk with the monitors.
- Place the monitor on the center bar (A).
- Use the ACCESS CARD X on the card reader (B).
- Exit through the door and turn right two times.
- Look close at the deactivated laser at the right of the door and take the ROPE (C) and automatically get a ROPE + BUCKET.
- Enter straight into the laboratory and head through the ventilation shaft.
- Look close at the floor (M) and use the BUCKET + ROPE to get the DVD DISK (D).
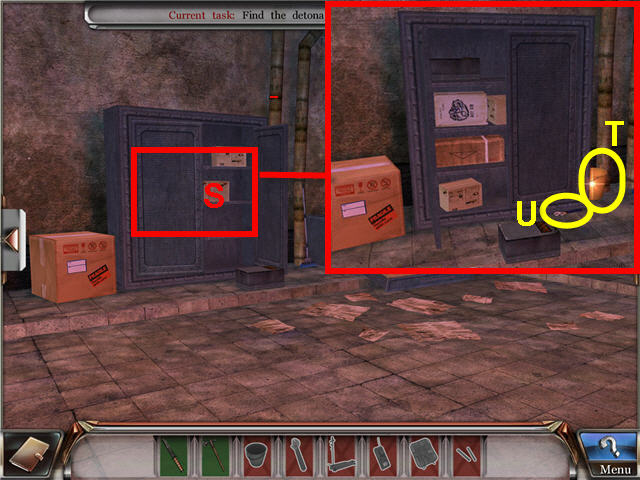
- Look close at the chest (N); move the left box of documents and take the ROUND KEY (O) and the DOCUMENT (P).
- Look close at the door (Q) to trigger a puzzle.
- Flip the pieces to complete the picture.
- The end pieces have a border on them and it is easier to place those first.
- Clicking on a piece and then moving your mouse will flip over every piece you pass the mouse over and will move the original tile with you until you click again to lock in place.
- This starting layout is random; see screenshot for completed picture (R).
- Enter straight into the newly opened door.
- Look close at the safe (S) and take the ROUND KEY (T).
- Back out and turn left.
- Look close at the display case (U) and take the LADDER (V) and ROUND KEY (W).
- Turn left and look close at the dragon.
- Take the LADDER (X).
- Turn left.
- Look close at the building materials on the right to access a Hidden Object Scene.
- Marked in red; place the clock hands on the clock face to get a fixed clock.
- Marked in green; place the two triangles on the sign to get a radiation sign.
- Find the items listed and get a CAR JACK.
- Turn right and head straight ahead.
- Look close at the bookcase (Y) and take the DOCUMENT (Z) and ROUND KEY (A).
- Look close at the desk (B); move the left chair and take the DOCUMENT (C); open the cabinet and take the KEY (D).
- Turn left.
- Look close at the right desk (E) and take the DOCUMENT (F).
- Turn right and head through the ventilation duct on the upper left.
- Look close at the lockers (G) and use the KEY on the middle locker.
- Take the ACCESS CARD Z (H) and the DOCUMENT (I).
- Turn right.

- Look close at and use the CAR JACK on the overturned lockbox (J) and take the ROUND KEY (K).
- Head through the ventilation duct and turn right.
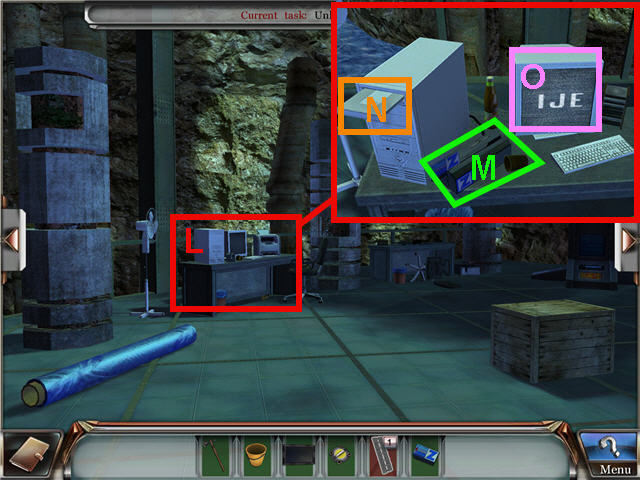
- Look close at the desk (L); use the ACCESS CARD Z in the scanner (M) and place the DVD DISK on the opened drive (N).
- Click on the code (O) on the monitor to get a journal update.
- Back out and turn left and head through the door.
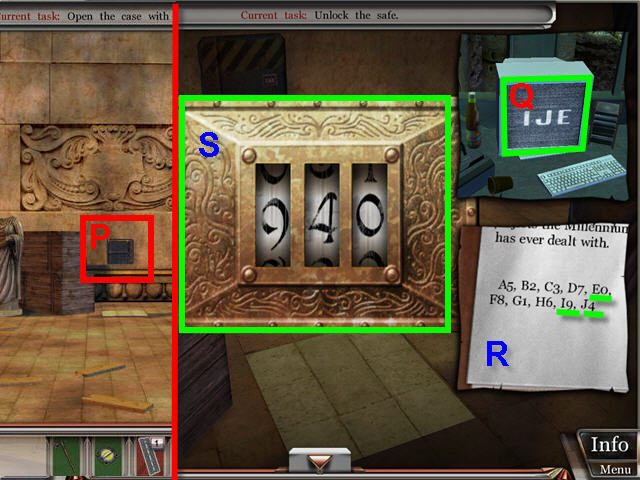
- Look close twice at the safe (P).
- Use the code from the DVD disk (Q) and the substance report (R) to determine the code for the safe (S).
- The code is random and yours may be different from ours.
- Solution; take the DVD code and locate the corresponding letters in the substance report and use the numbers next to that letter to get the code. See screenshot for our solution.
- Place the ROUND KEY on the opened safe to trigger a puzzle.

- The goal is to turn the dials so that the smaller colored circles surround the matching larger colored disk.
- The white disks will only have a small white circle on the outer edge of each.
- This original layout of the puzzle is random.
- Solution; see screenshot for the final layout (T).
- Use the AXE on the case (U) and take the NECKLACE PART (V) and the CASE (W).
- Take the last LADDER (X) part.
- Turn right.
- Use the LADDER on the scaffolding (Y).
- Use the AXE on the wall (Z) and exit through the hole.
Chapter 7 - Catacombs of Rome
- You begin the chapter with a SARCOPHAGUS formally known as a CASE.
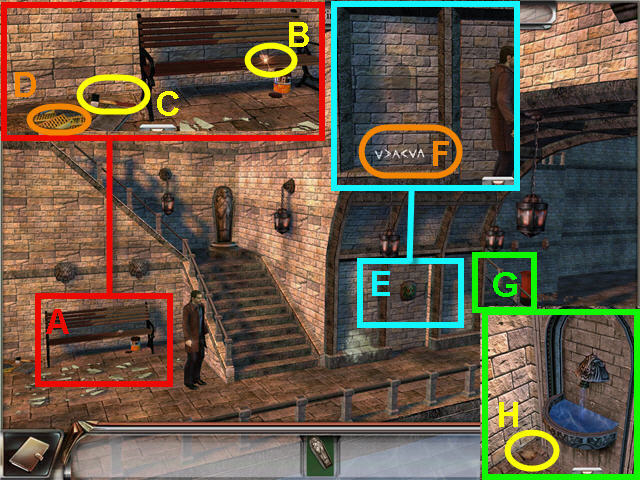
- Look close at the bench (A); take the PAINTBRUSH (B) and the SLEDGEHAMMER (C).
- Use the SLEDGEHAMMER on the bricks (D) and click on the broken bricks.
- Back out and look close at the arched wall (E); use the PAINTBRUSH on the lower left and click on the code (F) to get a journal update.
- Look close at the stairs (G); take the EMPTY SACK (H) and click on the water and get a RING.
- Back out.
- Look close at the bench on the left.
- Using the code from the arched wall (I), turn the first set of three heads (J).
- Solution; turn the heads so that the A shape on the top of the lion heads match the direction of the A in the code. See screenshot for our random solution.
- Use the EMPTY SACK on the brick powder to get a YELLOW POWDER (K).
- Back out.
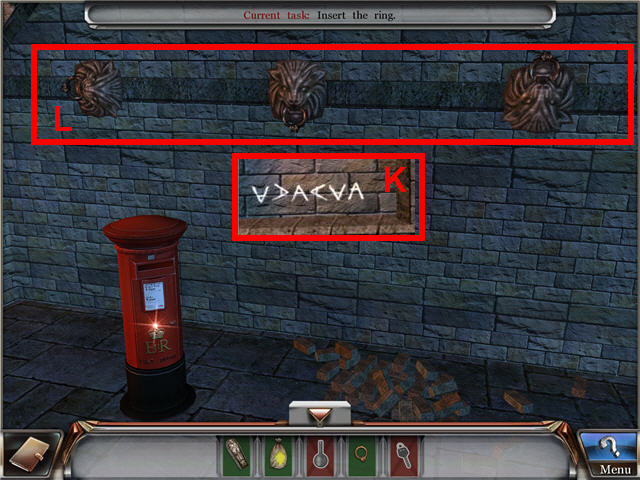
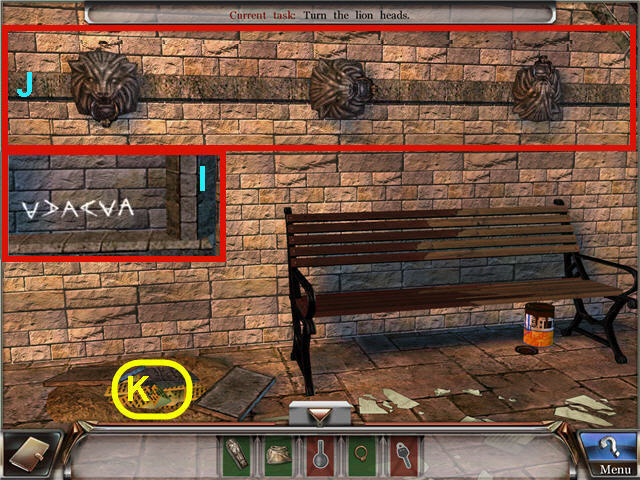
- Look close at the wall on the right of the stairs.
- Using the code from the arched wall (K) turn the second set of three heads (L).
- Solution; turn the heads so that the A shape on the top of the lion heads match the direction of the A in the code. See screenshot for our random solution.
- Back out.
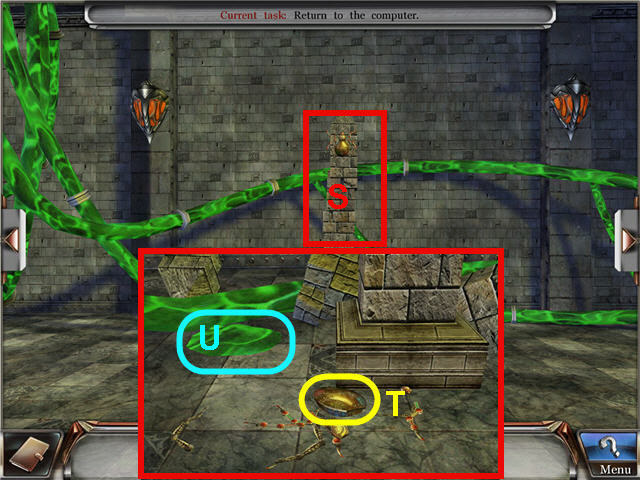
- Look close at the arched wall (M); place the RING on the lion head (N).
- Place the SARCOPHAGUS in the left slot (O).
- Back out and look close at the stairs (P) on the left.
- Click on the pillar to trigger a puzzle.
- The goal is to arrange the sections of the pillar to complete the pattern from top to bottom.
- The 2nd and 4th row will move each other in an opposite direction when turned. The first, middle and bottom row turn independently.
- The trick is to turn the 2nd or 4th and then turn the middle one to see if you have a match that completes the center 3 rows. If there is none, turn the 2nd or 4th once again and again check the center.
- When you have the center 3 matched together you can turn the top and bottom to complete the pattern.
- The starting layout is random. See screenshot for solution (Q).
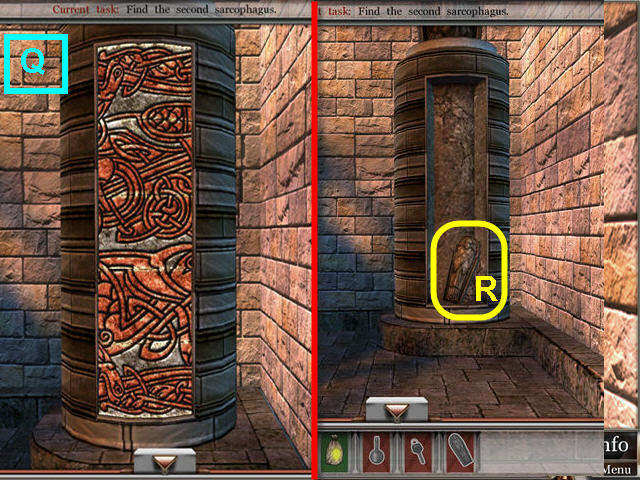
- Take the SARCOPHAGUS (R) when complete.
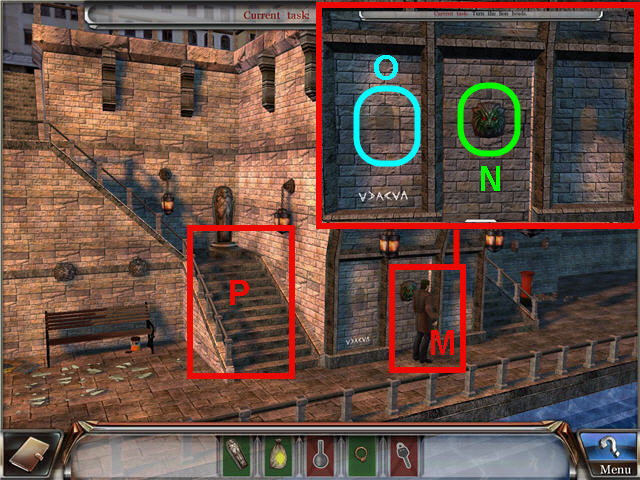
- Look close at the arched wall (S) and place the SARCOPHAGUS on the right slot (T).
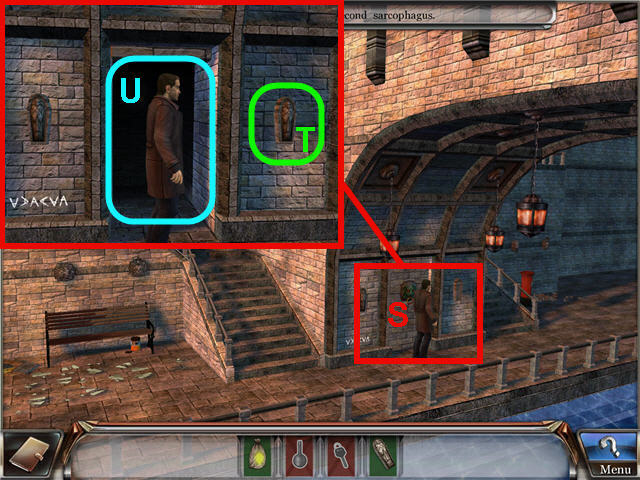
- Enter straight into the newly-opened room (U).
- Look close at the books (V) and take the KEY (W).
- Look close at the chest (X) and take the EMPTY FLASK (Y).
- Turn right two times and exit straight out of the room.
- Look close at the right wall (Z) and use the KEY on the mailbox (A).
- Move the letter on the left and take the PURPLE POWDER (B) and the BLUE POWDER (C) to get POWDERS TAKEN TOGETHER.
- Look close at the stairs (D); use the EMPTY FLASK on the water (E) to get a FLASK FILLED WITH WATER.
- Look close at the arched wall and head into the room and turn right two times.
- Look close at the left pillar (F) and click on the colored circles (G) to get a journal update.
- Look close at the right pillar (H) and take the CRYSTAL (I).
- Turn right.
- Place the CRYSTAL on the left pillar (J).
- Turn right two times.
- Place the FLASK FILLED WITH WATER on the second from left pillar (K).
- Place the POWDERS TAKEN TOGETHER on the pillars to trigger a puzzle.

- The goal is to use the dyes that are on the ground in between the pillars on the flasks to match the color of the water in the flasks on the pillars on the opposite side of the room (L).
- You need to create them in the mirror image.
- There is a reset button on the upper right.
- Solution; yellow + light blue =green, light blue + pink =dark blue, pink + yellow=red.
- The puzzle is random. See screenshot for our solution.
- Exit straight through the lit hallway.
Chapter 8 - Ancient Archive
- Look close at the bookcase (M) and take the PAPER WITH CODES (N).
- Click on the map (O) to get a journal update.
- Look close at the wall (P); click on the picture (Q) to get a journal update and take the FRESCO PART (R).
- Look close at the chest (S); move the top document and take the FRESCO PART (T).
- Turn right.
- Look close at the bookcase (U) and take the PAPER WITH CODES (V) from the upper right.
- Look close at the broken bookcase (W); take the BOARD (X).
- Use the BOARD on the broken leg (Y) of the bookshelf and then use the SLEDGEHAMMER on the BOARD.
- Use the SLEDGEHAMMER on the wall two times; move the bricks and take the two FRESCO PARTS (Z-A).
- Back out and turn right.
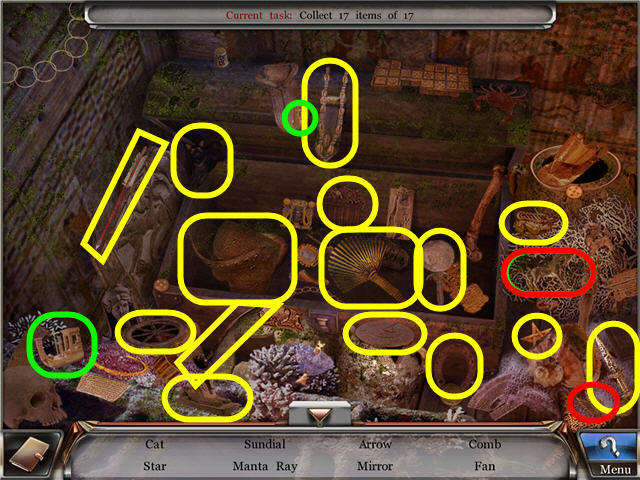
- Look close at the left bookcase to access a Hidden Object Scene.
- Marked in red; place the battery in the flashlight to get a lit flashlight.
- Marked in green; place the horn on the hat and get a horned hat.
- Find the items listed and get the final FRESCO PART.
- Turn right.
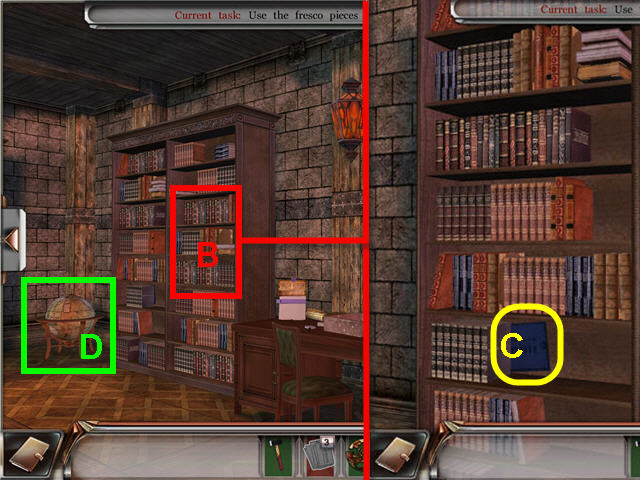
- Look close at the bookcase (B); move the books and take the PAPER WITH CODES (C).
- Look close at the globe (D) to trigger a puzzle.
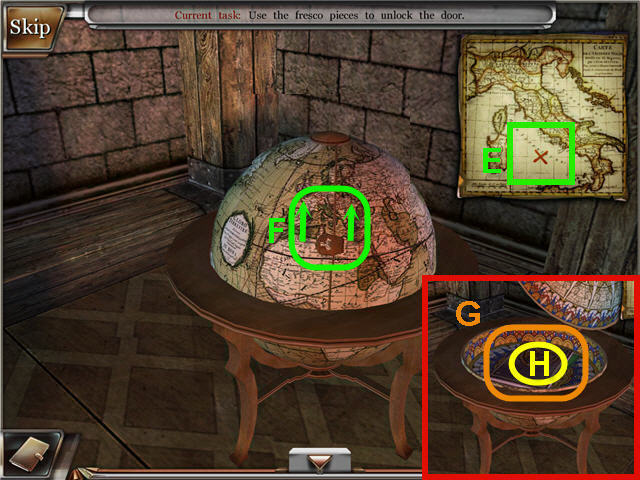
- The goal is to position the X on the globe in the same spot as on the map (E).
- Click the globe on the left and right of the center to turn it horizontally and click on the center vertical bar to move the X up and down vertically.
- See screenshot for solution (F).
- Take the note (G) to get a journal update and take the PAPER WITH CODES (H) underneath.
- Turn right two times.
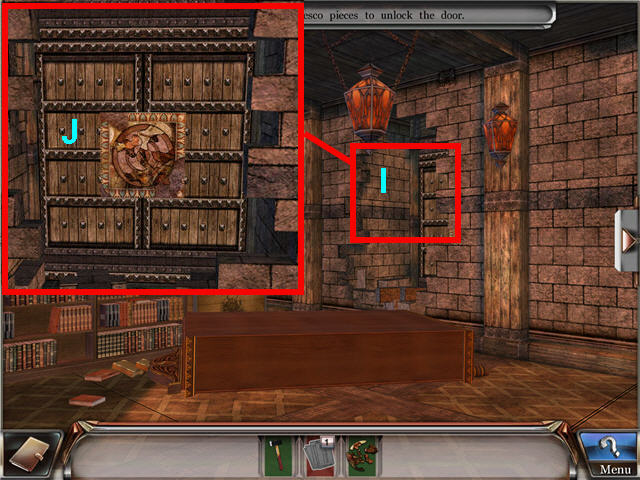
- Look close at the broken wall (I).
- Place the FRESCO PART on the door (J) to trigger a puzzle.
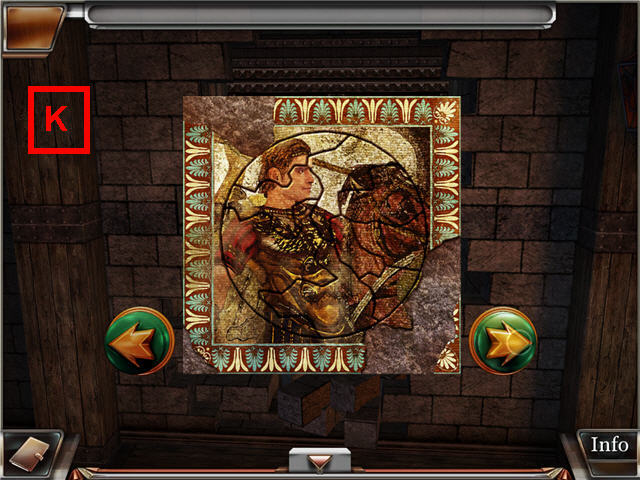
- The goal is to assemble the fresco.
- Use the arrows to rotate the fresco left and right and place the pieces in their matching shaped slot. See screenshot for solution (K).
- Enter into the secret room; turn left and enter into the control room.
- Look close at the periodic table (L) to get a journal update.
- Turn right and click on the blackboard (M) and turn right again.
- Look close at the table (N) and take the SAFETY FUSE (O) and DROPPER (P).
- Back out and head through the door and turn right.
- Look close at the electrical panel (Q) and click on the doors.
- Place the SAFETY FUSE on the electrical panel (R).
- Use the SLEDGEHAMMER on the pillar (S).
- Look close at the broken pillar and take the SPIDER'S BELLY (T).
- Use the DROPPER on the acid (U) to get a DROPPER FILLED WITH ACID.
- Turn left and click on the doorway; turn left and enter the library straight ahead.
- Look close at the table on the left (V).
- Place the SPIDER'S BELLY on the spider medallion (W) to trigger a puzzle.
- The goal is to light up the 4 lights by placing the tip of each spider leg in the center.
- Pulling on one leg joint will pull all other matching colored joints.
- Each joint reaches in a slightly different angle; the angles of each leg is random. See screenshot (X) for our solution.
- Get a FIXED SPIDER when complete.
- Turn right two times, head through the hole in the wall, into the secret room and turn right.
- Place the FIXED SPIDER in the center of the door (Y).
- Head straight into the control room, turn right two times and look close at the table (Z).
- Move the microscope.
- Use the DROPPER FILLED WITH ACID on the table (A) and take the last PAPER WITH CODES (B).
- Turn right and place the PAPER WITH CODES on the control panel to trigger a puzzle.
- Using the PAPER WITH CODES (C) that can be found in your journal, punch in the codes (D) as requested above the panel (E).
- The puzzle is random.
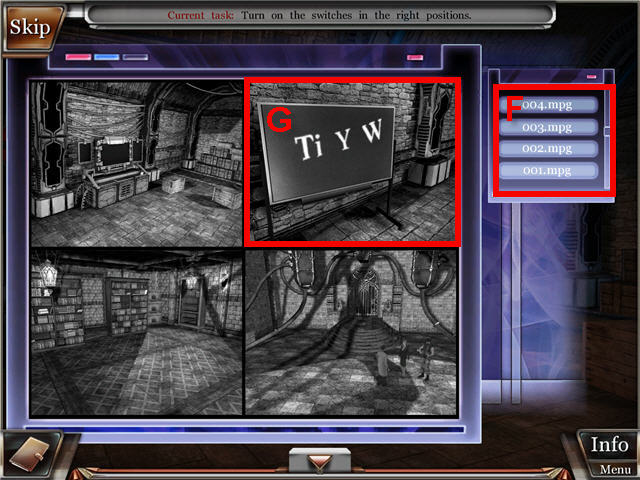
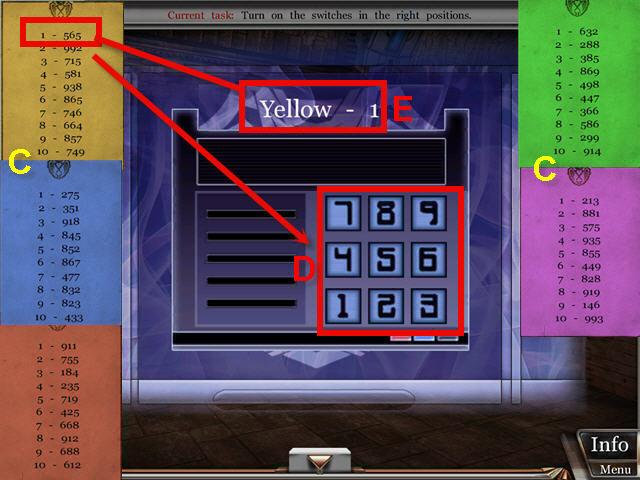
- While in close-up of the computer; click on each of the buttons on the right (F) starting from one to see the surveillance tapes and get the code on the blackboard (G) entered in your journal.
- See screenshot for solution.
- Back out and look close at the switches on the right.
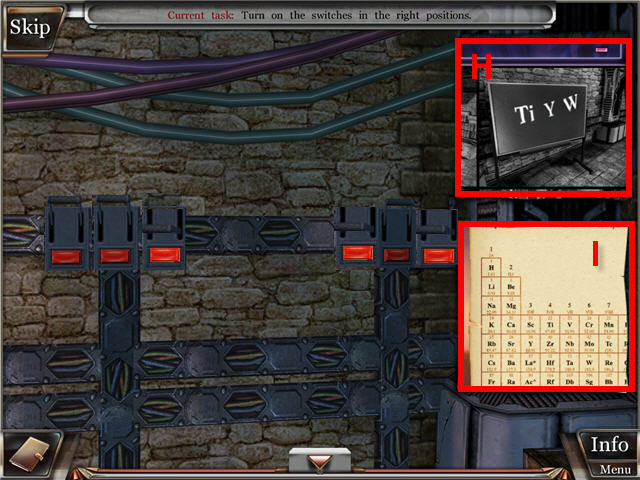
- The goal is to set the switches to the correct positions to open the safe.
- Using the code from the blackboard (H), find the corresponding letters on the periodic table (I) and pull the switches that corresponds with the number on the top of the column.
- Solution; Ti=4, Y=3, W=6; Pull the 4th, 3rd and 6th switch. See screenshot for solution.
- Turn right.
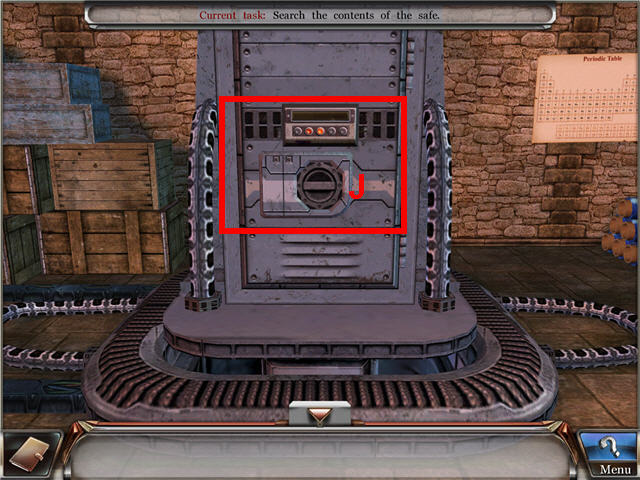
- Look close at the safe.
- Look close at the secret mechanism (J) to trigger a puzzle.
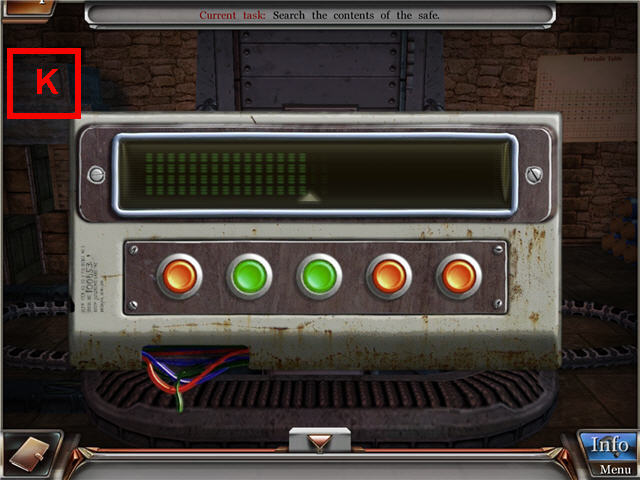
- The goal is to stretch the lines to the arrow by using the buttons below.
- Each orange button lengthens the line a different number of bars.
- If the button is green, clicking on it again will shorten the lines by the same number of bars.
- The number of lines each button increases is random. See screenshot for our solution (K).
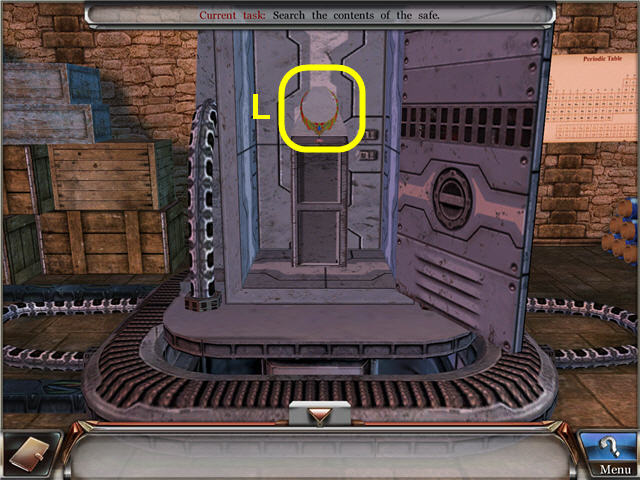
- Take the NECKLACE (L).
- Turn right and exit through the door.
- Congratulations! You have successfully completed Millennium Secrets: Roxanne's Necklace.
Created at: 2011-07-23