

Walkthrough Menu
- General Tips
- Chapter 1: Emerald
- Chapter 2: Amethyst
- Chapter 3: Diamond
- Chapter 4: Ruby
- Chapter 5: Amber
General Tips

- You will not need to follow the exact path of this guide; however, some actions will need to be performed before you can complete another scene.
- Zoom into the sparkling areas to trigger a Hidden Object Scene. Throughout the guide, we will use the acronym 'HOS' for Hidden Object Scenes.
- Some items require an action before the are available in HOS.
- At the end of every HOS solve the puzzle to receive a necessary inventory item.
- Some of the solutions to puzzles are random.
Chapter 1: Emerald

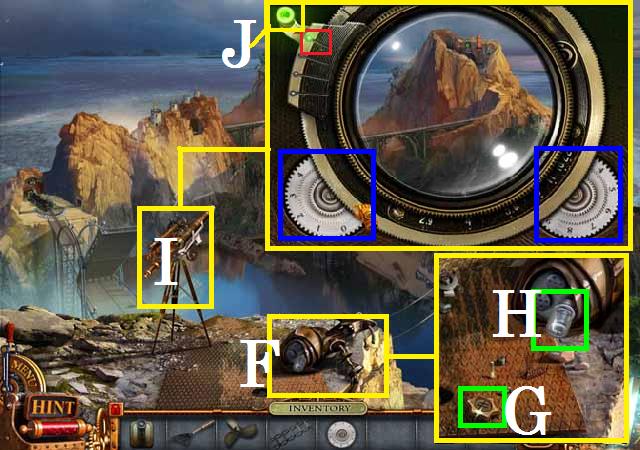
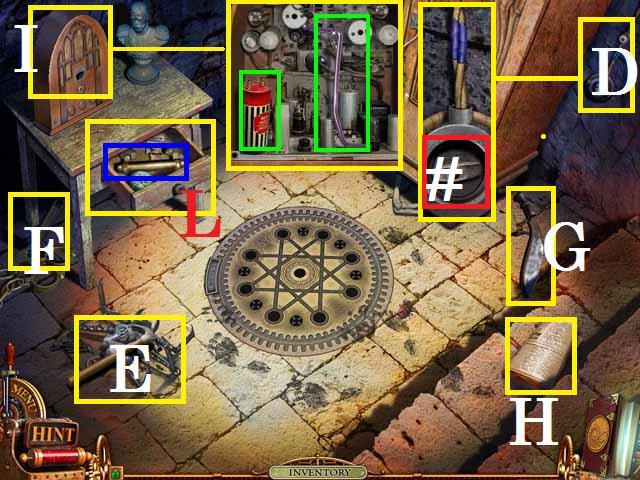
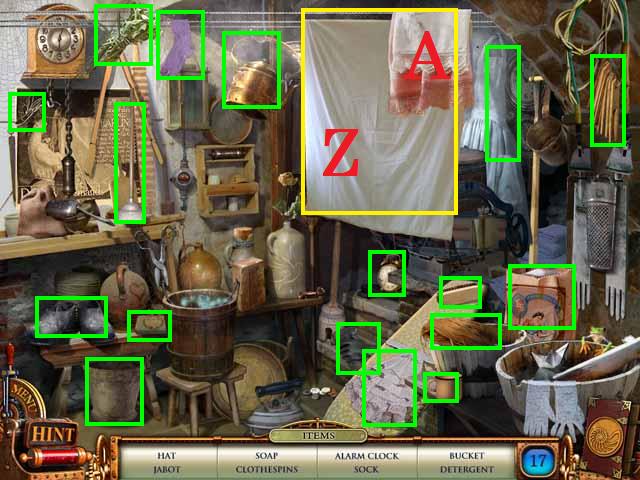
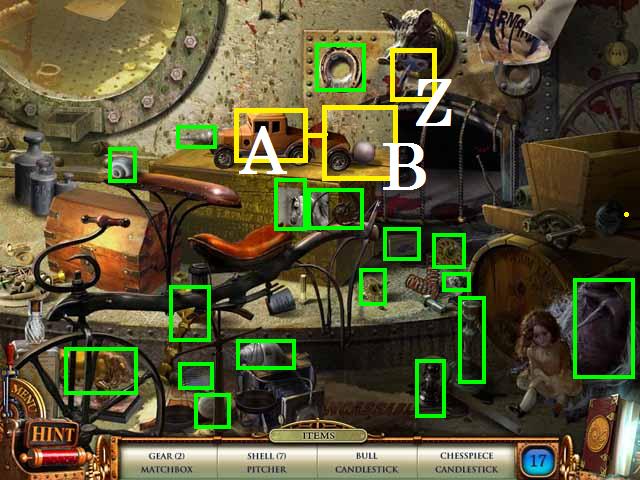
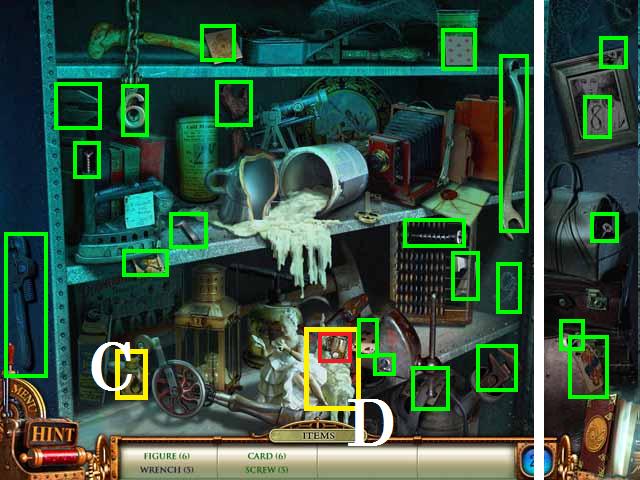
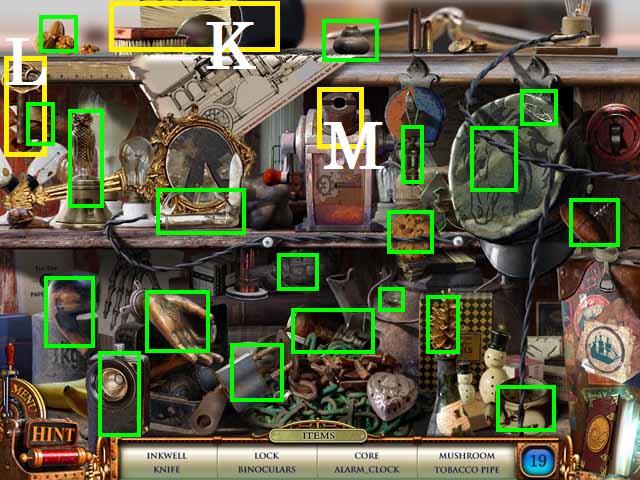
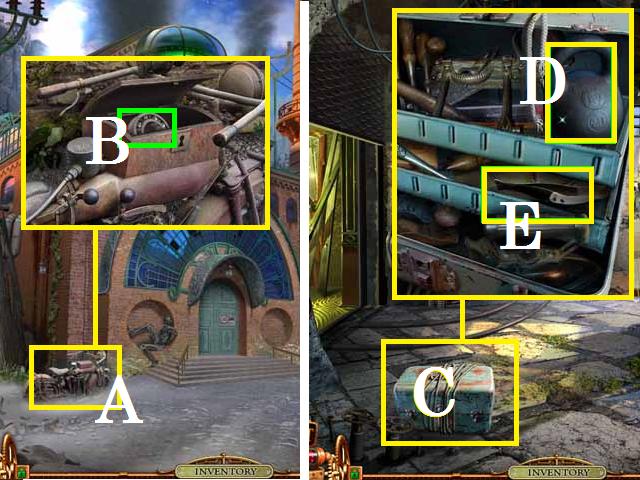
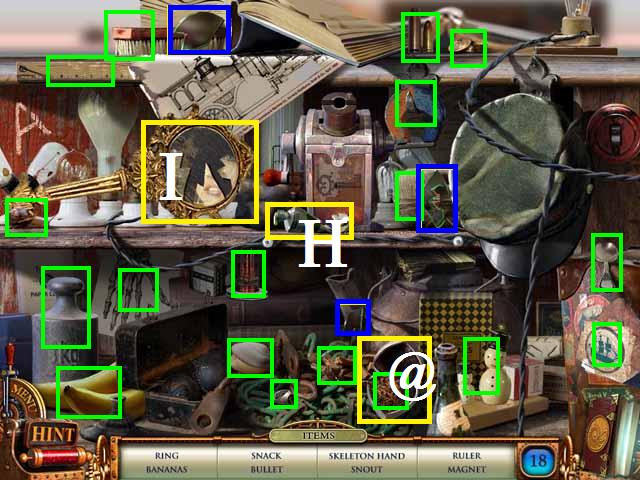
- Pick up the WIRE (A) and the CYLINDER (B).
- Zoom into the broken handle (C).
- Repair the handle with the WIRE and pull.
- Go down the hatch.
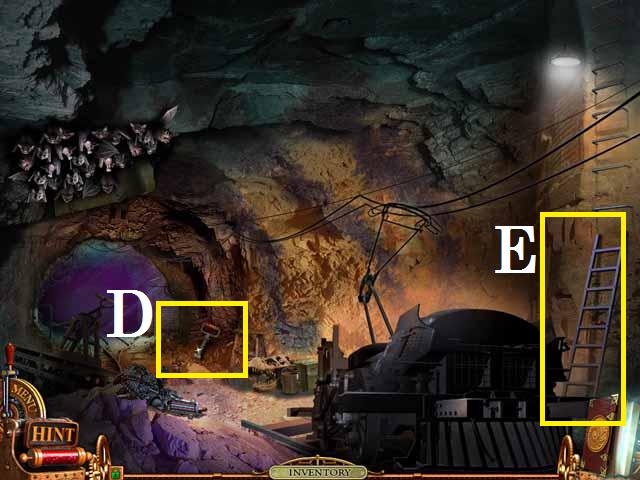
- Pick up the CROWBAR (D) and the HOOK (E).
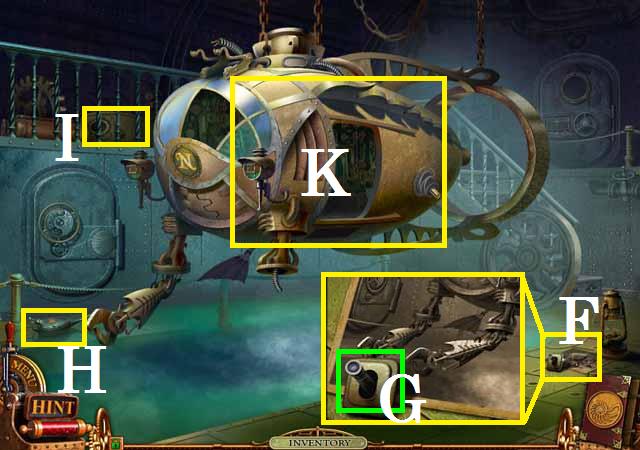
- Move forward into the pool room.
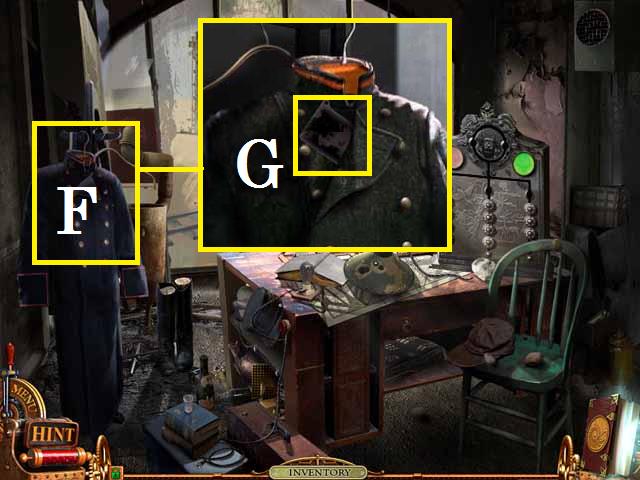
- Zoom into the PHOTOGRAPH (F).
- Pick up the SWITCH (G) and the PHOTOGRAPH.
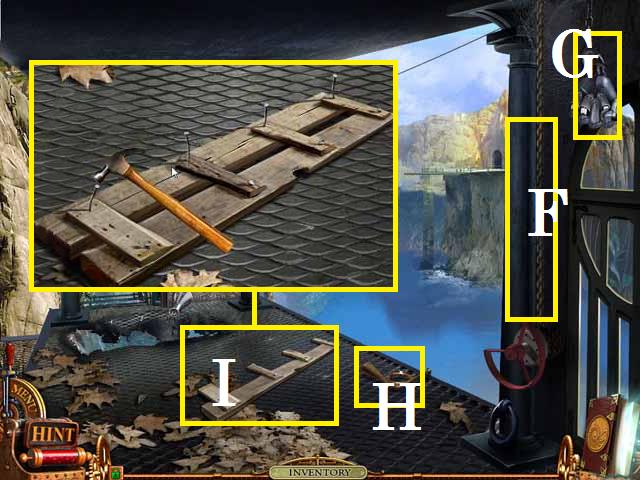
- Pick up the OIL CAN (H) and the DOOR (I).
- Place the DOOR on the bathysphere (K).
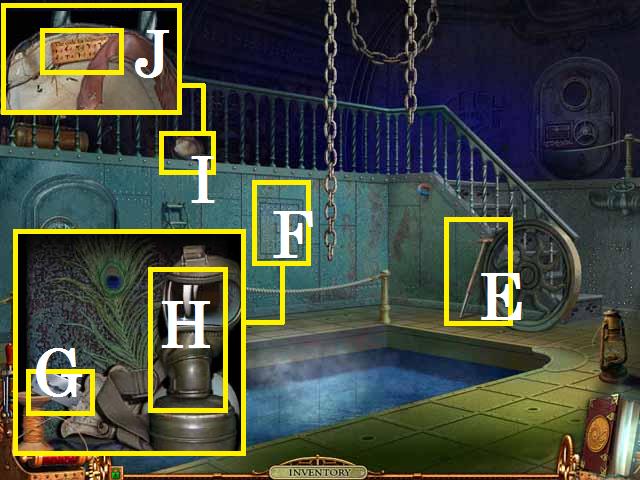
- Go back up stairs.
- Use the OIL CAN on the door (L).
- Open the door.
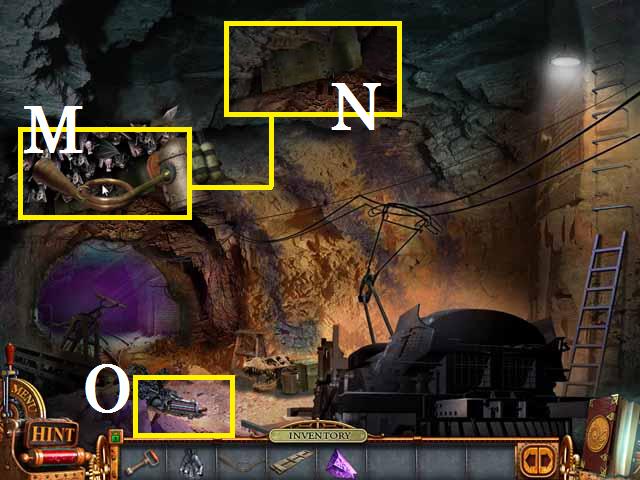
- Click on the flying robot (M) to receive a message.
- Go through the now open door.
- Zoom into the crate (N) and open it with the CROWBAR.
- Pick up the FLIPPER (O).
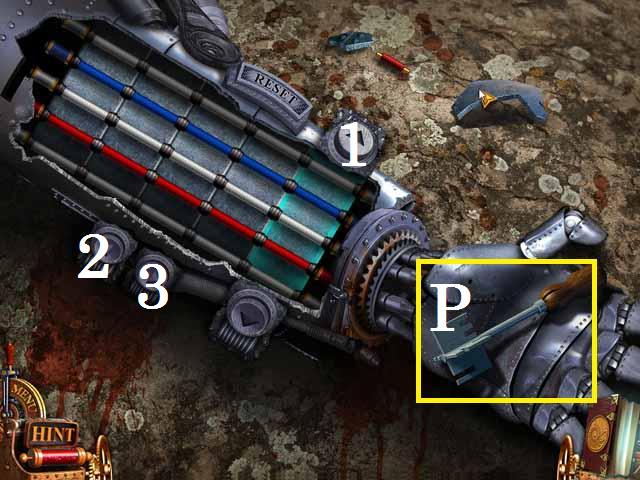
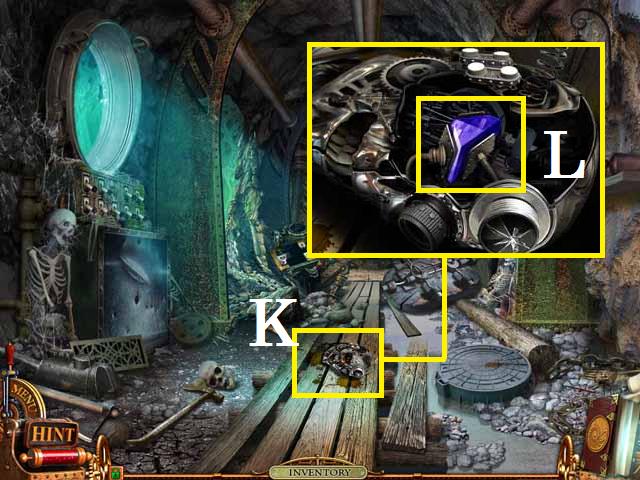
- Zoom into the tree (P).
- Use the HOOK to retrieve the CABLE (Q).
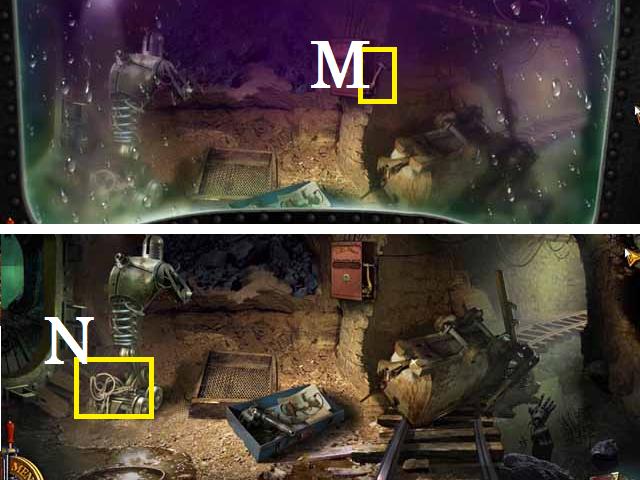
- Move forward.
- Click on the door (S).
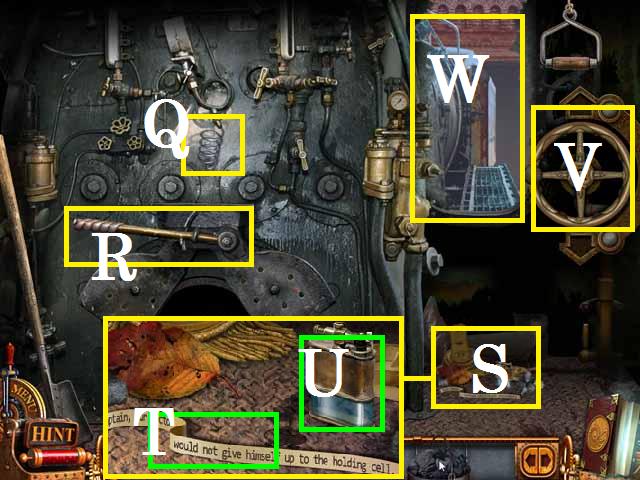
- Pick up the SCREW PROPELLER (R).
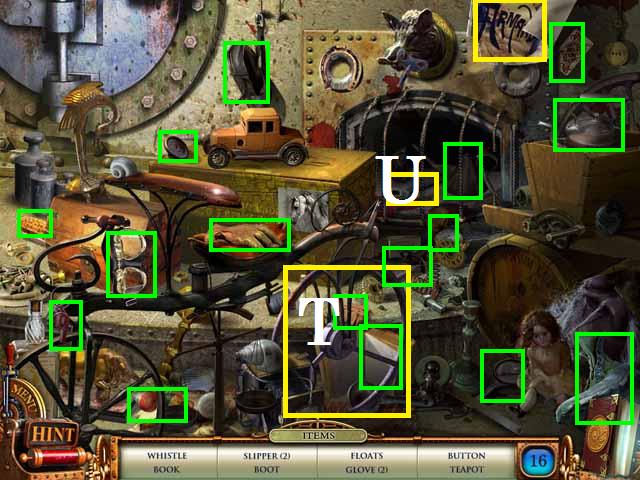
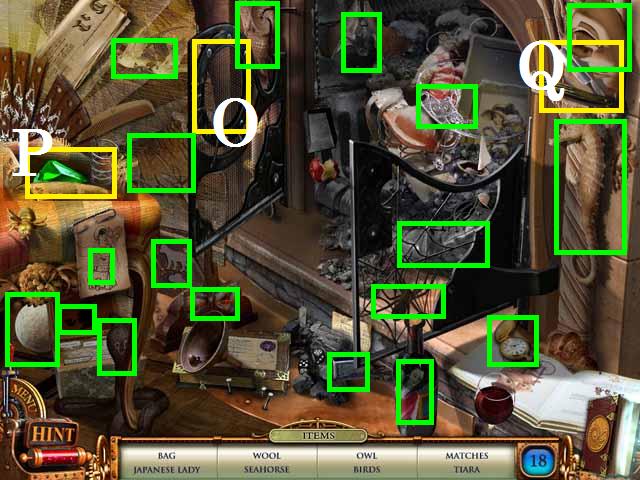
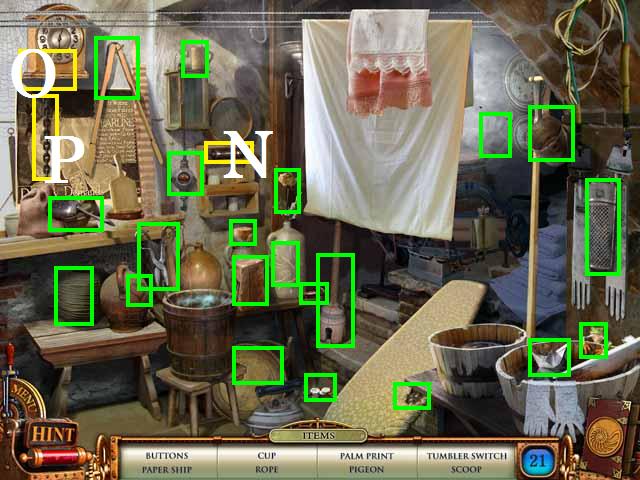
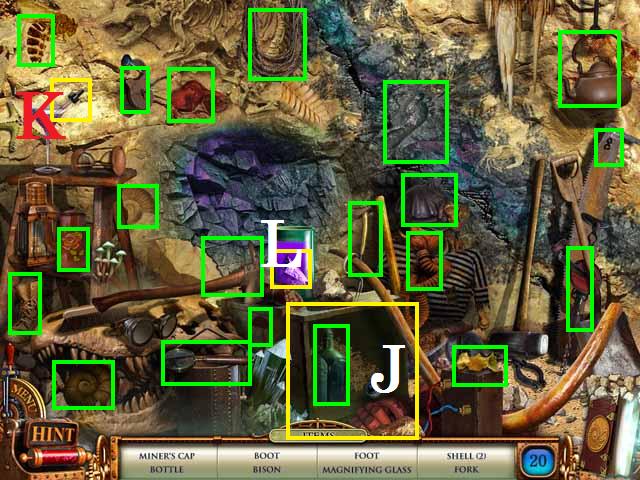
- Zoom into the sparkles to play a HOS.
- Move the poster (yellow) to reveal the card.
- Pick up the items (green) as their names appear on the list.
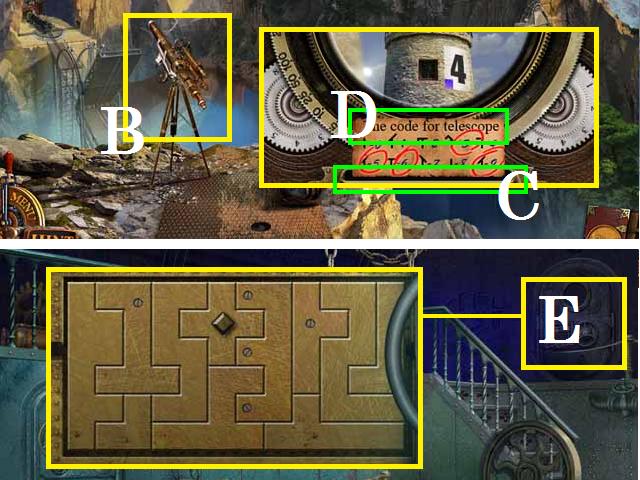
- After you have collected all of the items remove the VALVE (T) with the wrench (U).
- Place the VALVE on the door and enter the elevator room.
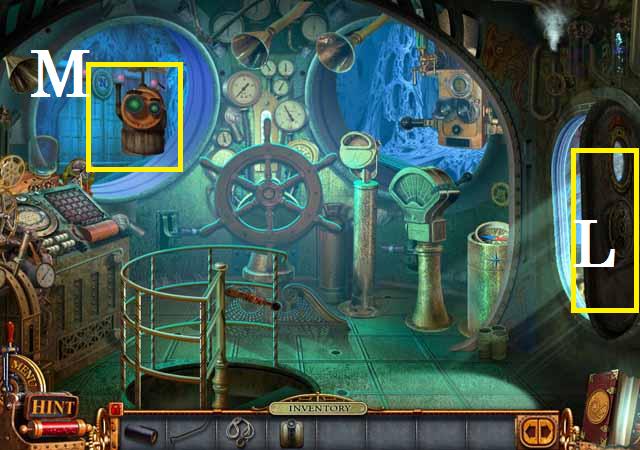
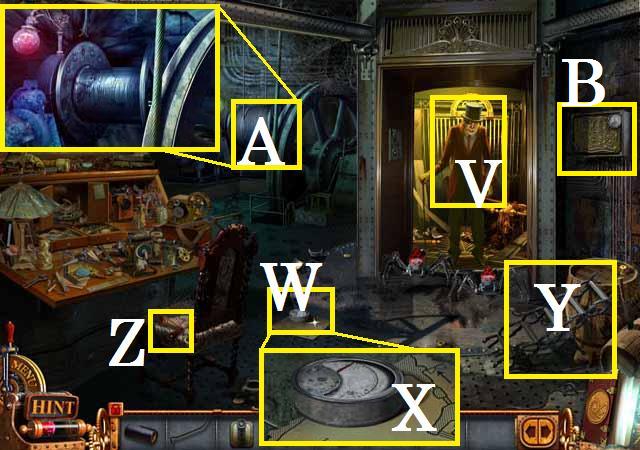
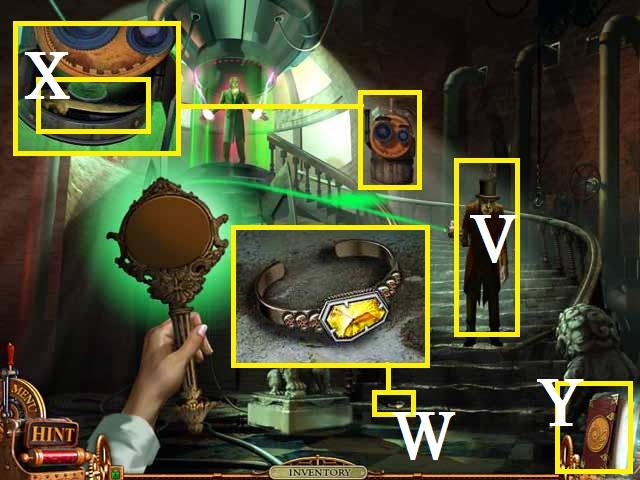
- Click on the man (V).
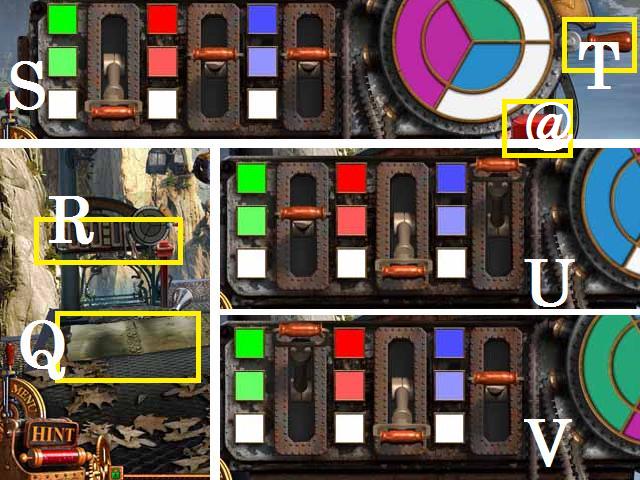
- Zoom into the MAP (W).
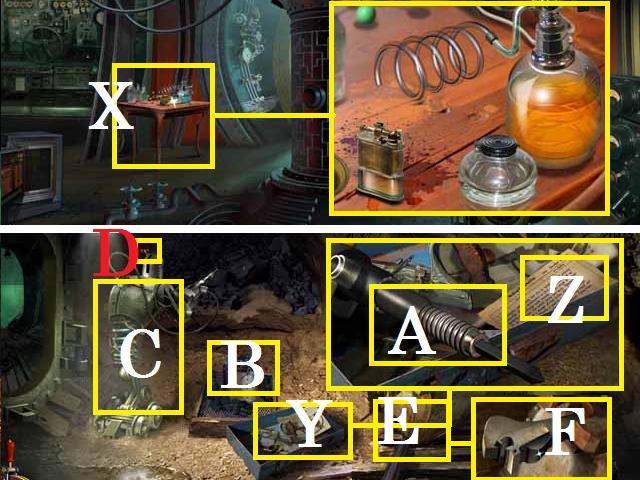
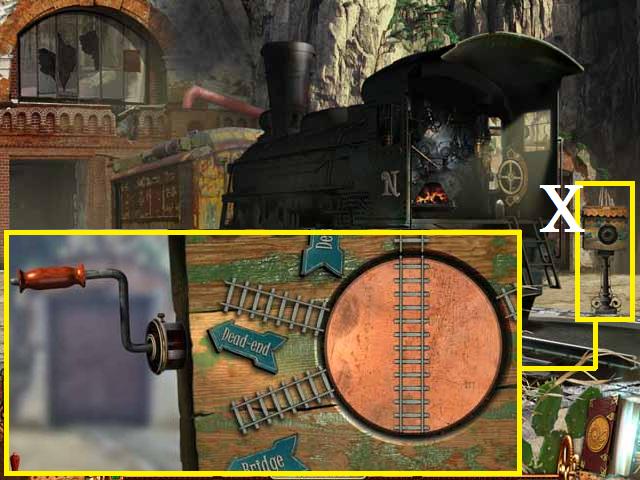
- Pick up the VALTMETER (X) and the MAP.
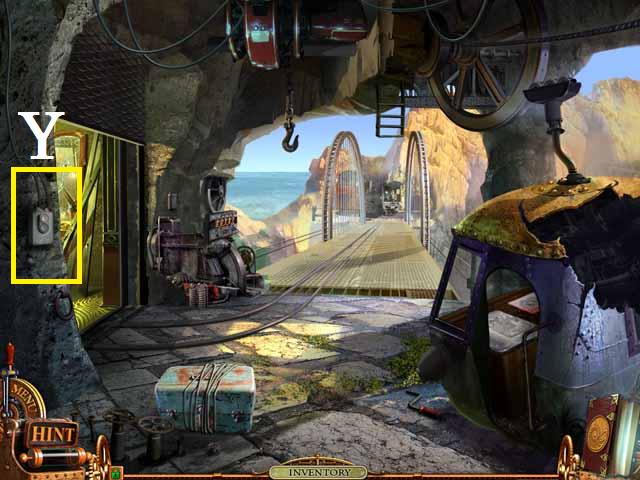
- Pick up the LADDER (Y), and the LEVER (Z).
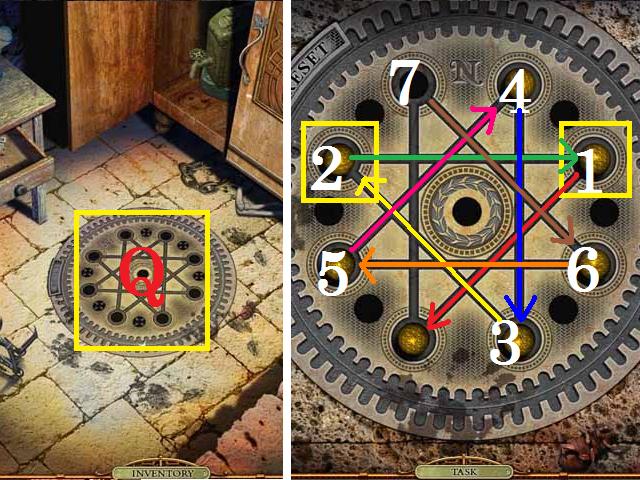
- Zoom into the elevator crank (A); replace the CABLE.
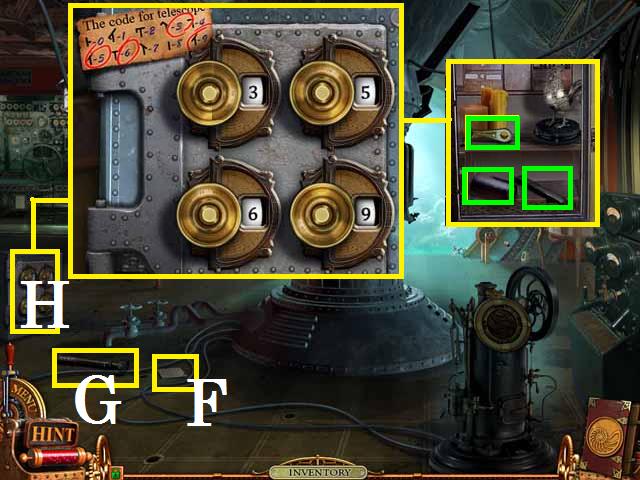
- Zoom into the panel (B).
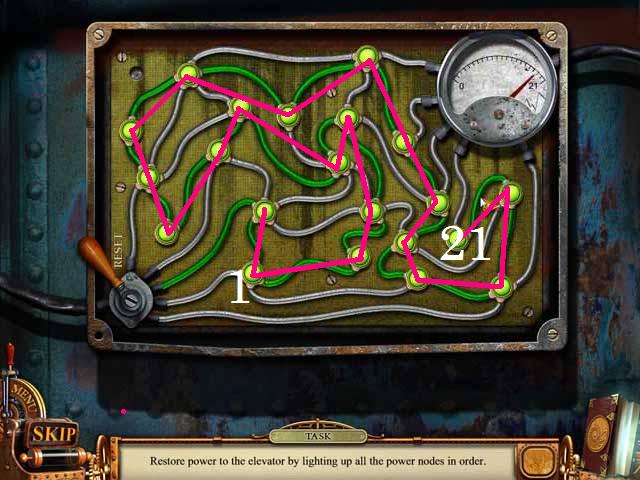
- Place the VALTMETER as shown in the screenshot.
- Follow the (pink) path, as marked in the screenshot, to turn on the lights (1-21).
- Enter the elevator.
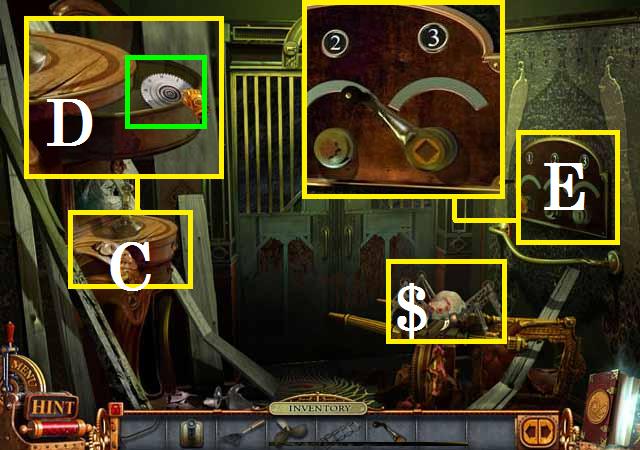
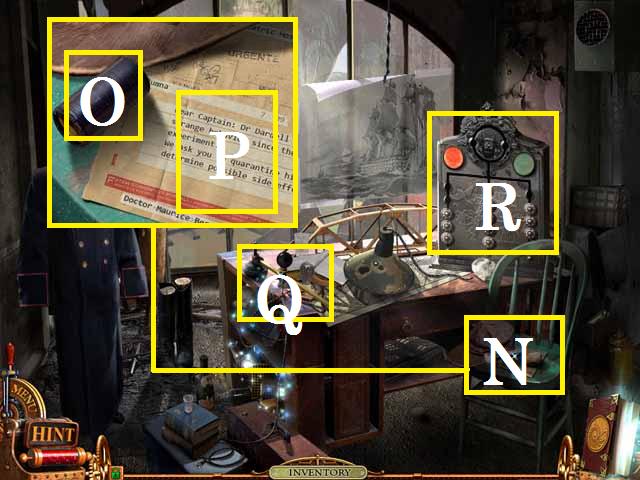
- Zoom into the table (C) and open the drawer.
- Move the picture and pick up the KNOB (D).
- Hit the spider ($) with the CROWBAR.
- Zoom into the panel (E) and place the LEVER as shown in the screenshot.
- Pull the lever to move to the third level.
- Zoom into the robot arm (F).
- Pick up the BUTTON (G) and the ELECTRON TUBE (H).
- Zoom into the telescope (I) and place the KNOB as shown in the screenshot.
- Spin both knobs (blue) until the image is in focus and the green light (red) is lit. (Hint: in the instance spin both nobs mainly clock wise).
- Once the light is lit, pull the lever (J).
- Repeat the above steps two more times.
- Click on the flying robot.
- Move back into the elevator and return to the first floor and exit the elevator.
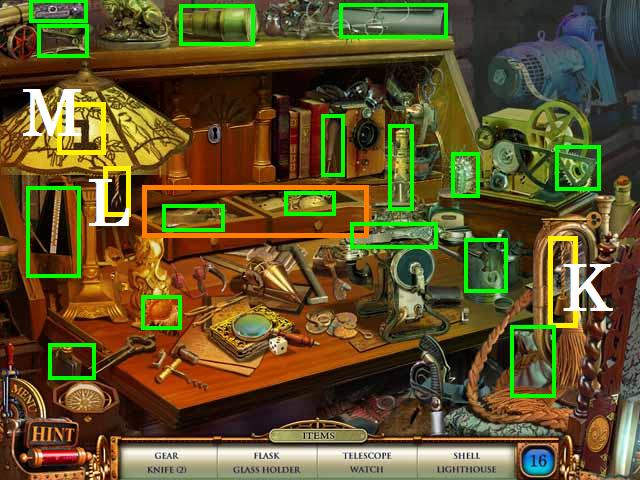
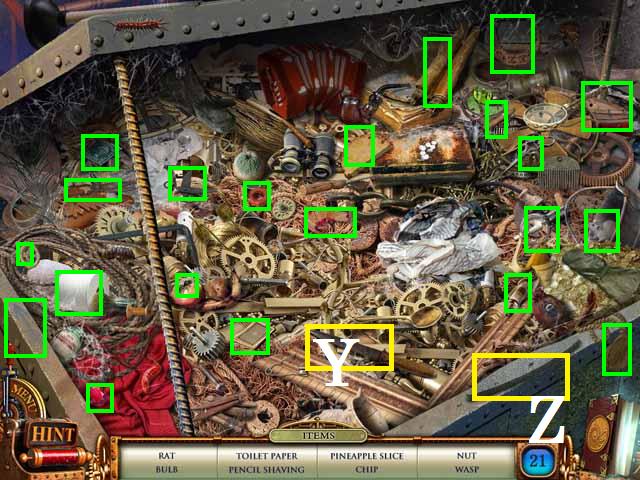
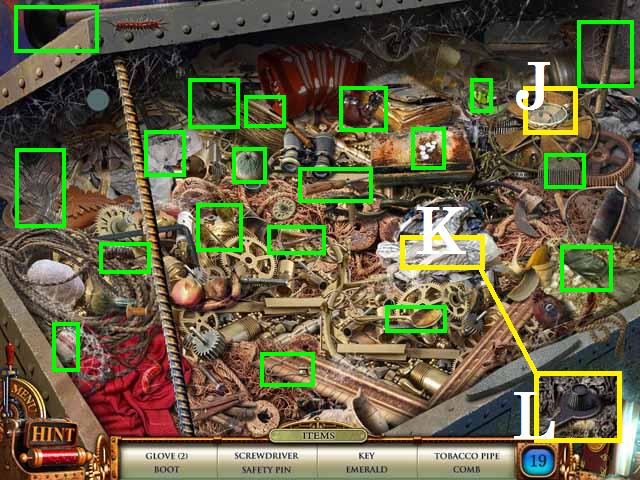
- Zoom into the sparkles to play a HOS.
- Open the drawers (orange) to pick up the knife and the watch.
- Once you have picked up all of the items, place the cord (K) on the lamp (L).
- Pick up the PART 1 (M).
- Zoom into the panel (N) and place the BUTTON (red).
- One possible solution to this puzzle is as follows: Slide (green) to position (2), (red) to position (1) and move the button in position (5) to position (4).
- Move position (6) to position (5), (3) to (6), and (green or 2) to (3).
- Move position (5) to (2), (6) to (5), and (green or 3) to (6).
- Move position (2) to (3), (red or 1) to (2), (4) to (1), and (5) to (4).
- Move (red or 2) to (5), (1) to (2), and (4) to (1).
- Move (red or 5) to (4), (green or 6) to (5), (3) to (6), (2) to (3), and (1) to (2).
- Finish by moving the (red) button from (4) to (1) and the (green) button from (5) to (4).
- Pick up the CODE KEY (orange).
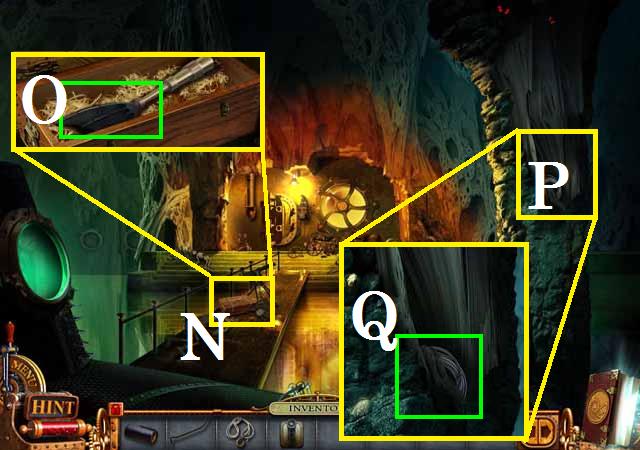
- Return to the pool room, down the hatch, and zoom into the sparkles to play a HOS.
- Move the rag (R) to reveal the IX.
- Once you have picked up all of the items, place the fan blades (S) on the fan (T).
- Pick up the LANTERN (blue).
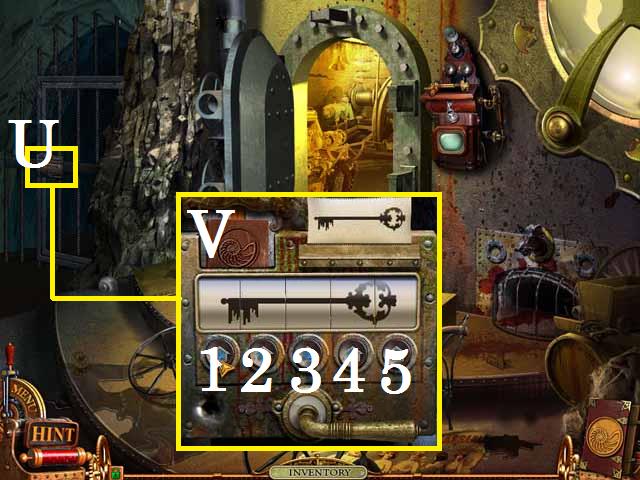
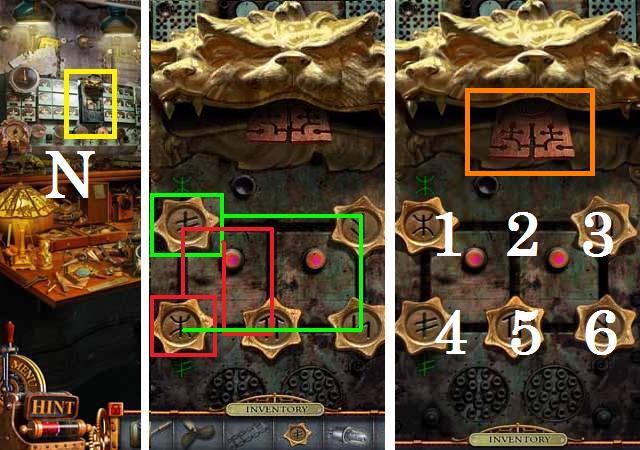
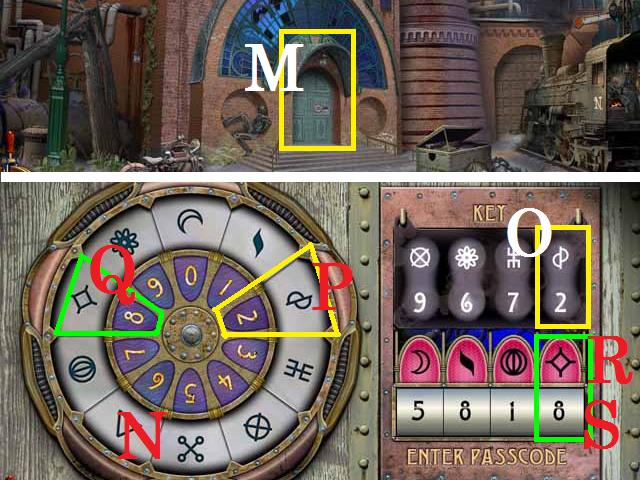
- Exit back four scenes and zoom into the gates lock (U).
- Insert the CODE KEY as shown in the screenshot.
- Set each dial to match the picture (V) using the arrows in the following order; 5, 1, 4, 2, and 3.
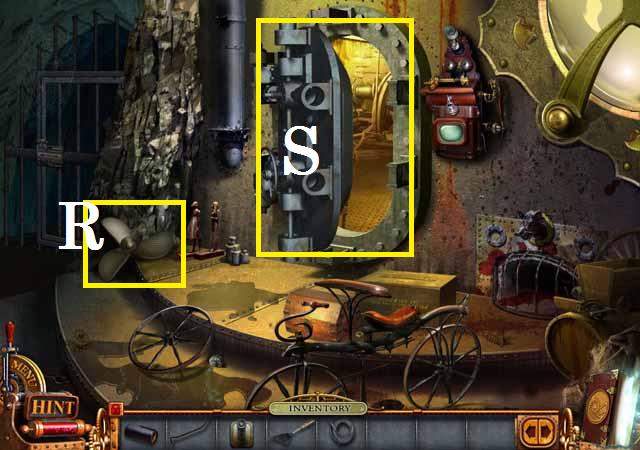
- Go through the gate.
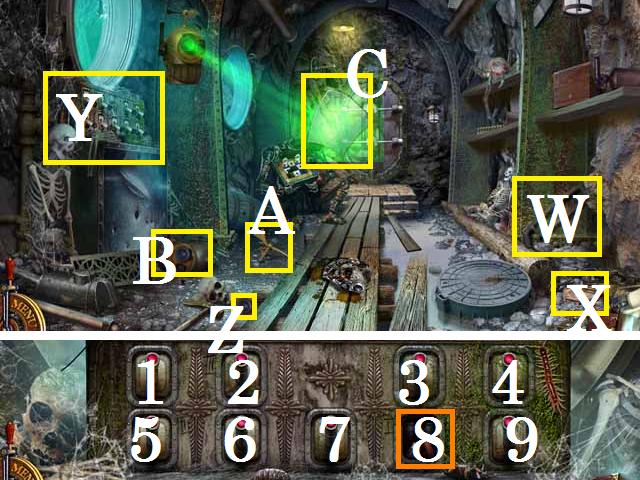
- Pick up the SAW (W) and the NOTE (X).
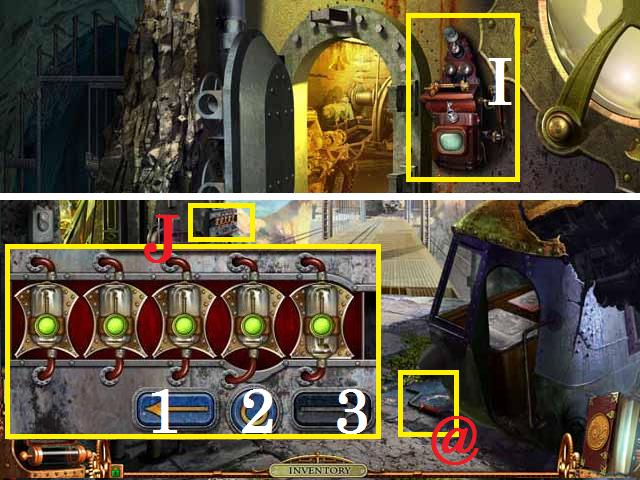
- Zoom into the switch panel (Y).
- Place the SWITCH (orange).
- Pull the switches in the following order: 8, 5, 2, 9, 6, 3, 1, 7, and 4.
- Once the flying robot has crashed, pick up the ROBOTS EYE (Z) and the ROBOTS PROPELLER (A).
- Zoom into the flying robot (B).
- Replace the ELECTRON TUBE, ROBOT EYE, and the ROBOTS PROPELLER.
- Pick up the WINDSHIELD (C).
- Back up one scene and click on the flying robot.
- Enter the elevator and return to level three.
- Zoom into the robots arm (D); remove and pick up the CLAW (E) with the SAW.
- Return to level one and back up four scenes.
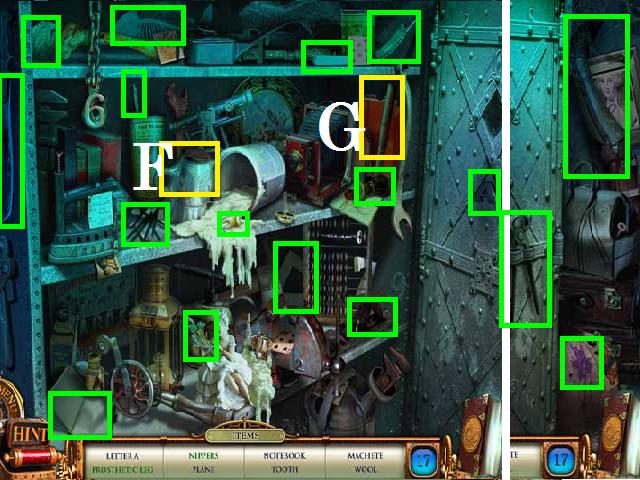
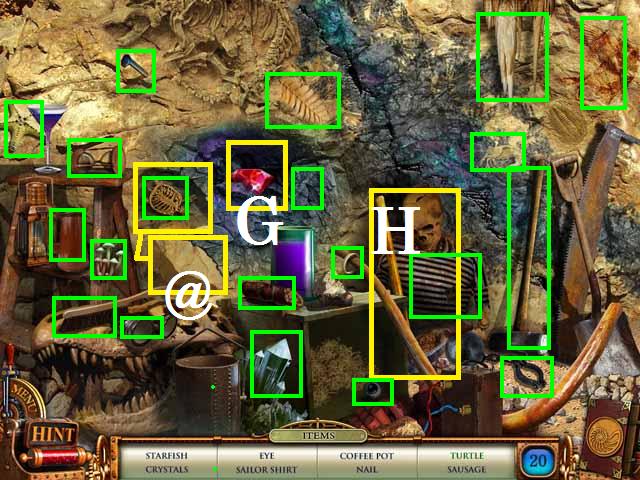
- Go down the hatch toward the pool room and zoom into the sparkles to play a HOS.
- Open the door to reveal the prosthetic leg, blot, and the nippers.
- After you have collected all of the items break glass (F) with the hammer (G) to reveal the KNIGHT and pick it up.
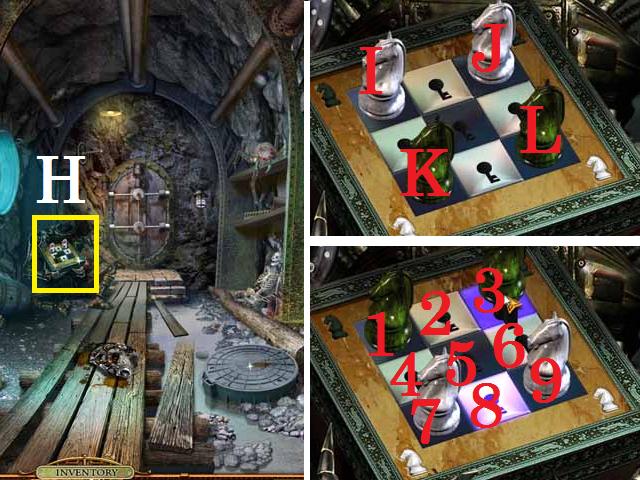
- Back up three scenes and go through the gate.
- Zoom into the chess board (H) and place the KNIGHT.
- One possible solution to this puzzle is as follows.
- Move the (J) piece to the position (4) and piece (L) to position (2).
- Move (J) from (4) to (9), (K) from (7) to (6), (I) from (1) to (8), (K) from (6) to (1), (L) from (2) to (7), (J) from (9) to (2), (I) from (8) to (3), (I) from (3) to (4), (I) from (4) to (9), (L) from (7) to (6), (J) from (2) to (7), (K) from (1) to (8), (L) from (6) to (1), and (K) from (8) to (3).
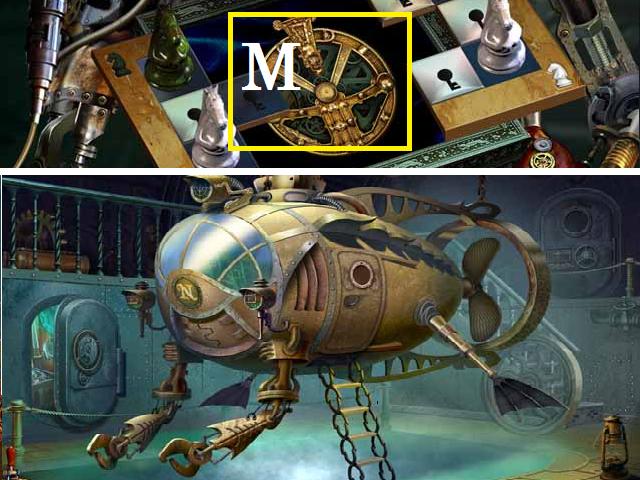
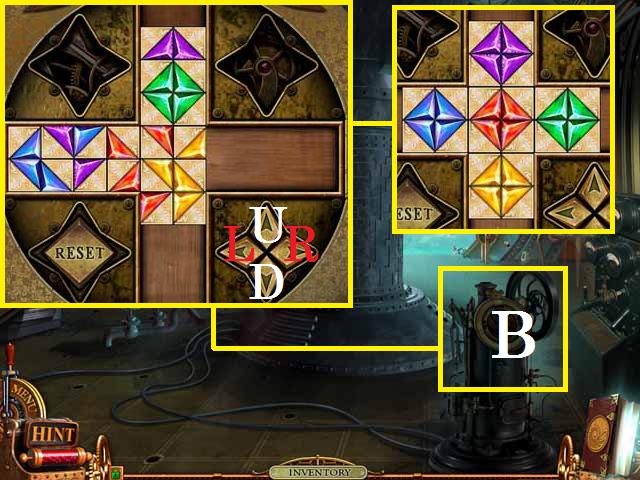
- Pick up the TIME WHEEL (M).
- Click on the flying robot.
- Return to the pool room.
- Place the LANTERN, CLAW, LADDER, SCREW PROPELLER, WINDSHIELD and FLIPPER on the bathysphere as shown in the screenshot.
- Enter the bathysphere.

- Click on the flying robot.
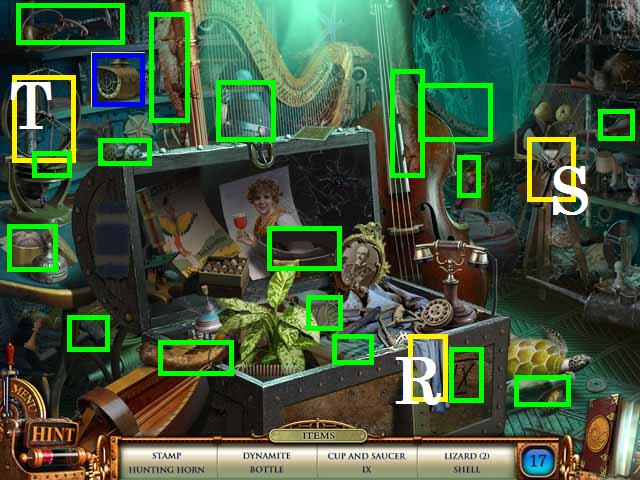
- Zoom into the sparkles to play a HOS.
- Click on the crab (N) to reveal the candy.
- After you have collected all of the items light the smoker (O) with the match (P) and pick up the INSULATING TAPE (Q).
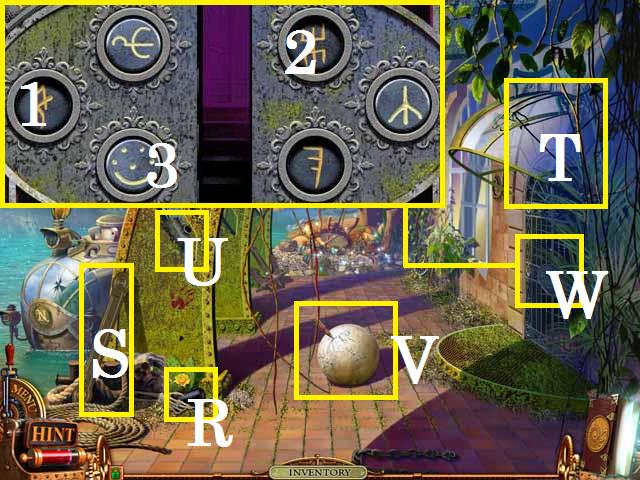
- Pick up the CYLINDER (R), ROD (S), CONNECTOR (T), and the EMPTY OIL CAN (U).
- Zoom into the stone (V).
- Zoom into the gate lock (W).
- Press the buttons in the following order: 1, 2, and 3.
- Go through the gate to enter the hallway.
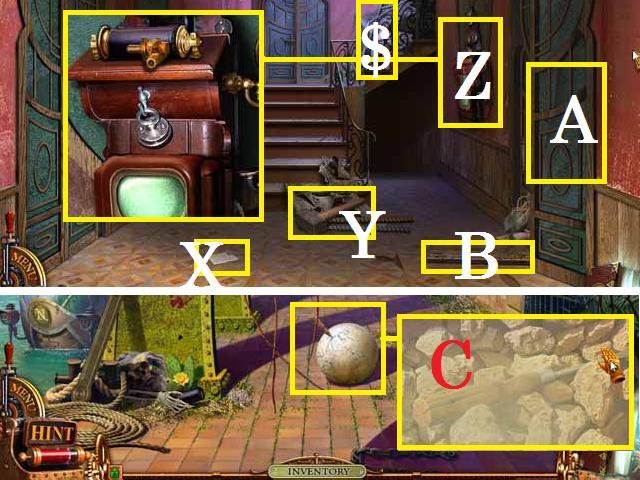
- Pick up the POSTCARD (X), LADDER ($), and the SLEDGEHAMMER (Y).
- Zoom into the phone (Z) and place the CYLINDER as shown in the screenshot.
- Click on the door (A) and pick up the BOARD (B).
- Exit back outside and smash the stone with the SLEDGEHAMMER.
- Pick up the SCREWDRIVER (C).
- Go back inside, go down stairs.
- Place the INSULATING TAPE on the wire (D) and turn the switch (#).
- Pick up the HAMMER (E), WRENCH (F), MACHETE (G) and the NEWSPAPER (H).
- Zoom into the radio (I).
- Remove the radios cover with the SCREWDRIVER.
- Pick up the BATTERY (green) and PICKLOCK (green).
- Open the drawer (L) and pick up the HANDLE (blue).
- Back up one scene.
- Place the HANDLE on the far left door.
- Enter the room.
- Zoom into the sparkles to play a HOS.
- Open the screen (O) to reveal the bat.
- After you have collected all of the items, cut the chairs upholstery (P) with the knife (Q) to reveal the EMERALD and pick it up.
Chapter 2: Amethyst
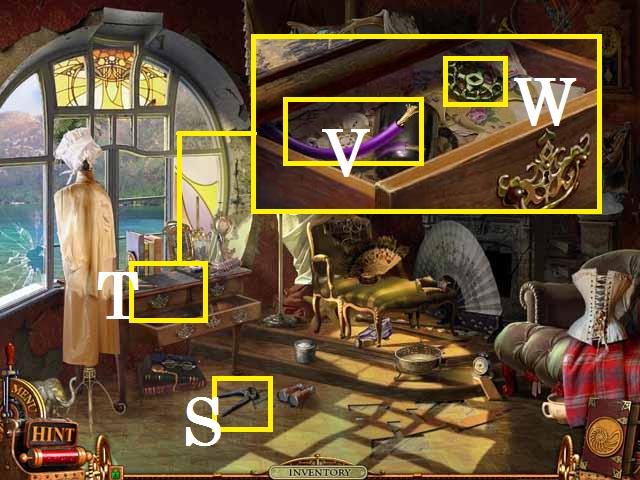
- Pick up the NIPPERS (S).
- Zoom into the drawer (T) and open it with the PICKLOCK.
- Pick up the CABLE (V) and the HANDWHEEL (W).
- Go back downstairs.
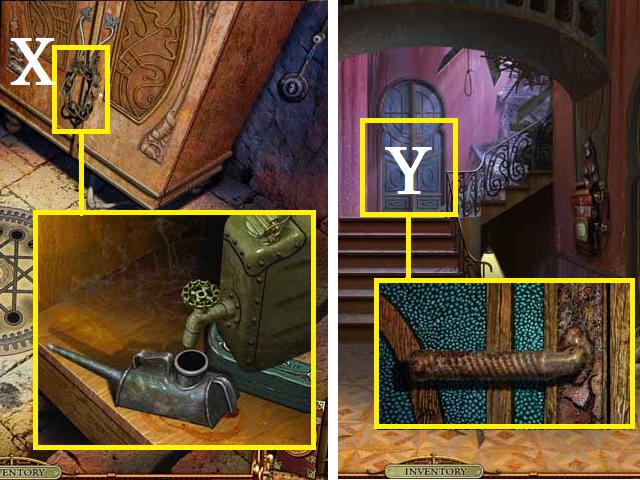
- Cut the chain (X) with the NIPPERS and open the cabinet.
- Place the HANDWHEEL on the tank and the EMPTY OIL CAN under the valve as shown in the screenshot.
- Turn the HANDWHEEL and pick up the OIL CAN.
- Exit back one scene.
- Zoom into the door (Y).
- Use the OIL CAN on the handle.
- Zoom into the sparkles to play a HOS.
- Move the sheet (Z) and towel (A) to reveal the sock.

- After you have collected all of the items, move the sheet and towel back to the left.
- Sweep away the cobwebs (B) with the broom (C) to reveal the TILE (D) and pick it up.
- Exit back outside.
- Zoom into the wall (E).
- Cut the vines with the MACHETE and pick up the WAGON WHEEL (F).
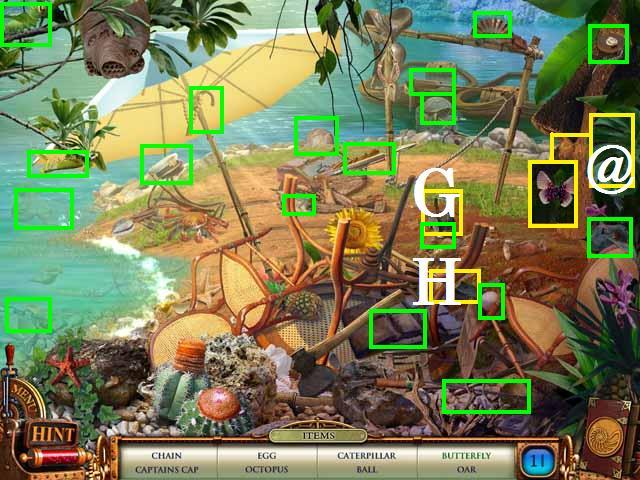
- Zoom into the sparkles to play a HOS.
- Move the leaf (@) to reveal the butterfly.
- After you have collected all of the items, dig up the LANTERN (G) with the shovel (H).
- Go back inside and enter the room to the left.
- Zoom into the sparkles to play a HOS.
- Open the screen to reveal the apple.
- After you have collected all of the items, pull the NAILS (I) with the hammer (J) and pick them up.
- Zoom into the tiles (K) above the fireplace.
- Place the TILE and rearrange the tiles as shown in the screenshot.
- Pick up the BALL (L).
- Zoom into the lantern base (M).
- Place the LANTERN on the base as shown in the screenshot and pick up the CARBIDE LAMP.
- Exit the room and zoom back into the sparkles to play a HOS.
- Move the sheet again to reveal the cup.
- After you have collected all of the items, place the weight (N) on the clock (O).
- Pick up the CHAIN (P).
- Go back downstairs.
- Zoom into the manhole cover (Q).
- Place the BALL in the manhole cover.
- Grab any ball and place it in any hole (1).
- Click one of the lines (red) to move the ball into another hole.
- Now place another ball into the hole (2) that will allow you to slide it into the hole (1) that your first ball started in by clicking on the (green) line.
- Continue with this pattern until all of the balls have been placed.
- For example next: place a ball in hole (3) and click line (yellow), (4) and (blue), (5) and (pink), (6) and (orange), and finish with (7) and (brown).

- Go down the manhole.
- Zoom into the panel (R).
- Place the CARBIDE LAMP as shown in the screenshot.
- Connect the first two fuses by using the path as shown in the screenshot (S).
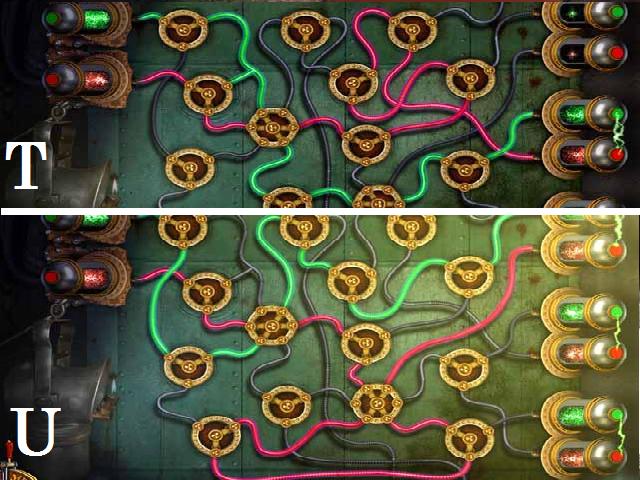
- Connect the second set of fuses by using the path as shown in the screenshot (T).
- Connect the third set of fuses by using the path as shown in the screenshot (U).
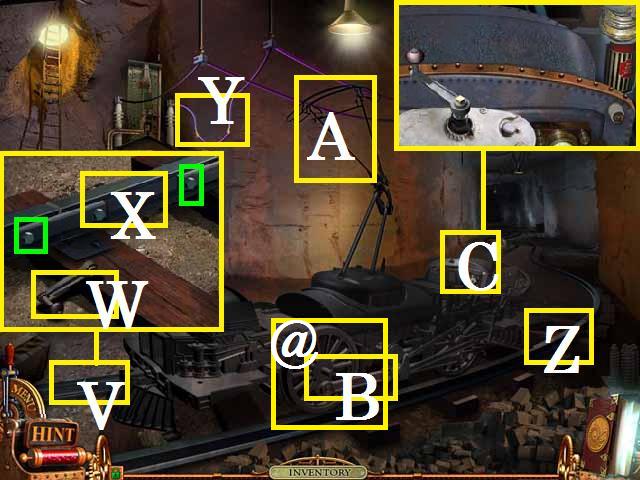
- Zoom into the track (V).
- Pick up the LEVER (W).
- Remove the bolts (green) with the WRENCH.
- Pick up the RAIL (X).
- Place the WIRE (Y).
- Place the RAIL (Z), the CONNECTOR (A), the WAGON WHEEL (@) and the ROD (B).
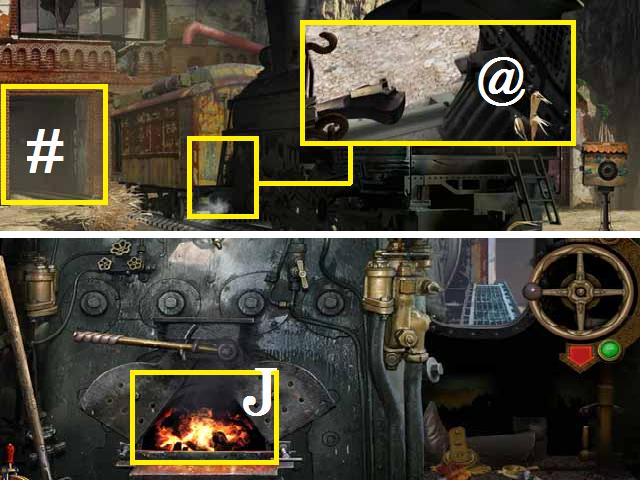
- Zoom into the front of the train (C).
- Place the LEVER and BATTERY as shown in the screenshot.
- Spin the LEVER to move forward down the track.
- Click on the flying robot.
- Pick up the LEVER (D).
- Place the LADDER (E) and go up top.
- Click on the man.
- Place the CHAIN (F) and pick up the ROBOTS HAND (G).
- Pick up the HORN (H).
- Zoom into the wood (I).
- Place the BOARD, followed by the NAILS, and finish with the HAMMER.
- Pick up the GANGWAY.
- Go back down the ladder.
- Zoom into the sparkles to play a HOS.
- Open the crate (J) to reveal the bottle.
- After you have collected all of the items, squeeze the dropper (K) into the jar (L) to reveal the AMETHYST and pick it up.
Chapter 3: Diamond
- Try to use the HORN on the bats (M).
- Place the HORN on the flying robot once it appears.
- Pick up the BLACK SHEET (N).
- Zoom into the ARM (O).
- Place the ROBOTS HAND as shown in the screenshot.
- Align the red and blue wires, as shown in the screenshot, by pressing the buttons in the following order: 2, 2, 2, 1, 3, 3, 3, 1, 2, 1, 2, 1, 2, and 1.
- Pick up the KEY (P).
- Go back up the LADDER.
- Place the BLACK SHEET (Q).
- Zoom into the control panel (R).
- Place the LEVER as shown in the screenshot.
- Adjust the levers as shown in screenshot (S) and pull the handle (T).
- Adjust the levers as shown in screenshot (U) and pull the handle.
- Adjust the levers as shown in screenshot (V) and pull the handle.
- Push the start button (@).

- Place the GANGWAY as shown in the screenshot (@) and climb aboard.
- Clean the controls (W) with the BRUSH (X).
- Pull the lever (red).
- Click on the flying robot.
- Click on the elevator button (Y) and enter the elevator.
- Pull the lever to level one.
- Click on the evil guy.
- Exit the elevator and back up one scene.
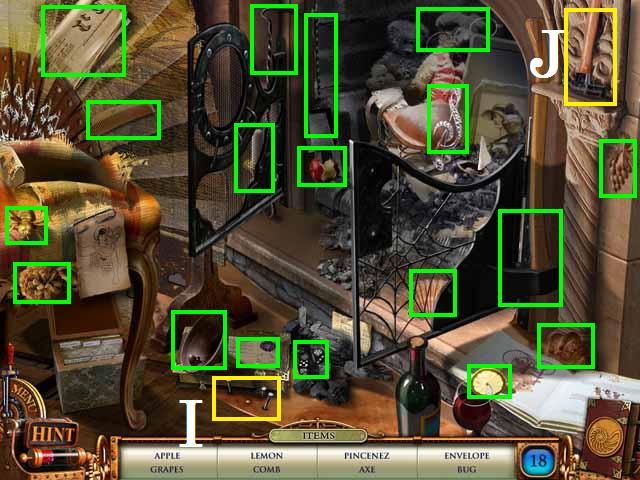
- Zoom into the sparkles to play a HOS.
- After you have collected all of the items, place the key (Z) in the car (A) and pick up the KNOB (B).
- Click on the flying robot.
- Back up two scenes and go down the hatch.
- Zoom into the sparkles to play a HOS.
- Once you have collected all of the items, pour the acid (C) over the wax (D) and pick up the FUSE (red).
- Move forward into the pool room.
- Pick up the CANE (E).
- Place the KNOB in the door (F).
- Pick up the RAZOR (G) and RESPIRATOR (H).
- Cut the hats (I) lining with the razor and pick up the CODE (J).
- Back up three scenes and go through the gate.
- Zoom into the robots head (K).
- Insert the KEY into the robots head.
- Pick up the DIAMOND (L).
Chapter 4: Ruby
- Drop the RESPIRATOR out in front of you to enter the back room.
- Pull the lever (M) to turn the fan on.
- Pick up the ROPES (N).
- Return to the pool room.
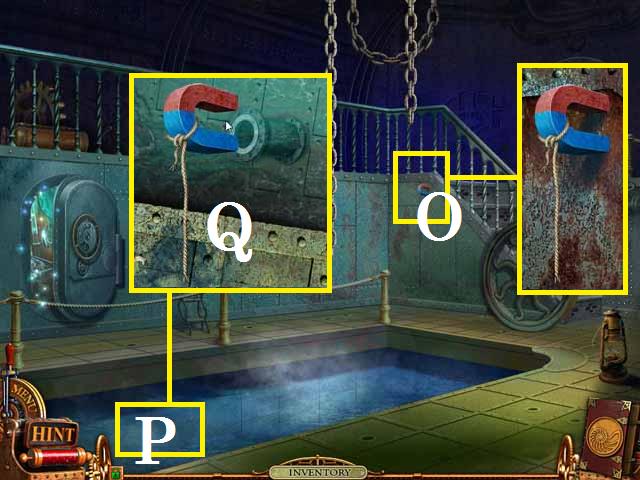
- Attach the ROPES to the MAGNET (O) and pull it down.
- Drop the MAGNET over the pool (P) to pick up the FLANEC (Q).
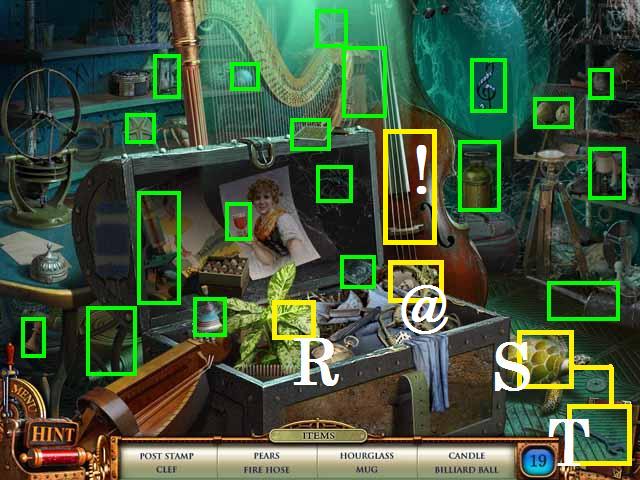
- Zoom into the sparkles to play a HOS.
- Move the picture frame (@) to reveal the stamp.
- Strum the cello (!) to reveal the clef.
- Once you have collected all of the items, feed the leaf (R) to the tortoise (S).
- Pick up the WRENCH (T).
- Back up four scenes and go through the gate.
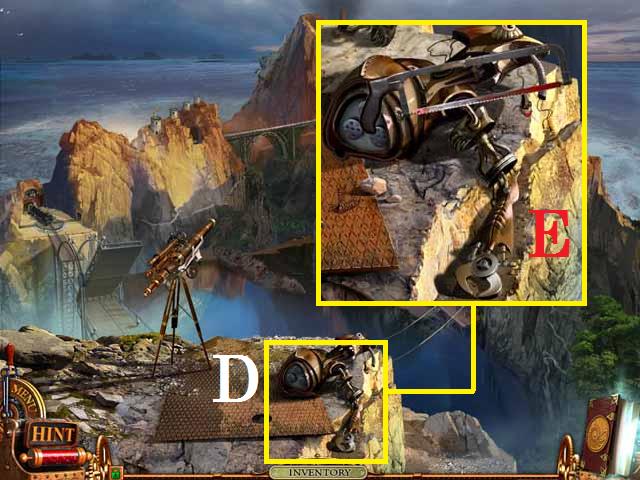
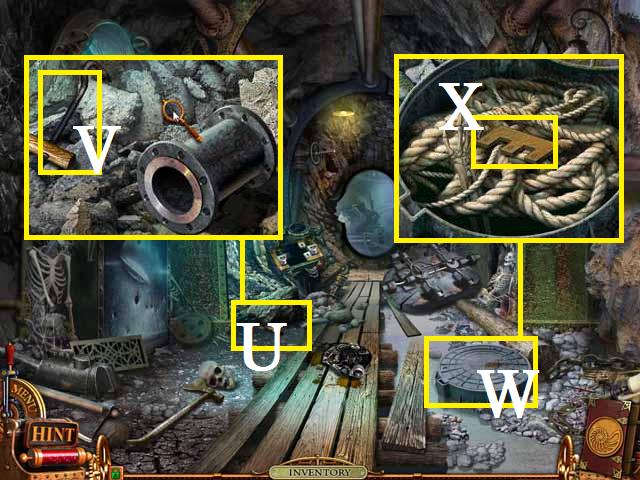
- Zoom into the rocks (U).
- Place the FLANEC, as shown in the screenshot, followed by the HANDLE.
- Pick up the NAIL PULLER (V).
- Open the hatch (W) with the NAIL PULLER.
- Pick up the PART 2 (X).
- Back out one scene and go through the door towards the elevator.
- Zoom into the sparkles to play a HOS.
- Open the drawer to reveal the compass.
- After you have collected all of the items, open the door (Y) with the KEY (Z).
- Pick up the STAFF (A).
- Take the elevator to level three.
- Zoom into the telescope (B).
- Place the CODE in the slot (C).
- Adjust the dials to focus all four pictures.
- Pick the CODE (D) back up.
- Return to level one.
- Go back down to the pool room.
- Zoom into the door (E).
- Place the PART 1 and PART 2 on the puzzle.
- Arrange the pieces as shown in the screenshot.
- Go through the open door to enter the time device room.
- Pick up the NOTE (F) and the OVEN LEVER (G).
- Zoom into the safe (H).
- Place the CODE on the safe and set the dials as shown in the screenshot.
- Pick up the CYLINDER (green), TIP (green), and the LEVER (green).
- Back up five scenes.
- Zoom into the phone (I).
- Place the CYLINDER on the phone.
- Enter the elevator and place the LEVER for level two.
- Move to level two.
- Exit the elevator.
- Pick up the HANDLE (@).
- Place the FUSE in the control panel (J).
- Flip all of the fuses vertical using the following sequence.
- 1, 2, 3, 2, 1, 2, 3, 3, 2, 1, 1, 2, 2, 2, 3, 2, 2, 2, 1, 2, 3, 3, 3.
- 2, 1, 1, 1, 2, 2, 2, 3, 2, 1, 2, 3, 3, 2, 2, 2, 1, 1, 2, 2, 2, 3, 2.
- 2, 2, 1, 2, 3, 3, 3, 3, 2, 1, 1, 1, 1, 2, 2, 2, 3, 2, 1, 2, 3, 3, 2, 1, 1, 2, 2, 2, and 3.
- Cross the bridge.
- Click on the flying robot.
- Pick up the BUCKET (K), the CABLE (L), and the HANDLE BAR (M).
- Zoom into between the rail cars (N).
- Pick up the RAG (O).
- Zoom into the back of the train (P).
- Pick up the VIAL (Q).
- Place the OVEN LEVER (R) and pull.
- Zoom into the small pile of stuff (S).
- Pick up the note (T) and the LIGHTER (U).
- Place the HANDLE BAR (V).
- Clean the window (W) with the RAG.
- Return to level one.
- Go back down to the pool room and go through the door to the time device room.
- Zoom into the table (X).
- Place the LIGHTER, and the VIAL as shown in the screenshot.
- Pick the LIGHTER back up once it is full.
- Exit back five scenes and go through the gate.
- Move forward one scene.
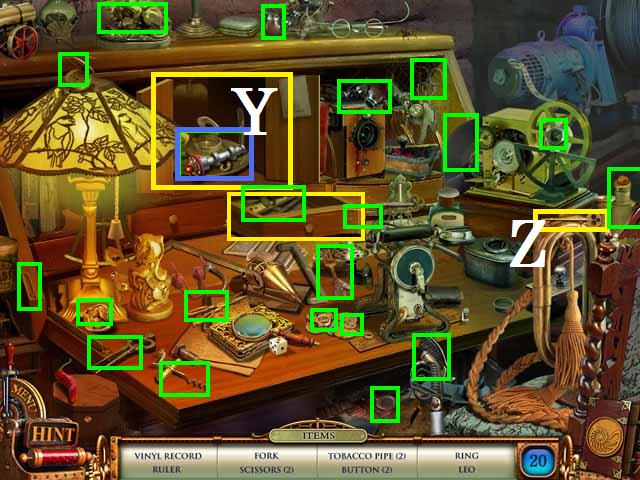
- Zoom into the toolbox (Y).
- Pick up the clipping (Z).
- Place the TIP on the JACKHAMMER (A) and pick it up.
- Place the BUCKET (B).
- Zoom into the robot (C).
- Place the SLEDGEHAMMER followed by the CABLE as shown in the screenshot.
- Pull the lever (D).
- Pick up the BUCKET once it is full of coal.
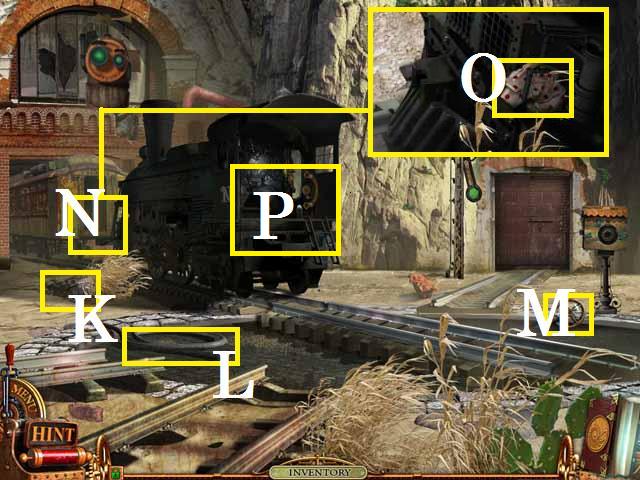
- Zoom into the coal car (E).
- Remove the COUPLER (F) with the WRENCH.
- Move forward one scene.
- Zoom into the sparkles to play a HOS.
- Move the rock (@) to reveal the turtle.
- After collecting all of the items, break open the wall (G) with the pick axe (H) and pick up the RUBY.
Chapter 5: Amber
- Return to the elevator.
- Go to level two and return to the train.
- Zoom back into the space between the cars.
- Place the COUPLER (@).
- Zoom into the back of the train.
- Place the BUCKET in the oven (J).
- Use the LIGHTER to start the coal burning.
- Spin the HANDLE BAR.
- Move forward down the now unblocked path (#) into the train station office.
- Zoom into the sparkles to play a HOS.
- Close the book (K) to reveal the inkwell.
- After you have collected all of the items, place the KEY (L) in the key maker (M).
- Zoom into the chair (N).
- Pick up the CYLINDER (O) and the NOTE (P).
- Pick up the CIRCLE CUTTER (Q).
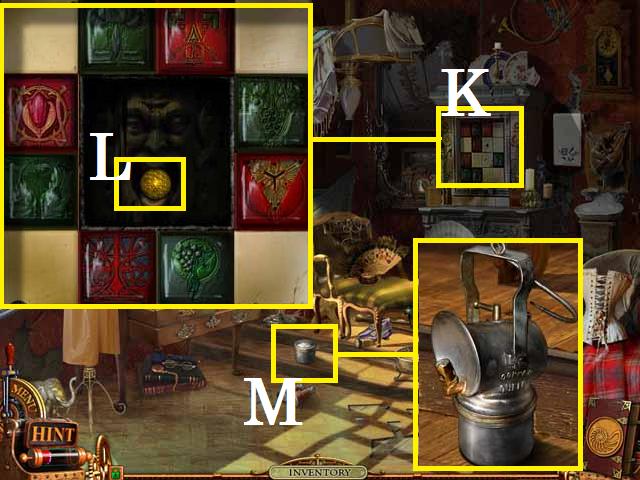
- Zoom into the panel (R) and insert the STAFF.
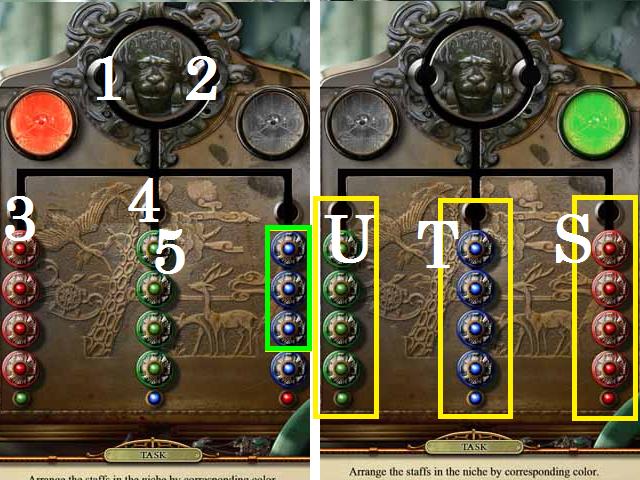
- Begin by moving all of the top three blue (green) staffs into positions (1, 2, and 3) leaving the bottom blue staff in its original position.
- Move all four green staffs to right side (S).
- Move the three blue staffs from positions (1, 2, and 3) into the center (T).
- Move all four red staffs into positions (1, 2, 4, and 5).
- Move all four green staffs to the far left side (U).
- Move the blue staff, which was under the green staffs, to position (3).
- Move all of the red staffs to the far right side (S).
- Slide the last blue staff into place as shown in the screenshot.
- Return to level one.
- Exit the elevator and back up one scene.
- Zoom back into the telephone ($) and place the CYLINDER.
- Go back down to the time device room.
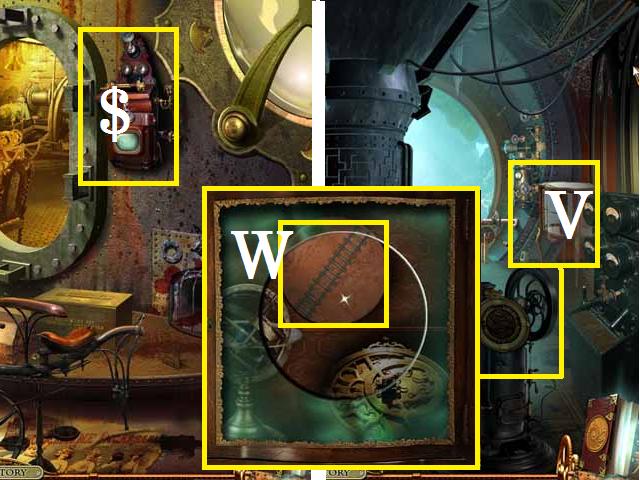
- Use the CIRCLE CUTTER on the case (V).
- Pick up the STARTER CRANK (W).
- Return to the train.
- Zoom into the control panel (X).
- Place the HANDLE and the STARTER CRANK as shown in the screenshot.
- Crank the HANDLE.
- Zoom into the back of the train.
- Spin the HANDLE BAR to unblock the path to the factory.
- Zoom into the sparkles to play a HOS.
- After you have collected all of the items, drag the KNIFE (Y) over the file (Z).
- Zoom into the motorcycle (A).
- Open the box (B) with the KEY.
- Pick up the BEARING (green).
- Exit back to the elevator.
- Zoom into the toolbox (C).
- Cut the ropes with the KNIFE.
- Pick up the WEIGHT (D), and the TWEEZERS (E).
- Return to the train station office.
- Zoom into the coat (F).
- Using the TWEEZERS, remove the X-RAY KEY (G).
- Zoom into the sparkles to play a HOS.
- Open the box (@) to reveal the snuff.
- Once you have collected all of the items, squeeze the glue (H) on the MIRROR (I).
- Place the mirror shards (blue) on the MIRROR.
- Move to the factory.
- Zoom into the sparkles to play a HOS.
- Once you have collected all of the items, place the magnifying glass (J) over the paper (K).
- Pick up the DIAL (L).
- Zoom into the door (M).
- Place the X-RAY KEY as shown in the screenshot.
- Spin the dial (N) so that the first symbol and number (O) match what is shown on the X-RAY KEY (P).
- Find the number (Q) that corresponds to the symbol (R) in pink and set the dial (S) to match.
- Repeat the above step for all four symbols in pink as shown in the screenshot.
- Enter the factory.
- Zoom into the control panel (T).
- Place and spin the DIAL as shown in the screenshot.
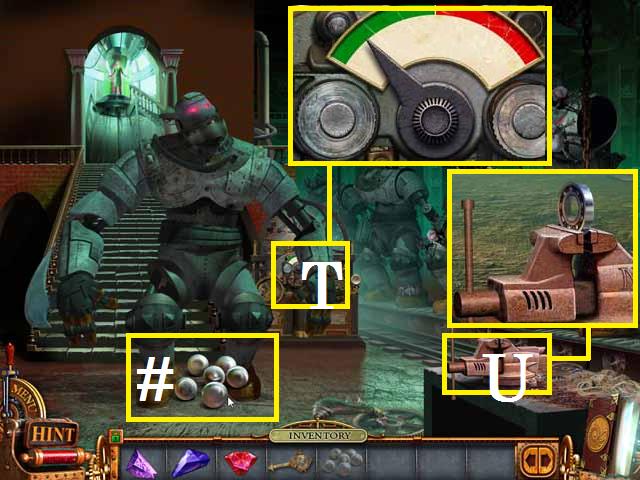
- Place the BEARING in the vice (U).
- Smash the BEARING with the WEIGHT to receive the BALLS.
- Throw the BALLS at the feet of the large robot (#).
- Go upstairs.
- Click on the man (V).
- Use the MIRROR to reflect his beam.
- Zoom into the bracelet (W) once it lands.
- Zoom into the flying robot and pick up the PAPER KNIFE (X).
- Zoom back into the bracelet.
- Pry out the AMBER with the KNIFE.
- Zoom into your journal (Y).
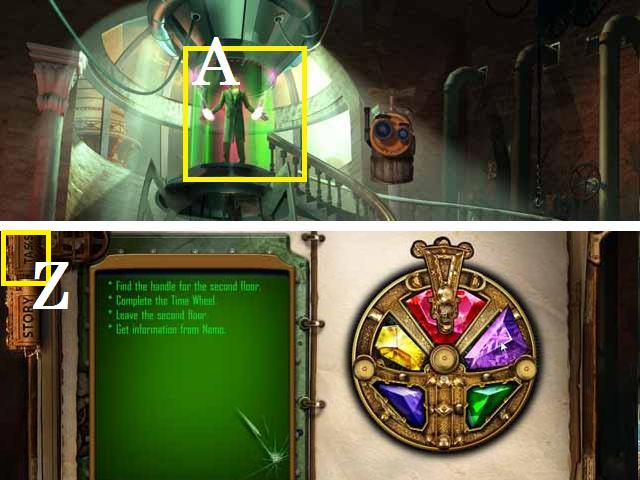
- Click on the task tab (Z).
- Place the DIAMOND, RUBY, AMETHYST, and the AMBER in the TIME WHEEL as shown in the screenshot.
- Click on Nemo (A).
- Return to the time device room.
- Zoom into the stand (B).
- Place the TIME WHEEL as shown in the screenshot.
- From the beginning position shown in the screenshot, use the following sequence to solve the puzzle: (Note: the beginning positions are random and change each time you zoom in and out of the stand) (U, R, D, R, U, L, L, D, D, R, R, R, U, U, and L).
- Congratulations you have saved Nemo!
Created at: 2011-12-10